Saturday, July 31, 2010

In-Box Review: Fantastic Plastic's Retooled “Beta-1”


Resin is an almost ubiquitous medium these days, used by professionals and enthusiasts alike, and often the line between them blurs away to nothing as skills grow and shoestring operations are replaced by full-on limited-production model firms. They're not just 'garage kits' now, they have in fact become a force to be reckoned with.

Fantastic Plastic is one of the success stories of the modern limited-run marketplace, specialising in science fiction, 'realspace' and 'paper' aeroplanes, with high quality kits patterned by master craftsmen and featuring the highest quality resin moulding and casting technology. These kits aren't cheap but they certainly deliver unusual subject matter.

It's not only Moebius and Polar Lights that resurrect classic subjects and recreate lost lines. Fantastic Plastic has had dozens of subjects through its catalogue in the last few years, and they recently released an eagerly awaited kit that brings to life an old 'what if' subject, a mid-Cold War design by the old Hawk company based on theoretical studies by Convair for a nuclear-propulsion bomber, presumably to replace the B-52 sometime around the end of the 1960s. Little could military planners have dreamed in those days that the B-52 would still be in service well into the 21st century.

Nuclear propulsion was a 1950s technological darling, something which worked on paper and was kicked around by 'backroom boys' but never saw the prototyping shop to the best of aviation historians' knowledge. The idea was that nuclear energy created heat which was passed to ingested air to create a ramjet effect without consuming liquid fuel, thus allowing an aircraft to remain in flight for long periods, indeed for as long as crew fatigue parameters would allow, and a whole slew of designs came along from major aircraft firms in the late 1950s.

Kit company Hawk cashed in on the public fascination with this extremely sci-fi concept and designed their “XAB-1,” the B-1 of an earlier era, as the flagship guardian of the West, intended to cruise for long periods on nuclear deterrent patrol, ready to head for targets in Russia if the world ever tipped into DEFCON-1... It's interesting to look back on how this nightmare scenario generated business for lots of people, and the kit industry's perpetual association with militaria is a prime example.


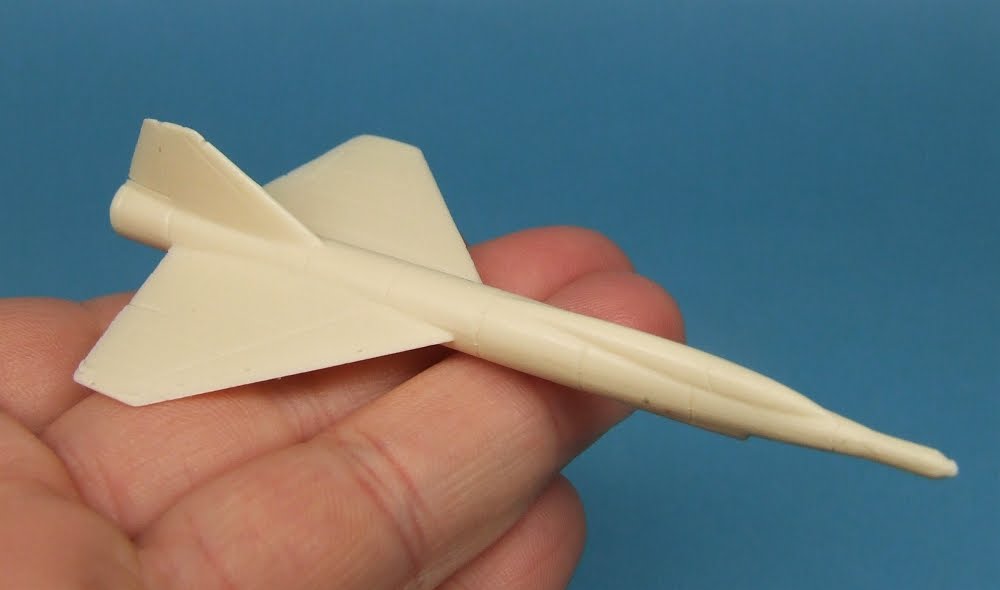
Hawk's original kit was injection moulded at 1:188th scale, and has become a collector's item. Rare unbuilt examples change hands at fabulous prices, a 1964 example is going at auction as I write this, they have become investment properties that one could never afford to build. Fantastic Plastic comes to the rescue with a fully retooled kit in pressure-cast resin, mastered by Scott Lowther and cast by Masterpiece Models, enlarged to 1:144th scale and featuring finely recessed panel lines in the modern style. The kits has a pencil-slim fuselage 17” long, landing gear which may be built deployed or retracted, waterslide decals by Jbot, and features photographic instructions. There is no cockpit detail, no detail in the wheelwells, and a few inconsistencies and flash in the resin to be cleaned up, but these are minor considerations. The original featured red plastic exhaust flames, a juvenile gimmick which has been dropped in this entirely serious 'take' on the subject, while the original's two 'parasite fighters' are also included as superb single-piece resin castings.

The kit comes packaged in a sturdy white card box, whose lid is decorated with a printed colour label featuring digital artwork combing the model with a realistic sky and CGI exhaust efflux, something of a Fantastic Plastic trademark. Inside, the largest castings, such as the one-piece wing and the right and left halves of the fore and aft fuselage sections, are loose in the box, the rest of the 45 parts being collected in a ziplock bag. Many parts are supplied with their pour-stubs already cleaned up.

The hollow-cast parts have alignment pegs and holes, allowing them to be snapped together exactly the same way as injection moulded parts, but curiously some of the pegs and holes don't match up, such as instances of opposing pegs. One needs to do some trimming of pegs and drilling of holes as part of the clean-up phase, but the good news is that the resin, while completely rigid, is soft to cut and works very readily. Go gently and adjustments should take almost no time at all.


There is no clear part for the cockpit canopy, and in so small a scale the model gets away with this. I have long harboured an interest in scratchbuilding this beast in 1:72nd scale, she would be a monster 34” long and 22” in span, and would definitely have a cockpit interior and clear parts. The interesting thing is that the layout of the super-streamlined nose virtually forbids a side-by-side pilot crew configuration, which is widely known (now) to be the only workable one for long duration flight.


I will be building this kit shortly as a review for a major magazine, so look for retrospective comments on Fantastic Plastic's Beta-1 in about a month's time. For now, the kit can be purchased for US$105 from Fantastic Plastic's online store, check it out at:

http://www.fantastic-plastic.com/ConvairXAB-1CatalogPage.htm

Sunday, July 25, 2010

Fascination With “Type”


Sometimes, without consciously meaning to, we find ourselves on a single-type production line. It can happen for a variety of reasons, and plain fascination with a particular subject matter is probably the single most significant. The hobby is about entertainment, education and general knowledge come decidedly second, so when a hobbyist finds him or herself focussing on a particular subject it's probably because there's an abiding interest.

It might be that you're a fan of MOPAR muscle, and you're on your tenth 1:25th scale Chrysler Corp F-body pro-streeter in a row. Maybe you're an armour fan who belongs to the "panzers only" club because they're colourful. Maybe your thing is vintage biplanes and between them Roden and classic Aurora have occupied your bench time for the last two years.

Of course, it can creep up on you. I recently found myself building four Fw 190 fighters at the same time sort of. One was started four years ago, brought to the painting stage and almost forgotten, back in its box. One was a quick build to work with some AM decals, another was a long-delayed foray into building a leading manufacturer's offering with all the bells and whistles. The last was a chance to work in 1:32nd scale for the first time in twenty years, and only the fourth time ever, on the assumption that there will shortly be somewhere to store and display a model that size.

However it worked out, there are four German WWII fighters on my bench at the same time, which will mostly be in the same RLM 74/75/76 scheme, and that's a plus to production-line building. You can get at least two of them ready for the paintshop at the same time and do both from the same mixing and cleaning cycle, which reduces work and economises on air if you're not using a compressor.

Does it risk boredom? Seeing a long line of the same subject ahead of you can either whet your appetite for completion, as each finished build fuels the next, or dull it completely when some other fascinating body shape and colour scheme comes along to compete with the same-old same-old. I think I'll stagger things, do a 1:72 and the 1:48 together, tackle the 1:32 on its own due to sheer volume, and the last 1:72 separately by default as it has a slightly different scheme. It'll take months to work through them, but I have every expectation that each finished plane will more than inspire me to press on with the next.

I suppose the three Phantoms I have underway also count as a fascination with type. Look for posts in future picking up the theme of the great Hasegawa/Fujimi Phantom Showdown, as both these brands are on the bench and will be reviewed together.

PS: I'm now using Picassa for my image loads, click them and you'll get a larger version from now on.

Saturday, July 24, 2010

Recently Completed: Trumpeter SA-2 -- Finishing That Shelf-Sitter


After a long and particularly busy hiatus (involving submission of a PhD thesis, beginning a new job and continuing with past endeavours), I find the itch to resume blogging about my favourite pass-time, and going by the traffic World in Miniature has been generating, fresh posts will probably be most welcome!

In the last few months I've been very busy on the hobby bench, working on a round dozen projects. The trouble with spreading yourself so thin is that no particular project moves along very quickly even though you seem to be working as many hours. The great thing about having some older, unfinished projects is that you can get them off the bench with comparatively minimal work, and that was the case with Trumpeter's SA-2 Guideline missile kit.


I began this item probably two years ago, and did almost all the construction at the time. I was very happy with the fit, the cylindrical missile parts lined up very nicely and joints were dressed with the old superglue and adzing technique, always the best and quickest way. The alignment of the sixteen fins were more problematical, a right-angle jig would be a great help, as I doubt I got any of them at exactly 90 degrees. Still, 89 is close enough to satisfy the eye from most angles.

The thing that stopped me at the time was “Russian Green.” What shade is it? I have an old tin of Humbrol Russian Armour Green, which is no longer in the range, and I'm hoarding it. Besides, these days I try to paint in acrylics whenever I can, especially for armour subjects as it's not only far less toxic (and fairer to the family where the stink is concerned), it also lends itself perfectly to oil wash weathering afterward.


I did some research online, found my way to chat boards and such, and found that there were actually several shades of camouflage green in simultaneous use in the Soviet military, and any of them would be used in any particular context on the basis of what supplies were available. One common shade has been calculated to a Federal Standard value of 34098, and given that 34097 is a standard US shade, available in model paint ranges, I decided this was close enough for me. Tamiya XF-58 matches FS 34097, so that became my launcher shade.

Still, that alone was not enough to get me to pull the box off the shelf and get to it. As I'm sure I've mentioned in some previous post, I use a commercial compressed gas cylinder to power my airbrush, and I recently had a negative experience: for the first time in 15 years, I had a defective cylinder. I picked it up and seemingly overnight the fill had dropped from 15 bars to 10. I thought I had maybe failed to safety the main tap correctly, and heaved a sigh of frustration, but the next time I came to it the reading was 8, and I knew I'd safetied it properly that time. I talked to the company and they agreed to exchange it (they checked it and my gauges and the tank was definitely leaking). There was a weekend in the way, however, so I did some spraying and tried to use up whatever air I had available. The SA-2 was one of the kits that got some long-overdue attention.


I sprayed the launcher's six subassemblies with a good coat of XF-58, then I could do the standard armour weathering techniques I've developed. The big idea with this kit is that the launcher and missile are, literally, two different kits. In Soviet markings the installation is typical of the air defence settup found in North Vietnam, and this offers interesting finishing possibilities. The launcher stood in the tropical heat, dust and rain of Vietnam for years, and despite maintenance it would suffer the extremes of climate. Naturally, it would display rust and dust, and general dirt, just like any piece of heavy equipment. The missile, however, would not, being transported to the launcher site, loaded and fired long before weathering could set in. Also, the missiles themselves probably received more protection from the elements than the launchers.

So, I pursued them as separate projects. The missile was a painting experiment also. The pale grey shade used on the missiles seems to have no Western equivalent, so I mixed it. It was not the flat camo of the launcher, but either gloss or semigloss. I've had problems spraying gloss, and was not convinced the missiles were full gloss anyway, so I mixed 50% X-2 Gloss White with 30% XF-2 Flat White and 20% XF-66 Flat Light Grey. On reflection the finish is not quite bright enough and the shade not quite light enough, next time I build one I'll raise the gloss white to 60% and drop the grey to 10%, which should be a better mix. Nevertheless, I'm happy with this one, the grey certainly looks pale against the launcher green. Weathering was kept to a minimum, a thin black oil pinwash around raised details and recessed panel lines simply to make the structures visually 'pop.'


The missile is covered with stencil decals, more than forty of them. Many of them group adjacent Russian data placards, and they can be fiddly: I mangled only one decal in the process, and decided for ease to separate out elements from one or two others, which both extended the time involved and simplified getting a correct positioning. I was still decalling as I wrote the first draft of this post.

Speaking of decals, Trumpeter's printer, Cartograf, in Italy, have done a remarkable job on them. I don't think I have ever seen kit decals snug down into the surface so tight, and with carrier film that literally vanished against the lustre of my paint mix. The dried decal transparent areas are faintly lighter than the background, that's the only thing that gives them away. Placement instructions could have been more explicit, though. There is one interesting gaff, one of the red stripe markings that circles the body, just back of the juncture to the nose, is incorrect. Under a magnifying glass you can see that, instead of Russian stencil data, it says in English “NO PHOTO SORRY” – presumably a notation from the research team during creation of the decal sheet which, as it was not in Chinese, accidentally made its way through quality checking all the way to manufacture. Having omitted this one, I used a few bits of stripping from it to help repair the mid-body wrap-around decal that I mangled somewhat.


Final details involved spraying a grey-black mix to simulate the scorching of the rocket efflux on the blast deflector, brush-painting inside the rocket motor with a dark metallic enamel, fitting a few tiny parts on the launcher, including a few that fell/broke off during handling, then I could get some MiG “Vietnam Earth” pigment onto the launcher. This is good stuff! I can't wait to apply it to some Vietnam-era US armour.

Mating the two stages was an interesting job. A snug fit to start with, the paint on the alignment runners made it extra-snug, so I worked the boost stage carefully onto its guide, then slipped the upper stage onto its own guide and glued them together actually on the ramp.


It's the only kit I've built in many years which uses every last part and decal: there are no alternatives provided. However, three small decals, 8, 9 and 15, don't appear in the instructions: 8 and 9 are the starboard side counterparts of 7 and 10 and go at the base of the small aft fins on the second stage. 15 I haven't spotted anywhere.

All in all, this was a very pleasing model that built well and looks sharp on the shelf. I'm not sure if it's still in production but examples change hands on eBay for reasonably attractive prices these days. As a companion to Revell's re-released Nike Hercules missile, a similar vintage and role of weapon, and in fairly close scales too, it makes a most interesting display of Cold War technology.

PS: Yes, a part fell off the launcher and was not reattached before I did the photos, a sharp eye will spot the absence in the photos above. So, sue me...

Monday, April 5, 2010

A Thousand Appologies...

... for the month that's gone by since I last posted. I honestly expected to see a post about my recent experiences working with ProCast resin at a lab at my local university, and was amazed to discover that with all the flap in the last couple of weeks over getting my PhD thesis completed and submitted that I hadn't actually uploaded the darn thing. I wrote it, I took the photos, but...

Normal service will be resumed as soon as possible! And there's plenty happening on the modeling bench for the foreseeable future!

Cheers, TB379

Monday, March 1, 2010

Monochrome, Pt 2


 As promised, here’s another look at “triple value monochrome,” with the Trumpeter 1:35 M1126 Stryker as the subject. I started this one along with the Strv 103B as back to back projects, and both have built well (review posts coming up in due course), and both are now at the same stage, they’ve been through the paintshop and are waiting on the weathering process, decals, hull tools and antennas. The first thing that strikes you about the NATO Green is just how grey it really makes the Swedish scheme look. When I mixed the Swedish shade it seemed particularly green to me, now it seems quite grey. Nevertheless, both shades were given the same treatment, and by the same ratios. The fade coat, applied to the middle of panels and hatches, was NATO Green (Tamiya XF-67) lightened with 20% flat white (XF-2) and thinned by the standard 50%, or maybe a tad more. Likewise, the shadow coat, applied to the underside, under overhanging structures and in a subtle post-shade effect around the line of hatches and divisions in the armour, was mixed the same way, using 20% flat black (XF-1). The photos were taken at this stage. The gradient from lightened to darkened across the base colour value seems quite steep at this point, and the temptation is to think maybe only 10% tinting should have been used. But the washes to follow have the effect of darkening the cumulative value of the model, as well as drawing all the tonalities together, so I’m not concerned at this point. If the values turn out to be too contrasting I can always slap on some more wash over the highlights to pull them back. Drybrushing will be a slightly different operation, as it’ll take place in enamels (I’ve not learned the trick of brush painting Tamiya acrylics yet… Unlike the Citadel range for Warcraft miniatures, they’re not formulated specifically for brush painting, and while they airbrush like a dream I’ve learned to switch to enamels when it’s time to break out the sables.) So I’ll be mixing an equivalent tinted shade, perhaps starting with FS 34127 Forest Green or FS 34102 Medium Green, then lightening with white to profile edges. I had hoped to have this batch of models finished at this time, but real life has a way of intruding… I better stop writing and get back to the bench!

Wednesday, February 17, 2010

Taming Brass


I had something of a pleasant surprise today: my latest AFV is decked out with photoetched brass, something I would never have expected. Brass has never behaved for me and I didn’t expect it to this time. But… That Trumpeter M1126 Stryker came with a beautiful fret in the box, and I thought I might as well give it a shot, as there were alternate plastic parts if the brass wasn’t cooperative. I’ve used PE before, of course, I’ve added screens and grills on three previous models, but folding brass has so far defied me. Maybe I started out on the wrong foot… The Airwaves set I picked up for my Academy Merkava II was simply too hard to fold with the old standby, two single-edge razor blades, and I had not heard of the annealing trick at the time, so the PE more or less ended up back in the packet with a big question mark hanging over it. With those memories, I approached the Trumpeter brass with trepidation, worked on basic theory and gave it a go, open to the possibilities but expecting nothing in particular.  


 Well… It cut where it was meant to cut, filed where filing was necessary, and folded where folding was called for. In moments, it seemed, some very tidy brass structures were on my bench. The only pain was the pedestal for the forward wire cutter which did not match the size of the recess in the hull, which needed filing out to accept it, and that may have been my fault for folding into the guides in the brass, instead of away from them. No matter, the fit was quickly adjusted with files. The only brass part for which I opted to use the plastic instead was the small shield part that goes behind the weapon station on the commander’s cupola, and that’s because the component is simply the wrong size. The plastic part fits (and was moulded remarkably thinly), the brass part never will. Similarly, the support under the starboard jerry can holder will also simply not fit: the locator slot is set too far back, the fold points result in a structure that would hold the rack away from the hull if located there. I filed the tab away and tried again but the support structure interfered with the plastic components directly below. The plastic equivalent was moulded as part of the plastic version of the rack, and I considered cutting it away… Another option would be to scratch the support from some light stock, which may be the easiest route. 


I found something of a lesson in this; one automatically assumes that hi-tech metal parts must be “better” than the plastic ones, but their accuracy can only be as great as the information on which they are based, and if they are the wrong size or shape they will never fit properly, no matter how sophisticated their manufacture. The cya bond between brass parts is surprisingly quick and strong, but the bond between brass and plastic seems lamentably weak: this model must be handled with the greatest care. If the brass parts, with the exception of the securely-snugged-down engine grills, end up falling off, I may retro to the plastic parts in the end, but the experiment has been very much worthwhile.  


 All told, I feel more charitable toward photoetch today than before. It’s a learning curve, for sure, to fold and trim tiny pieces of brass and steel, and I don’t see myself ever using much of what’s out there, especially when it crosses that line between adding necessary detail and “gilding the lily,” or what’s worse, overcomplication for the sake of it, but I can certainly see myself using etch at this level, to reproduce scale thickness and make from fine sheet metal those structures which are made from light sheet metal on the real deal. I don’t for a moment consider myself a brass-tamer yet, another few successful metal detailing outings and I might start to think of myself as one, but I’ve made a start… I find myself thinking about that Lion Roar set of turret armour for late Panzer IVs I picked up last year, and can actually see me getting my clumsy fingers around the job after all! More on the Stryker when the paint goes on.

Monday, February 15, 2010

Monochrome, and When It Isn’t


 There are some techniques that “take a bit of getting comfortable with,” and some that take a bit of nerve to try out. Pre- and post-shading I’ve not yet given a whirl. The idea of blacking the panel lines of an aircraft to show through the actual colour coats as a subtle shadow around the lines, like a dark halo to each side of the final line accent, is a great one, but it takes a surprising degree of guts to try it out, when models already come out pretty good on less drastic techniques. And as for post-shading, even after 31 years of air painting, I don’t trust my airbrush not to make a mess at the last minute… I started fading paint on the top surfaces of tanks about two years ago, and I’ve faded seven models so far. Mostly disruptive schemes with dirt and rust on top, the fading is subtle and delivers a pleasing effect. For only the second time I’m doing a single colour vehicle, and the fade-and-shade routine seems to be becoming more natural, just a part of the process. The shot above is an overview of Trumpeter’s 1:35 Strv 103B, Sweden’s famous “S-tank,” the only fixed-gun MBT to see service. I’ll review this very good kit fully when it’s finished, for now I’d like to talk about the process of fooling the eye with the paintwork. I mixed the base colour from Tamiya acrylics and got a good solid coat on, then mixed a batch lightened with a 20% addition of white. It took this much to get a visible result, the green was a powerful pigment. I laid this mixture on, well thinned, with subtle spotting and stroking in the centre of panels and areas, the typical pattern for sun-fading and general wearing away of paint. Then I mixed some more and darkened it with a 20% addition of black, and applied that to the undersides, the hull behind the running gear, under the bow, tail and stowage bins, and under the topmost portion of the dozer blade, the idea being to encourage the eye to see shadow where shadows would most naturally fall. The photo is taken at this point, and the variation in tonality is actually more visible in the image than it is to the naked eye. The next round of work will be oil pinwashing followed by enamel drybrushing, my standard armour finishing process, and I expect the overall effect to blur together into a pleasing optical illusion. Do real tanks display fading this way? Peacetime tanks that get regularly serviced? Maybe not, but the eye tends to expect these tricks, and when you get used to them, a model finished in parade-clean condition has the disturbing quality of a toy. Tanks should be dirty, they should be rusty and their paint should be faded by the elements in which they serve, and this logic has created a suite of visual queues without which armour models don’t seem quite right. This is not really true, certainly not all the time, but that’s maybe the theme for another post entirely. The question is whether you can paint a model one colour overall and have it look convincing to the naked eye. I would say probably not. So long as it is subtly done, the fade-and-shade routine automatically imparts a tonal gradient between highlight and shadow which are close but perceptible, and provide a narrow “reference range” against which the much starker contrast of the dark pinwash in corners and angles around details, and the light drybrushing that profiles the sharp edges of structures, become part of an overall spectrum of tonality that tie the model visually together. That’s the theory, it seemed to work on the Japanese Type 74 I featured back in the early days of this blog, and I’ll know pretty soon if it works on the Strv 103B. My next project up is Trumpeter’s M1126 Stryker, another monochrome subject, and I’ll do it the same way, with one extension: I’ll use the darkened version of the base colour to generate a soft post-shade effect around all the divisions in the Stryker’s external plating. Combined with the fade coat applied to the middle of all the panels, this effect will either look great or like a patchwork quilt (in which case I’ll zap on another coat of NATO Green and start again…) I’ll sequel this post with another look at the “triple-value monochrome” trick when I do that job, and there’ll probably be something soon about natural metal finishes for aircraft, if the approach I’m trying on a Tamiya F-84 works like it should…

Friday, February 5, 2010

Now That’s What I Call Shelf-Life


 I have rarely had cause to need gold paint. I have always fancied doing that gold-painted F-16, Sioux City Special I believe she was called, I even have a kit and decals lined up for the day I have the time... The chance... Somewhere to put it... But the odd gold detail might call for having gold in stock. I have a tinlet of Humbrol #16, Gold. I recently needed to open it for a few dabs of gold to visually blend in some gold foil I was applying, and sure enough, there it was, in the box at the back of the drawer. I really don’t remember if it was ever opened to do a job, but I am sure it was bought to do the gold detail work (engine accents, IIRC) on a small kit of the Honda CB 1100R motorcycle, by a firm called Crown. I bought that kit around Christmas 1982, it may be the oldest single article in my stash (still unbuilt). And by default, that means the paint is now around 27 years old. (The pic above is a new tin, I can’t seem to lay my hands on the old classic…) It wasn’t even thick in the tin. I gave it a shake, opened it and stirred it for thirty seconds, and it was good to go. When that paint was manufactured, that expression wasn’t even in use, nor were in the pipeline, 24/7, on track or my bad. That’s what you call shelf-life! Maybe the pigments weren’t as finely ground in those days, and the available ranges were smaller, but the chemical balance of the paint in the tin makes for a virtual time-capsule: so long as the balance remains within certain margins the mixture should remain viable forever. Of course, there are other tins that go hard while you look at them, and I had a bottle of MM enamel whose contents turned into a strange, rubbery substance without ever being opened, or maybe only for a tinting dab, but this is where chemistry meets philosophy. The same thing happened recently to another bottle, much newer, something to do with failure of the foiled card seal in the cap, I think. Folks have been complaining on other forums about this and other shortcomings of the Model Master range, lately, which is a pity as it’s really good paint, just let down at times by packaging issues (and accuracy issues, like the identification numbers of the RLM 82 and RLM 83 shades somehow getting reversed when the labels were printed… Or their Dunkelgelb being a bit on the dark side…) For the moment, I’m very impressed with Humbrol. Of course, the delicate balance of chemistry in the tin has been disturbed now, and the next time I look at it, it may have congealed, disintegrating like a vampyre whose coffin was opened before dusk. I guess we’ll see when it comes time to build that F-16 (unless I’ve graduated to Talon Acrylics by then...)

Saturday, January 30, 2010

Product Review: MicroScale Trimfilm (and how I don’t seem to have the knack…)


 I’ve used MicroScale Industries products for many years and have the greatest respect for the firm. Established in 1933, they’ve been serving the modelling community even longer than Kalmbach Publishing, and their decals are legendary. In the days before everyone and his uncle was churning out decals through computerised imaging systems, Krasel Industries was the big guy on the block, and when they split into MicroScale and SuperScale, many years ago, it was double the bang for your buck, one firm catering to railroaders and others, the other to the burgeoning military enthusiast marketplace. First of all, I would like to say that I have over 400 sheets of SuperScale decals in my collection, and know their quality, plus seven of MicroScale’s finishing products which I use with confidence. So why am I complaining about Trimfilm? Trimfilm was a great idea. Solid colour sheets, and sheets of generic designs, stripes, checkerboards, in a variety of colours and gauges, a mix-and-match solution for a thousand different graphical challenges. Add to these a wide range of typestyle sheets, fonts, sizes and colours, and you have a resource to rustle up detailing at the drop of a hat. That’s the theory: what about practise? Maybe practice is what I need, because I can’t get the stuff to cooperate. I tried using Trimfilm on an SF scratchbuild or two, e.g., the bold red stripes around the rear fuselage of the MEV from Thunderbirds Are Go, and found to my frustration that the half-inch red stripe material had no intention of cooperating. The thinness, so valuable in getting small decals to conform to surface contours, made the material so fragile that it shattered if I breathed on it. It tended to break up while merely detaching from the backing paper, was quite impossible to move effectively once it was on the surface, and grabbed almost at once in any case, drying decidedly lumpy over a surface wet-polished smooth. I tried several times to get the material to do what I wanted it to, then gave up and sprayed the stripes instead. Perhaps I had hold of a defective sheet, I thought, and tried other sheets and other gauges. The red stripe around the MEV is flanked by two finer black stripes and I did these with eighth-inch Trimfilm. The story was the same, and I pieced the lines together from multiple fragments of broken decal, not enjoying the process. When I came to do the wing walkway lines on my scratchbuilt F-116 fighter from Joe-90 I found myself using the same material by necessity, but having no more rewarding an experience. For black lines around the engine nacelles I had far better luck spraying flat black and masking with Tamiya tape, and for some lines circling the nacelles I actually sprayed the tape black and applied it permanently, because the tape will stretch symmetrically across a two-dimensional curve, and decal film essentially will not. This is unfortunate. Perhaps my technique is off, maybe I don’t have a sufficiently gentle touch to use this material: if it behaved like most decals usually do for me it would be great, but it didn’t (which is odd, as I’ve used SuperScale aircraft decals before and had no trouble with them). Maybe I should have reinforced them with Liquid Decal Film to keep them from shattering. I’m still drawn to the range, though, a sort of love-hate relationship. All those pre-made items are creative candy! And the typestyles suggest custom lettering on home-designed projects (though to be fair, custom made decals have made a very effective challenge to the idea of piecing logos together a letter at a time.) For now I’ll say that my Trimfilm collection lies in its box, forlorn and neglected, awaiting either a renewed sense of adventure on my part or the wisdom of those who know how to make it behave. Check out the enormous range at: http://www.microscale.com/

Thursday, January 21, 2010

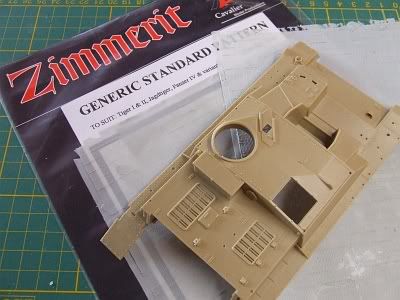
Product Review: Cavalier Zimmerit


Australian firm Cavalier Model Productions has been around for quite a few years now, and besides their resin car kits and other esoteric goodies, they are perhaps most famous for their Zimmerit. Zimmerit was an antimagnetic paste applied like cement to the hulls of German armoured vehicles in the middle years of World War II (discontinued around November 1944) in response to the Russian tactic of magnetic mines which could be attached by infantrymen. Many choice modelling subjects are properly depicted with a coat of this rough, rippled stuff, and while there are many techniques for creating the effect, and some manufacturers, notably Dragon, have made forays into producing it as a moulded detail, Cavalier’s solution has been very successful and very popular.

Basically, Cavalier zimmerit is a wafer-thin sheet of moulded grey resin, as thin as paper and highly flexible. It’s delicate but captures the texture perfectly, including damage and defects in application for an amazingly realistic effect. Some 35 sets are presently available, including a batch for the new 1:48th scale armour, though most are for traditional 1:35th scale, with specific sets designed for particular kits. Fiddly parts are reproduced from kit parts with zimmerit added, so you have a complete replacement part. All sheets are cast in a uniform pale grey resin.

High utility can be found with their generic sheets too. If your vehicle is not covered by their sets of pre-formed parts, you can buy a generic sheet (there are four different patterns available) and you’ll more than likely have all you need for your project.

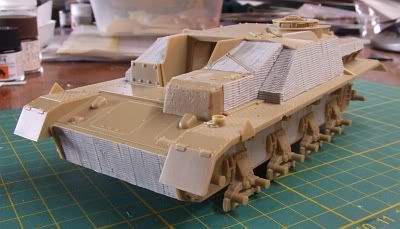
That’s what I did, working on Tamiya’s old (but still excellent) StuG IV kit (35087), as mentioned in the last post. No specific set has been produced for this kit, so I ordered up set CV-118, generic standard pattern zimmerit, and basically cut the parts as required. The set is very generous, containing two 15.5cm x 21cm sheets, and the whole project took me around half a sheet: that’s great value, panning out at about Aus$5 to zim each of potentially four models.


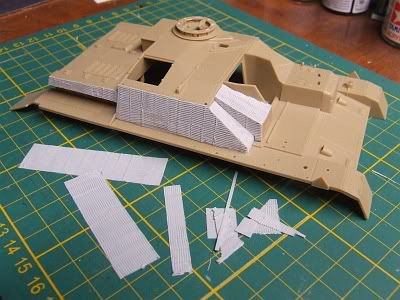
Starting from one symmetrical corner of the sheet, I began by measuring up needed panels and cutting them out with knife and straightedge. I cut them a fraction large, especially allowing the inclined edges of panels to lie inside the edges of the pieces I was cutting (photo, below). The method in this madness will soon become apparent. One needs to remember the orientation of the pattern, check references and see which way the pattern runs on which surfaces, and cut components accordingly.


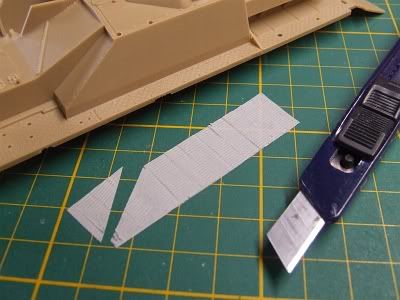
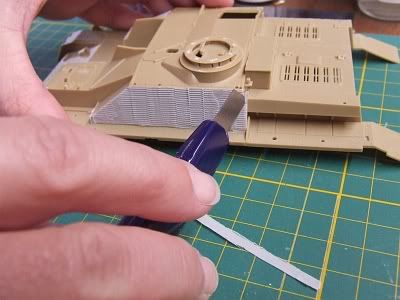
There are several suitable adhesives to use with this resin, five-minute epoxy, for instance. I used regular superglue as, given the fact I would be trimming the edges afterward, absolute precision was not called for. If using one of the pre-formed sets, I would use slow-cure gel superglue, for its strength and because it allows time to both spread the glue completely over the back of the sheet (as in the next photo) and to slip, or remove and replace, the piece once in place to refine the fit. As each piece was secured, simply by pressing carefully into place (second next photo), the slight excess left at the edges was trimmed with a sharp blade, creating an essentially perfect fit (third next photo). Any points on the edges that were not fully secured were glued down with thin CA, brushed on sparingly, then the edges were lightly filed to virtually blend the resin sheets together.


It is worth doctoring the zimmerit as well, you can score and chip the edges in high-wear areas, the likely contact zones, to create damage, chunks of the cement-like matter either chipped away by contact with branches or obstructions, or shattered free by the impact of shot. It’s as easy as cutting in with a knife or the edge of a file.

The sets come with a zimmerit tool, a cast resin ‘rake’ for custom work using one of the standard techniques. Basically, in areas where the zimmerit doesn’t quite fit, or edges where the juncture of sheets did not come out as perfectly as you might have wished, you can paint on some thinned putty, wait until it’s firming up, then score the pattern into it to match the resin sheets around about.


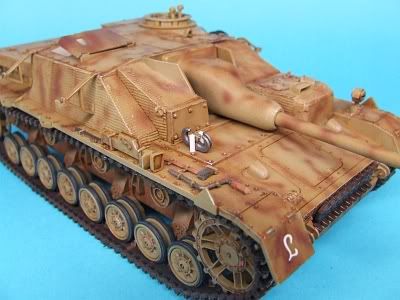
The complete zim job on this model took several hours to do, and it was my first outing with the product -- I’ll probably be quicker in future. Here she is with some paint on, late in the finishing stage:


I couldn’t be happier with the result, and look forward to more Cavalier zimmerit-enhanced German armour models to come.

You can find some sheets at better hobby stores, but for the full range go to:

http://www.cavaliermodels.com/Zimmerit.html

Here you’ll find an historic article on the stuff, including reference photos, plus a listing of all available sets. At Aus$19.99 each they are a good buy, and domestic postage of $3.95 is no blow to the wallet.

This is a first-rate product, highly recommended, and proudly Australian!