Showing posts with label vinyl. Show all posts

Friday, February 18, 2011

Doing It (Not So) Tough


I had thought that I would be calling this “Doing It Tough,” but in the end it wasn’t that hard. I bought Italeri’s M110 SP Howitzer (#291) on sale from Squadron probably 12 years ago, certainly not less than ten, and had a go at a few parts many years ago. It ended up back in the stash because I had nowhere to store a finished model at that time.

I seem to be enjoying a run of completions on old projects lately, and there are a few more to come. This one took a fair bit of effort but nothing out of the ordinary, and a few concessions to the kit’s failings as well as acknowledging my own skills and where they were either not adequate or where I was unwilling to invest the time, eyesight and elbow-grease to achieve that extra standard of realism that is the grail of the hobby.

Italeri comes in for some flak, and not without reason, but that doesn’t mean all their kits can be pigeonholed easily. In recent years their packaging and breadth of subject matter have been impressive, as have their claims to realism and accuracy. Older kits suffer the same maladies no matter what company one considers, and, as with Hobbycraft and early Dragon, Italeri’s kits are best assessed on a one by one basis. Verlinden produced a conversion set (#423) to build the early (short barrel) A1 or late (long barrel) A2, plus stowage boxes, to be mounted on the recoil spade, that Italeri did not include.


The M110 is dated 1996, but the molds may perhaps be older. Certainly the chassis is in common with the M107 which appeared in a couple of editions from the same firm in the 90s. The parts breakdown is fairly normal, though the large number of small parts can be off-putting for some. Here and there were structures that were never going to work, such as the shell trays on the recoil spade bearers: there is insufficient room between their swivel points and the rear of the hull to fit them in their standard orientation.


Construction was generally straight forward, the dark green plastic reacted well to glue and worked well when I dressed the long seams of the barrel with adzed superglue and filler. There were many small, fiddly parts around the gun cradle and tail end, and the instructions were not terribly clear, the illustrations drawn rather small and difficult to see, so that things that should have been obvious were mysteries almost to the finish.

That said, the model went together in an entirely normal fashion. The gun swivel dropped in the same way as a tank turret but the tolerances were very close, even with the surfaces masked to preserve plastic-to-plastic sliding contact they needed filing a bit to get them to seat properly after painting. The small parts, handles and projections, were quite fragile, one had to be repaired twice.


The installation of the drive wheels was not engineered in a foolproof way and I ended up with one frozen in position. That’s no biggie, it’s not as if the tracks are ever going to roll, but having them mobile during track installation eases things. The tracks themselves were well-detailed both sides and took paint well. Italeri tracks are often criticised for lacking detail and being too stiff, but these were quite acceptable, though of course, like any vinyls, are never going to lie down along the top of the roadwheels like the tracks on the real thing. Perhaps someone makes a replacement set for this chassis, but buying tracks that cost more than the kit tends to stick in my craw.


The paintjob was all acrylic, Tamiya XF-62 Olive Drab, with shade and fade coats as per standard, then black and brown oil pinwash and enamel drybrushing in lightened olive and bare metal silver. Orange enamel was pinwashed here and there for bright rust, and MiG Europe Dust pigment was liberally applied last of all.

Italeri made a number of concessions to simplicity, such as molding in the hydraulic and electrical cables around the gun cradle as solid, raised detail, and not all of them are there either. I had considered using fine wire to replace the kit details, but after reviewing every reference picture I could find on the web, as well as some taken for me at a US exhibit, I decided not to. I either would not know where to begin, or where to stop, and in the absence of a Dremmel the idea of carving away all that raised detail added up to (probably) just sore fingers and a mess.


Decals are another area of contention. The Italeri decals are quite matt, and provide markings for four countries, all over standard Olive Drab, but the stern plate of the vehicle is a very cramped place to put markings. Either the model crowds the details too much or the decals are too big, because there was no way the German markings would ever fit into the space available. I used the US marking option and even they barely fitted.


But on the whole, the model had few surprises and was well within my capabilities to produce a decent, if simplified here and there, rendition of this important piece of Western allied artillery from the Cold War to recent times. Examples change hands on eBay for sometimes steeper prices these days, less perhaps because it’s a particularly great kit than because it may be the only kit. I would love to see Tamiya, Dragon or Trumpeter tackle this subject matter!

Saturday, August 22, 2009

Where would we be without superglue?


When I was a kid the standard household tube glue in England was called Bostik, and if I remember correctly my earliest Airfix kits (bagged, Series 1, chosen from the front window of the newsagent at the end of the street -- ah, what a memory!) were assembled with this stuff. It was stinky, it was stringy, and it blobbed, but it was all there was! When I came to Australia with my family in 1971 the model glue of choice here was Britfix, I think there was a ‘77’ on that name but it’s too long ago to be sure. It was stinky, it was stringy, and it blobbed, in fact in every meaningful way it was Bostik in a different tube, so while it left something to be desired, it was familiar.

These were the days when parts had to be left for ages to dry, clamped and rubber-banded, even overnight, and one would cautiously remove the bands to see if things had actually set or if the model would fall apart when moved. This, despite Britfix actually being rated a ‘welding’ glue, i.e., solvent-based. Landing gear was fragile beyond words and the glues available took a mature touch to get them to cooperate--little wonder all my fighter planes as a kid were built gear-up.

I was 12 when I first encountered Testors Liquid Cement, and I thought Christmas had come. A strong cement (note, the word ‘glue’ had abruptly become old-fashioned), which applied neatly with that handy brush built into the bottle cap (praise be to the engineer who thought of something truly practical!), and which dried essentially invisible. And it had grip! The first model I tackled with it was Monogram’s 1:72 B-52, ambitious for an early teen if I say so myself. Things remained static for many years, then. ‘Superglue’ was a mysterious and dangerous substance around which the words ‘skin graft’ floated. I remember being with my dad when he bought a tube one day (mid-70s, I guess) and the retailer cautioning him about it sticking fingers together, that it was indestructible and a skin graft would be required if this dreaded accident occurred.

The truth was a closely guarded secret in marketing terms, I only heard the facts recently. I thought it was miraculous back in the 90s when I bought some PicApart, a simple water-based solvent that dissolves cyanoacrylate, but of course the chemists who invented the stuff (in the 1960s, I heard, as a battlefield surgical tool for sticking wounds together when there was no time for stitches!) had always known its strengths and weaknesses. Acetone is the principle solvent, which is why it’s a fair bet so many macho hobby guys who build powerful, filthy tanks, rusted to perfection and draped with the battle flags of fascists and communists, have a bottle of nail polish remover hidden somewhere in their workshops. Probably behind the bottle of brake fluid they use to strip old paint, but that’s another post! 

At first I resisted using superglue, it seemed too strong, liable to melt plastic or lock up parts in the wrong order. Meah... It you want severe, try Revell Contacta Professional, in the precision applicator, I’ve never seen plastic disintegrate like it before or since. (Except that fine component in a Hobbycraft kit that dissolved before my eyes under the assault of old fashioned Testors Liquid Cement, but that’s another post too...) I think I began to use superglue after reading Paul Boyer’s Basic Techniques/Advanced Results series of articles in FSM in the early 90s, and realised that a precise parts-fit coupled with superglue in the seam created a rock-solid joint which could be dressed with a knife blade and sand paper and -- wallah! -- the seam was invisible. This was the holy grail of finishing skills at the time, how to defeat the appearance of the model being a model.

I developed that skill in the decade following until it was easy as breathing. When my brother in law came down from the States many years ago he looked at my models and the first thing he said was ‘I can’t see how it went together... How did you do that?’ (I rarely preen, but that was an occasion.) The model I think was Horizon’s 1:30th scale vinyl T. rex, a model which took ingenuity and a swag of different techniques as I had never built a vinyl before … and never seen gaps like those either. Superglue to the rescue (and shims, putty and plasticine). Another kudo...

What would we do without superglue? Joints would all need putty again, unless the fit was precise enough to be closed up firm with liquid cement alone (old kits and limited-run subjects would be a lot less popular). Rubber bands and clamps would be in demand. “Allow to dry overnight” would reappear in instructions, and kitchen tables would be commandeered with stacks of books and paint bottles carefully balancing models in the dark hours while landing gear dried (shhh, tiptoe past in case it moves!), then there would be a giddy experimental moment the next day when the set was tried out and the hobbyist held his or her breath to see if that carefully finished fighter’s landing gear would collapse under it. Nostalgia, with a certain jaundiced outlook -- and maybe superglue isn’t solely responsible for remedying these ills, I’m sure a competent builder could put a quality modern kit together with the tube glue still rated safe for junior modellers, and come up with a perfectly good result. But a touch of the cya sure makes things easier!

Tuesday, July 14, 2009

Why do so many companies have trouble with tracks?


Tracks... All armoured vehicles over a certain weight have them. They come in endless styles, narrow ones, broad ones, cleated tracks, padded tracks, live track, dead track... Amtracks with ‘swimming grousers,’ Shermans with ‘snow grousers,’ Panzers with Ostketten. The fascination with modelling tanks brought with it the challenge of companies producing realistic tracks, and most modellers would say they’ve never really achieved 100% accuracy no matter what approach they’ve taken.

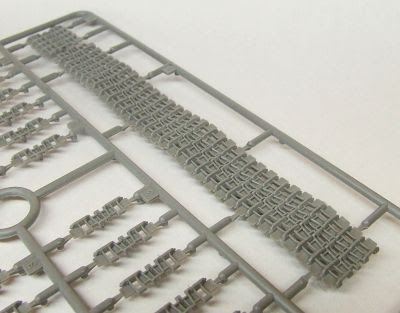
There are traditional flexible vinyl tracks, single-piece, to be joined around the running gear, and they do a generally good job. In the early 1970s they tended to be poorly detailed and possibly undetailed on one side, though today molding technology and computerised machining of the molds means they can be highly detailed both sides. The ones above are from Tamiya’s 1:35th scale King Tiger, Ardennes. The drawback is that the relative stiffness of the vinyl means the tracks don’t develop a sag between the return rollers, or lie along the top of large diameter wheels, like real tracks do. 


 Then there are individual-link or link-and-length tracks, which call for cleanup and assembly. For some modellers these are the best, though for others they are a nightmare whose tedious nature more than forgives the lack of sag in the vinyls. Above are the indie links made by Academy to compliment their issue of the early Tamiya Panzer IV-derived tanks (all the models on the box are of Tamiya origin). And below are ModelKasten’s set for the above-mentioned King Tiger. 


If sag is your thing, Trumpeter got ambitious a few years ago and produced superbly machined link-and-length tracks for their KV-1 series of kits in which the sag over the return rollers was molded right in, and even the most die-hard anti-L&L builder must feel tempted by these amazing pieces of injection work:  


Then come the workable tracks from AM companies, whitemetal, plastic or resin with wire pivots taking the place of the real track bolts, and which will hang, sag and roll like real (dead) track -- for a price.  


Dragon came up with Magic Tracks, a soft styrene type in which the links click-fit and will hold their shape until you can hit them with liquid cement, lending themselves to being shaped to any configuration of suspension. This is a neat idea and probably the most innovative. Vehicles with skirts tend to make that perfect hang and sag of the return length superfluous though: you can’t see it, so why sweat blood on it? And tight tracks don’t sag anyway. But tightness raises the question of why some companies don’t seem to be able to get it right in the most profound sense. 


I’m talking about early Trumpeter. I was really attracted to the Chinese Type 89 tank Destroyer, and was building along quite satisfactorily -- until I came to the tracks. They were half an inch too short (below) to link up around the running gear, and no amount of coaxing was going to change that: snapping off the portside idler wheel convinced me to give up. I tried heat treatment, stretching them by heating them with a hair drier, and hanging them with weights, but after half a dozen exhaustive treatments, using all the heat my hands could tolerate, one track had grown about one link’s worth, as the vinyl shrank again upon cooling. I was fed up and shelved the project. That late-mold Tamiya StuG III I reviewed last time was both a pleasure and a relief to build instead.


 Of course I didn’t give up entirely. The Type 89 shares the same chassis with the 122mm MBRL and the Type 83 SP artillery, I have them all, and all I would need is a single extra length of track to complete them. Cut out a few links and splice them in with superglue and thread as necessary, and suddenly the tracks will go round the running gear and meet as they should. I emailed Trumpeter, seeking to buy a spare length of track, got a reply asking me to forward photographs of the parts involved... Then nothing. Hey, I tried, but their aftermarket support at this point is as dodgy as their English, which is curious given their truly ambitious products and their dedicated assault on the affluent end of the Western marketplace. Their more modern products are of higher quality, I would certainly hope the tracks are the right length given the price they charge for their new armour.

And what about Dragon? That other Chinese company often considered to have eclipsed Tamiya as king of 1:35th scale? Early Dragon is beset by far too many microscopic parts which vanish into the carpet, and by the sort of over-thought engineering that has Dragon airplane models glide into waist bins beside the benches of grown modellers sobbing with frustration at their sheer unfriendliness and inaccuracy of fit. This is the antithesis of Tamiya’s philosophy, and while Tamiya’s earlier products may not be acceptably accurate or sufficiently detailed for today’s more mature taste, you can mostly rely on them to build well. “Buildability” was Mr. Tamiya’s watchword, and is sure to have contributed to the company’s historic success.


My only experience with early Dragon is in the reboxing of their classic Russian armour models when the molds were obtained by Zvezda. Their BTR-70 built fine, only a few grab handles needed to be replaced with brass because they broke before I could remove them from the sprue (because the parts were finer than their sprue attachments!) But their T-72 is another matter. It may be Zvezda’s plastic: the link and length tracks are brittle and the plastic really does not like to react with superglue (a bit like Chinese plastic in that respect). Thus trying to piece those tracks together promised to be an exercise in frustration. The Zvezda T-72B with Explosive Reactive Armour is easily the most detailed tank model I have ever built, and it sits unfinished in its box because there is no way I’ll mess around with that job, and the only AM T-72 tracks I can locate are far more expensive than the kit was. My prayer, thrown to the gods of styrene, is that AFV Club will finally produce high quality vinyl replacements in their expanding range of sell-alone tracks.

Which brings me back to my lament, why can’t companies with all the expertise and the million-dollar computer-assisted design and manufacture, get the tracks right? Properly detailed, that fit the sprockets exactly, articulate with each other, and take a realistic paintjob? If it has to be link-and-length, then the plastic had better respond well to glue, you certainly can’t stitch them together. And if they’re vinyl then is it too much to ask that they be the right length?

These criticisms don’t apply to modern Tamiya products, modern Dragon, or, as far as I know, current Trumpeter or Revell-Germany. But they can all be criticised for their sometimes exorbitant prices. I know, I know—I want it all ways, tracks that fit and an affordable price. I’m just out of touch with reality...