Showing posts with label airbrushing. Show all posts

Thursday, May 23, 2024

A New Bit of Kit


 I’ve not put on a new piece of “plant” in a very long time, but circumstances recently compelled me to update. For something like 35 years, I’ve run my airbrush on a cylinder of compressed air, which has worked very well indeed, however complications with supply forced a rethink. When the yearly hire cost of the bottle crept up toward a dollar per day, I knew I needed a cheaper alternative.

I’ve resisted the idea of a compressor for years on two counts—the noise they’re liable to make, and the cost. I looked at units years ago and they were still substantially more expensive than bottle hire, but, lo and behold, there are more modest units designed specifically for the hobby/craft marketplace that are not so expensive, and, being meant for domestic or public-contact business applications, also run quietly.

It turns out I didn’t have to look far. This is the Artlogic AC1418, which is compact and tidy. I originally looked at the 1318 model, but on having a chat with the customer service folk at Airbrush Warehouse, I found the 1318 was not recommended for use with syphon-feed airbrushes, like my Paasche VL. The 1418 has a 3-litre collecting tank, which smooths the delivery, and this is certainly essential. The 1418 was on special, only $20 more than its smaller counterpart, so I was very much into pocket.

The unit weighs only 4.15kg, and is small—370 x 170 x 350mm. It neatly occupies the same floor space that the gas bottle used to, and is less obtrusive in the room (I can get to drawers without moving the cylinder now!) Operation is very straight forward, and the first thing that impressed me was how quiet the unit it. It generates only 47 dB with the pump running, which is no louder than a normal conversation!

Default setting on the pressure control valve was 35psi, which turned out to be way higher than I’ve been using all these years. My CIG gauges (yes, they’re so old they predate Australia’s Commonwealth Industrial Gasses concern being taken over by British Oxygen Corporation!) read in flow (litres per minute) rather than pressure, while the compressor reads in psi, and there is of course no objective way to convert between those measurements. A comfortable spraying pressure for my settup seems to be a touch under 20psi. I dialled it way down in the first session of experimentation, and will take it even lower for some applications.

The Paasche connector’s quarter-inch thread screwed straight onto the compressor outlet, and didn’t even need thread tape. I find the AC1418 easily delivers more power than my usual applications demand: I could see using the higher end (up to 60psi) for painting something big, a large-scale tank or battleship kit, or perhaps doing airbrush art in which I’m laying a solid base colour onto a large panel area—say a solid black over which to do spacescapes. I used to do paintings like that back in the 80s, with my old Badger 350—but I “blacked-up” the board with a 1” brush in those days!

I’ve done several sessions of work so far, and I must be using the unit well within its capacities. The instructions caution the user to let the compressor cool down before touching, but so far it’s only been mildly warm. Also, this is my first time working with a moisture trap, and I have yet to see any liquid collect in the trap chamber.

The price was very attractive. The unit plus courier costs came in at under Aus$200, and I’m very happy with that. I’m optimistic that this will be a new lease of life on my hobby and art. The next step is to renew my workshop lighting—the old strip light gave up the ghost years back, so it’s high time to get back to bright, daylight-type illumination for both working and photography, and the real kicker is that I can probably do it and still be into pocket against the savings on a single year’s tank hire . This blog could do with some serious revitalising, and soon I might just have a work flow worth talking about again!


Cheers, Mike Adamson

Thursday, July 4, 2019

Kit Review: MPC/Round 2 Space: 1999 MK. IX Hawk


I can’t remember the last science fiction model kit I completed. I have a few in my stash but I actively can’t remember completing one in recent times, so this Hawk is rather a milestone. In the late 70s I did a couple of the very disappointing MPC Eagles (under the Airfix label), and obtained their Hawk as a built example from the famous collector Phil Rae ten or more years back, but brand new kits from this cult TV classic have started to come available in the last few years from Round 2, under the MPC label, as a direct result of interaction between company manager Jamie Hood and both the fans who would be buying the product on one hand, and the leading experts on the originals, on the other. This fusion culminated in the Eagle Transporter kit in 1:48th scale, which has done great business and spawned a family of secondary releases. The first guest-star hardware to join the family is a 1:72nd scale Hawk.

The Hawk appeared in the episode Wargames, familiar Earth craft which mysteriously appeared from an alien planet and attacked Alpha. They were mental projections, plucked from the Alphans’ own minds, as was the entire unfolding scenario of destruction, as a means to persuade the humans not to attempt to settle on the planet they were passing, no matter how compatible it seemed. This meant a craft could be designed to reflect the same general era and mode of design as the familiar Eagles, which leant itself to rapid production of the needed models. Two were built, a definitive model scaled to the 1:24th scale Eagle, and a distance model at 1:48th scale. They were very different in detail when studied together (both have survived and are well documented photographically, and appear at fan conventions).


Round 2 based their detailing on the “hero” 1:24th scale Hawk and on inspection I was most impressed with the degree to which almost every detail of the original has been captured at one third the size. I studied the Hawk with a view to building a studio scale replica some years ago, amassing a fair bit of reference material in the process, and as a result I am able to say that the company has captured the important features to an amazing degree. Proportion and detail, including precise replication of the kit parts used as dressing on the original, are all there. The only notable exception I could find was the absence of the ribbing on the Saturn V-derived parts, this being more than likely due to the limitations of moulding technology. When the firm produces the promised 1:48th scale version to go with the larger Eagle, this omission will hopefully be corrected.


Assembly was quite straight forward, though fit was not as crisp as one might have hoped for, giving rise to some seams to be dressed, mainly on the command module sides and where the fuselage, split in upper and lower halves, comes together just behind the stub wings, and at the rear. Otherwise there were few hassles. The worst parts are the tiny Lunar Module legs, five of which are produced at a third their original size. The originals were forever breaking on the studio model, and these are so fragile you hardly dare breathe on them. The one above the cockpit broke and was repaired four times, while the ones around the engine barely fit (locator holes in the wrong places?) and the modeller is reduced to “superglue and prayer” — not ideal. Whitemetal replacement parts would be highly desirable.


I built the model in subassemblies, the lateral boosters and engine, solar panel and underslung weapons pods, the X-girders, plus the underside girder/rod/pipe parts all being completed separately, including decals and topcoats, and brought together at the end. This eased painting of the fuselage and side boosters, and I noticed that proper alignment of these units to each other depends largely on all parts coming together in one go—so they needed to be fully finished at that point.


In 1:72nd scale no cockpit is provided, just black decals for the windows. The Hawk’s interior was never shown in the program so any attempt to add one to a kit is an exercise in what-if. It will be interesting to see how the company tackles the issue at larger scale.

The biggest “wow” factor was the decals. The sheet is very finely printed, featuring over 130 markings for the craft as seen on-screen (orange trim) or the prototype model (white overall). I did the latter for simplicity, though picked up two kits and will do the on-screen version at a later date. The decals reproduce every marking seen on the original, including many which were actually drawn on by hand. They behaved very well indeed, were a delight to work with, and reacted well enough to Microscale chemistry. The small coloured bands took some work to wrap around the girders, several applications of Microsol were needed to get them to conform, and they could have done with being somewhat longer to wrap fully and seal to themselves. The anti-glare panel decals were sprayed with Micro Flat and trimmed closely from the backing paper, producing a decent flat finish in those areas, contrasting with the satin finish white I selected overall.


Improvements are always possible, and when I do the second kit I’ll make some small changes. The original had rows of holes drilled into the leading edges of the stub wings, weapon pods and solar panels, and these are represented as silver dots on the decal sheet. Dressing those edges very carefully to fully eliminate mould lines and drilling in the holes is an obvious enhancement. Being forewarned about those LM legs might ease that aspect too.


The model was a pleasure to build, notwithdstanding the acute frustration of those aforementioned LM parts. On the provided stand it looks the part, and is a milestone as the first fully accurate depiction of this craft to be produced as a conventional styrene kit. If the larger version eventuates, it will build upon the experience from this one, and be the perfect compliment to the big Eagle—as surely as the soon-to-be-released 1:72nd scale Eagle compliments this Hawk.

Full marks to Jamie Hood and Round 2 for giving us the kits we craved long ago and never expected to be possible!

Cheers, Mike Adamson


Monday, December 31, 2018

Recently Completed: Airfix 1:72 Hawker Typhoon Mk. Ib (A02041).


This is the first Typhoon I have ever done (though there was a Matchbox 1:72 Tempest II back in the 80s). Tooled in 2013, this kit looks very nice in the box, and as a Series 2 kit comes on four sprues and with two decal options. I had intended to do the more colourful scheme with invasion stripes, but didn’t trust such large decals not to pose grab and alignment problems that might result in tearing; plus I wanted to get this one off the bench before New Year and wasn’t in the market for surprises, or for backing up and painting the stripes.

Another good-looking addition to Airfix’s stable of British aviation in miniature, the model’s pleasing lines conceal a few challenges. I got the feeling Airfix somewhat over-thought the engineering in this kit, especially in the way the cockpit interior locates, and the cockpit floor/wheelwells part, which demands a certain order of assembly and unavoidably introduces the potential for misalignment. Fit problems I found inevitable, steps at the wingroot being the most serious, though gaps manifested on the horizontal tails too: whiteglue to the rescue. I expected the keyed landing gear to be out of alignment also, but surprisingly it was not – the wheels are flattened and bulged, and keyed to the struts, and once the model is “up on its feet” the flat spots are firmly to the ground. Assembly took a little time, and there was plenty of prepainting to do, between the prominent radiator/carburettor intake assembly, the cockpit and surrounds, landing gear, bay doors and propeller assembly.


Overall, though, the model looks the part, and once it was together the finishing techniques flowed along well enough. I used Tamiya’s accurised RAF late-WWII shades (XF-81, -82 and -83) topped with Microscale clears and Florey panel wash, finished with oil wash weathering and Mig pigments. I used the Eduard mask set for the canopy and wheels, and the AML masks for the Type A camo scheme. The set includes an extra sheet of straight strips doubtless intended for painting the invasion stripes.

The best part of the kit was the decals, they were superb and pulled into surface detail even before MicroSet was applied. Very thin, they grabbed a bit quickly, but are of solid tone, fully in-register, and seem especially accurate. They behaved much better than the sheet in the Spitfire I finished last, indeed I completed all decals, with the exception of the leading edge yellow stripes, in a single day of work.


Criticisms? The small antenna on the underside of the fuselage did not fit its locator hole – I fiddled and fumbled with it for a good twenty minutes, most of which was involved in getting hold of the tiny component, over and over and over, while applying a file to the base until it actually dropped into the receiver. The tailwheel is moulded as one part and must be seated before the fuselage is closed, which ups the odds of damage during handling and makes painting the unit a matter of a small brush and prayer. When the propeller is finally installed, the mounting calls for a cylindrical unit to be inserted between four moulded guides which “tension” it into place – why so complicated? The fuselage aperture had to be filed to accommodate the outer ring of the cylinder, and when it slid home it became apparent the outer diameter of the fuselage mouldings is larger than the outside diameter of the spinner backplate, leaving a strip of unpainted plastic exposed – yet with the prop now quite firmly in place there seems no way to tease it free again to paint the strip. Chancing getting camo green on the satin black spinner is not a risk I’m willing to take at the very finish, so it stands as-is, and angle of view will hopefully conceal the flaw for the moist part.


I have another of these, in the “Dogfight Doubles” edition with Pips Priller’s FW 190 (an unusual combination, as the Tiffie found its forté as a ground attack plane and probably never tangled with a 190, at least not on purpose) but it may be a few years before I welcome going 15 rounds with this kit again. There are some lessons learned here, of course, such as leaving the main gear bay doors off until after the struts are in place, which would make it easier to keep the doors aligned and not “toed-in” a bit.

Enjoyable? It’s always nice to see a project come together, but I would have to say I was happy to see this one leave the bench in the end. Maybe the shake’n’bake kits have somewhat spoiled me, but I had hoped for better alignment. Recommended nevertheless, to those with a little experience under their belts.


Saturday, November 17, 2018

Building Bigger


Sometimes, with the pressure of one's daily obligations, a piece of work can be produced and clean forgotten. Below is a model build-up feature I wrote years ago, and even then it was a retrospective on a project which had not been documented at time of actual completion. I was browsing for some information in old articles and came across the text, so figured it was high time this one saw the light of day!
_________________________________

As I’ve ruefully mentioned before on this blog, some modellers build bigger as they get older simply because they can’t see the small ones anymore. That’s very true for me, yet I haven’t built large scale planes since I was a kid – in fact I’ve only done one 1:32 aircraft in modern times. My previous was 34 (now 36!) years ago!


In 2014 I tackled Hasegawa’s big scale Fw 190 A-8 and had a great deal of fun with it. There were one or two hassles – the fit of the engine cowling to the fuselage left a lot to be desired and was a tough contour to fill and sand but that was about the only structural difficulty. The decal sheet was a let-down – I had selected Hans Dortenmann’s Red 1 and as with so many Luftwaffe aircraft the markings and the camouflage scheme particulars go hand in hand. It was bad news when it turned out the sheet was unserviceable, as the paintwork was fully finished. Patching the markings together from AM sheets would have been a $60 job (three sheets required). Fortunately a friend in Europe had the same kit and was doing it in different markings and sent me his sheet, which worked perfectly.


It’s a big, beautiful bird, and at this scale the problems of airbrush mottling are minimised – overspray can still be an issue but the battle for fineness seems less acute. The cockpit was easy to detail, and the 1:32 etched harness was incredibly realistic. The outer pair of canon barrels is missing – by the time I was done I was more than slightly browned off with Hasegawa’s engineering choice to simply scab them onto the exterior as optional bits, as my confidence to get them lined up in both axes while glue dried was in negative numbers, so she’s a slightly odd-looking A-8 here. Better that than make a mess after so much work had been invested…


I didn’t weather this one heavily – weathering is a skill mated t0 scale and one must learn to use a heavier hand as scale increases. I’m not comfortable with really laying on filth so this bird is in very well-maintained condition – which they must have been at least some of the time.

So why so few models in this scale? Simple, somewhere to put them. You can store four, even six, 1:72nd scale models in the same area as the “footprint” of a 1:32nd scale project, and you very quickly fill display cases with the big guys. I have plenty of models in this scale and would like plenty more, but until the day comes I have some sort of storage designed to receive them – shelves of the appropriate depth and at a spacing which does not waste cubic volume with empty air – I fear I’ll have to leave them where they are, buried deep in the stash.


There’s also a lot of work in a big model, even if it’s structurally no more complicated. It certainly uses a lot more paint, you’re aware of your running supplies being used more quickly. But that’s par for the course, I can only imagine the investment in time and materials the ship guys go to when they’re building the new Trumpeter 1:200th scale battleships. Now there’s a project to conjure with – it gives a whole new meaning to the term “big scale.” It is to ships what 1:16th scale is to armour or 1:24th scale to planes.

Hmmm, that reminds me, I have an Airfix 1:24th scale Harrier hiding away in the stash. After more than forty years since the basic tooling came out it might be high time it got the full treatment… If only I had somewhere to put it!


Monday, October 3, 2011

Product Review: Model Master Acryl Paints


The quest for less-obnoxious spray painting is never over, and while I have had great pleasure with the Tamiya acrylics range they just don’t have matches for many of the standard shades in use, whether German RLM shades or modern US Federal Standard colours. What few they do purport to match are actually very wide of the mark (for instance, their equivalents to RLM 02 grey, RLM 70 schwartzgrun, or British Sky are not satisfactory and require mixing to improve.)

The Pollyscale acrylic range is hard to find in Australia, and Humbrol acrylics are not imported, nor are Revell Aqueus. But recently, distributors have begun to bring in the Model Master Acryl range, and these are definitely worth a look. Colours are matched by precise industrial techniques, same as for the old standard MM enamels range, and the paints are supplied in the same old fashioned bottle. Some people have criticised the bottle design as hard to stir, favouring the Tamiya broad-neck type, but I have never had an issue, perhaps because I cut my teeth stirring paint in Humbrol tinlets, after which, it’s fair to say, anything is an improvement.

Obviously, my base for comparison is the Tamiya range, and on that footing, I can make the following observations:

Model Master Acryls are a virtually odourless formulation, there is no ester-smell on opening the jars. Though it seems they separate into phases when standing, a shake seems to do most of the work, they need very little stirring and recombine fully. I have sprayed light and dark shades and they seem to have equivalent covering ability. Thinning is an issue in point, these paints seem to demand 25%, compared to 50% for Tamiya, meaning you use proportionally more paint from each bottle in any given job. Any more than 25% and spatter begins to develop, which if controlled through flow rates and brush motion sets down in a somewhat pebbly fashion, drying with excess gloss. The finish seems to be somewhat harder, more durable, than that of Tamiya paints, and it can be said that the paints go on and lie down differently, though I would be hard pressed to actually describe how. They certainly dry quickly, from a wet, almost pebbly application to a dry, satiny coat in a few minutes.

Random gloss patches have been reported by others but I have yet to encounter this phenomenon with these paints; in any case, if using topcoats, it’s neither here nor there. Another general criticism is their tendency to tip-dry, blocking the airbrush, which I have encountered when spraying a fairly large amount of paint in one session (doing the template technique on a set of tank wheels, for instance), however under normal circumstances this does not seem to be a bother (nor is it affected by increasing the thinning ratio). I image it will become more of an issue in warmer weather.

One last point, these paints are entirely appropriate for applying with a brush, something Tamiya paints really do not like to do. After many years of struggling with touch-ups in the Japanese range, I can now dip a brush and have the paints go on the way enamels do, rather than the frustrating wipe-on, wipe-off effect of the others.

At this point I have used only four paints from this range. I am thinning with Tamiya thinner which is completely compatible, and cleaning up with water, between airbrush strip-and-clean sessions using Tamiya thinner and a Paasche brush set (invaluable, the best buy I ever made for ensuring the airbrush remains fully serviceable at all times.) I will be expanding my range and applications, and expect to be trying their gull, ghost and compass greys in due course.

I would recommend Model Master Acryls to anyone painting indoors and who is interested in their health. The range is very large (it takes three pages at the Testor website to present them all), and as acrylics they can be mail-ordered by air from the US or elsewhere. See the range at:

http://www.testors.com/category/136648/Acrylic_Paints
I’m happy with their performance so far, and will continue to acquire shades, but I will be using them in concert with the Tamiya range which, though it may be just familiarity with these paints over so many years, seem to be a tiny bit more user-friendly in the way they go on when sprayed.

Friday, July 22, 2011

Not Retiring Enamels After All


Real life has been in the way bigtime, it’s been three months, to the day, since I had a chance to post, but finally I have the time and something important to look at.

Last year I posted a speculative point that acrylic paint technology had almost reached the point that it was worth retiring enamels altogether, for their toxicity and stink. How many of us spray outside to keep the fumes from offending the family? And mortgage our health in any case, as unless we can afford a proper industrial respirator, we’re going to breathe in at least something of the atomised hydrocarbons or whatever other noxious fumes our airbrushes emit.

I have spent most of the last year studiously avoiding enamels, my last enamel job is awaiting completion, and that last camo shade will probably go on with acrylic anyway, just like the topcoat. But where metallics are concerned, acrylics are just not up to snuff yet.

Reviews of the original Tamiya range many years ago reported a granular effect from their silver, and though their paints are now better made, more finely ground or whatever, that granularity is still with us. Add in difficult conditions of temperature and humidity and you can have a mess.

I recently set out to do the natural metal parts of a whole line of Phantoms, and Tamiya acrylics only wanted to spatter and dry like pebbledash paving. Next I gave the Talon brand another go, but I don’t think I’ve encountered a more unfriendly and delicate formulation. I ended up with five sets of tail fins to sand clean for the second time, as the ‘gradual build up of mist coats’ technique was gradually building up little more than … pebbledash pavements.

In frustration (and as I had an hour with the family out) I pulled out an ancient bottle of Model Master Chrome Silver. There was a tiny bit of sludge at the bottom and I was about to bin it, but decided to give it a go anyway. Tamiya X-20 enamel thinner reconstituted it perfectly and it went onto the engine areas of five Phantoms without a hitch, and without the spatter effect that has had me convinced lately my airbrush’s #3 needle needs replacing.

I should have just sprayed everything in enamel and given the Talon a miss, then the whole job would be done. After masking I can do the darker shade in acrylic, Tamiya Aluminium and Gunmetal are far less temperamental than their Chrome Silver, but for the bright base it turns out there really was no alternative. I’m not saying the Talon paints aren’t excellent, but they’re a technique that takes practice, and a patient hand, and I hope one day to have the chance to find my feet with it.

For now, I find myself thinking again about that fumehood setup and respirator for the hobby workshop ("mancave," is a common term for it, but that's sexist, there are plenty of great female talents in the hobby) that's out there on the horizon. Enamels really do flow on so beautifully… It’s a pity they’re poison.

Thursday, January 27, 2011

Raiders of the Lost Paint Stand


Many years ago, about 2002 I think, I published a small article in FineScale Modeler about how to make your own painting stands. They have those fancy ones you can buy, with clamps and a rotating base, they adapt to any model, and sure, they’re great, but they cost mucho dollars. I proposed a simple solution, a purpose-made painting jig that will support a model while you’re spraying it. With aircraft, the idea is you paint the underside, then turn it over with the stand locating into the wheel wells, and go hands-off to paint the top.

Car modellers have long used the old standby of a bent coat hanger to support a car body while it’s being sprayed, the single most critical phase in car models. The finish on the paint is everything and getting that coat on just right means treating the job like the real thing. Armour is less demanding in this sense, as flat paints are much more forgiving: no matter how complex the scheme, the paints will be touch-dry in no time and you can adjust and move on.

Aircraft of multiple colours offer the chance to spray one shade, let it dry, then support the model by those areas while painting the next, but what about models which are largely or completely mono-tone? The axiom of “keeping a wet edge” to the spray coat becomes difficult to say the least, and that’s where a stand really comes in.

We probably all have ideas and solutions to this problem, and no particular approach is any righter (or wronger) than another. I have found that a handy way to do it is to glue together a few bits of styrene rod, strip and sheet to make a stand that supports the plane on three points, and it really couldn’t be easier.

The stand I made for the article all those years ago was designed for a 1:72 Corsair, and, working on the kit that has appeared in my last two posts, I had a need for it. Unfortunately I couldn’t find it, so had to make up another. Rather than duplicate the original design, I used the even simpler design for the 1:72 Phantom painting stand that I made in 2003 for another FSM feature project, and which I do still have to hand.

Two pieces of sheet plastic are tenon-jointed together to make a cruciform shape with the short axis equal to the track of the main gear wells, and the long arm reaching to the tail gear well. They are braced together with some 3.2mm angle stock, then three uprights are installed, the main well supports from 2mm square stock, braced with small angle, and the tail support made from strip stock laid onto each side of the sheet and another piece between them to create a solid column above the sheet. I cut the pieces in ten minutes and assembled them with liquid cement in less.


The great thing is, you can adapt this formula for any aircraft type in any scale, and if you know you’ll be building many of a particular type they can solve the hassle of how to hold a monocoloured bird while the paint is going on. For US Navy types between 1944 and 1958, with that iconic overall Dark Sea Blue scheme, it really simplifies things.

Oh, and yes, if you remember that article in FSM, it was the very same Corsair model appearing in it as I am just now coming to grips with!

Saturday, January 1, 2011

Product Review: Microscale Satin


Sometimes a product is under your nose and you don’t realise just how good it is.

The Microscale finishing system has been around since the 1970s and it’s hard to think where the hobby would be without the products churned out by Microscale and Superscale. But the clear coats they make, water-based acrylics in those no-nonsense plastic bottles, are something of a minor miracle. I’ve experimented with clears before and been largely disappointed: orangepeel finish, flats that are anything but flat, uncooperative airbrushing, not to mention the spectre of a terrific build being spoiled by a clearcoat crazing or going misty, which really renders the clear a dubious case of gilding the lily. But this was something else...

From time to time you have to experiment and working with Hobbycraft’s Avia S-199 kit was just such a build (article forthcoming). One major innovation of this project was the decision to clearcoat over flat paints rather than mixing gloss into the paint as I have previously. While this worked perfectly in enamels, in acrylics I found bright spots in the paint as if specks of clear gloss had failed to disperse evenly into the mixture. Thus the next step, try clear again.

Microscale’s clears are a joy to use. I have yet to give their flat and gloss a whirl (I have heard their flat will never generate a true flat), and in a sense satin was the friendliest possible experiment: I was trying for neither a dead flat nor a high gloss, but the perfect compromise between them, and this product delivered beautifully.

The liquid is milky in the bottle but dries crystal clear. Cleanup is with water, and I thinned the fluid for spraying with the same, by 50% or maybe a little more. It was extremely forgiving to work with, drying so quickly on the model that you can literally blow it dry with your breath as you watch. At the same time there is absolutely no tendency to tip-dry in the airbrush, which is amazing. You can slightly lift the sheen with successive coats, but not by much, the integrity of the lustre holds good.


Above, the Avia is seen after the sealant coat. The paint was sealed with an initial two coats, applied lightly, before the decals went on. Then the panel lines were accented with Promodeller wash, and the whole was sealed with another coat of Micro Satin. The sheen is even and attractive over the decals, and the panel wash, while not very contrasty the moment it was dry, jumped out into sharp relief with the wetting effect of the clear.


Decal carrier film largely disappears, indeed this is what these finishes were developed for, and combined with the Micro Set and Micro Sol decal solutions, is a straightforward means to quality decal work that should last a long, long time.

I have used a lot of this product previously in professional art, working with brushes to apply heavy protective coats to collectibles; put on in those quantities the finish is brighter, closer to gloss but not yet there.

The handy 1oz bottles hold enough for a dozen models or more, and at US$3.00 each are excellent value. I bought this one in Australia, but as a non-solvent based product it can be shipped by air along with most Microscale products – see them all at:

Microscale Industries

Saturday, September 25, 2010

Giving Up Enamels: Just Around the Corner?


I've posted a fair few times on the contrasting merits of enamels and acrylics, and despite being a lifetime enamel user I find I'm drifting toward acrylics more and more.

They don't go on as silky-smooth, they dry quicker in the airbrush tip, and for sure you need to get used to them, but the benefits really do weigh heavily in their favour. They're far less toxic, they come in larger bottles that have phenomenal shelf-life, there are enough shades around that you can either get a decent match right off the shelf or mix one without much bother, and they're durable enough to survive gentle handling. Their non-toxic nature means they're probably the only option for indoor spraying if you're health-conscious at all (brain cells, we don't need no stinkin' brain cells!), so you can paint through the winter without being well-enough heeled to have a spray booth/ fume hood in your workshop, and that's the majority of us. Also, enamel paint chemically attacks vinyl so if you fancy anything from anime subjects to dinosaurs via movie tie-in figures, acrylics will be your medium of choice.

They've come a long way in the last twenty years, and modern acrylics are seriously competing with traditional enamels. I've done mostly-acrylic paintjobs on my last eight armour kits, with oil-wash weathering over the top, and it's become my standard armour technique, so it may only have been a matter of time before the medium encroached on aircraft.

The Convair XAB-1 that I reviewed in the box in my last post, rather longer ago than I had imagined (apologies for the long delay in posting!) is now finished and submitted to the commissioning magazine, and it turned out to be an all-acrylic paintjob. I had intended to do the natural metal parts in enamel, but fate took a hand: I discovered I had no enamel thinner in stock other than the dirty thinner in the bottom of an old bottle I use to suspend oils for wash detailing, and as I was on a deadline I realised the metallic would have to be acrylic too. Fortunately I had the shades in hand, so I mixed Tamiya X-11 Chrome Silver with XF-16 Flat Aluminium (9:1) and laid it on in several decent coats. The underside white of the bomber was four coats of satin white mixed from X-2 Gloss White and XF-2 Flat White, while the red of the engine inlets, the chromate green of the wheel wells, satin black of the antiglare panel, dark metallic of the flaps and gunmetal of the exhausts were all previously mixed and sprayed in the same acrylic range.

I was impressed by the covering ability (with the exception of the white, and that's the nature of the beast where white is concerned), and the rapid drying which made multiple coats a practical proposition in a modest timeframe. The job became practical and the finish was entirely acceptable. Yes, the natural metal had a certain grain to it that an enamel job probably would not, and in future I will still work in enamels when the environmental conditions are right; but when they are not and there is a model to be finished, the less-toxic medium is now fully up to the job.

I have a Tamiya Fw 190 F-8 underway with an all-acrylic finish. I'll write a review of this excellent kit when she's done, and talk about mixing the RLM paint shades from the basic Tamiya range, an operation which, at time of writing this article, looks both simple and highly accurate (sometimes...).

Cheers, Mike

Sunday, July 25, 2010

Fascination With “Type”


Sometimes, without consciously meaning to, we find ourselves on a single-type production line. It can happen for a variety of reasons, and plain fascination with a particular subject matter is probably the single most significant. The hobby is about entertainment, education and general knowledge come decidedly second, so when a hobbyist finds him or herself focussing on a particular subject it's probably because there's an abiding interest.

It might be that you're a fan of MOPAR muscle, and you're on your tenth 1:25th scale Chrysler Corp F-body pro-streeter in a row. Maybe you're an armour fan who belongs to the "panzers only" club because they're colourful. Maybe your thing is vintage biplanes and between them Roden and classic Aurora have occupied your bench time for the last two years.

Of course, it can creep up on you. I recently found myself building four Fw 190 fighters at the same time sort of. One was started four years ago, brought to the painting stage and almost forgotten, back in its box. One was a quick build to work with some AM decals, another was a long-delayed foray into building a leading manufacturer's offering with all the bells and whistles. The last was a chance to work in 1:32nd scale for the first time in twenty years, and only the fourth time ever, on the assumption that there will shortly be somewhere to store and display a model that size.

However it worked out, there are four German WWII fighters on my bench at the same time, which will mostly be in the same RLM 74/75/76 scheme, and that's a plus to production-line building. You can get at least two of them ready for the paintshop at the same time and do both from the same mixing and cleaning cycle, which reduces work and economises on air if you're not using a compressor.

Does it risk boredom? Seeing a long line of the same subject ahead of you can either whet your appetite for completion, as each finished build fuels the next, or dull it completely when some other fascinating body shape and colour scheme comes along to compete with the same-old same-old. I think I'll stagger things, do a 1:72 and the 1:48 together, tackle the 1:32 on its own due to sheer volume, and the last 1:72 separately by default as it has a slightly different scheme. It'll take months to work through them, but I have every expectation that each finished plane will more than inspire me to press on with the next.

I suppose the three Phantoms I have underway also count as a fascination with type. Look for posts in future picking up the theme of the great Hasegawa/Fujimi Phantom Showdown, as both these brands are on the bench and will be reviewed together.

PS: I'm now using Picassa for my image loads, click them and you'll get a larger version from now on.

Monday, March 1, 2010

Monochrome, Pt 2


 As promised, here’s another look at “triple value monochrome,” with the Trumpeter 1:35 M1126 Stryker as the subject. I started this one along with the Strv 103B as back to back projects, and both have built well (review posts coming up in due course), and both are now at the same stage, they’ve been through the paintshop and are waiting on the weathering process, decals, hull tools and antennas. The first thing that strikes you about the NATO Green is just how grey it really makes the Swedish scheme look. When I mixed the Swedish shade it seemed particularly green to me, now it seems quite grey. Nevertheless, both shades were given the same treatment, and by the same ratios. The fade coat, applied to the middle of panels and hatches, was NATO Green (Tamiya XF-67) lightened with 20% flat white (XF-2) and thinned by the standard 50%, or maybe a tad more. Likewise, the shadow coat, applied to the underside, under overhanging structures and in a subtle post-shade effect around the line of hatches and divisions in the armour, was mixed the same way, using 20% flat black (XF-1). The photos were taken at this stage. The gradient from lightened to darkened across the base colour value seems quite steep at this point, and the temptation is to think maybe only 10% tinting should have been used. But the washes to follow have the effect of darkening the cumulative value of the model, as well as drawing all the tonalities together, so I’m not concerned at this point. If the values turn out to be too contrasting I can always slap on some more wash over the highlights to pull them back. Drybrushing will be a slightly different operation, as it’ll take place in enamels (I’ve not learned the trick of brush painting Tamiya acrylics yet… Unlike the Citadel range for Warcraft miniatures, they’re not formulated specifically for brush painting, and while they airbrush like a dream I’ve learned to switch to enamels when it’s time to break out the sables.) So I’ll be mixing an equivalent tinted shade, perhaps starting with FS 34127 Forest Green or FS 34102 Medium Green, then lightening with white to profile edges. I had hoped to have this batch of models finished at this time, but real life has a way of intruding… I better stop writing and get back to the bench!

Saturday, December 5, 2009

Acrylics or Enamels?


 It has to be the biggest question in model painting today, beyond choice of brushes or airbrushes, beyond colour selection: which type of paint is best for your project? There are modellers who have switched entirely to water-based acrylics for all spray work, for the health benefits: nontoxic paints are a major factor and not to be taken lightly. When you’re used to the light, sweet smell of acrylics and their water cleanup, to start spraying solvent-based paints and their spirit cleanup is a rude reminder of just how frequently and casually we poison ourselves with the things we invite into our environment. Got a spray booth with a ducted exhaust fan? Good for you, but most of us make do with an open window and sometimes it’s just not enough.

Like many modellers, I have both types of paint in stock. I first bought acrylics when tackling vinyl subjects in the early 90s, and I must say the Tamiya paints I bought have been extraordinarily long-lived. They’re still good over 15 years later, all they need is a stir. They haven’t made the old, large bottles in many years, possibly because people discovered the paint lasted remarkably well, and for the rate of usage a smaller quantity was just fine. I have scores of Tamiya shades, plenty of useful colours, and my collection grows gradually. But I also have hundreds of enamels, the ubiquitous Humbrol range and Testor Model Master (which despite being superb quality, with an easy-stir jar and an enormous selection of specialty-matched shades, is getting hard to find in Australia, as Humbrol and Tamiya have grabbed the popularity).

I have not brush painted a model in 30 years, but today when I spray enamels I do so outside, which is a nuisance. Acrylics I can use indoors with simple ventilation, which makes them easy and convenient. But what about detail painting by brush? This is where the real applicability of the paints comes to the fore. Acrylics spray superbly but they don’t brush worth a damn--at least the Taniya variety. You can thin them a little and that helps, but the drying rate is like lightning and in one minute a brush is unusable -- clean it and start over. This seems a characteristic of the Tamiya range in particular, they are by far the most available here and I have sampled no others at this time (but I’ve heard others dry even faster…)

By comparison, dipping a fine brush in enamel paint provides familiar flow and control, and one can concentrate on the finesse of the task rather than fighting the characteristics of the medium. The same thing applies when airbrushing, though on a longer timescale. When used to the tip-drying characteristics of enamel, acrylics can bite you: you must keep the job moving when you’re working with the nontoxic paints, and when it’s done be sure you’re finished and clean the AB at once. This tends to lead to wasted paint, as when forgotten bits are noticed you need to mix more, and if using a syphon-bottle AB there is a minimum amount the airbrush will actually pick up from the jar. If working in enamels you have the extra working time to consider the job from all angles, turn the thing around again, look at it in different light, go 30 seconds or more and be sure the paint will still flow normally when you press the trigger.

My impression is that enamels and acrylics will continue to share the marketplace. Enamels flow on so smoothly they are a joy to use, they are a ‘friendlier’ medium than acrylics, you can polish their finish just like automotive paints (which ironically have all been acrylics for the last 25 years at least), and the range of precision-matched shades is enormous. The major manufacturers must have churned out over a billion bottles and tinlets in the last 40 years, in fact probably far more, Humbrol alone used to produce 25 million tinlets a year in the 1980s, if I remember correctly, and that’s an awful lot of paint in collections out there. I personally have tins that date from that era and the contents still slosh. But if acrylics were friendlier, dried slower, brushed better, and were available in hundreds more shades, precision-matched to historic sources, I would be using them more often. I have no wish to poison myself, and while the chemistry involved with acrylics is almost certainly not 100% harmless, it’s a significant improvement.

Friday, July 31, 2009

Hasegawa Bf 109 K-4: Soft-Masking the Camouflage


The Hasegawa K-4 has certainly been gestating a long time, what with professional commitments and a month’s jury service, but she’s on the last lap now. I just completed the paintwork and for the first time I’ve tried the technique of soft-masking.

The late-war German camouflage patterns were a simplified, time-saving exercise. Gone were the masked, hard-edge patterns from the early war years, replaced with free-handed patterns on the horizontal surfaces and ever more complex freehand disruptive schemes on the fuselage sides. The challenge here is to reproduce that scheme with smooth graduations between the colours at a resolution which is a fair scale representation of the feather of the original sprayguns. There are many approaches, and while you can change down to a fineline tip and needle on your airbrush, and adjust the thinning ratio of the paint and the pressure delivery to the AB, these techniques take a lot of mastering. Soft-masking leaves the paint operation alone and addresses the problem directly on the model.

The idea is to mask the camo but support the masks clear of the surface by around an eighth of an inch, so that the cloud of paint passing the edge lands on the surface in a tight but still diffuse edge, creating a resolution often difficult by regular means. The first step is to prepare the paint scheme: 


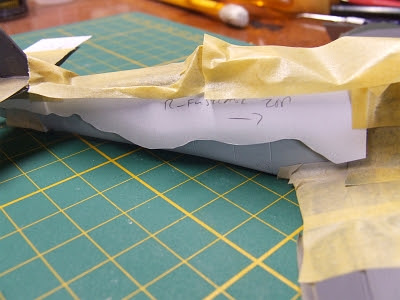
 I sprayed the underside LM 76 first, and when that was thoroughly dry I masked the edges of the flying surfaces, including the wavy-edge demarcation at the leading edge, using Tamiya tape. The card masks are photographed with the model at this stage.  


I masked the sides of the fuselage to protect the 76 and the RLM 75 grey topside colour was then sprayed on the horizontal surfaces and left to harden. Then I cut rectangles from white 120-gsm cardstock large enough to cover each area of the grey to be protected. The card pieces were laid onto the wings and tail, fuselage and nose, and the shape was roughly drawn on in pencil, then cut out with small scissors. At this point it's worth noting that Hasegawa "kicked" the grey/green pattern on the left wing: reverse them, grey areas for green areas, to get the historically correct pattern. I kept the positive and negative area masks for the fuselage sides as I was pretty sure I would need both. 


 Above: The card masks were attached loosely to the model with rolled out strips of blu-tac (the same stuff as you use to put up posters) and then extra bits of tape were used to link them together where necessary. With the fuselage sides masked I went on to spray the 75 on the upper parts:  


The three masks crossing the fuselage crest were made on the fly, matching with the horizontal masks already in place:  


Lastly the RLM 83 green was sprayed overall, and when dry the masks were carefully removed. 


The blu-tac develops considerable grab, so it’s important to remove it carefully. The mask crossing the canopy was so firmly attached that it pulled the canopy right off, so it will be reattached in the final round of work. A soft eraser removes some slight residue remaining on the paint. From this point I touched up as necessary, including applying the negative masks to protect the camo on the upper parts of the fuselage, so I could touch up over some overspray darkening the 76, 


then I removed those masks once more, revealing the virtually complete paintjob:  


The definition between the colours could have been softer, I thought, to be more clearly soft-masked rather than hard-masked, but overall I’m very pleased with the result. While labour-intensive, it was a lot less traumatic than trying for fineline airbrush effects can often be. Now, onto the small details and the decals!