Showing posts with label soft masking. Show all posts

Saturday, November 17, 2018

Building Bigger


Sometimes, with the pressure of one's daily obligations, a piece of work can be produced and clean forgotten. Below is a model build-up feature I wrote years ago, and even then it was a retrospective on a project which had not been documented at time of actual completion. I was browsing for some information in old articles and came across the text, so figured it was high time this one saw the light of day!
_________________________________

As I’ve ruefully mentioned before on this blog, some modellers build bigger as they get older simply because they can’t see the small ones anymore. That’s very true for me, yet I haven’t built large scale planes since I was a kid – in fact I’ve only done one 1:32 aircraft in modern times. My previous was 34 (now 36!) years ago!


In 2014 I tackled Hasegawa’s big scale Fw 190 A-8 and had a great deal of fun with it. There were one or two hassles – the fit of the engine cowling to the fuselage left a lot to be desired and was a tough contour to fill and sand but that was about the only structural difficulty. The decal sheet was a let-down – I had selected Hans Dortenmann’s Red 1 and as with so many Luftwaffe aircraft the markings and the camouflage scheme particulars go hand in hand. It was bad news when it turned out the sheet was unserviceable, as the paintwork was fully finished. Patching the markings together from AM sheets would have been a $60 job (three sheets required). Fortunately a friend in Europe had the same kit and was doing it in different markings and sent me his sheet, which worked perfectly.


It’s a big, beautiful bird, and at this scale the problems of airbrush mottling are minimised – overspray can still be an issue but the battle for fineness seems less acute. The cockpit was easy to detail, and the 1:32 etched harness was incredibly realistic. The outer pair of canon barrels is missing – by the time I was done I was more than slightly browned off with Hasegawa’s engineering choice to simply scab them onto the exterior as optional bits, as my confidence to get them lined up in both axes while glue dried was in negative numbers, so she’s a slightly odd-looking A-8 here. Better that than make a mess after so much work had been invested…


I didn’t weather this one heavily – weathering is a skill mated t0 scale and one must learn to use a heavier hand as scale increases. I’m not comfortable with really laying on filth so this bird is in very well-maintained condition – which they must have been at least some of the time.

So why so few models in this scale? Simple, somewhere to put them. You can store four, even six, 1:72nd scale models in the same area as the “footprint” of a 1:32nd scale project, and you very quickly fill display cases with the big guys. I have plenty of models in this scale and would like plenty more, but until the day comes I have some sort of storage designed to receive them – shelves of the appropriate depth and at a spacing which does not waste cubic volume with empty air – I fear I’ll have to leave them where they are, buried deep in the stash.


There’s also a lot of work in a big model, even if it’s structurally no more complicated. It certainly uses a lot more paint, you’re aware of your running supplies being used more quickly. But that’s par for the course, I can only imagine the investment in time and materials the ship guys go to when they’re building the new Trumpeter 1:200th scale battleships. Now there’s a project to conjure with – it gives a whole new meaning to the term “big scale.” It is to ships what 1:16th scale is to armour or 1:24th scale to planes.

Hmmm, that reminds me, I have an Airfix 1:24th scale Harrier hiding away in the stash. After more than forty years since the basic tooling came out it might be high time it got the full treatment… If only I had somewhere to put it!


Friday, July 31, 2009

Hasegawa Bf 109 K-4: Soft-Masking the Camouflage


The Hasegawa K-4 has certainly been gestating a long time, what with professional commitments and a month’s jury service, but she’s on the last lap now. I just completed the paintwork and for the first time I’ve tried the technique of soft-masking.

The late-war German camouflage patterns were a simplified, time-saving exercise. Gone were the masked, hard-edge patterns from the early war years, replaced with free-handed patterns on the horizontal surfaces and ever more complex freehand disruptive schemes on the fuselage sides. The challenge here is to reproduce that scheme with smooth graduations between the colours at a resolution which is a fair scale representation of the feather of the original sprayguns. There are many approaches, and while you can change down to a fineline tip and needle on your airbrush, and adjust the thinning ratio of the paint and the pressure delivery to the AB, these techniques take a lot of mastering. Soft-masking leaves the paint operation alone and addresses the problem directly on the model.

The idea is to mask the camo but support the masks clear of the surface by around an eighth of an inch, so that the cloud of paint passing the edge lands on the surface in a tight but still diffuse edge, creating a resolution often difficult by regular means. The first step is to prepare the paint scheme: 


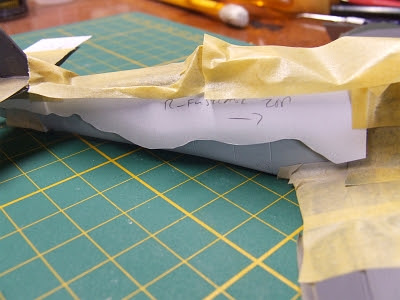
 I sprayed the underside LM 76 first, and when that was thoroughly dry I masked the edges of the flying surfaces, including the wavy-edge demarcation at the leading edge, using Tamiya tape. The card masks are photographed with the model at this stage.  


I masked the sides of the fuselage to protect the 76 and the RLM 75 grey topside colour was then sprayed on the horizontal surfaces and left to harden. Then I cut rectangles from white 120-gsm cardstock large enough to cover each area of the grey to be protected. The card pieces were laid onto the wings and tail, fuselage and nose, and the shape was roughly drawn on in pencil, then cut out with small scissors. At this point it's worth noting that Hasegawa "kicked" the grey/green pattern on the left wing: reverse them, grey areas for green areas, to get the historically correct pattern. I kept the positive and negative area masks for the fuselage sides as I was pretty sure I would need both. 


 Above: The card masks were attached loosely to the model with rolled out strips of blu-tac (the same stuff as you use to put up posters) and then extra bits of tape were used to link them together where necessary. With the fuselage sides masked I went on to spray the 75 on the upper parts:  


The three masks crossing the fuselage crest were made on the fly, matching with the horizontal masks already in place:  


Lastly the RLM 83 green was sprayed overall, and when dry the masks were carefully removed. 


The blu-tac develops considerable grab, so it’s important to remove it carefully. The mask crossing the canopy was so firmly attached that it pulled the canopy right off, so it will be reattached in the final round of work. A soft eraser removes some slight residue remaining on the paint. From this point I touched up as necessary, including applying the negative masks to protect the camo on the upper parts of the fuselage, so I could touch up over some overspray darkening the 76, 


then I removed those masks once more, revealing the virtually complete paintjob:  


The definition between the colours could have been softer, I thought, to be more clearly soft-masked rather than hard-masked, but overall I’m very pleased with the result. While labour-intensive, it was a lot less traumatic than trying for fineline airbrush effects can often be. Now, onto the small details and the decals!