Showing posts with label Airfix. Show all posts

Wednesday, January 23, 2019

Recently Completed: Airfix 1:72 P-51D Mustang (A01004A)


This is the “8th Air Force” edition of Airfix’s new-tool Mustang kit, featuring markings for one of the famous “Blue-Nosed Bastards of Bodney.” Structurally it’s the same kit I built in 2014 and 2018. No luck with the joystick this time, and the radio mast is scratch built as always. I used SAC whitemetal landing gear as a matter of course.


I used Model Master Acryl Interior Green for the first time, and sprayed a shade to represent the plywood cockpit floor as well, something of a first for a detail seen so little (I generally do the canopy closed.) The “Bodney blue” was straight Tamiya XF-8, glossed with Microscale clear, maybe a touch too dark, but fairly close – closer than the Humbrol “French Blue” which is recommended in the plans.


I used the same graphite weathering technique as last time to vary the panel shades of the natural metal finish. It may not be perfect but it’s not bad and it’s certainly quick – an hour’s gentle masking and brushing with powdered 6B lead and the job was done. It also avoids the possibility of firmer masking pulling up previous paint or of anything going wrong with a second application of paint, if varying the metallic with a mixed shade.

The canopy was masked from scratch using Tamiya tape and Gunze fluid, which worked brilliantly on the main hood but on the windscreen it pulled the paint off the narrow struts. I rectified this by making strip decal with clear film – spraying interior green, then blue, then clear, and cutting fine strips with my Chopper II guillotine.


Speaking of the windscreen, the part does not fit as snugly as it might – you can have it tight into the lower curve on one side or the other but not both unless using a hot glue to make it grab before you release the seating pressure – but that will craze the plastic. I used white glue as a gap-filler on the left, which was not terribly successful.

It’s been observed that the drop-tanks in this kit are not very good, certainly they lack the prominent median ridge of the real thing, and I left them off this build, though I might transplant the better-detailed tanks from an Academy bird, if practical.


I love how the finished model feels “busy” to the eye. Consider the left fuselage side – the basic metallic, selectively darkened with graphite, then overlaid with clear, accented panel lines and the decals, all pulled together with final clear – there’s a lot going on to catch the eye in a very small space. The same goes for the wings – technically they should be a uniform aluminium shade and the panel lines should be filled and smoothed, as they were on the original, but it would make for an awfully plain display. This is where artistic license gets in the way of historical accuracy.


This kit was assembled before the end of 2018 but I knew there was no way I could get it finished in time to include it in last year’s tally. Painting was a fairly straight forward process but included one or two backtracks, all of which cost time. I have three more of this edition, plus a couple of other editions of the kit, and look forward to adding to my Mustang line-up in future.

Cheers, Mike Adamson


Monday, December 31, 2018

Recently Completed: Airfix 1:72 Hawker Typhoon Mk. Ib (A02041).


This is the first Typhoon I have ever done (though there was a Matchbox 1:72 Tempest II back in the 80s). Tooled in 2013, this kit looks very nice in the box, and as a Series 2 kit comes on four sprues and with two decal options. I had intended to do the more colourful scheme with invasion stripes, but didn’t trust such large decals not to pose grab and alignment problems that might result in tearing; plus I wanted to get this one off the bench before New Year and wasn’t in the market for surprises, or for backing up and painting the stripes.

Another good-looking addition to Airfix’s stable of British aviation in miniature, the model’s pleasing lines conceal a few challenges. I got the feeling Airfix somewhat over-thought the engineering in this kit, especially in the way the cockpit interior locates, and the cockpit floor/wheelwells part, which demands a certain order of assembly and unavoidably introduces the potential for misalignment. Fit problems I found inevitable, steps at the wingroot being the most serious, though gaps manifested on the horizontal tails too: whiteglue to the rescue. I expected the keyed landing gear to be out of alignment also, but surprisingly it was not – the wheels are flattened and bulged, and keyed to the struts, and once the model is “up on its feet” the flat spots are firmly to the ground. Assembly took a little time, and there was plenty of prepainting to do, between the prominent radiator/carburettor intake assembly, the cockpit and surrounds, landing gear, bay doors and propeller assembly.


Overall, though, the model looks the part, and once it was together the finishing techniques flowed along well enough. I used Tamiya’s accurised RAF late-WWII shades (XF-81, -82 and -83) topped with Microscale clears and Florey panel wash, finished with oil wash weathering and Mig pigments. I used the Eduard mask set for the canopy and wheels, and the AML masks for the Type A camo scheme. The set includes an extra sheet of straight strips doubtless intended for painting the invasion stripes.

The best part of the kit was the decals, they were superb and pulled into surface detail even before MicroSet was applied. Very thin, they grabbed a bit quickly, but are of solid tone, fully in-register, and seem especially accurate. They behaved much better than the sheet in the Spitfire I finished last, indeed I completed all decals, with the exception of the leading edge yellow stripes, in a single day of work.


Criticisms? The small antenna on the underside of the fuselage did not fit its locator hole – I fiddled and fumbled with it for a good twenty minutes, most of which was involved in getting hold of the tiny component, over and over and over, while applying a file to the base until it actually dropped into the receiver. The tailwheel is moulded as one part and must be seated before the fuselage is closed, which ups the odds of damage during handling and makes painting the unit a matter of a small brush and prayer. When the propeller is finally installed, the mounting calls for a cylindrical unit to be inserted between four moulded guides which “tension” it into place – why so complicated? The fuselage aperture had to be filed to accommodate the outer ring of the cylinder, and when it slid home it became apparent the outer diameter of the fuselage mouldings is larger than the outside diameter of the spinner backplate, leaving a strip of unpainted plastic exposed – yet with the prop now quite firmly in place there seems no way to tease it free again to paint the strip. Chancing getting camo green on the satin black spinner is not a risk I’m willing to take at the very finish, so it stands as-is, and angle of view will hopefully conceal the flaw for the moist part.


I have another of these, in the “Dogfight Doubles” edition with Pips Priller’s FW 190 (an unusual combination, as the Tiffie found its forté as a ground attack plane and probably never tangled with a 190, at least not on purpose) but it may be a few years before I welcome going 15 rounds with this kit again. There are some lessons learned here, of course, such as leaving the main gear bay doors off until after the struts are in place, which would make it easier to keep the doors aligned and not “toed-in” a bit.

Enjoyable? It’s always nice to see a project come together, but I would have to say I was happy to see this one leave the bench in the end. Maybe the shake’n’bake kits have somewhat spoiled me, but I had hoped for better alignment. Recommended nevertheless, to those with a little experience under their belts.


Saturday, August 25, 2018

Mustang in Blue Diamonds


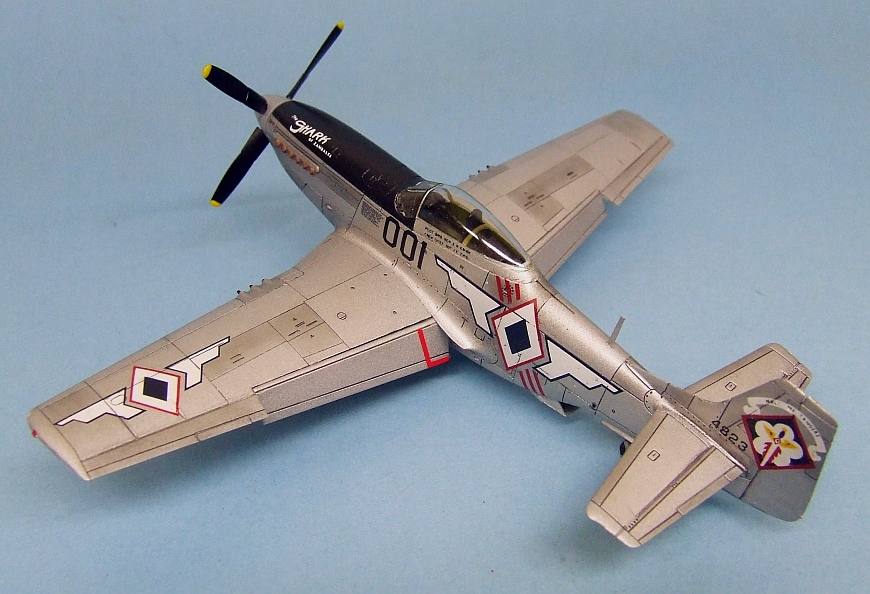
Earlier this year I completed Airfix’s 1:72 P-51D Mustang (A01004). This is the same kit I built around 2014, same original issue, though the kit has been boxed several times now with fresh marking options. This time I learned from my errors and did not try to include photoetched harness, though I succeeded in installing both joystick and radio mast unbroken. It remains to be seen if I can do that trick twice.

I have long wanted to do the varied post-war schemes and an old Superscale sheet (72-149) features the markings of the Philippine Air Force, who used Mustangs between the late ’40 and late ‘50s. The most famous of these was “Shark of Zambales,” the personal mount of the commanding general of the arm, B. N. Ebuen, and which has been the subject of numerous restorations over the years, including a standing display at the PAF museum at Villamor Airbase. Superscale included markings for a very particular phase in the original’s career, as the markings seem to differ in detail from one photograph to the next. Prolific aviation artist Gaetan Marie (check out his page here) has painted three different schemes worn by this aircraft, varying by the size, shape and colour of the shark-mouth, the scroll over the tail marking, spinner decoration, etc. and Superscale seem to have based their rendition on a single B&W photograph in which I am not prepared to swear the shark-mouth was actually applied. Angle and the nature of the filmstock make it dubious, but what’s not dubious is the unlikelihood of me applying the decals perfectly, so I left them on the sheet. I can always apply them in future if I feel justified.


The sheet must be over twenty years old and worked beautifully, I find myself thinking I’ll still be using decals from my stash decades hence, and they’ll still work as well as ever!


Another important factor, this is my first natural metal scheme in many years, as I have had the greatest difficulty in achieving a credible finish. I used Tamiya flat aluminium acrylic, overworked with 6B pencil graphite to vary the tonal values, then topcoated with Micro Satin for lustre. It feels quite good and I look forward to trying this technique again.


The landing gear of the Airfix kit is its only real disappointment – the plastic is soft and the main gear legs are irretrievably warped right on the sprue. The first time I built the kit I overlooked the problem and photographed it from angles that hid the gear, but this time I just couldn’t. I picked up the white metal replacement set from Scale Aircraft Conversions, beautiful castings in strong metal, absolutely straight, and they even supply two sets in the box so the next Airfix Mustang will get them too.


This bird came out very nicely and I look forward to adding more to my line-up – I recently picked up decal sets for postwar ANG birds and third world users, plus the Airfix edition with decals for Grenada, 1983, the last user of Mustangs in a combat role. I should think I’ll develop a long line of P-51Ds based on this kit and the ocean of decals I’ve collected over the years.


Wednesday, December 27, 2017

A Lifetime Since My Last Skyhawk


The Airfix 1:72 A-4B Skywawk (A03029) is the first Skyhawk I’ve done since I was a kid – and that one, some 44 years ago, was also an Airfix, the ancient-tool original! I’ve wanted to add those classic Douglas lines to my display case for a long time, and the new Airfix seemed an inexpensive place to start.


This is a nice kit to put together for the most part, but can bite you here and there. Alignment is generally fine but there were gaps at the wingroots and intakes. The former I dressed using white glue and capillary action, which seemed to work quite well, while the latter received traditional filler, though the repair is by no means invisible. The canopy fit is fair but can wander around in terms of seating the windscreen, while the main hood is too deep – it stands high at the rear hinges, as if designed to be displayed in the open position. There are delicate and fiddly parts, the landing gear especially, and I had to take a few days break to let my frustration settle down before resuming the job. The secondary strut on the nose gear snapped on the sprue and was simply omitted, in the interests of sanity.


Paintwork is MM Acryl Gull Gray over Tammy flat white, with Microscale Satin for the lustre. The decals are very good, but large ones grabbed very fast, resulting in the loss of one of the large NAVY titles – I’ll replace it next time I do one of these kits. Areas where multiple markings lie close together are served by single decals, which is a good idea, except that with the grab of these thin, lovely printings I dare not even try them – I cut away the modex numbers from the front insignia and applied them separately. The same would likely work for the rear flank decals – separate the elements and maybe they’ll slip better.


There are a number of omissions in this build – mine, more then the company’s. There is no decal for the “barbershop pole” effect on the arrester hook, and after attempting to cannibalise strip decal, which shattered at the first attempt, I dropped the hook into the receiver without glue so I can come back to it at a later date if the means comes to hand. Likewise the red edges of the gear bay doors are ignored – way too hard to freehand paint and I’ll need strip decals of some sort (reliable ones…) before I try. The intake warning markings are painted freehand around the curve (the sheet provides straight decals for them, which must be some sort of hobby company joke), and masking the correct narrower area for brush painting simply did not work. So it was brushed up to the adjoining panel line, and that was as good as it was going to get.


I’m more or less amazed that the landing gear is actually strong enough to hold the model up, but it seems to be. I had visions of its collapsing once the tanks were on, but superglue seems to have pinned everything up well enough. The Eduard masks for the canopy were their usual breeze to use, and their usual frustration when they pulled up both paint and decals as they came off. There are times I wonder why I bother to use them when the result is so shoddy -- then I imagine trying to hand paint canopy struts and I remember why.

Overall, a good model that looks the part on the shelf, but I’m reminded yet again that 1:72nd scale is a real trial, and I prefer 1:48th – so long as there’s somewhere to put the finished article. While doing this one I had the urge to grab a late-tool F-16 in the larger scale and just do it, but sense prevailed. Until that fabled new display case puts in an appearance, I must restrain my urge to build bigger!

Cheers, Mike


Friday, August 28, 2009

Big Models for the Big Boys


 No, I don’t mean radio control. I don’t mean those two-stroke motors that seem to be revving at ear-splitting volume in hobby shops every time you go in to find that bottle of paint you need, and I don’t mean the endless shock absorbers, steering gear and offroad tyres that seem to take forever for shop staff to sort out for the people permanently in line ahead, hogging the counter... I’ve nothing against RC, really -- but that’s another post!

No, I mean BIG MODELS. That Dragon or Trumpeter 1:35 Leopold railway gun. Italeri’s new 1:35th scale German Schenllboot. Andrea’s gigantic 1:32nd scale U-boat. Revell’s old B-1 bomber in 1:48th scale. Monogram’s classic 1:72nd scale B-36. Airfix’s 1:24th scale Harrier. Heller’s 1:100th scale sailing ships. And so on...  


 Is it the mystique of the very large that attracts us? Is it the possibility of acres of minute detail? Is it the childlike thought of having a bigger one than the next modeller? Or is it that some subjects just can’t be done justice to any smaller? The state of modern tooling suggests 1:48th scale is a good benchmark for realism, incorporating a fair detail resolution against the real thing and a general simplicity of construction, so demanding bigger is not necessarily the answer (though consider the detail found on Tamiya’s F-4s in 1:32nd scale... Bigger sometimes is just plain better).

There’s the status aspect. Bigger models are more expensive, and modellers at both an advanced skill level and approaching the rollover time of life are a major part of the target demograph that can actually afford them. (“Do we have to go on that cruise next winter, Martha? I had a hankering for Trumpeter’s 1:16th scale King Tiger...” After which the hobbyist probably slept on the couch.)  


 But what about really big: those limited-edition monsters that sometimes appear. Of course, I’m thinking about the 80cm K(E), the Dora, the biggest gun ever fired in anger. It first appeared at European toy fairs about four years ago, a 1:35th scale kit initially researched and designed by Heller IIRC, but after the demise of the company it was taken over (if I’m understanding correctly) by an independent firm, and molded in a limited edition of 1000 copies, in China. As a $1000 kit, that’s a million dollars turnover in one property, though it has been permanently discounted to US$700 for the last two years or so. At the present exchange rate, that’s nearly a grand in Australian money. It would take a seriously dedicated hobbyist to square away the funds for that (though to be fair, the cost is still significantly lower than Tamiya’s RC tanks and trucks. In England there is a hobby finance company that loans out funds against them as if you were buying basic transport to get to work.) That brings to mind Tamiya’s RC Tiger 1 and the costs involved, over $1500 Australian some years ago. I remember casting an eye on it longingly and my sister saying “you’ll look ridiculous driving to work in that on Monday.” The implication being you could buy a car for that price.  


 But does larger scale really mean more detail? It means a different feel, that’s for sure. Compare tanks in 1:72nd, 1:35th and 1:16th scales. Between the first two scales there is a wealth of difference, and it takes a surgeon’s hands to make a 72 -- they don’t call it Braille Scale for nothing -- really look the part. It can be done, there are brilliant mini-masterpieces out there, and better kits than ever before to work with. But 35 seems to be the charm, the perfect balance point at which the techniques that come naturally to hand find their best and simplest expression. Academy have those big 25th scale Panthers and Jagdpanthers, and Tamiya have just reissued their 1:25th scale Tiger and Chieftain, for the first time in something like thirty years (SF modellers will be rubbing their hands as the latter has been fetching US$60 on eBay and is needed for some studio replicas). The AM guys must have thrown prayers of thanks skyward when these kits were re-released, the accessory sets are already hitting the market… 1:16th scale is a new situation completely, in which the delicacy of touch one evolves for 35th generates effects that are almost invisible at a normal viewing distance: one must learn to weather with a broader brush, a heavier hand.

In the end, perhaps it is personal choice, as with every aspect of the hobby. The lifetime 1:72nd scale aircraft builder will fit a lot more of them into a display case than the ship modeller who builds at 1:96th, and the armour modeller who prefers Braille Scale will have far more space and funds than the 1:35th scale builder, but these are practical matters, and the aesthetic of the thing probably ultimately commands the decision. We like what we like, and that’s the end of it. There’s a certain undeniable fascination to palm-top Panzers, but part of me has a hard time taking them seriously.  


 Of course, it could be simpler... It could be that we start out affording small models and fill shelves with them, and they gradually get bigger as we get older, in proportion to the thickness of our glasses. By the time we retire our eyesight is so shot we have to build the big ones: we have no choice, we just can’t see the teensy ones anymore! Okay, extracting tongue from cheek... Normal service resumes next post!


I have the Harrier in my stash and would have photographed those huge parts but it's in a carton on the bottom and I didn't fancy excavating down to find it...

Wednesday, July 1, 2009

The Very First Kit


Can you remember your first kit? Can you remember where and when it came to you, and what it was that drew you to the hobby in the first place?

I was five years old the first time I saw plastic kits and understood them for what they were. Airfix Series 1 bagged kits, in a window display at the newsagent at the end of my street. I remember my dad taking me to the shop on a Sunday morning and buying me an Airfix Tiger Moth. He built it for me as I watched, rapt, and by the end of the day there was a bright yellow (it was molded in trainer yellow in those days) biplane for me. I was fascinated, and wanted more!

The following week was the same pattern, and the Airfix Bristol Fighter joined the Tiger Moth. And in the weeks after, each Sunday morning brought a new shape in plastic: the Westland Whirlwind was one, the Gloster Gladiator another, and the F-5A was the first jet in the collection, as well as the first kit where I was sufficiently inspired to try my own hand and help out on the building. I think the Me 262 was one of them also.

A child’s nimble brain is way ahead of his or her dexterity in relating the shapes and how they go together, and there is always a lot of frustration in getting from A to B—A being the fresh kit and an idea in mind of what the product should look like, and B being the actual result. But I do remember my family never stinting their praise for my efforts, no matter how far I had to go to perfect the skills involved. As a child I was more interested in quantity than quality, and production-lined models through at an amazing speed, without giving a thought to accuracy or moving beyond the limitations of the kit, but these things developed automatically as the years went by.

I still have a fondness for that so-simple Airfix Tiger Moth, and Roy Cross’s classic box art. I have it in my stash (that's the box top of the current issue above), and one day I’ll do the best job on it I possibly can, including rigging and maybe score out the control surfaces and reposition them. There’s only so much you can do with 25 parts, but as with the generation of RAF pilots who began their flying career in De Havilland’s classic trainer, this aircraft, and this particular kit, will always mean the beginning of the road to me.