Showing posts with label 1:35. Show all posts

Wednesday, December 25, 2024

Tamiya Leopard 1A4: Like Going Home


I’ve neglected this blog for far too long, and have been so busy in recent years with my writing career that modelling has taken a back seat. I've completed only two models this year (though worked on at least five others), the first being the Dragon 1:72 Jagdtiger I posted about six months ago. Recently I got to build one that’s been on my to-do list for many years, Tamiya’s 1979 35th scale tooling of the West German Leopard 1A4 (35112).

The Leopard 1 is still in service in 2025 with some sixteen armies around the world, with new upgrades on offer from many firms, so it’s far from a period piece, despite Australia having retired our Leos in favour of reconditioned M1A1s (not a universally popular decision) many years ago.

Okay, Meng’s much newer kit is far superior, but it’s also correspondingly expensive, and I do enjoy vintage Tamiya for its own sake. The kit is straight-forward though there are one or two bits that can bite you if you’re unwary. Construction follows the standard Tamaya pattern, running gear being suggested to be assembled first, though the wheels form a subset that can be built and detailed separately from the rest and added late in the process if you work that way—I do, as it happens. Upper and lower hulls are large single piece toolings, dressed with smaller parts.


The drive wheels housings are compromised by the kit sharing tooling with the popular early motorised version. I say compromised, they are inherently weak and need to take a lot of force when the tracks are joined and tension thus comes into play. This has never been a problem, however, with superglue making a suitably strong bond.

When I began this project it felt like going home. Muscle memory would just about build it, especially as I built the Flakpanzer Gepard AA tank version back in the 90s, about my third armour kit ever. Construction proceeded without much difficulty, though there were details I wish I'd spotted. The co-axial MG in the turret is not moulded as a proper gun barrel, merely a protruding rounded shape, and I could have at least drilled out the port for appearances.

The tracks took a lot of work. One thinks that one-piece vinyls should be child's play, and they are, but the detail is very repetitious. There are 672 rubber pads—that’s four per link times 84 links per track times two. After a sprayed base coat of rust/dirt browns, every single pad was brush painted rubber black (Tamiya XF-85) by hand, rather a daunting proposition. They were then treated with a Tamiya dark brown weathering wash to create depth, and oversprayed with an ultra-thin glaze of buff (two drops to forty drops of thinner) to create a dust coat. Lastly they got a few touches of MiG powder pigment to suggest fresher rust here and there, and the guide horns were drybrushed metallic. For all this effort, the effect doesn’t really show up in pictures—I might as well have not bothered... Fully half of each track is also behind the side skirts, so I could have detailed only the middle part and saved the effort!


The wheels were masked with a combination of rubber solution and disc stickers, then sprayed rubber black for the tires. I used the template method for the faces of the wheels, a 15mm circle template fitted nicely.

The main paintwork was a mixed shade for German Army Gelbolive, a formula I found at Armorama. XF-51 Khaki Green plus XF-57 Buff plus XF-74 Japanese Olive at a ratio of 4:1:2. This seems a very good match for the original. I made a batch darker with the addition of some black as a shade coat for the underside and behind the running gear, then another batch lightened with extra buff as a fade coat to mottle/pattern the upper surfaces. With all this done, I sealed the surface with Micro Flat. Where the decals would go I splashed with Micro Satin to bring up the lustre and improve adhesion, then resealed with flat over the decals once applied.

The kit decals were quite old but worked very well indeed. They took a while to part from the backing sheet, but snugged down surprisingly well and their finish was very close to that of the paint. They were slightly out of register, so when it came to the crosses, I took some from a Supercsale sheet that were within half a millimetre of the correct size, and these, surprisingly, were glossier and needed more attention to blend in.


The pioneer tools were a fair job in their own right, with a sprayed metallic, brush painted wood tone and hull colour on the clamps, Micro Flat over the hull colour areas, brown oil wash to create a patina on the metal and a darkening effect on the wood.

Finishing techniques included Flory wash in the engraved detail, MiG pigments for dust and rust, and drybrushed metallic for abraded areas, plus the usual suite of oil techniques, being dirt spots and chipping, edge profiling and rust streaks.

I had the advantage of a research source showing the very same vehicle as the kit depicts—a 1984 partwork whose first issue featured a centre spread of the Leo by the talented Kieth Fretwell. On reflection, the kit might have actually guided the illustration, which even shows the wading -kit tower on the commander’s hatch, which is included in the kit as optional parts! I did not bother rigging a radio antenna, as photographs are quite contradictory. Many Leos are photographed without radio masts at all, others have stub antennas only. If I get a definitive source on this I can always add it later.


The Leo looks good, was a fun build—I wish I could have spent a little longer on it: I could have caught some problems before they happened. But it’s a good addition to the modern armour collection. I look forward to doing Revell’s Marder IFV in the same scale, using the same pre-NATO-camo Gelbolive.

If and when I replace my studio lights, I’ll take better photos.

Thanks for looking,


Mike


Saturday, February 25, 2012

Kit Review: Academy’s M51 Isherman (#1373)


When Academy learned their craft and got over the period when they pirated Tamiya’s range to flesh out their own (no, I will never forget or forgive that…) their inherent quality really began to shine. This kit was tooled in 1997 and shows up very nicely even now. Dragon tooled this subject, then retooled their kit (doubtless with typically Dragon over-thought engineering) and Tamiya have just issued an Isherman, probably with typically Tamiya simplified construction and great attention to detail. By and large, these models all look pretty similar when lined up – you need to be an M51 expert to pick the differences and know what they mean, and that means the older kit stands up well.


I pursued this model in subassemblies, building everything I possibly could before being obliged to move on to the main sections. Cans, stowage bin, suspension units, the turret, the engine deck and final drives were all made up long in advance, so when I came to drop the model together it was pretty much as simple as that. About two days work and she was ready for paint. There are minimal fit issues, the junction between the transmission cover and main hull at the front needed some filler, and the gap under the gun mantlet is a bit dubious (the canvas shroud behind the mantlet is perhaps the poorest part of the model and needs some pushing and pulling to get an even acceptable fit, plus there are no alignment guides at all and your down to the sticking power of glue to get it to hang together).

Options include open hatches and raised or lowered periscopes, choice of drive sprockets and stowage units, and the option of spare track on the turret sides, all of which go together for an early (Six Day War) Isherman or a late (Yom Kippur) vehicle. I built the latter.


Other than the points above, the kit did not fight me. The suspension units need filing carefully to line up level, if you stick them on as-is they will all sit up sharply at the front, which will look decidedly odd. But that’s what files are for, and while one might grumble that Tamiya’s HVSS subassemblies will probably assume their perfect alignment naturally, it really was not much of a modification to get these to line up, and the detail on the completed eight-part bogie units is excellent, even including foundry casting numbers. Suitably wash weathered, they provide an amazing visual texture when the Sherman’s twenty wheels per side (including drives, idlers and return rollers) are all lined up.

I mixed Tamiya Acrylics for the paintwork. I had obtained Model Master Acryl Israeli Sand, but cannot imagine where Testors got their research data for this paint. I have seen models finished in it and they look the least representational of the replicas out there on the net; they certainly don’t resemble either the Shermans in the museum at Latrun or colour photos of Shermans in service. The Acryl is a satin finish mustard yellow which by no definition could agree with the name “Sinai Grey.” I used the ratios published by IDF Modeling to mix a shade for the October 1973 conflict, being Tamiya XF-20 Light Grey, XF-57 Buff and XF-59 Desert Yellow (1:1:1), and airbrushed it overall, followed by shade and fade coats as usual for a monochrome subject. The result was a very pleasing drab desert scheme, which took weathering with oils and powder pigments very nicely indeed.


Academy’s decals are usually condemned as the worst in any commercial kits but I found these to behave quite well. The only major drawback was their shine, and as I was not planning on using clearcoats on this model I cut the shine by using a stiff brush to grind pigments into the decals, giving the impression of dust over the markings. It was not 100% successful, but visually very pleasing so long as the light does not catch the decals.

The kit provides a good selection of stowage in the form of ammo cans and crates, 105mm shells and an MG tripod, plus kitbags and rolled items such as groundsheets, which painted up very nicely. Unfortunately the kitbags are moulded with open backs which demands they lie against a flat surface, and they are arranged in the box photos in places where there are no tie-downs. Technically they should be hung from the rail around the rear of the turret, but if you do that you will see without much difficulty that they are open at the back. Packing the rear with some sort of putty, sculpting and repainting would fix this, but it was rather more work than I wanted to get into at this point.


A couple of wire radio masts, paint and fit the searchlight, and this beast was done. It’s one of the most textured models I’ve ever built, including an etched quality to the hull surface which suggests the original casting process.

I would recommend this kit to anyone with a few armour models under his or her belt – take it easy and enjoy the build, and don’t let it bite you in a few places!

Friday, December 30, 2011

Kit Review: Tamiya #35156 M1A1 (ODS) MBT


What is there to say about this kit that hasn’t been said before? Probably nothing. But it’s a good one and deserves to be revisited. It’s commonly available and while the accuracy brigade are quick to point out the many flaws (more in the nature of omissions than flaws, really) it builds with typical Tamiya ease straight from the box and the finished model captures the stance and feel of the Abrams.

The M1 Abrams Main Battle Tank is one of a handful of vehicles that seem to have reached a plateau in the development of armour. No new MBT has been designed in America in 33 years, there has been no need because the M1 is largely invulnerable to other tanks, is invariably lethal to them, and after three decades in service is as much an institution as the M16 rifle (which has been around for five). In that time model companies have produced a lot of kits, some better than others, some more buildable than others, but not a single one is 100% accurate, not even Dragon with its patented slide-mould technology. Experts have done the work for the modeller having an attack of AMS (Advanced Modeller Syndrome), you can compare several of the top kits at Vodnik’s site, while a complete list of necessary modifications to accurise any particular kit, assembled by those highly versed in the m1’s anatomy and evolution, can be found here as a downloadable .pdf. On the basis of that .pdf, there are a great many details I overlooked, but I’m not quite so afflicted with AMS that I am up to putting 1:35th scale split-pins and retaining chains on bolts. I can’t build an Abrams without doing at least some superdetailing, and I have done more on this one than previously, around 18 physical additions, plus AM decals and every finishing trick I can think of.


This kit was a retooling of Tamiya’s early-production M1 of 1982, produced about a decade later to reflect vehicles used during Operation Desert Storm in 1991. Basically it is an early generic M1A1, identified as such by the 120mm main gun, revised MRS, main sight, ammo blowout panels and crosswind sensor, smoke grenade stowage boxes, long turret stowage bins, and of course the “bustle rack” for crew gear stowage. The only hull modifications are the NBC environment panel on the port flank (which is missing an important detail) and the cutaway rear panels of the skirt armour.

Assembly is largely based on the 1982 original and the kit falls together as well as it ever did, the only hitch being a tiny mismatch in the upper hull to rear hull joint line, which calls for a bit of finesse and maybe a lick of filler. It’s largely up to you how much superdetailing you want to do, some details are easier than others. Drilling out the solid-moulded towing lugs fore and aft is a no-brainer, and adding missing bolt heads from slivers of styrene rod is another easy one. Relocating the portside grab handle on the forward hull about a scale foot forward to its proper location is another easy one. I also floored the bustle rack with Voyager's photoetched wire mesh part, a distinct improvement on the vinyl mesh supplied in the kit.


Tamiya missed a host of details. The “Z-springs” that tension the hinged forward mudguards are still absent and are easily made from bent spring steel wire. On the NBC panel, a triangular fillet is needed, with a hole drilled to represent the crew heater drain; likewise, the cabin heater intake is missing from the port flank hull and can be made up from a few small pieces of plasticard. On the starboard flank, under the edge of the turret, the bilge pump outlet is missing (only Trumpeter seem to have nailed this detail), and it can be scratched from card and brass tube. A bracket was missed from the hinges of the rear engine bay doors, and some plates and lift lugs too, all easily scratched from cardstock and wire.


A major criticism is the running gear (above), as the return rollers and idler axle detail are entirely spurious. I had been going to rebuild it all, including the track tensioning piston on each side, but realised that it would be wasted effort. This tank has side skirts and not one item I just mentioned is ever going to be seen, so why bother? The T-156 track is not accurate, the guidehorns should be between links rather than centred on them, but, that said, Tamiya’s T-156 track is the most accuarate in any kit, whether vinyl or styrene (according to Vodnik), and the only replacement set is both very expensive and of the dreaded individual link variety, so I was very happy to overlook this point (as discussed in my previous post).


Assembly was largely trouble-free and the most fiddly and frustrating jobs were late in the process. The barrel of the 7.62mm MG was snapped on the sprue, as was one of the tow cables, and they required very delicate repair with cya, and the antennas are fully scratched. The shorter mast I always make from .015” wire, but the heavier, taller mast I make by scraping .035” rod thinner toward one end, then bending it and CA’ing it into place. The tiedown is usually a plaited bungee chord, and for that I used spandex thread (EZ-line, rather simpler than unpicking elastane thread from a pair of nylons, like I did last time I built an Abrams!), twisted repeatedly, and this took three attempts and a large part of an afternoon. Tying knots with tweezers is my least favourite thing (barring L&L tracks…), but it makes a pretty realistic tie-down. The plastic balls on then ends of the masts are made by dipping the tip repeatedly into paint, and the flexible spring-type mounting at the base of the big mast was done with strips of tape, painted metallic. Trumpeter moulded this part properly, and Academy did so, on other subjects; I doubt their Abrams kits feature them as they were cloned from Tamiya’s.

I used Echelon decals which went on without a hitch (but for one which flicked away from the scissors and vanished) and my only criticism is that they are rather glossy. For that reason I held off on a final round of Mig pigments as I’ll see if I can source a decent clear flat to take the shine off the decals first. One task in pigments that came out very nicely was the burned metal on the transom above the exhaust vents (below), accomplished in seconds with two shades, Vietnam Dust and Black Smoke.


To this day Tamiya provide only tiny scraps of clear plastic for the periscopes, a great let down. I replaced them with styrene inserts and painted them all gold to suggest the prismatic tone of the real deal, but I was not very happy with the way they turned out. I would prefer to look for an aftermarket substitute in future.

Overall paintwork was Testor Model Master Acryl #4812 US Army/Marines Gulf War Sand, a non-FS shade originally mixed from available supplies in-theatre. It went on very well indeed, though my surface prep could have been better, I found myself respraying some spots around the front end when masking took the paint straight off. The tracks, as detailed in a separate post, were done with mainly Tamiya Acrylics.


The finished model looks the part and has enough extra detail to satisfy my desire for accuracy without breaking the bank re my bench hours, or my pocketbook. I could go on, but… Who looks under a tank model to know if the hull bottom is accurate? To be fair, the next Abrams I build will be Trumpeter’s HA and one of the Dragon offerings with all kinds of fine detail, including non-slip texturing moulded in: I ignored the necessity this time as there were some –A1s in Desert Storm which had not received the coating when they went to the Persian Gulf, so I can claim at least some accuracy. I’m happy with the model, my first Gulf War armour, and feel this kit, despite its age and legacy of parts from 1982, captures the design well enough to provide a solid basis for superdetailing, while avoiding the fit and assembly issues reported of at least some of the kits which offer superior detail right out of the box.

Tuesday, November 29, 2011

Tracks: A Six-Part Process


It’s been the proverbial age since I last posted, what with completing my PhD, working, and a recent trip to the UK for a conference, but I’m at last back on the bench and have something work talking about.

Tank tracks are an area I’ve discussed on a few occasions, mainly to grumble about link & length and how I detest them. This time I’d like to talk about the finishing techniques that are applicable to all sorts of track approaches.

Building Tamiya’s 1:35 M1A1 (ODS) is a straightforward experience and I superdetailed with 17 corrected or missing detail items (it seems I can’t build an Abrams without adding as many missing details as I can, though I’m nowhere near a full amplification, according to the experts…) The vinyl T-156 tracks are the most accurate of kit offerings but still not correct (the guide horns are centred on the links, when they should straddle the gap between links), but I did not feel like spending the $$ for an AM set, especially as they would be L&L, which I loathe.

Never mind, I can live with the discrepancy. What about making that grey vinyl look like steel that’s been run across a desert?


It turned out to be a six-step process, starting with a base colour (above). I looked at photos of M1s in service and noted the general colour of their tracks, which of course reflects the terrain. I mixed Tamiya Acrylics Buff (XF-57) with NATO Brown (XF-68) and Dark Sea Grey (XF-54) at a ratio of 20:3:3, and coated both sides of the tracks. I tape or pin the tracks to a length of card to control them as I’m doing this.

Step 2 (also above) was the really boring one – paint the track pads and blocks into flat black (XF-1) individually. I used a small, flat sable brush and for once the Tamiya paints behaved themselves reasonably well coming off a brush. The effect does not have to be precise by any means, real tracks are so coated with filth that the point where rubber meets steel is rarely obvious to the naked eye, so I used a near-drybrushing technique across the raised areas, then blocked them in.


An oil wash was the third phase, van Dyke brown suspended in enamel thinner run into all detail areas on both sides, a fairly quick process that created some depth. It’s subtle, but it’s visible above.

The fourth step, also above, was to overspray the tracks with well-thinned Buff (one part paint to three parts thinner, which is 600% over-spec for Tamiya) to simulate dust ground into everything, and which toned down the starkness of the fresh black to a grey-beige which looks pretty good against many service photos.


The job was nearly done by this point. Drybrushing with silver to create bare metal wear on the guidehorns and some external link ends came next, and a light wash here and there of bright rust to add visual interest. Step 6 was MiG Gulf War Sand pigment powder, but that technically would go on overall when everything else on the beast was done, and in the shot above is added to just one part of the right-hand track to demonstrate how it settles into declivities. I called it done at this point and set the tracks aside for later.

Tracks are not difficult to make look good, but it does take a little thought beforehand, and the patience to work through the process when it gets a bit tedious!

Thursday, March 31, 2011

I’m Stunned


I could say I’m disgusted, bemused or distressed, just the same. Even naïve… I read on a net forum last night that there was never a business agreement between Tamiya and Academy…

I flipped through an Academy catalogue in the early 90s and nodded with a certain boredom at the time as I recognised item after item as being Tamiya, 1:350 battleships, tanks I’d already built… I assumed, and of course that’s always a bad thing. It may be something to do with the Western mindset that can’t comprehend thieving on this scale, that twenty years later it comes as an amazement.

The discrepancy I noticed and wrote up last time but one is symptomatic, perhaps. Was it a change instituted to get around some aspect of copyright? Or some mysterious feature added in? Who knows, the only thing for certain is that copyright in Asia, certainly in the late 1980s, was so nebulous a thing that one major company could establish itself by stealing the product line from another. That’s cut-throat…

My respect for Academy just went down a notch, but hopefully their business practice had more integrity once they were up and running. Mr Tamiya must have had some deep discussions with his legal team at the time, but I doubt he ever stooped to stealing back from Academy. (Personally I’m amazed he ever reboxed Italeri and Monogram, the Tamiya name is associated with another class of product.)

The knock-off product certainly was not pantographed, there is none of the characteristic softness. My guess is that laser inferometery was up to the job, and Tamiya sprues were scanned into a 3D model and output through a CAD/CAM process to cut new moulds. This process was in use in the early 90s in film-making, to translate a sculpted miniature into a 3D model, so in industrial terms it might have been around as early as ’87… Switching out the part numbers and rearranging the plan drawings might have instituted just enough difference for them to call it a new kit.

I guess the collector can only shrug and accept a good deal when it comes along. The Academy knock-offs were not much cheaper than their identical cousins, but you can pick them up on eBay for a decent price these days, a fair few dollars less than originals. That StuG is ready for paint, but it will always carry a mental tang, for me, that the Tamiya original does not, and it’s all about the notion of legitimacy.

Monday, March 28, 2011

Kits That Build Themselves (Almost)


Late in 2009 I built Tamiya’s old StuG IV kit (35087) and was delighted with the easy-build characteristics of the 1970s approach to kit engineering. Dragon sophistication had not come into the world, but Dragon over-complexity had also yet to appear, and notions like slide moulding were a technical phantasm. As I’ve mentioned on occasion, while the armour kits of the 70s leave a lot to be desired by modern standards, they also had the virtue of buildability, and before the advent of Dragon, Tamiya’s only real competitiors were Esci/ERTL and odd offerings from Heller, plus the 1:32nd scale range from Monogram and the 1:40th scale series from Revell.

I recently found the urge to build another Tamiya StuG IV, this time the Academy issue of 1987 (from the period when a batch of older Tamiya kits fleshed out their range for market impact before their own product really got rolling). The factory example photographed for the box shows a very attractive fall ’44 ‘Ambush’ scheme complete with blowing leaves, but the markings (for what appears to be the Grossdeutschland Division, going by the helmet motif) are not included. Academy scanned Tamiya’s plans, rearranged the drawings and renumbered the parts, rather a pointless exercise if it was meant to disguise the origins of the kit, all of which rendered the plans confusing in places. I built from Tamiya plans, and referred to the Academy plans merely for part numbers on the rare occasions I couldn’t recognise them instantly.


This is a very simple kit, but its 217 components would have been an impressive total in the 70s. What strikes me about it is how easy the build is. This example fell together in about four sittings, even wasting time I doubt I spent more than five hours from go before I was encountering the need for paint. The moulds were showing their age, some parts needed extra filing and fiddling to get them to line up, some separation lines were pretty heavy, especially in the suspension, but these issues were par for the course in the 70s anyway, and compared to the Dragon StuG III F/8 I’ve had underway since last year, this one built in a blink. The indie-link Ostketten on that one put me off every time I think about them.

One unusual thing, there is a gap about .060” wide between the idler axle components. The rooting of the parts, moulded onto the transom, is supposed to fit against the outer axle parts which are cast with the main tub, but the parts sit back, with a pronounced cutaway. This element does not appear on the original Tamiya kit, I just checked the one in my display case and it’s not there. So did Academy retool and introduce this change for some bizarre reason? The parts do not look soft and ‘blobby’ as they would if they had been three-dimensionally traced with a pantograph. I have Academy’s issue of the Panzer IV H with stand-off armour, originally Tamiya 35057, and this difference does not appear in the transom plate of this essentially identical kit (identical as far as these components are concerned, certainly). Whatever, that left me with gaps where none should be and axle roots that don’t look convincing.


Given that it’s not the easiest part of the vehicle to see, I decided a perfect fix was not required, and sufficed to shim the gap with a sliver of 4.8mm tubing to create a mechanical illusion of completeness. A proper fix would have been to shim it with sheet plastic and carve the plastic to match the structures adjoining, and this would have been possible before assembly, but that much knife and file work when there are finished structures in close proximity seemed like asking for trouble. This is a simple build, I want it finished, not living on my bench. Filling in the slots behind the axle mounts with strip plastic was also a simple enough process, and created the impression once again of mechanical detail, barely-seen.

Modelling is meant to be about fun, and the simplicity of the engineering lends itself to prompt assembly while the age of the moulds inescapably exercises the skill muscles to compensate. In that much, it’s a good mix. The artistic muscles come next: I’ve never done an ‘Ambush’ scheme before, and have not dialled the airbrush down for tight soft-edge freehand spraying in two or three years. Maybe it’s time to give that technique a whirl again.

Friday, February 18, 2011

Doing It (Not So) Tough


I had thought that I would be calling this “Doing It Tough,” but in the end it wasn’t that hard. I bought Italeri’s M110 SP Howitzer (#291) on sale from Squadron probably 12 years ago, certainly not less than ten, and had a go at a few parts many years ago. It ended up back in the stash because I had nowhere to store a finished model at that time.

I seem to be enjoying a run of completions on old projects lately, and there are a few more to come. This one took a fair bit of effort but nothing out of the ordinary, and a few concessions to the kit’s failings as well as acknowledging my own skills and where they were either not adequate or where I was unwilling to invest the time, eyesight and elbow-grease to achieve that extra standard of realism that is the grail of the hobby.

Italeri comes in for some flak, and not without reason, but that doesn’t mean all their kits can be pigeonholed easily. In recent years their packaging and breadth of subject matter have been impressive, as have their claims to realism and accuracy. Older kits suffer the same maladies no matter what company one considers, and, as with Hobbycraft and early Dragon, Italeri’s kits are best assessed on a one by one basis. Verlinden produced a conversion set (#423) to build the early (short barrel) A1 or late (long barrel) A2, plus stowage boxes, to be mounted on the recoil spade, that Italeri did not include.


The M110 is dated 1996, but the molds may perhaps be older. Certainly the chassis is in common with the M107 which appeared in a couple of editions from the same firm in the 90s. The parts breakdown is fairly normal, though the large number of small parts can be off-putting for some. Here and there were structures that were never going to work, such as the shell trays on the recoil spade bearers: there is insufficient room between their swivel points and the rear of the hull to fit them in their standard orientation.


Construction was generally straight forward, the dark green plastic reacted well to glue and worked well when I dressed the long seams of the barrel with adzed superglue and filler. There were many small, fiddly parts around the gun cradle and tail end, and the instructions were not terribly clear, the illustrations drawn rather small and difficult to see, so that things that should have been obvious were mysteries almost to the finish.

That said, the model went together in an entirely normal fashion. The gun swivel dropped in the same way as a tank turret but the tolerances were very close, even with the surfaces masked to preserve plastic-to-plastic sliding contact they needed filing a bit to get them to seat properly after painting. The small parts, handles and projections, were quite fragile, one had to be repaired twice.


The installation of the drive wheels was not engineered in a foolproof way and I ended up with one frozen in position. That’s no biggie, it’s not as if the tracks are ever going to roll, but having them mobile during track installation eases things. The tracks themselves were well-detailed both sides and took paint well. Italeri tracks are often criticised for lacking detail and being too stiff, but these were quite acceptable, though of course, like any vinyls, are never going to lie down along the top of the roadwheels like the tracks on the real thing. Perhaps someone makes a replacement set for this chassis, but buying tracks that cost more than the kit tends to stick in my craw.


The paintjob was all acrylic, Tamiya XF-62 Olive Drab, with shade and fade coats as per standard, then black and brown oil pinwash and enamel drybrushing in lightened olive and bare metal silver. Orange enamel was pinwashed here and there for bright rust, and MiG Europe Dust pigment was liberally applied last of all.

Italeri made a number of concessions to simplicity, such as molding in the hydraulic and electrical cables around the gun cradle as solid, raised detail, and not all of them are there either. I had considered using fine wire to replace the kit details, but after reviewing every reference picture I could find on the web, as well as some taken for me at a US exhibit, I decided not to. I either would not know where to begin, or where to stop, and in the absence of a Dremmel the idea of carving away all that raised detail added up to (probably) just sore fingers and a mess.


Decals are another area of contention. The Italeri decals are quite matt, and provide markings for four countries, all over standard Olive Drab, but the stern plate of the vehicle is a very cramped place to put markings. Either the model crowds the details too much or the decals are too big, because there was no way the German markings would ever fit into the space available. I used the US marking option and even they barely fitted.


But on the whole, the model had few surprises and was well within my capabilities to produce a decent, if simplified here and there, rendition of this important piece of Western allied artillery from the Cold War to recent times. Examples change hands on eBay for sometimes steeper prices these days, less perhaps because it’s a particularly great kit than because it may be the only kit. I would love to see Tamiya, Dragon or Trumpeter tackle this subject matter!

Wednesday, November 24, 2010

Breaking Your Dragon Virginity


Over the years I have noticed a certain progression in armour modellers, from easy scales to more challenging ones, and from easier builds to the more difficult. Dragon is a case in point, a company which from its inception some twenty years ago set out to find unprecedented detail levels through complex plastic engineering.

Many modellers call building your first Dragon kit 'breaking your Dragon virginity,' and it seems to be a somewhat accurate notion, but to be fair there is Dragon, and there is Dragon.

I have in fact already built two early Dragons, both Russian armour reboxed by Zvezda, and I was frustrated by a trend toward too many small parts and too few positive location devices. I did not really count these as they were from the company's first five years or so, and any firm goes through an evolution in approach and engineering.

I'm rating Dragons's StuG III Ausf. F/8, in the old Imperial Series, as my first genuine Dragon, and this is perhaps a less than perfect first choice as the Imperials are known for being both complex and, by many standards, over-thought. The object was to create the maximum number of variants from the same set of moulds, resulting in a huge number of parts in any box, with many sprues in common between kits and scores of parts unused on any particular project. For instance, though this is a Sturmgeschuts, there are enough parts to construct a Panzer III turret in the box, along with many other elements. My impression is that if I was to carefully inventory what unused parts I have and buy a batch of bits through Dragoncare (if they're available), I could more than likely build a Panzer III as well.

To look at the plethora of individually bagged sprues in the box is an impressive experience, then you start to build and inevitably compare the engineering with other firms and eras. The large number of parts is derived at least in part from tiny details being molded individually rather than as part of larger units, but as some variants have such details and some do not, you find either holes to open as locators (if you're lucky) or merely raised lines to indicate where the parts go. In any other context I would have rated the latter as very amateurish indeed, especially in view of the very high shelf price Dragon has always commanded. If you're paying the big bucks you expect less of a fight and better fit.

The superstructure is a case in point. Individual panels in the roof cater to the evolution of the StuG's fighting compartment so that a common core casting can be detailed for a number of marks, but the fit of those parts is far from great. While cast detail provides tight panel lines and rivet runs in some places, separate parts conjure gaps only an inch or two away which would have been fatal flaws in the real machine. Likewise, the engineering of the canon mount is weak, a multi-part structure to which the gun will glue at the end of assembly but which depends totally on the strength of your adhesive to hold the pivots in place in a friction-fit. I reinforced the assembly with strip styrene and superglue to be a bit more confident of the canon not simply falling out one day.

And what do you do when two parts are trying to occupy the same space? The instructions are not sufficiently explicit on assembly order, the way that details crowd around the superstructure and relate to the hull top, and a strip on the glacis (bullet splashguard?) which is supplied with a locator tab and slot was around 1mm too close to the superstructure for the frontal armour to fit. After filing and fiddling for a while I shrugged and ground away the strip's locating tab. It can lie 1mm forward of where it's supposed to be: no one will ever know the difference.

The Imperials did not necessarily venture into photoetch and I'll need to source engine grills for this one. Despite an inevitable negative comparison of Dragon in the 90s to Tamiya (of almost any era) when it comes to simple building pleasure, I would have to say this is going to be a good looking model on the shelf. Assuming I can conquer the individual track links... I've never tried before! I have a few other Imperials in my stash and now know what to expect, and look forward to building more recent Dragon engineering too.

I'll post a full review when this kit is finished. For now, I have some plastic to wrestle with...

Saturday, July 24, 2010

Recently Completed: Trumpeter SA-2 -- Finishing That Shelf-Sitter


After a long and particularly busy hiatus (involving submission of a PhD thesis, beginning a new job and continuing with past endeavours), I find the itch to resume blogging about my favourite pass-time, and going by the traffic World in Miniature has been generating, fresh posts will probably be most welcome!

In the last few months I've been very busy on the hobby bench, working on a round dozen projects. The trouble with spreading yourself so thin is that no particular project moves along very quickly even though you seem to be working as many hours. The great thing about having some older, unfinished projects is that you can get them off the bench with comparatively minimal work, and that was the case with Trumpeter's SA-2 Guideline missile kit.


I began this item probably two years ago, and did almost all the construction at the time. I was very happy with the fit, the cylindrical missile parts lined up very nicely and joints were dressed with the old superglue and adzing technique, always the best and quickest way. The alignment of the sixteen fins were more problematical, a right-angle jig would be a great help, as I doubt I got any of them at exactly 90 degrees. Still, 89 is close enough to satisfy the eye from most angles.

The thing that stopped me at the time was “Russian Green.” What shade is it? I have an old tin of Humbrol Russian Armour Green, which is no longer in the range, and I'm hoarding it. Besides, these days I try to paint in acrylics whenever I can, especially for armour subjects as it's not only far less toxic (and fairer to the family where the stink is concerned), it also lends itself perfectly to oil wash weathering afterward.


I did some research online, found my way to chat boards and such, and found that there were actually several shades of camouflage green in simultaneous use in the Soviet military, and any of them would be used in any particular context on the basis of what supplies were available. One common shade has been calculated to a Federal Standard value of 34098, and given that 34097 is a standard US shade, available in model paint ranges, I decided this was close enough for me. Tamiya XF-58 matches FS 34097, so that became my launcher shade.

Still, that alone was not enough to get me to pull the box off the shelf and get to it. As I'm sure I've mentioned in some previous post, I use a commercial compressed gas cylinder to power my airbrush, and I recently had a negative experience: for the first time in 15 years, I had a defective cylinder. I picked it up and seemingly overnight the fill had dropped from 15 bars to 10. I thought I had maybe failed to safety the main tap correctly, and heaved a sigh of frustration, but the next time I came to it the reading was 8, and I knew I'd safetied it properly that time. I talked to the company and they agreed to exchange it (they checked it and my gauges and the tank was definitely leaking). There was a weekend in the way, however, so I did some spraying and tried to use up whatever air I had available. The SA-2 was one of the kits that got some long-overdue attention.


I sprayed the launcher's six subassemblies with a good coat of XF-58, then I could do the standard armour weathering techniques I've developed. The big idea with this kit is that the launcher and missile are, literally, two different kits. In Soviet markings the installation is typical of the air defence settup found in North Vietnam, and this offers interesting finishing possibilities. The launcher stood in the tropical heat, dust and rain of Vietnam for years, and despite maintenance it would suffer the extremes of climate. Naturally, it would display rust and dust, and general dirt, just like any piece of heavy equipment. The missile, however, would not, being transported to the launcher site, loaded and fired long before weathering could set in. Also, the missiles themselves probably received more protection from the elements than the launchers.

So, I pursued them as separate projects. The missile was a painting experiment also. The pale grey shade used on the missiles seems to have no Western equivalent, so I mixed it. It was not the flat camo of the launcher, but either gloss or semigloss. I've had problems spraying gloss, and was not convinced the missiles were full gloss anyway, so I mixed 50% X-2 Gloss White with 30% XF-2 Flat White and 20% XF-66 Flat Light Grey. On reflection the finish is not quite bright enough and the shade not quite light enough, next time I build one I'll raise the gloss white to 60% and drop the grey to 10%, which should be a better mix. Nevertheless, I'm happy with this one, the grey certainly looks pale against the launcher green. Weathering was kept to a minimum, a thin black oil pinwash around raised details and recessed panel lines simply to make the structures visually 'pop.'


The missile is covered with stencil decals, more than forty of them. Many of them group adjacent Russian data placards, and they can be fiddly: I mangled only one decal in the process, and decided for ease to separate out elements from one or two others, which both extended the time involved and simplified getting a correct positioning. I was still decalling as I wrote the first draft of this post.

Speaking of decals, Trumpeter's printer, Cartograf, in Italy, have done a remarkable job on them. I don't think I have ever seen kit decals snug down into the surface so tight, and with carrier film that literally vanished against the lustre of my paint mix. The dried decal transparent areas are faintly lighter than the background, that's the only thing that gives them away. Placement instructions could have been more explicit, though. There is one interesting gaff, one of the red stripe markings that circles the body, just back of the juncture to the nose, is incorrect. Under a magnifying glass you can see that, instead of Russian stencil data, it says in English “NO PHOTO SORRY” – presumably a notation from the research team during creation of the decal sheet which, as it was not in Chinese, accidentally made its way through quality checking all the way to manufacture. Having omitted this one, I used a few bits of stripping from it to help repair the mid-body wrap-around decal that I mangled somewhat.


Final details involved spraying a grey-black mix to simulate the scorching of the rocket efflux on the blast deflector, brush-painting inside the rocket motor with a dark metallic enamel, fitting a few tiny parts on the launcher, including a few that fell/broke off during handling, then I could get some MiG “Vietnam Earth” pigment onto the launcher. This is good stuff! I can't wait to apply it to some Vietnam-era US armour.

Mating the two stages was an interesting job. A snug fit to start with, the paint on the alignment runners made it extra-snug, so I worked the boost stage carefully onto its guide, then slipped the upper stage onto its own guide and glued them together actually on the ramp.


It's the only kit I've built in many years which uses every last part and decal: there are no alternatives provided. However, three small decals, 8, 9 and 15, don't appear in the instructions: 8 and 9 are the starboard side counterparts of 7 and 10 and go at the base of the small aft fins on the second stage. 15 I haven't spotted anywhere.

All in all, this was a very pleasing model that built well and looks sharp on the shelf. I'm not sure if it's still in production but examples change hands on eBay for reasonably attractive prices these days. As a companion to Revell's re-released Nike Hercules missile, a similar vintage and role of weapon, and in fairly close scales too, it makes a most interesting display of Cold War technology.

PS: Yes, a part fell off the launcher and was not reattached before I did the photos, a sharp eye will spot the absence in the photos above. So, sue me...

Monday, March 1, 2010

Monochrome, Pt 2


 As promised, here’s another look at “triple value monochrome,” with the Trumpeter 1:35 M1126 Stryker as the subject. I started this one along with the Strv 103B as back to back projects, and both have built well (review posts coming up in due course), and both are now at the same stage, they’ve been through the paintshop and are waiting on the weathering process, decals, hull tools and antennas. The first thing that strikes you about the NATO Green is just how grey it really makes the Swedish scheme look. When I mixed the Swedish shade it seemed particularly green to me, now it seems quite grey. Nevertheless, both shades were given the same treatment, and by the same ratios. The fade coat, applied to the middle of panels and hatches, was NATO Green (Tamiya XF-67) lightened with 20% flat white (XF-2) and thinned by the standard 50%, or maybe a tad more. Likewise, the shadow coat, applied to the underside, under overhanging structures and in a subtle post-shade effect around the line of hatches and divisions in the armour, was mixed the same way, using 20% flat black (XF-1). The photos were taken at this stage. The gradient from lightened to darkened across the base colour value seems quite steep at this point, and the temptation is to think maybe only 10% tinting should have been used. But the washes to follow have the effect of darkening the cumulative value of the model, as well as drawing all the tonalities together, so I’m not concerned at this point. If the values turn out to be too contrasting I can always slap on some more wash over the highlights to pull them back. Drybrushing will be a slightly different operation, as it’ll take place in enamels (I’ve not learned the trick of brush painting Tamiya acrylics yet… Unlike the Citadel range for Warcraft miniatures, they’re not formulated specifically for brush painting, and while they airbrush like a dream I’ve learned to switch to enamels when it’s time to break out the sables.) So I’ll be mixing an equivalent tinted shade, perhaps starting with FS 34127 Forest Green or FS 34102 Medium Green, then lightening with white to profile edges. I had hoped to have this batch of models finished at this time, but real life has a way of intruding… I better stop writing and get back to the bench!

Wednesday, February 17, 2010

Taming Brass


I had something of a pleasant surprise today: my latest AFV is decked out with photoetched brass, something I would never have expected. Brass has never behaved for me and I didn’t expect it to this time. But… That Trumpeter M1126 Stryker came with a beautiful fret in the box, and I thought I might as well give it a shot, as there were alternate plastic parts if the brass wasn’t cooperative. I’ve used PE before, of course, I’ve added screens and grills on three previous models, but folding brass has so far defied me. Maybe I started out on the wrong foot… The Airwaves set I picked up for my Academy Merkava II was simply too hard to fold with the old standby, two single-edge razor blades, and I had not heard of the annealing trick at the time, so the PE more or less ended up back in the packet with a big question mark hanging over it. With those memories, I approached the Trumpeter brass with trepidation, worked on basic theory and gave it a go, open to the possibilities but expecting nothing in particular.  


 Well… It cut where it was meant to cut, filed where filing was necessary, and folded where folding was called for. In moments, it seemed, some very tidy brass structures were on my bench. The only pain was the pedestal for the forward wire cutter which did not match the size of the recess in the hull, which needed filing out to accept it, and that may have been my fault for folding into the guides in the brass, instead of away from them. No matter, the fit was quickly adjusted with files. The only brass part for which I opted to use the plastic instead was the small shield part that goes behind the weapon station on the commander’s cupola, and that’s because the component is simply the wrong size. The plastic part fits (and was moulded remarkably thinly), the brass part never will. Similarly, the support under the starboard jerry can holder will also simply not fit: the locator slot is set too far back, the fold points result in a structure that would hold the rack away from the hull if located there. I filed the tab away and tried again but the support structure interfered with the plastic components directly below. The plastic equivalent was moulded as part of the plastic version of the rack, and I considered cutting it away… Another option would be to scratch the support from some light stock, which may be the easiest route. 


I found something of a lesson in this; one automatically assumes that hi-tech metal parts must be “better” than the plastic ones, but their accuracy can only be as great as the information on which they are based, and if they are the wrong size or shape they will never fit properly, no matter how sophisticated their manufacture. The cya bond between brass parts is surprisingly quick and strong, but the bond between brass and plastic seems lamentably weak: this model must be handled with the greatest care. If the brass parts, with the exception of the securely-snugged-down engine grills, end up falling off, I may retro to the plastic parts in the end, but the experiment has been very much worthwhile.  


 All told, I feel more charitable toward photoetch today than before. It’s a learning curve, for sure, to fold and trim tiny pieces of brass and steel, and I don’t see myself ever using much of what’s out there, especially when it crosses that line between adding necessary detail and “gilding the lily,” or what’s worse, overcomplication for the sake of it, but I can certainly see myself using etch at this level, to reproduce scale thickness and make from fine sheet metal those structures which are made from light sheet metal on the real deal. I don’t for a moment consider myself a brass-tamer yet, another few successful metal detailing outings and I might start to think of myself as one, but I’ve made a start… I find myself thinking about that Lion Roar set of turret armour for late Panzer IVs I picked up last year, and can actually see me getting my clumsy fingers around the job after all! More on the Stryker when the paint goes on.

Monday, February 15, 2010

Monochrome, and When It Isn’t


 There are some techniques that “take a bit of getting comfortable with,” and some that take a bit of nerve to try out. Pre- and post-shading I’ve not yet given a whirl. The idea of blacking the panel lines of an aircraft to show through the actual colour coats as a subtle shadow around the lines, like a dark halo to each side of the final line accent, is a great one, but it takes a surprising degree of guts to try it out, when models already come out pretty good on less drastic techniques. And as for post-shading, even after 31 years of air painting, I don’t trust my airbrush not to make a mess at the last minute… I started fading paint on the top surfaces of tanks about two years ago, and I’ve faded seven models so far. Mostly disruptive schemes with dirt and rust on top, the fading is subtle and delivers a pleasing effect. For only the second time I’m doing a single colour vehicle, and the fade-and-shade routine seems to be becoming more natural, just a part of the process. The shot above is an overview of Trumpeter’s 1:35 Strv 103B, Sweden’s famous “S-tank,” the only fixed-gun MBT to see service. I’ll review this very good kit fully when it’s finished, for now I’d like to talk about the process of fooling the eye with the paintwork. I mixed the base colour from Tamiya acrylics and got a good solid coat on, then mixed a batch lightened with a 20% addition of white. It took this much to get a visible result, the green was a powerful pigment. I laid this mixture on, well thinned, with subtle spotting and stroking in the centre of panels and areas, the typical pattern for sun-fading and general wearing away of paint. Then I mixed some more and darkened it with a 20% addition of black, and applied that to the undersides, the hull behind the running gear, under the bow, tail and stowage bins, and under the topmost portion of the dozer blade, the idea being to encourage the eye to see shadow where shadows would most naturally fall. The photo is taken at this point, and the variation in tonality is actually more visible in the image than it is to the naked eye. The next round of work will be oil pinwashing followed by enamel drybrushing, my standard armour finishing process, and I expect the overall effect to blur together into a pleasing optical illusion. Do real tanks display fading this way? Peacetime tanks that get regularly serviced? Maybe not, but the eye tends to expect these tricks, and when you get used to them, a model finished in parade-clean condition has the disturbing quality of a toy. Tanks should be dirty, they should be rusty and their paint should be faded by the elements in which they serve, and this logic has created a suite of visual queues without which armour models don’t seem quite right. This is not really true, certainly not all the time, but that’s maybe the theme for another post entirely. The question is whether you can paint a model one colour overall and have it look convincing to the naked eye. I would say probably not. So long as it is subtly done, the fade-and-shade routine automatically imparts a tonal gradient between highlight and shadow which are close but perceptible, and provide a narrow “reference range” against which the much starker contrast of the dark pinwash in corners and angles around details, and the light drybrushing that profiles the sharp edges of structures, become part of an overall spectrum of tonality that tie the model visually together. That’s the theory, it seemed to work on the Japanese Type 74 I featured back in the early days of this blog, and I’ll know pretty soon if it works on the Strv 103B. My next project up is Trumpeter’s M1126 Stryker, another monochrome subject, and I’ll do it the same way, with one extension: I’ll use the darkened version of the base colour to generate a soft post-shade effect around all the divisions in the Stryker’s external plating. Combined with the fade coat applied to the middle of all the panels, this effect will either look great or like a patchwork quilt (in which case I’ll zap on another coat of NATO Green and start again…) I’ll sequel this post with another look at the “triple-value monochrome” trick when I do that job, and there’ll probably be something soon about natural metal finishes for aircraft, if the approach I’m trying on a Tamiya F-84 works like it should…

Thursday, January 21, 2010

Product Review: Cavalier Zimmerit


Australian firm Cavalier Model Productions has been around for quite a few years now, and besides their resin car kits and other esoteric goodies, they are perhaps most famous for their Zimmerit. Zimmerit was an antimagnetic paste applied like cement to the hulls of German armoured vehicles in the middle years of World War II (discontinued around November 1944) in response to the Russian tactic of magnetic mines which could be attached by infantrymen. Many choice modelling subjects are properly depicted with a coat of this rough, rippled stuff, and while there are many techniques for creating the effect, and some manufacturers, notably Dragon, have made forays into producing it as a moulded detail, Cavalier’s solution has been very successful and very popular.

Basically, Cavalier zimmerit is a wafer-thin sheet of moulded grey resin, as thin as paper and highly flexible. It’s delicate but captures the texture perfectly, including damage and defects in application for an amazingly realistic effect. Some 35 sets are presently available, including a batch for the new 1:48th scale armour, though most are for traditional 1:35th scale, with specific sets designed for particular kits. Fiddly parts are reproduced from kit parts with zimmerit added, so you have a complete replacement part. All sheets are cast in a uniform pale grey resin.

High utility can be found with their generic sheets too. If your vehicle is not covered by their sets of pre-formed parts, you can buy a generic sheet (there are four different patterns available) and you’ll more than likely have all you need for your project.

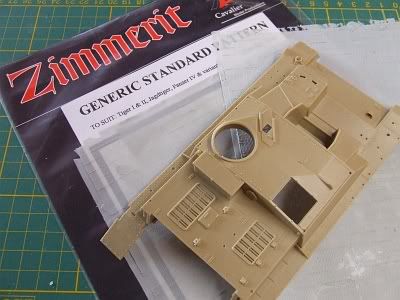
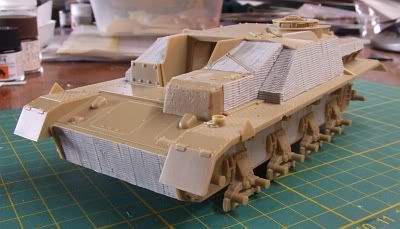
That’s what I did, working on Tamiya’s old (but still excellent) StuG IV kit (35087), as mentioned in the last post. No specific set has been produced for this kit, so I ordered up set CV-118, generic standard pattern zimmerit, and basically cut the parts as required. The set is very generous, containing two 15.5cm x 21cm sheets, and the whole project took me around half a sheet: that’s great value, panning out at about Aus$5 to zim each of potentially four models.


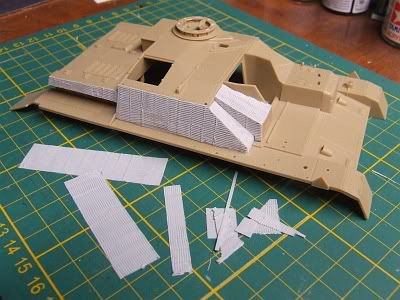
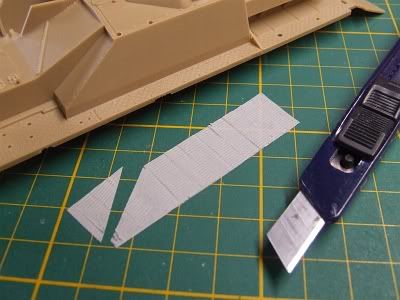
Starting from one symmetrical corner of the sheet, I began by measuring up needed panels and cutting them out with knife and straightedge. I cut them a fraction large, especially allowing the inclined edges of panels to lie inside the edges of the pieces I was cutting (photo, below). The method in this madness will soon become apparent. One needs to remember the orientation of the pattern, check references and see which way the pattern runs on which surfaces, and cut components accordingly.


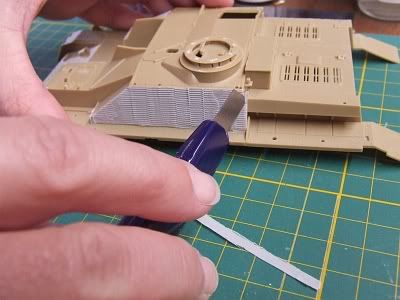
There are several suitable adhesives to use with this resin, five-minute epoxy, for instance. I used regular superglue as, given the fact I would be trimming the edges afterward, absolute precision was not called for. If using one of the pre-formed sets, I would use slow-cure gel superglue, for its strength and because it allows time to both spread the glue completely over the back of the sheet (as in the next photo) and to slip, or remove and replace, the piece once in place to refine the fit. As each piece was secured, simply by pressing carefully into place (second next photo), the slight excess left at the edges was trimmed with a sharp blade, creating an essentially perfect fit (third next photo). Any points on the edges that were not fully secured were glued down with thin CA, brushed on sparingly, then the edges were lightly filed to virtually blend the resin sheets together.


It is worth doctoring the zimmerit as well, you can score and chip the edges in high-wear areas, the likely contact zones, to create damage, chunks of the cement-like matter either chipped away by contact with branches or obstructions, or shattered free by the impact of shot. It’s as easy as cutting in with a knife or the edge of a file.

The sets come with a zimmerit tool, a cast resin ‘rake’ for custom work using one of the standard techniques. Basically, in areas where the zimmerit doesn’t quite fit, or edges where the juncture of sheets did not come out as perfectly as you might have wished, you can paint on some thinned putty, wait until it’s firming up, then score the pattern into it to match the resin sheets around about.


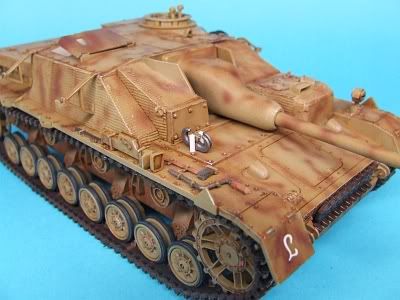
The complete zim job on this model took several hours to do, and it was my first outing with the product -- I’ll probably be quicker in future. Here she is with some paint on, late in the finishing stage:


I couldn’t be happier with the result, and look forward to more Cavalier zimmerit-enhanced German armour models to come.

You can find some sheets at better hobby stores, but for the full range go to:

http://www.cavaliermodels.com/Zimmerit.html

Here you’ll find an historic article on the stuff, including reference photos, plus a listing of all available sets. At Aus$19.99 each they are a good buy, and domestic postage of $3.95 is no blow to the wallet.

This is a first-rate product, highly recommended, and proudly Australian!