Showing posts with label 1:72. Show all posts

Thursday, July 4, 2019

Kit Review: MPC/Round 2 Space: 1999 MK. IX Hawk


I can’t remember the last science fiction model kit I completed. I have a few in my stash but I actively can’t remember completing one in recent times, so this Hawk is rather a milestone. In the late 70s I did a couple of the very disappointing MPC Eagles (under the Airfix label), and obtained their Hawk as a built example from the famous collector Phil Rae ten or more years back, but brand new kits from this cult TV classic have started to come available in the last few years from Round 2, under the MPC label, as a direct result of interaction between company manager Jamie Hood and both the fans who would be buying the product on one hand, and the leading experts on the originals, on the other. This fusion culminated in the Eagle Transporter kit in 1:48th scale, which has done great business and spawned a family of secondary releases. The first guest-star hardware to join the family is a 1:72nd scale Hawk.

The Hawk appeared in the episode Wargames, familiar Earth craft which mysteriously appeared from an alien planet and attacked Alpha. They were mental projections, plucked from the Alphans’ own minds, as was the entire unfolding scenario of destruction, as a means to persuade the humans not to attempt to settle on the planet they were passing, no matter how compatible it seemed. This meant a craft could be designed to reflect the same general era and mode of design as the familiar Eagles, which leant itself to rapid production of the needed models. Two were built, a definitive model scaled to the 1:24th scale Eagle, and a distance model at 1:48th scale. They were very different in detail when studied together (both have survived and are well documented photographically, and appear at fan conventions).


Round 2 based their detailing on the “hero” 1:24th scale Hawk and on inspection I was most impressed with the degree to which almost every detail of the original has been captured at one third the size. I studied the Hawk with a view to building a studio scale replica some years ago, amassing a fair bit of reference material in the process, and as a result I am able to say that the company has captured the important features to an amazing degree. Proportion and detail, including precise replication of the kit parts used as dressing on the original, are all there. The only notable exception I could find was the absence of the ribbing on the Saturn V-derived parts, this being more than likely due to the limitations of moulding technology. When the firm produces the promised 1:48th scale version to go with the larger Eagle, this omission will hopefully be corrected.


Assembly was quite straight forward, though fit was not as crisp as one might have hoped for, giving rise to some seams to be dressed, mainly on the command module sides and where the fuselage, split in upper and lower halves, comes together just behind the stub wings, and at the rear. Otherwise there were few hassles. The worst parts are the tiny Lunar Module legs, five of which are produced at a third their original size. The originals were forever breaking on the studio model, and these are so fragile you hardly dare breathe on them. The one above the cockpit broke and was repaired four times, while the ones around the engine barely fit (locator holes in the wrong places?) and the modeller is reduced to “superglue and prayer” — not ideal. Whitemetal replacement parts would be highly desirable.


I built the model in subassemblies, the lateral boosters and engine, solar panel and underslung weapons pods, the X-girders, plus the underside girder/rod/pipe parts all being completed separately, including decals and topcoats, and brought together at the end. This eased painting of the fuselage and side boosters, and I noticed that proper alignment of these units to each other depends largely on all parts coming together in one go—so they needed to be fully finished at that point.


In 1:72nd scale no cockpit is provided, just black decals for the windows. The Hawk’s interior was never shown in the program so any attempt to add one to a kit is an exercise in what-if. It will be interesting to see how the company tackles the issue at larger scale.

The biggest “wow” factor was the decals. The sheet is very finely printed, featuring over 130 markings for the craft as seen on-screen (orange trim) or the prototype model (white overall). I did the latter for simplicity, though picked up two kits and will do the on-screen version at a later date. The decals reproduce every marking seen on the original, including many which were actually drawn on by hand. They behaved very well indeed, were a delight to work with, and reacted well enough to Microscale chemistry. The small coloured bands took some work to wrap around the girders, several applications of Microsol were needed to get them to conform, and they could have done with being somewhat longer to wrap fully and seal to themselves. The anti-glare panel decals were sprayed with Micro Flat and trimmed closely from the backing paper, producing a decent flat finish in those areas, contrasting with the satin finish white I selected overall.


Improvements are always possible, and when I do the second kit I’ll make some small changes. The original had rows of holes drilled into the leading edges of the stub wings, weapon pods and solar panels, and these are represented as silver dots on the decal sheet. Dressing those edges very carefully to fully eliminate mould lines and drilling in the holes is an obvious enhancement. Being forewarned about those LM legs might ease that aspect too.


The model was a pleasure to build, notwithdstanding the acute frustration of those aforementioned LM parts. On the provided stand it looks the part, and is a milestone as the first fully accurate depiction of this craft to be produced as a conventional styrene kit. If the larger version eventuates, it will build upon the experience from this one, and be the perfect compliment to the big Eagle—as surely as the soon-to-be-released 1:72nd scale Eagle compliments this Hawk.

Full marks to Jamie Hood and Round 2 for giving us the kits we craved long ago and never expected to be possible!

Cheers, Mike Adamson


Friday, April 5, 2019

Recently Completed: Fujimi 1:72 F-86F (Kit No. F-18)


I’ve only done two Sabres previously – the Airfix F-86D when I was a kid, and the Matchbox F-86A at a teenager. The Sabre is a very elegant and impressive plane, historically and technically important, and surprisingly long-lived – I was not really aware of the fact at the time, but there were Sabres still flying with several countries, in secondary roles, certainly, at the beginning of the 1980s. This example, as befits a Japanese kit, is a Mitsubishi-built Sabre, distinguished by the small engine bay intake on the right rear fuselage.

This is only my third completed Fujimi kit, the others being their Ju-87 G-2 Stuka and A-7A Corsair II, in the same scale. It was quite a fun build but their engineering leaves a bit to be desired, creating problems of alignment – all around parts fit was nothing to write home about, and did the instruction to add nose weight have to be in Japanese? The parts look good in the box – also very familiar, I built a Hobbycraft F-86E many years ago, part of a conversion project which is still incomplete, and it’s quite obviously the Fujimi kit reboxed. The kit features excellent recessed detail, deep enough to take a wash and hold it, but the separate gun panels are a pain, as the fit is far from exact. They were tooled separately to facilitate swapping out for camera nose parts on the RF-86, an example of stretching the mould applicability at cost of builder ease. Likewise, the air brakes can be posed open, and do not fit as precisely as they should for the closed option.


Nevertheless, the kit builds quite well. It features the unslatted “6-3” wing, a pair of AIM-9B Sidewinders and pylons, and a choice of raised instrument details or decals. The decals would never lie down over the 3D detail, so drybrushing was used to bring out the instruments. The instrument decals were also far from crisp depictions.

The decal sheet provides sets of individual numbers so you can build any F-86 in the fleet (except the 500-series serials on the RF birds), though this invites alignment problems in the tail codes and makes for a lot more work. I chose a bird from No. 8 Squadron, Komaki AB, August 1977, sourced from a photograph, a fairly plain scheme which obviated messing on with masking for colour trim. The black and yellow stripes on the Sidewinders came from the Hasegawa US missile set (X72-3), though I used the Fujimi missiles.


Speaking of the decals, they were very matte, took their time separating from the backing sheet, and during the softening time exuded a milky goop I can only assume is the decal adhesive as it resembled nothing so closely as PVA whiteglue. I wiped away the majority and the decals adhered perfectly with what remained. The decals overall behaved better than I feared they might, so I’m inclined to give the kit sheets a go in more Fujimi outings of similar vintage.

I used my standard approach to painting metallic finishes, Tamiya XF-16 Flat Aluminium, overcoated with Microscale Satin, but resisted the impulse to use graphite to create panel variation as these birds seem to have been in metallic paint rather than natural metal, and were well-maintained, therefore clean and tidy. No weathering was applied to this model. The gun panels were probably stainless steel and always look darker, so graphite was used for this effect.


There are a few errors and omissions – joint lines needed more work, nothing shows up defects like metallics! Joints I would have sworn were perfect, adzed, then milled with wet 1200-grade paper, showed up hairline gaps under paint. Also, the fit of the jet intake pipe is not perfectly centralised and thus does not line up well with the nose part, necessitating work with a round rat-tail file in the intake to try to minimise the mis-match. I had tried chocking the fit with styrene shims, but it needed more. Next time I do a Fujimi Sabre I’ll know what to look out for. Same with the weight to keep her from being a tail-sitter, it should be superglued behind the gun panels, but the bird was finished before I noticed “3g” among the Japanese script and realised it was telling me to weight the nose. Two grams turned out to be enough, and the crushed lead shot is in fact simply lying deep in the intake trunk.


I mis-cued on masking in the wheel well, calling for brush touch-ups (in FS 34102, it seems North American used a green darker than Interior Green/Zinc Chromate for their gear bays on both major lineages of the Sabre). At the end of the day some details were left unpainted – a tiny black panel on the tail plane, plus the radome of the radar gunsight, because, with the rest of the model finished, I simply did not trust my wobbly hands to spot in that detail, especially with the brushing characteristics of Tammy acrylics. Risk spoiling the job at the last moment? I don’t think so!

I have a couple more E and F Sabres from Fujimi in my stash, and a couple of the Airfix tooling from several years ago, in the guise of the Canadair Sabre Mk. 4, to play with. I hope to line up a representative selection of Sabres in time, detailing the colourful schemes and range of variation among this milestone fighter’s thousands of examples.


On the bench in the not too distant future will be the Italeri F-100 Super Sabre, wearing Superscale decals and featuring a variegated metal finish.

Cheers, Mike Adamson


Wednesday, January 23, 2019

Recently Completed: Airfix 1:72 P-51D Mustang (A01004A)


This is the “8th Air Force” edition of Airfix’s new-tool Mustang kit, featuring markings for one of the famous “Blue-Nosed Bastards of Bodney.” Structurally it’s the same kit I built in 2014 and 2018. No luck with the joystick this time, and the radio mast is scratch built as always. I used SAC whitemetal landing gear as a matter of course.


I used Model Master Acryl Interior Green for the first time, and sprayed a shade to represent the plywood cockpit floor as well, something of a first for a detail seen so little (I generally do the canopy closed.) The “Bodney blue” was straight Tamiya XF-8, glossed with Microscale clear, maybe a touch too dark, but fairly close – closer than the Humbrol “French Blue” which is recommended in the plans.


I used the same graphite weathering technique as last time to vary the panel shades of the natural metal finish. It may not be perfect but it’s not bad and it’s certainly quick – an hour’s gentle masking and brushing with powdered 6B lead and the job was done. It also avoids the possibility of firmer masking pulling up previous paint or of anything going wrong with a second application of paint, if varying the metallic with a mixed shade.

The canopy was masked from scratch using Tamiya tape and Gunze fluid, which worked brilliantly on the main hood but on the windscreen it pulled the paint off the narrow struts. I rectified this by making strip decal with clear film – spraying interior green, then blue, then clear, and cutting fine strips with my Chopper II guillotine.


Speaking of the windscreen, the part does not fit as snugly as it might – you can have it tight into the lower curve on one side or the other but not both unless using a hot glue to make it grab before you release the seating pressure – but that will craze the plastic. I used white glue as a gap-filler on the left, which was not terribly successful.

It’s been observed that the drop-tanks in this kit are not very good, certainly they lack the prominent median ridge of the real thing, and I left them off this build, though I might transplant the better-detailed tanks from an Academy bird, if practical.


I love how the finished model feels “busy” to the eye. Consider the left fuselage side – the basic metallic, selectively darkened with graphite, then overlaid with clear, accented panel lines and the decals, all pulled together with final clear – there’s a lot going on to catch the eye in a very small space. The same goes for the wings – technically they should be a uniform aluminium shade and the panel lines should be filled and smoothed, as they were on the original, but it would make for an awfully plain display. This is where artistic license gets in the way of historical accuracy.


This kit was assembled before the end of 2018 but I knew there was no way I could get it finished in time to include it in last year’s tally. Painting was a fairly straight forward process but included one or two backtracks, all of which cost time. I have three more of this edition, plus a couple of other editions of the kit, and look forward to adding to my Mustang line-up in future.

Cheers, Mike Adamson


Monday, December 31, 2018

Recently Completed: Airfix 1:72 Hawker Typhoon Mk. Ib (A02041).


This is the first Typhoon I have ever done (though there was a Matchbox 1:72 Tempest II back in the 80s). Tooled in 2013, this kit looks very nice in the box, and as a Series 2 kit comes on four sprues and with two decal options. I had intended to do the more colourful scheme with invasion stripes, but didn’t trust such large decals not to pose grab and alignment problems that might result in tearing; plus I wanted to get this one off the bench before New Year and wasn’t in the market for surprises, or for backing up and painting the stripes.

Another good-looking addition to Airfix’s stable of British aviation in miniature, the model’s pleasing lines conceal a few challenges. I got the feeling Airfix somewhat over-thought the engineering in this kit, especially in the way the cockpit interior locates, and the cockpit floor/wheelwells part, which demands a certain order of assembly and unavoidably introduces the potential for misalignment. Fit problems I found inevitable, steps at the wingroot being the most serious, though gaps manifested on the horizontal tails too: whiteglue to the rescue. I expected the keyed landing gear to be out of alignment also, but surprisingly it was not – the wheels are flattened and bulged, and keyed to the struts, and once the model is “up on its feet” the flat spots are firmly to the ground. Assembly took a little time, and there was plenty of prepainting to do, between the prominent radiator/carburettor intake assembly, the cockpit and surrounds, landing gear, bay doors and propeller assembly.


Overall, though, the model looks the part, and once it was together the finishing techniques flowed along well enough. I used Tamiya’s accurised RAF late-WWII shades (XF-81, -82 and -83) topped with Microscale clears and Florey panel wash, finished with oil wash weathering and Mig pigments. I used the Eduard mask set for the canopy and wheels, and the AML masks for the Type A camo scheme. The set includes an extra sheet of straight strips doubtless intended for painting the invasion stripes.

The best part of the kit was the decals, they were superb and pulled into surface detail even before MicroSet was applied. Very thin, they grabbed a bit quickly, but are of solid tone, fully in-register, and seem especially accurate. They behaved much better than the sheet in the Spitfire I finished last, indeed I completed all decals, with the exception of the leading edge yellow stripes, in a single day of work.


Criticisms? The small antenna on the underside of the fuselage did not fit its locator hole – I fiddled and fumbled with it for a good twenty minutes, most of which was involved in getting hold of the tiny component, over and over and over, while applying a file to the base until it actually dropped into the receiver. The tailwheel is moulded as one part and must be seated before the fuselage is closed, which ups the odds of damage during handling and makes painting the unit a matter of a small brush and prayer. When the propeller is finally installed, the mounting calls for a cylindrical unit to be inserted between four moulded guides which “tension” it into place – why so complicated? The fuselage aperture had to be filed to accommodate the outer ring of the cylinder, and when it slid home it became apparent the outer diameter of the fuselage mouldings is larger than the outside diameter of the spinner backplate, leaving a strip of unpainted plastic exposed – yet with the prop now quite firmly in place there seems no way to tease it free again to paint the strip. Chancing getting camo green on the satin black spinner is not a risk I’m willing to take at the very finish, so it stands as-is, and angle of view will hopefully conceal the flaw for the moist part.


I have another of these, in the “Dogfight Doubles” edition with Pips Priller’s FW 190 (an unusual combination, as the Tiffie found its forté as a ground attack plane and probably never tangled with a 190, at least not on purpose) but it may be a few years before I welcome going 15 rounds with this kit again. There are some lessons learned here, of course, such as leaving the main gear bay doors off until after the struts are in place, which would make it easier to keep the doors aligned and not “toed-in” a bit.

Enjoyable? It’s always nice to see a project come together, but I would have to say I was happy to see this one leave the bench in the end. Maybe the shake’n’bake kits have somewhat spoiled me, but I had hoped for better alignment. Recommended nevertheless, to those with a little experience under their belts.


Saturday, August 25, 2018

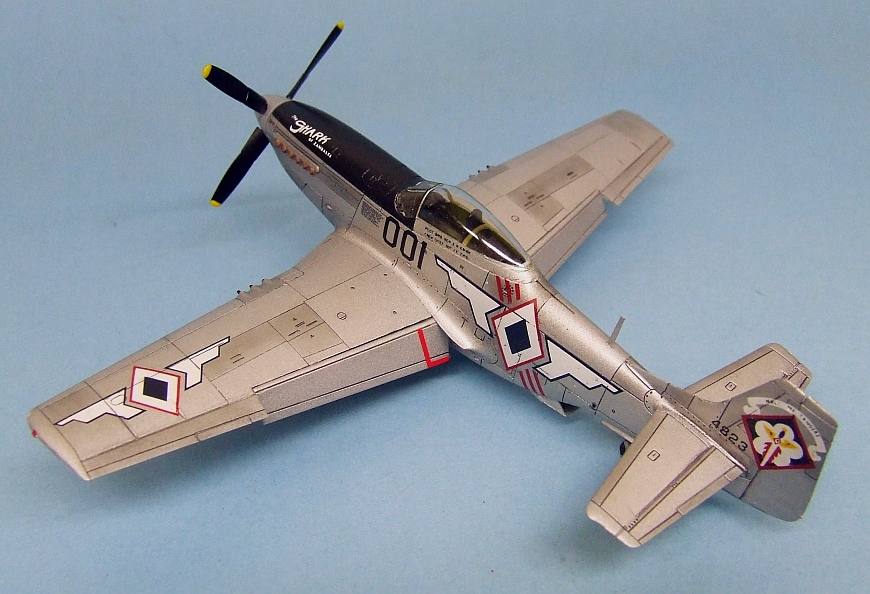
Mustang in Blue Diamonds


Earlier this year I completed Airfix’s 1:72 P-51D Mustang (A01004). This is the same kit I built around 2014, same original issue, though the kit has been boxed several times now with fresh marking options. This time I learned from my errors and did not try to include photoetched harness, though I succeeded in installing both joystick and radio mast unbroken. It remains to be seen if I can do that trick twice.

I have long wanted to do the varied post-war schemes and an old Superscale sheet (72-149) features the markings of the Philippine Air Force, who used Mustangs between the late ’40 and late ‘50s. The most famous of these was “Shark of Zambales,” the personal mount of the commanding general of the arm, B. N. Ebuen, and which has been the subject of numerous restorations over the years, including a standing display at the PAF museum at Villamor Airbase. Superscale included markings for a very particular phase in the original’s career, as the markings seem to differ in detail from one photograph to the next. Prolific aviation artist Gaetan Marie (check out his page here) has painted three different schemes worn by this aircraft, varying by the size, shape and colour of the shark-mouth, the scroll over the tail marking, spinner decoration, etc. and Superscale seem to have based their rendition on a single B&W photograph in which I am not prepared to swear the shark-mouth was actually applied. Angle and the nature of the filmstock make it dubious, but what’s not dubious is the unlikelihood of me applying the decals perfectly, so I left them on the sheet. I can always apply them in future if I feel justified.


The sheet must be over twenty years old and worked beautifully, I find myself thinking I’ll still be using decals from my stash decades hence, and they’ll still work as well as ever!


Another important factor, this is my first natural metal scheme in many years, as I have had the greatest difficulty in achieving a credible finish. I used Tamiya flat aluminium acrylic, overworked with 6B pencil graphite to vary the tonal values, then topcoated with Micro Satin for lustre. It feels quite good and I look forward to trying this technique again.


The landing gear of the Airfix kit is its only real disappointment – the plastic is soft and the main gear legs are irretrievably warped right on the sprue. The first time I built the kit I overlooked the problem and photographed it from angles that hid the gear, but this time I just couldn’t. I picked up the white metal replacement set from Scale Aircraft Conversions, beautiful castings in strong metal, absolutely straight, and they even supply two sets in the box so the next Airfix Mustang will get them too.


This bird came out very nicely and I look forward to adding more to my line-up – I recently picked up decal sets for postwar ANG birds and third world users, plus the Airfix edition with decals for Grenada, 1983, the last user of Mustangs in a combat role. I should think I’ll develop a long line of P-51Ds based on this kit and the ocean of decals I’ve collected over the years.


Saturday, January 20, 2018

Keeping it Simple: Academy’s Hellcat


When the weather has hit 112 F out there and you need AC and fan in combination to get through the day, you don’t want heavy, complicated projects, and knocking off some quick builds is the right medicine to break up professional commitments.


I picked up Academy’s 1:72 F6F Hellcat (#2121) on eBay many years ago and it has hung around on my shelves for the last two years or so with some pre-painting done, therefore technically started. I would like to do a USN midnight blue subject in each year, along with another from the grey-over-white era, but my last blue was Academy’s F2H Banshee in 2015 – I was amazed to find years had gone by since the last time I uncapped the blue! This Hellcat is a surprisingly good little kit, very simple to put together (so long as you’re careful with alignments, the wing to fuselage can bite you on the underside) and has engraved detail so looks the part under a coat of paint.


Construction was not difficult, fit is generally okay, though the engineering is not quite up there with the big guys. Options include the small side panel windows to do the -3 variant, and you have bombs and rockets for the -5. Clear parts are well done, with a choice of windscreens for the two variants plus clear plug-in domes for the position lights on the spine an tail light under the rudder. The engine is a decent little rendition of an R-2800 and looks okay with a black wash. The prop shaft seems a bit thick and profits from a swipe with a file. Landing gear is reasonably strong for the scale, and undetailed gun barrels are moulded into the wing halves.


I’ve had disappointing results from commercial canopy masks, they can pull up the paint as you remove them, and it’s frustrating indeed when that happens as the product adds several dollars to the build cost. This time I did it the old fashioned way, using thin-cut slivers of Tamiya tape and Gunze masking fluid to outline and fill in the areas, and the thin braces are custom decals – clear Superscale decal film oversprayed first with Interior Green, then Midnight Blue, and finally Micro Satin. I made a piece 30 x 48 mm and should be cutting strips from it for many years to come. I used my “Chopper” mini guillotine to precision-cut a single strip, which provided the four short pieces necessary (I didn’t get fancy with the 45-degree corners of the bracing strips – tis is meant to be a simple project, after all).


I went with a mixed version of USN Midnight Blue (An 607/FS 25042), as I had read and agreed with the observation that Tamiya’s shade (XF-17) was too dark. I tried the mixing ratio of XF-17 : XF-8 : XF-2 at 5:3:2, this producing a slightly brighter and lighter blue. The original was not a full gloss, so Microscale Satin was the perfect finish, right out of the airbrush. I used the Academy instrument decal and going by the way it went on the kit sheet would probably have been usable, but I intended from the start to go with Superscales for this build, 72-737 being my choice, simple markings for a -5 from an unidentified unit toward the end of the war.


The support straps running under the belly tank should be in natural metal, and if I ever locate my silver strip decals I’ll add them. Likewise with the bombs – lightened Olive Drab for scale effect, but the ordnance decals I remembered turned out to be 1:48th scale, so if I ever find smaller ones I may add them and perhaps a clear coat to dull down the weapons. In the same spirit, when I get some superglue in a fresher state I’ll look at adding a radio antenna, if I judge the mast strong enough to take the mild but constant pull of EZline.


It came out very nicely and is my first Hellcat ever – I built a Wildcat as a kid, if memory serves, but never its successor.

I can’t wait to get a Corsair into this mixed blue – it looks better, to my eye, than any I’ve had out of a jar or can so far. Mind, it’s a good job I wasn’t trying for a high gloss, or I’d have been very disappointed, as I have yet to learn the trick of keeping dust and micro-fine hairs out of the painting space.

Next up looks like being a Spit, and maybe a Phantom is impending…

Cheers, Mike