Showing posts with label tank. Show all posts

Wednesday, December 25, 2024

Tamiya Leopard 1A4: Like Going Home


I’ve neglected this blog for far too long, and have been so busy in recent years with my writing career that modelling has taken a back seat. I've completed only two models this year (though worked on at least five others), the first being the Dragon 1:72 Jagdtiger I posted about six months ago. Recently I got to build one that’s been on my to-do list for many years, Tamiya’s 1979 35th scale tooling of the West German Leopard 1A4 (35112).

The Leopard 1 is still in service in 2025 with some sixteen armies around the world, with new upgrades on offer from many firms, so it’s far from a period piece, despite Australia having retired our Leos in favour of reconditioned M1A1s (not a universally popular decision) many years ago.

Okay, Meng’s much newer kit is far superior, but it’s also correspondingly expensive, and I do enjoy vintage Tamiya for its own sake. The kit is straight-forward though there are one or two bits that can bite you if you’re unwary. Construction follows the standard Tamaya pattern, running gear being suggested to be assembled first, though the wheels form a subset that can be built and detailed separately from the rest and added late in the process if you work that way—I do, as it happens. Upper and lower hulls are large single piece toolings, dressed with smaller parts.


The drive wheels housings are compromised by the kit sharing tooling with the popular early motorised version. I say compromised, they are inherently weak and need to take a lot of force when the tracks are joined and tension thus comes into play. This has never been a problem, however, with superglue making a suitably strong bond.

When I began this project it felt like going home. Muscle memory would just about build it, especially as I built the Flakpanzer Gepard AA tank version back in the 90s, about my third armour kit ever. Construction proceeded without much difficulty, though there were details I wish I'd spotted. The co-axial MG in the turret is not moulded as a proper gun barrel, merely a protruding rounded shape, and I could have at least drilled out the port for appearances.

The tracks took a lot of work. One thinks that one-piece vinyls should be child's play, and they are, but the detail is very repetitious. There are 672 rubber pads—that’s four per link times 84 links per track times two. After a sprayed base coat of rust/dirt browns, every single pad was brush painted rubber black (Tamiya XF-85) by hand, rather a daunting proposition. They were then treated with a Tamiya dark brown weathering wash to create depth, and oversprayed with an ultra-thin glaze of buff (two drops to forty drops of thinner) to create a dust coat. Lastly they got a few touches of MiG powder pigment to suggest fresher rust here and there, and the guide horns were drybrushed metallic. For all this effort, the effect doesn’t really show up in pictures—I might as well have not bothered... Fully half of each track is also behind the side skirts, so I could have detailed only the middle part and saved the effort!


The wheels were masked with a combination of rubber solution and disc stickers, then sprayed rubber black for the tires. I used the template method for the faces of the wheels, a 15mm circle template fitted nicely.

The main paintwork was a mixed shade for German Army Gelbolive, a formula I found at Armorama. XF-51 Khaki Green plus XF-57 Buff plus XF-74 Japanese Olive at a ratio of 4:1:2. This seems a very good match for the original. I made a batch darker with the addition of some black as a shade coat for the underside and behind the running gear, then another batch lightened with extra buff as a fade coat to mottle/pattern the upper surfaces. With all this done, I sealed the surface with Micro Flat. Where the decals would go I splashed with Micro Satin to bring up the lustre and improve adhesion, then resealed with flat over the decals once applied.

The kit decals were quite old but worked very well indeed. They took a while to part from the backing sheet, but snugged down surprisingly well and their finish was very close to that of the paint. They were slightly out of register, so when it came to the crosses, I took some from a Supercsale sheet that were within half a millimetre of the correct size, and these, surprisingly, were glossier and needed more attention to blend in.


The pioneer tools were a fair job in their own right, with a sprayed metallic, brush painted wood tone and hull colour on the clamps, Micro Flat over the hull colour areas, brown oil wash to create a patina on the metal and a darkening effect on the wood.

Finishing techniques included Flory wash in the engraved detail, MiG pigments for dust and rust, and drybrushed metallic for abraded areas, plus the usual suite of oil techniques, being dirt spots and chipping, edge profiling and rust streaks.

I had the advantage of a research source showing the very same vehicle as the kit depicts—a 1984 partwork whose first issue featured a centre spread of the Leo by the talented Kieth Fretwell. On reflection, the kit might have actually guided the illustration, which even shows the wading -kit tower on the commander’s hatch, which is included in the kit as optional parts! I did not bother rigging a radio antenna, as photographs are quite contradictory. Many Leos are photographed without radio masts at all, others have stub antennas only. If I get a definitive source on this I can always add it later.


The Leo looks good, was a fun build—I wish I could have spent a little longer on it: I could have caught some problems before they happened. But it’s a good addition to the modern armour collection. I look forward to doing Revell’s Marder IFV in the same scale, using the same pre-NATO-camo Gelbolive.

If and when I replace my studio lights, I’ll take better photos.

Thanks for looking,


Mike


Sunday, November 28, 2010

War Stories


The modelling hobby loves militaria. Planes, tanks, ships, artillery, it's like the modern day hand down of toy soldiers in the days when war games were played on back lawns. Okay, that's an oversimplification, and we build our chosen thematic material for many different reasons. A love of aviation, memories of service life, tribute to those who have served, a fascination with a time or place... I tend to look on the military equipment I model as elements of history, both the social and political history of the world and the history of technology itself. Also, the subjects we model, if they are true to life and have any accuracy at all, have stories behind them, or real human lives and dangers, not just of glue and paint.

During a recent group build on the FineScale Modeler forums, three aircraft were presented by one builder, including a brief backstory for each – the historical reality of the subject matter. That crystalised the concept for me, that each and every model we build has its story. Every time someone completes a model of the Bismark or Hood, they are retelling the terrible hours in the Davis Strait when those ships duelled. When we put the finishing touches to a favourite aircraft type in the markings of an ace, we are remembering the exploits of that pilot. The same with tanks, whatever markings you settle on, for whatever reason, whether aesthetic or due to historical research beforehand, we are recalling the actions of that vehicle and its crew, valorous, victorious or otherwise.

I was struck by the degree to which the vast range of subject matter presented to modellers today is a catalogue of the ephemeral: the markings this aircraft wore for that six week period, the equipment fit that tank carried during that particular action, the camouflage scheme experimented with on ships during those months of that year... And there is the personal record.

I'm a big fan of the Bf 109 and have collected a great many decal sheets detailing the history of the type in the various theatres of World War II, and while there are markings for victorious aces who survived the war (Galland, Hartmann, etc.) there are many schemes belonging to aircraft that went down and pilots who did not survive. This became very clear when I read through the notes accompanying Eagle Strike sheet #48078, Jagdwaffe over the Sahara, a collection of Bf 109 F-4 decals. Every one of the five aircraft depicted on the sheet was lost (that in itself is not ultimately surprising), and at least three of the pilots died, possibly all five, it was not absolutely clear from the information given. It's this latter that strikes a chord. The lives that were bound up with the machines, invested in the necessity of the moment, the imperatives of the politics of the age, and which went the way of millions.

If one builds a model of the Arizona, one is remembering the dreadful death-toll in her torpedoed hull. The same with the Yamato, as well as the courageous actions that preceded the coming of the end. Tiger tanks are ever-popular, but by 1944 they were not the invincible rolling fortresses they had been, and crews died by the bushel. To build a diorama of vehicles marked for units at the Battle of Kursk, whether German or Russian, is to recall, with hopefully a due sombreness, what is by many criteria the largest and perhaps the most terrible set-piece battle in human history.

So when critics of the hobby point with a certain negativity to its fascination with military subjects, rather than with the branches that build, cars, trucks, trains and airliners, I reply thoughtfully that the hobby celebrates courage and maps the course of technological development, while also serving as a reminder of the past, which is, of course, one of the best ways to escape reliving it.

Saturday, September 26, 2009

Persnickety on the Details


Should we build in details we can’t see?

When I was a junior I used to take a strange pride in adding details to the interior of models, so that I could say the seats and radios inside that bomber fuselage were present, and maybe even painted some colour which more than likely was not correct. But they were there, as if the model came ever closer to depicting the real thing with such additions. Maybe it does, but surely that principle has been taken a bit far these days.

I’m thinking of the engines in Trumpeter’s jet kits, in which considerable time and effort has been invested, serving to jack up their already high prices that yard further. Not only that, the fuselage does not assemble properly if the engine is not inside, meaning you can’t invest time in finishing the engine and then displaying it alongside the aircraft: finish it realistically or not, it must disappear inside if the model is to be assembled complete, the most-usual state for the aircraft, and that seems a perverse logic. 


 The built-in option is to display the engine with the tail of the aircraft separated, in maintenance mode, but not every modeller wants to do this, and certainly not with every entry into his or her big-scale jets collection, any more than every modeller wants to fold the wings of carrier planes merely because that feature is engineered into some kits (which don’t build cleanly if you don’t take that option, which is at least as perverse as the engine business…)

But we’re all guilty of this to some degree. I religiously fill and smooth off the holes in the bottom of tank models for the controls of motorized versions, so popular long ago and still made by Trumpeter (I have quite a few of their motor/battery packs in my stash now, and am not quite sure what to do with them!) But there are other details that sometimes get by.  


 Having a hard time finding a few bench hours, I was recently stalled by the painting stage of various projects and just wanted to do some gluing, so I broached a subject I’d been looking at for a while, Academy’s M981 FISTV, a laser designator vehicle for guided munitions that fought in Desert Storm, based on the M113 A3 chassis. The model assembles from multiple subassemblies which can be tackled as small projects evening by evening, but the first thing I spotted was the raised company logo on the bottom of the hull. I usually scrape and sand this away so I’m comfortable in the knowledge that my tanks don’t say Tamiya on the bottom, or whatever, but it occurred to me that in all my years I’ve never actually picked up one of my tanks and looked under it.

So who cares? Am I enough of a bean counter to be bothered if the logo is there? This time, no. But, perversely, I blanked and filled the holes as well, done carefully with two rounds of filler for a good job. If I can be motivated to do one, why not both?

It seems to be a question of steam – how much enthusiasm is there on the night? I just wanted to get to the swing arm assembly, I would need to carve away the logo with a blade parallel to the belly plates first, and the bone in my head rebelled at that … so this one has an Academy logo on the bottom. But no motor holes – they I could tackle later!  


 Academy produced a complete engine for their 1:48th scale Sabre which disappears when the fuselage is closed, and there are many tank interior kits which are visible only through hatches, so where should the line be drawn? It’s a very individual thing, I think, and a question we can only answer for ourselves. For myself I have begun to buck at the thought of investing hours and eyesight in cockpit details that are obscured by a canopy which is distortive or simply not clear enough, or trying for details that are at the edges of my own visual resolution, but that’s just me. There are plenty of modellers who set up their vision aids and go to work on minute photoetched bits which will barely be visible, a scale realism they want, to bring their work closer to an accurate replica of the real thing, and this is a skill and a dedication to be applauded.

Where does that leave the modeller’s own sense of persnicketiness? That is probably the ultimate personal aesthetic, and what drives us, in many ways. How we face the challenges of the kit, what compromises we make and how much work we’re willing, or able, to invest in a project in return for what we learn from it and the pleasure of both the build and displaying the model ever after. So long as that equation balances up for each of us, relative to our skills and resources at any particular time, then we’ve been true to our hobby and done our best.

“Rivet-counters,” however, are a whole other matter, and a whole other post!

Tuesday, July 14, 2009

Why do so many companies have trouble with tracks?


Tracks... All armoured vehicles over a certain weight have them. They come in endless styles, narrow ones, broad ones, cleated tracks, padded tracks, live track, dead track... Amtracks with ‘swimming grousers,’ Shermans with ‘snow grousers,’ Panzers with Ostketten. The fascination with modelling tanks brought with it the challenge of companies producing realistic tracks, and most modellers would say they’ve never really achieved 100% accuracy no matter what approach they’ve taken.

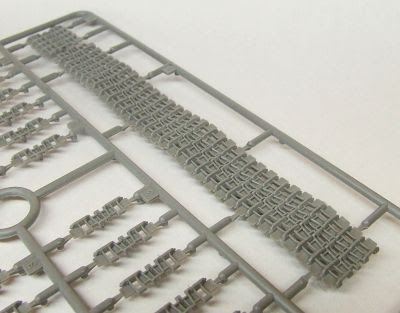
There are traditional flexible vinyl tracks, single-piece, to be joined around the running gear, and they do a generally good job. In the early 1970s they tended to be poorly detailed and possibly undetailed on one side, though today molding technology and computerised machining of the molds means they can be highly detailed both sides. The ones above are from Tamiya’s 1:35th scale King Tiger, Ardennes. The drawback is that the relative stiffness of the vinyl means the tracks don’t develop a sag between the return rollers, or lie along the top of large diameter wheels, like real tracks do. 


 Then there are individual-link or link-and-length tracks, which call for cleanup and assembly. For some modellers these are the best, though for others they are a nightmare whose tedious nature more than forgives the lack of sag in the vinyls. Above are the indie links made by Academy to compliment their issue of the early Tamiya Panzer IV-derived tanks (all the models on the box are of Tamiya origin). And below are ModelKasten’s set for the above-mentioned King Tiger. 


If sag is your thing, Trumpeter got ambitious a few years ago and produced superbly machined link-and-length tracks for their KV-1 series of kits in which the sag over the return rollers was molded right in, and even the most die-hard anti-L&L builder must feel tempted by these amazing pieces of injection work:  


Then come the workable tracks from AM companies, whitemetal, plastic or resin with wire pivots taking the place of the real track bolts, and which will hang, sag and roll like real (dead) track -- for a price.  


Dragon came up with Magic Tracks, a soft styrene type in which the links click-fit and will hold their shape until you can hit them with liquid cement, lending themselves to being shaped to any configuration of suspension. This is a neat idea and probably the most innovative. Vehicles with skirts tend to make that perfect hang and sag of the return length superfluous though: you can’t see it, so why sweat blood on it? And tight tracks don’t sag anyway. But tightness raises the question of why some companies don’t seem to be able to get it right in the most profound sense. 


I’m talking about early Trumpeter. I was really attracted to the Chinese Type 89 tank Destroyer, and was building along quite satisfactorily -- until I came to the tracks. They were half an inch too short (below) to link up around the running gear, and no amount of coaxing was going to change that: snapping off the portside idler wheel convinced me to give up. I tried heat treatment, stretching them by heating them with a hair drier, and hanging them with weights, but after half a dozen exhaustive treatments, using all the heat my hands could tolerate, one track had grown about one link’s worth, as the vinyl shrank again upon cooling. I was fed up and shelved the project. That late-mold Tamiya StuG III I reviewed last time was both a pleasure and a relief to build instead.


 Of course I didn’t give up entirely. The Type 89 shares the same chassis with the 122mm MBRL and the Type 83 SP artillery, I have them all, and all I would need is a single extra length of track to complete them. Cut out a few links and splice them in with superglue and thread as necessary, and suddenly the tracks will go round the running gear and meet as they should. I emailed Trumpeter, seeking to buy a spare length of track, got a reply asking me to forward photographs of the parts involved... Then nothing. Hey, I tried, but their aftermarket support at this point is as dodgy as their English, which is curious given their truly ambitious products and their dedicated assault on the affluent end of the Western marketplace. Their more modern products are of higher quality, I would certainly hope the tracks are the right length given the price they charge for their new armour.

And what about Dragon? That other Chinese company often considered to have eclipsed Tamiya as king of 1:35th scale? Early Dragon is beset by far too many microscopic parts which vanish into the carpet, and by the sort of over-thought engineering that has Dragon airplane models glide into waist bins beside the benches of grown modellers sobbing with frustration at their sheer unfriendliness and inaccuracy of fit. This is the antithesis of Tamiya’s philosophy, and while Tamiya’s earlier products may not be acceptably accurate or sufficiently detailed for today’s more mature taste, you can mostly rely on them to build well. “Buildability” was Mr. Tamiya’s watchword, and is sure to have contributed to the company’s historic success.


My only experience with early Dragon is in the reboxing of their classic Russian armour models when the molds were obtained by Zvezda. Their BTR-70 built fine, only a few grab handles needed to be replaced with brass because they broke before I could remove them from the sprue (because the parts were finer than their sprue attachments!) But their T-72 is another matter. It may be Zvezda’s plastic: the link and length tracks are brittle and the plastic really does not like to react with superglue (a bit like Chinese plastic in that respect). Thus trying to piece those tracks together promised to be an exercise in frustration. The Zvezda T-72B with Explosive Reactive Armour is easily the most detailed tank model I have ever built, and it sits unfinished in its box because there is no way I’ll mess around with that job, and the only AM T-72 tracks I can locate are far more expensive than the kit was. My prayer, thrown to the gods of styrene, is that AFV Club will finally produce high quality vinyl replacements in their expanding range of sell-alone tracks.

Which brings me back to my lament, why can’t companies with all the expertise and the million-dollar computer-assisted design and manufacture, get the tracks right? Properly detailed, that fit the sprockets exactly, articulate with each other, and take a realistic paintjob? If it has to be link-and-length, then the plastic had better respond well to glue, you certainly can’t stitch them together. And if they’re vinyl then is it too much to ask that they be the right length?

These criticisms don’t apply to modern Tamiya products, modern Dragon, or, as far as I know, current Trumpeter or Revell-Germany. But they can all be criticised for their sometimes exorbitant prices. I know, I know—I want it all ways, tracks that fit and an affordable price. I’m just out of touch with reality...

Friday, June 5, 2009

Recently Completed: Tamiya Type 74 MBT


 This model was something of a milestone for me as I had previously only worked in enamel paints on armour. For this one I decided to give a full acrylic paintjob a go, especially as the correct shade for JGSDF Green was standard stock in Tamiya’s range. I won the kit on eBay for a bargain price. It’s the original edition, MM-214, from the days of Tamiya’s partnership with MRC for North American distribution, distinct from the current version of the kit which has markings for a winter scheme.


 The Japanese Type 74 was Japan’s second indigenous post-war MBT and incorporated concepts pioneered by the US/German MBT-70, such as independent, fully-adjustable suspension, and the British L-7 rifled 105mm gun used a few years later on the early production M1, plus laser rangefinder, IR night vision systems and multiple other state of the art refinements for the 1969 – 1975 period. In other ways the tank is very traditional, with the ballistic formula and running gear of the T-34 very apparent.  


The model builds a breeze, it more or less falls together, and has some interesting options, including a wading configuration with vertical exhausts and hatch tower, and posable suspension for a diorama depicting the vehicle on either uneven ground or in ‘kneeling’ mode, in which greater depression or elevation angle was obtained by compressing the hydropneumatic suspension system. There is even a tool for creating a symmetrical offset of the suspension arms. Other features include two figures and a variety of markings for service and training units. The only fiddly bit was the small turret basket which used a lot of CA and taxed my patience somewhat. Less fiddly was the necessity to mount the IR searchlight after applying the forward turret decals, which came out looking most realistic. The kit shows its age in some ways, such as an absence of periscopes under the armoured covers of the driver’s hatch, and no amount of stretching or reverse bending would take the fold-kink out of the vinyl tracks.  


As I began, this was my first acrylic basecoat on armour, and I was very pleased with the result, going on to do a standard triple tonal variation, a lightened shade sprayed into the middle of panels and a darkened shade to the edges as post-shading, which came out particularly effectively on the flank hull. I enjoyed the smooth simplicity of oil wash weathering over the base: I pin-washed as usual, but did some streaking and dirt build-up on the lower hull with soft brushes. I had intended to try clearcoats for applying the prominent decals to the turret, but Tamiya’s decals went on perfectly over the flat finish, so I did not extend things to that range of techniques.  


After that I mounted the antennas from .015” spring steel wire, and used MiG pigments to dust the hull, tracks and running gear. In retrospect the dusting job might have been a bit heavy-handed and I’m toying with the idea of wasing it away and starting again, more subtly, but once again this would be an experiment, I would first study the washing characteristic of the pigment on scrap plastic so as not to turn an aesthetic doubt into a disaster.  


I built this model in 2008 and am very happy with the result (okay, a gap opened up between mantlet and turret in the time she’s been standing, and I’ll have to repair that... Who says model vehicles don’t need maintenance?!) So happy, I have adopted this general suite of techniques as my standard armour finishing procedure and may never spray a tank with enamels again, unless the necessary colour is simply unobtainable and unmixable.