Showing posts with label Academy. Show all posts

Saturday, January 20, 2018

Keeping it Simple: Academy’s Hellcat


When the weather has hit 112 F out there and you need AC and fan in combination to get through the day, you don’t want heavy, complicated projects, and knocking off some quick builds is the right medicine to break up professional commitments.


I picked up Academy’s 1:72 F6F Hellcat (#2121) on eBay many years ago and it has hung around on my shelves for the last two years or so with some pre-painting done, therefore technically started. I would like to do a USN midnight blue subject in each year, along with another from the grey-over-white era, but my last blue was Academy’s F2H Banshee in 2015 – I was amazed to find years had gone by since the last time I uncapped the blue! This Hellcat is a surprisingly good little kit, very simple to put together (so long as you’re careful with alignments, the wing to fuselage can bite you on the underside) and has engraved detail so looks the part under a coat of paint.


Construction was not difficult, fit is generally okay, though the engineering is not quite up there with the big guys. Options include the small side panel windows to do the -3 variant, and you have bombs and rockets for the -5. Clear parts are well done, with a choice of windscreens for the two variants plus clear plug-in domes for the position lights on the spine an tail light under the rudder. The engine is a decent little rendition of an R-2800 and looks okay with a black wash. The prop shaft seems a bit thick and profits from a swipe with a file. Landing gear is reasonably strong for the scale, and undetailed gun barrels are moulded into the wing halves.


I’ve had disappointing results from commercial canopy masks, they can pull up the paint as you remove them, and it’s frustrating indeed when that happens as the product adds several dollars to the build cost. This time I did it the old fashioned way, using thin-cut slivers of Tamiya tape and Gunze masking fluid to outline and fill in the areas, and the thin braces are custom decals – clear Superscale decal film oversprayed first with Interior Green, then Midnight Blue, and finally Micro Satin. I made a piece 30 x 48 mm and should be cutting strips from it for many years to come. I used my “Chopper” mini guillotine to precision-cut a single strip, which provided the four short pieces necessary (I didn’t get fancy with the 45-degree corners of the bracing strips – tis is meant to be a simple project, after all).


I went with a mixed version of USN Midnight Blue (An 607/FS 25042), as I had read and agreed with the observation that Tamiya’s shade (XF-17) was too dark. I tried the mixing ratio of XF-17 : XF-8 : XF-2 at 5:3:2, this producing a slightly brighter and lighter blue. The original was not a full gloss, so Microscale Satin was the perfect finish, right out of the airbrush. I used the Academy instrument decal and going by the way it went on the kit sheet would probably have been usable, but I intended from the start to go with Superscales for this build, 72-737 being my choice, simple markings for a -5 from an unidentified unit toward the end of the war.


The support straps running under the belly tank should be in natural metal, and if I ever locate my silver strip decals I’ll add them. Likewise with the bombs – lightened Olive Drab for scale effect, but the ordnance decals I remembered turned out to be 1:48th scale, so if I ever find smaller ones I may add them and perhaps a clear coat to dull down the weapons. In the same spirit, when I get some superglue in a fresher state I’ll look at adding a radio antenna, if I judge the mast strong enough to take the mild but constant pull of EZline.


It came out very nicely and is my first Hellcat ever – I built a Wildcat as a kid, if memory serves, but never its successor.

I can’t wait to get a Corsair into this mixed blue – it looks better, to my eye, than any I’ve had out of a jar or can so far. Mind, it’s a good job I wasn’t trying for a high gloss, or I’d have been very disappointed, as I have yet to learn the trick of keeping dust and micro-fine hairs out of the painting space.

Next up looks like being a Spit, and maybe a Phantom is impending…

Cheers, Mike


Monday, March 12, 2012

Kit Review: Academy (Tamiya) StuG IV, #1332


It was about a year ago that I was posting on building this kit and being stunned to find that Academy had thieved most of their early range from Tamiya. I mentioned one or two minor differences that appeared in the building stage, then this kit lay fallow for a long time waiting for its paintjob.

Having just this summer got back to the bench after a quite protracted absence, I have been finishing some shelf-sitters, this one being my fifth in a row. This was my first tri-tone “ambush” scheme and I enjoyed it very much.


The basic vehicle was sprayed overall with XF-60 Dark Yellow, then a slightly darkened version was applied to the hull sidewalls and underside as a shade/dirt colour. The airbrush was changed to the fine tip and needle and Redbrown (XF-64) and Dark Green (XF-26) were sprayed, following the pattern seen in the box photos. Some extra yellow was used to touch up overspray, then a pattern of blowing leaves was applied in the three colours by brush. More yellow was mixed for the fade coat, being thinned 800% overspec as a glaze which was misted onto the upper surfaces, creating the impression of faded paint, and visually tying all three colours together.


The usual suite of techniques was used, being drybrushing with lightened shades of the three main colours on all edges, then drybrushing silver to represent areas of bare metal, washes of black and dark brown oil paint to create rust streaks and dirt accumulations, some washes of orange here and there for fresh, bright rust, graphite dust around the gun muzzle, and so forth. Alliance Modelworks German Vehicle Templates were used to spray the wheel hubs, .015” wire was used for the radio mast, and the muffler was treated with applications of liquid glue and sanding dust to create the bubbled rust effect.


Another variation from the Tamiya original showed up, the spare track links on the lower forward hull had to be back-ground to reduce their thickness by a considerable amount before they would fit the rack, whereas the originals just dropped into place. There are probably other subtle differences here and there, but to all practical ends the model really is identical.


The paint scheme I used is featured on the box photos but the decals for this vehicle, of the Grossdeutschland Division by the looks of the insignia, are not featured in the kit. I brought out the spare markings from the Tamiya example I did about two years ago and did some online research for which StuG IV units were operational in the west in late ’44, and thus good candidates to be wearing the “ambush” scheme. I chose the 251st Assault Gun Brigade, whose colourful eagle badge was on the Tamiya sheet, and while this is obviously a best-guess situation, I feel it’s a reasonable one.


In conclusion, Academy’s knock-off of Tamiya’s StuG IV is an enjoyable build with a few quirks not found in the original but nevertheless a straight forward prospect for anyone with a few projects to their credit. I’m very happy with the result, it looks good, aggressive in its dust and rust, colourful in its blowing-leaves autumn paintjob, and demonstrates once again how much versatility there is in the early Tamiya kits. That’s two of these so far, and I know there’ll be more. Winter markings, full skirts, heavy weathering, mud, stowage, there are plenty of options for depicting these hard-used, hard-fighting workhorses of the Wermacht.

Saturday, February 25, 2012

Kit Review: Academy’s M51 Isherman (#1373)


When Academy learned their craft and got over the period when they pirated Tamiya’s range to flesh out their own (no, I will never forget or forgive that…) their inherent quality really began to shine. This kit was tooled in 1997 and shows up very nicely even now. Dragon tooled this subject, then retooled their kit (doubtless with typically Dragon over-thought engineering) and Tamiya have just issued an Isherman, probably with typically Tamiya simplified construction and great attention to detail. By and large, these models all look pretty similar when lined up – you need to be an M51 expert to pick the differences and know what they mean, and that means the older kit stands up well.


I pursued this model in subassemblies, building everything I possibly could before being obliged to move on to the main sections. Cans, stowage bin, suspension units, the turret, the engine deck and final drives were all made up long in advance, so when I came to drop the model together it was pretty much as simple as that. About two days work and she was ready for paint. There are minimal fit issues, the junction between the transmission cover and main hull at the front needed some filler, and the gap under the gun mantlet is a bit dubious (the canvas shroud behind the mantlet is perhaps the poorest part of the model and needs some pushing and pulling to get an even acceptable fit, plus there are no alignment guides at all and your down to the sticking power of glue to get it to hang together).

Options include open hatches and raised or lowered periscopes, choice of drive sprockets and stowage units, and the option of spare track on the turret sides, all of which go together for an early (Six Day War) Isherman or a late (Yom Kippur) vehicle. I built the latter.


Other than the points above, the kit did not fight me. The suspension units need filing carefully to line up level, if you stick them on as-is they will all sit up sharply at the front, which will look decidedly odd. But that’s what files are for, and while one might grumble that Tamiya’s HVSS subassemblies will probably assume their perfect alignment naturally, it really was not much of a modification to get these to line up, and the detail on the completed eight-part bogie units is excellent, even including foundry casting numbers. Suitably wash weathered, they provide an amazing visual texture when the Sherman’s twenty wheels per side (including drives, idlers and return rollers) are all lined up.

I mixed Tamiya Acrylics for the paintwork. I had obtained Model Master Acryl Israeli Sand, but cannot imagine where Testors got their research data for this paint. I have seen models finished in it and they look the least representational of the replicas out there on the net; they certainly don’t resemble either the Shermans in the museum at Latrun or colour photos of Shermans in service. The Acryl is a satin finish mustard yellow which by no definition could agree with the name “Sinai Grey.” I used the ratios published by IDF Modeling to mix a shade for the October 1973 conflict, being Tamiya XF-20 Light Grey, XF-57 Buff and XF-59 Desert Yellow (1:1:1), and airbrushed it overall, followed by shade and fade coats as usual for a monochrome subject. The result was a very pleasing drab desert scheme, which took weathering with oils and powder pigments very nicely indeed.


Academy’s decals are usually condemned as the worst in any commercial kits but I found these to behave quite well. The only major drawback was their shine, and as I was not planning on using clearcoats on this model I cut the shine by using a stiff brush to grind pigments into the decals, giving the impression of dust over the markings. It was not 100% successful, but visually very pleasing so long as the light does not catch the decals.

The kit provides a good selection of stowage in the form of ammo cans and crates, 105mm shells and an MG tripod, plus kitbags and rolled items such as groundsheets, which painted up very nicely. Unfortunately the kitbags are moulded with open backs which demands they lie against a flat surface, and they are arranged in the box photos in places where there are no tie-downs. Technically they should be hung from the rail around the rear of the turret, but if you do that you will see without much difficulty that they are open at the back. Packing the rear with some sort of putty, sculpting and repainting would fix this, but it was rather more work than I wanted to get into at this point.


A couple of wire radio masts, paint and fit the searchlight, and this beast was done. It’s one of the most textured models I’ve ever built, including an etched quality to the hull surface which suggests the original casting process.

I would recommend this kit to anyone with a few armour models under his or her belt – take it easy and enjoy the build, and don’t let it bite you in a few places!

Sunday, February 12, 2012

Rusting Metal


Creating convincing rust is an artform, every armour modeller knows how, and there are a plethora of techniques. Oil pinwash creates very convincing old rust that has been rain-streaked down vertical surfaces, and capillary action draws oils in a very visually pleasing way around all three dimensional detail to the same effect. Pigments and ground pastels can be used to generate very convincing rust staining, but these are all 2D colour applications. What about when the rust has actually eaten into and modified a surface?

I recently came upon a quick technique for making rust bubble up on tank exhausts. It’s a combination of methods but takes only a short while.

I first brush on liquid cement, then scatter the wet cement with saved sanding dust – yes, when I sand putty I tap the resulting dust into a container and save it for jobs just like this! The glue locks it in place and when it’s dry I overspray with acrylics in a colour close to that of the finished rust. Then I brush it over with Migs, a red rust shade, then a black for soot and to give it depth.

The result can be surprisingly realistic for minimal effort. It doesn’t always come out perfectly, much depends on the randomness of the powder scatter in the first part, but it’s never less than an interesting and unusual effect. The accompanying photos show the exhaust of an Academy M51 Super Sherman (kit review coming soon) and the muffler of my Academy/Tamiya StuG IV, which is finally taking shape.


Thursday, March 31, 2011

I’m Stunned


I could say I’m disgusted, bemused or distressed, just the same. Even naïve… I read on a net forum last night that there was never a business agreement between Tamiya and Academy…

I flipped through an Academy catalogue in the early 90s and nodded with a certain boredom at the time as I recognised item after item as being Tamiya, 1:350 battleships, tanks I’d already built… I assumed, and of course that’s always a bad thing. It may be something to do with the Western mindset that can’t comprehend thieving on this scale, that twenty years later it comes as an amazement.

The discrepancy I noticed and wrote up last time but one is symptomatic, perhaps. Was it a change instituted to get around some aspect of copyright? Or some mysterious feature added in? Who knows, the only thing for certain is that copyright in Asia, certainly in the late 1980s, was so nebulous a thing that one major company could establish itself by stealing the product line from another. That’s cut-throat…

My respect for Academy just went down a notch, but hopefully their business practice had more integrity once they were up and running. Mr Tamiya must have had some deep discussions with his legal team at the time, but I doubt he ever stooped to stealing back from Academy. (Personally I’m amazed he ever reboxed Italeri and Monogram, the Tamiya name is associated with another class of product.)

The knock-off product certainly was not pantographed, there is none of the characteristic softness. My guess is that laser inferometery was up to the job, and Tamiya sprues were scanned into a 3D model and output through a CAD/CAM process to cut new moulds. This process was in use in the early 90s in film-making, to translate a sculpted miniature into a 3D model, so in industrial terms it might have been around as early as ’87… Switching out the part numbers and rearranging the plan drawings might have instituted just enough difference for them to call it a new kit.

I guess the collector can only shrug and accept a good deal when it comes along. The Academy knock-offs were not much cheaper than their identical cousins, but you can pick them up on eBay for a decent price these days, a fair few dollars less than originals. That StuG is ready for paint, but it will always carry a mental tang, for me, that the Tamiya original does not, and it’s all about the notion of legitimacy.

Monday, March 28, 2011

Kits That Build Themselves (Almost)


Late in 2009 I built Tamiya’s old StuG IV kit (35087) and was delighted with the easy-build characteristics of the 1970s approach to kit engineering. Dragon sophistication had not come into the world, but Dragon over-complexity had also yet to appear, and notions like slide moulding were a technical phantasm. As I’ve mentioned on occasion, while the armour kits of the 70s leave a lot to be desired by modern standards, they also had the virtue of buildability, and before the advent of Dragon, Tamiya’s only real competitiors were Esci/ERTL and odd offerings from Heller, plus the 1:32nd scale range from Monogram and the 1:40th scale series from Revell.

I recently found the urge to build another Tamiya StuG IV, this time the Academy issue of 1987 (from the period when a batch of older Tamiya kits fleshed out their range for market impact before their own product really got rolling). The factory example photographed for the box shows a very attractive fall ’44 ‘Ambush’ scheme complete with blowing leaves, but the markings (for what appears to be the Grossdeutschland Division, going by the helmet motif) are not included. Academy scanned Tamiya’s plans, rearranged the drawings and renumbered the parts, rather a pointless exercise if it was meant to disguise the origins of the kit, all of which rendered the plans confusing in places. I built from Tamiya plans, and referred to the Academy plans merely for part numbers on the rare occasions I couldn’t recognise them instantly.


This is a very simple kit, but its 217 components would have been an impressive total in the 70s. What strikes me about it is how easy the build is. This example fell together in about four sittings, even wasting time I doubt I spent more than five hours from go before I was encountering the need for paint. The moulds were showing their age, some parts needed extra filing and fiddling to get them to line up, some separation lines were pretty heavy, especially in the suspension, but these issues were par for the course in the 70s anyway, and compared to the Dragon StuG III F/8 I’ve had underway since last year, this one built in a blink. The indie-link Ostketten on that one put me off every time I think about them.

One unusual thing, there is a gap about .060” wide between the idler axle components. The rooting of the parts, moulded onto the transom, is supposed to fit against the outer axle parts which are cast with the main tub, but the parts sit back, with a pronounced cutaway. This element does not appear on the original Tamiya kit, I just checked the one in my display case and it’s not there. So did Academy retool and introduce this change for some bizarre reason? The parts do not look soft and ‘blobby’ as they would if they had been three-dimensionally traced with a pantograph. I have Academy’s issue of the Panzer IV H with stand-off armour, originally Tamiya 35057, and this difference does not appear in the transom plate of this essentially identical kit (identical as far as these components are concerned, certainly). Whatever, that left me with gaps where none should be and axle roots that don’t look convincing.


Given that it’s not the easiest part of the vehicle to see, I decided a perfect fix was not required, and sufficed to shim the gap with a sliver of 4.8mm tubing to create a mechanical illusion of completeness. A proper fix would have been to shim it with sheet plastic and carve the plastic to match the structures adjoining, and this would have been possible before assembly, but that much knife and file work when there are finished structures in close proximity seemed like asking for trouble. This is a simple build, I want it finished, not living on my bench. Filling in the slots behind the axle mounts with strip plastic was also a simple enough process, and created the impression once again of mechanical detail, barely-seen.

Modelling is meant to be about fun, and the simplicity of the engineering lends itself to prompt assembly while the age of the moulds inescapably exercises the skill muscles to compensate. In that much, it’s a good mix. The artistic muscles come next: I’ve never done an ‘Ambush’ scheme before, and have not dialled the airbrush down for tight soft-edge freehand spraying in two or three years. Maybe it’s time to give that technique a whirl again.

Tuesday, December 29, 2009

I Feel Like Building A Model… NOT Painting It!


 Have you ever had the feeling that one part of your artistic creativity is in conflict with another? There have been occasions when I had a spare hour or two and found myself staring at the projects underway and realising that every single one was at some point which obliged me to set up my airbrush and start pushing various colours through to spot-paint detail parts, which means far more cleaning of the airbrush and its jars, and far more mixing of paint, than actual painting. There are times when you just want to build. One problem with aircraft, much as I love them, is that you’re pretty much obliged to paint that wretched cockpit first. Struggle with tiny details, drybrush the controls, put on decals perhaps, create instrument lenses with blobs of Clear Parts Cement, and suchlike. And frankly, there are times you don’t want to be bothered with all that, but just get to the engineering of the piece, tidying up the parts and bringing them together just so, then perhaps doctoring the joint lines with whatever technique you prefer. Perhaps that’s one of the drawcards of armour modelling. Unless you have a perverse desire to open hatches all the time, the inside of a tank is a mystery to the viewer and can be conveniently ignored, which means most of a tank can be built before you need to start painting, and that’s attractive. Building the barrel and turret, mounting suspension swing arms and other lower hull details, dressing the upper hull with hatches, grills, any number of parts that can go on before you need to paint anything… Then join the hull, do some joint work if needed, and you’re into masking the locators for tools and such, masking the mating ring of the turret and all the axles. Oh yes, there’s lots to do before you need put down the first colour. The Academy M981 above falls into this category: I just wanted to enjoy building, and a relatively complex, multi-part armoured vehicle fit the bill to a T. I put it together months ago, and when a slot comes up in my painting schedule it'll finally see it's three-colour camouflage.  


 Right now I have 20 models in progress, at some stage or other. I could be mottling the camo of that Tamiya Me 262, or I could be prepping for the natural metal finish of that F-84 Thunderjet. But over the last week or so I’ve been wash-and-drybrush detailing three armour kits. The time comes when you have to paint what you’ve built and production line modelling is a way of getting through them. Base colour, camo pattern, fade coat, oil filter weathering, pinwash, drybrush profiling, decals, dust coat… I’ll get back to aircraft shortly, I have at least seven to finish in the next two months or so, but you know, when the fiddly details have got me at my wits’ end, I’ll take a break from being an artist, and be an engineer again for a few relaxing sessions. One thing I’m certain of: whatever I build on that day, the odds are it’ll have tracks under it! Hoping you all had a wonderful festive season and that the New Year brings everything you could hope for! Cheers, Mike/Thunderbolt379

Tuesday, July 14, 2009

Why do so many companies have trouble with tracks?


Tracks... All armoured vehicles over a certain weight have them. They come in endless styles, narrow ones, broad ones, cleated tracks, padded tracks, live track, dead track... Amtracks with ‘swimming grousers,’ Shermans with ‘snow grousers,’ Panzers with Ostketten. The fascination with modelling tanks brought with it the challenge of companies producing realistic tracks, and most modellers would say they’ve never really achieved 100% accuracy no matter what approach they’ve taken.

There are traditional flexible vinyl tracks, single-piece, to be joined around the running gear, and they do a generally good job. In the early 1970s they tended to be poorly detailed and possibly undetailed on one side, though today molding technology and computerised machining of the molds means they can be highly detailed both sides. The ones above are from Tamiya’s 1:35th scale King Tiger, Ardennes. The drawback is that the relative stiffness of the vinyl means the tracks don’t develop a sag between the return rollers, or lie along the top of large diameter wheels, like real tracks do. 


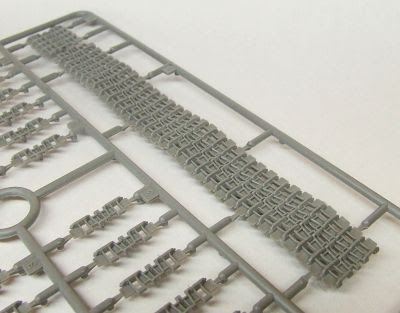
 Then there are individual-link or link-and-length tracks, which call for cleanup and assembly. For some modellers these are the best, though for others they are a nightmare whose tedious nature more than forgives the lack of sag in the vinyls. Above are the indie links made by Academy to compliment their issue of the early Tamiya Panzer IV-derived tanks (all the models on the box are of Tamiya origin). And below are ModelKasten’s set for the above-mentioned King Tiger. 


If sag is your thing, Trumpeter got ambitious a few years ago and produced superbly machined link-and-length tracks for their KV-1 series of kits in which the sag over the return rollers was molded right in, and even the most die-hard anti-L&L builder must feel tempted by these amazing pieces of injection work:  


Then come the workable tracks from AM companies, whitemetal, plastic or resin with wire pivots taking the place of the real track bolts, and which will hang, sag and roll like real (dead) track -- for a price.  


Dragon came up with Magic Tracks, a soft styrene type in which the links click-fit and will hold their shape until you can hit them with liquid cement, lending themselves to being shaped to any configuration of suspension. This is a neat idea and probably the most innovative. Vehicles with skirts tend to make that perfect hang and sag of the return length superfluous though: you can’t see it, so why sweat blood on it? And tight tracks don’t sag anyway. But tightness raises the question of why some companies don’t seem to be able to get it right in the most profound sense. 


I’m talking about early Trumpeter. I was really attracted to the Chinese Type 89 tank Destroyer, and was building along quite satisfactorily -- until I came to the tracks. They were half an inch too short (below) to link up around the running gear, and no amount of coaxing was going to change that: snapping off the portside idler wheel convinced me to give up. I tried heat treatment, stretching them by heating them with a hair drier, and hanging them with weights, but after half a dozen exhaustive treatments, using all the heat my hands could tolerate, one track had grown about one link’s worth, as the vinyl shrank again upon cooling. I was fed up and shelved the project. That late-mold Tamiya StuG III I reviewed last time was both a pleasure and a relief to build instead.


 Of course I didn’t give up entirely. The Type 89 shares the same chassis with the 122mm MBRL and the Type 83 SP artillery, I have them all, and all I would need is a single extra length of track to complete them. Cut out a few links and splice them in with superglue and thread as necessary, and suddenly the tracks will go round the running gear and meet as they should. I emailed Trumpeter, seeking to buy a spare length of track, got a reply asking me to forward photographs of the parts involved... Then nothing. Hey, I tried, but their aftermarket support at this point is as dodgy as their English, which is curious given their truly ambitious products and their dedicated assault on the affluent end of the Western marketplace. Their more modern products are of higher quality, I would certainly hope the tracks are the right length given the price they charge for their new armour.

And what about Dragon? That other Chinese company often considered to have eclipsed Tamiya as king of 1:35th scale? Early Dragon is beset by far too many microscopic parts which vanish into the carpet, and by the sort of over-thought engineering that has Dragon airplane models glide into waist bins beside the benches of grown modellers sobbing with frustration at their sheer unfriendliness and inaccuracy of fit. This is the antithesis of Tamiya’s philosophy, and while Tamiya’s earlier products may not be acceptably accurate or sufficiently detailed for today’s more mature taste, you can mostly rely on them to build well. “Buildability” was Mr. Tamiya’s watchword, and is sure to have contributed to the company’s historic success.


My only experience with early Dragon is in the reboxing of their classic Russian armour models when the molds were obtained by Zvezda. Their BTR-70 built fine, only a few grab handles needed to be replaced with brass because they broke before I could remove them from the sprue (because the parts were finer than their sprue attachments!) But their T-72 is another matter. It may be Zvezda’s plastic: the link and length tracks are brittle and the plastic really does not like to react with superglue (a bit like Chinese plastic in that respect). Thus trying to piece those tracks together promised to be an exercise in frustration. The Zvezda T-72B with Explosive Reactive Armour is easily the most detailed tank model I have ever built, and it sits unfinished in its box because there is no way I’ll mess around with that job, and the only AM T-72 tracks I can locate are far more expensive than the kit was. My prayer, thrown to the gods of styrene, is that AFV Club will finally produce high quality vinyl replacements in their expanding range of sell-alone tracks.

Which brings me back to my lament, why can’t companies with all the expertise and the million-dollar computer-assisted design and manufacture, get the tracks right? Properly detailed, that fit the sprockets exactly, articulate with each other, and take a realistic paintjob? If it has to be link-and-length, then the plastic had better respond well to glue, you certainly can’t stitch them together. And if they’re vinyl then is it too much to ask that they be the right length?

These criticisms don’t apply to modern Tamiya products, modern Dragon, or, as far as I know, current Trumpeter or Revell-Germany. But they can all be criticised for their sometimes exorbitant prices. I know, I know—I want it all ways, tracks that fit and an affordable price. I’m just out of touch with reality...

Thursday, May 28, 2009

Product Review: Bison Decals


 In the modern hobby environment new decal manufacturers seem to spring up every time you blink, but that goes to underline the fact that the hobby grew up with those who were born into it, and the modern plastic hobbyist demands accuracy, performance and variety. Swedish company Bison specialise in armour decals, with a strong emphasis on World War II. Their sheets are compact and economical, providing both vehicle tactical numbers and national insignia for numerous subjects, with a B&W foldout instruction sheet showing placement. Paintscheme diagrams are very small, however, and of limited use: you’re meant to do your research for these subjects, and Bison include the complete list of published works and online resources they used to create the decals. This is really interactive modelling!


 My first taste of Bison was sheet 35023, Early Tiger Is on the Eastern Front, featuring complete markings for eight tanks. I built Academy’s Tiger I (Early), kit #1386, and used the markings for 1325 of the LAH at Kursk (two white outline balkenkreutzer and three tactical numbers, one for each side of the turret and one for the stowage bin, facing the rear. My sample was fractionally out of register between the black and white elements of the numbers, but the error factor was so close to the resolving ability of my eyes that it made no difference to me. The silk-screened waterslide decals, manufactured by Fantasy Printshop in France, are very thin and take around 90 seconds soaking time to free off from their backing paper. They respond well to Microscale chemistry, a few applications of MicroSol really pulling them into surface detail. They go down over a flat finish with absolutely no silvering at all. Drawbacks -- the decals tend to want to stick wherever they touch, there’s precious little slippage available, no matter if you absolutely puddle them in MicroSet, so be as accurate as you can when placing them. They’re strong enough to withstand repositioning with a fingertip a time or two, which is a good thing as a brush will never move them. The graphics are designed to be proportionally correct on flat surfaces, there is no built-in correction for distortion over 3D detailing where this occurs. And lastly, they have a bright, glossy finish. I overcoated them with two or three applications of Gunze clear flat before trimming them close, but even so they were brighter than surrounding paintwork. This may be a case for airbrushing clearcoats if you’re a stickler for finish. Bison are available from numerous outlets around the world, a favourite is http://ausfwerks.com, whose website features larger, full colour versions of the diagrams (left profiles only).


You can find Bison themselves at: http://www.angelfire.com/pro/bison Their website features the colour profiles and a look at the sheets themselves. 35023 is further reviewed at: http://www.perthmilitarymodelling.com/reviews/vehicles/bison/bison.htm New subjects are coming along regularly, for fans of Axis and Allied armour. For unusual subject matter and excellent quality, this is a range to keep in stock in your decal drawer.