Showing posts with label Superscale. Show all posts

Wednesday, December 25, 2024

Tamiya Leopard 1A4: Like Going Home


I’ve neglected this blog for far too long, and have been so busy in recent years with my writing career that modelling has taken a back seat. I've completed only two models this year (though worked on at least five others), the first being the Dragon 1:72 Jagdtiger I posted about six months ago. Recently I got to build one that’s been on my to-do list for many years, Tamiya’s 1979 35th scale tooling of the West German Leopard 1A4 (35112).

The Leopard 1 is still in service in 2025 with some sixteen armies around the world, with new upgrades on offer from many firms, so it’s far from a period piece, despite Australia having retired our Leos in favour of reconditioned M1A1s (not a universally popular decision) many years ago.

Okay, Meng’s much newer kit is far superior, but it’s also correspondingly expensive, and I do enjoy vintage Tamiya for its own sake. The kit is straight-forward though there are one or two bits that can bite you if you’re unwary. Construction follows the standard Tamaya pattern, running gear being suggested to be assembled first, though the wheels form a subset that can be built and detailed separately from the rest and added late in the process if you work that way—I do, as it happens. Upper and lower hulls are large single piece toolings, dressed with smaller parts.


The drive wheels housings are compromised by the kit sharing tooling with the popular early motorised version. I say compromised, they are inherently weak and need to take a lot of force when the tracks are joined and tension thus comes into play. This has never been a problem, however, with superglue making a suitably strong bond.

When I began this project it felt like going home. Muscle memory would just about build it, especially as I built the Flakpanzer Gepard AA tank version back in the 90s, about my third armour kit ever. Construction proceeded without much difficulty, though there were details I wish I'd spotted. The co-axial MG in the turret is not moulded as a proper gun barrel, merely a protruding rounded shape, and I could have at least drilled out the port for appearances.

The tracks took a lot of work. One thinks that one-piece vinyls should be child's play, and they are, but the detail is very repetitious. There are 672 rubber pads—that’s four per link times 84 links per track times two. After a sprayed base coat of rust/dirt browns, every single pad was brush painted rubber black (Tamiya XF-85) by hand, rather a daunting proposition. They were then treated with a Tamiya dark brown weathering wash to create depth, and oversprayed with an ultra-thin glaze of buff (two drops to forty drops of thinner) to create a dust coat. Lastly they got a few touches of MiG powder pigment to suggest fresher rust here and there, and the guide horns were drybrushed metallic. For all this effort, the effect doesn’t really show up in pictures—I might as well have not bothered... Fully half of each track is also behind the side skirts, so I could have detailed only the middle part and saved the effort!


The wheels were masked with a combination of rubber solution and disc stickers, then sprayed rubber black for the tires. I used the template method for the faces of the wheels, a 15mm circle template fitted nicely.

The main paintwork was a mixed shade for German Army Gelbolive, a formula I found at Armorama. XF-51 Khaki Green plus XF-57 Buff plus XF-74 Japanese Olive at a ratio of 4:1:2. This seems a very good match for the original. I made a batch darker with the addition of some black as a shade coat for the underside and behind the running gear, then another batch lightened with extra buff as a fade coat to mottle/pattern the upper surfaces. With all this done, I sealed the surface with Micro Flat. Where the decals would go I splashed with Micro Satin to bring up the lustre and improve adhesion, then resealed with flat over the decals once applied.

The kit decals were quite old but worked very well indeed. They took a while to part from the backing sheet, but snugged down surprisingly well and their finish was very close to that of the paint. They were slightly out of register, so when it came to the crosses, I took some from a Supercsale sheet that were within half a millimetre of the correct size, and these, surprisingly, were glossier and needed more attention to blend in.


The pioneer tools were a fair job in their own right, with a sprayed metallic, brush painted wood tone and hull colour on the clamps, Micro Flat over the hull colour areas, brown oil wash to create a patina on the metal and a darkening effect on the wood.

Finishing techniques included Flory wash in the engraved detail, MiG pigments for dust and rust, and drybrushed metallic for abraded areas, plus the usual suite of oil techniques, being dirt spots and chipping, edge profiling and rust streaks.

I had the advantage of a research source showing the very same vehicle as the kit depicts—a 1984 partwork whose first issue featured a centre spread of the Leo by the talented Kieth Fretwell. On reflection, the kit might have actually guided the illustration, which even shows the wading -kit tower on the commander’s hatch, which is included in the kit as optional parts! I did not bother rigging a radio antenna, as photographs are quite contradictory. Many Leos are photographed without radio masts at all, others have stub antennas only. If I get a definitive source on this I can always add it later.


The Leo looks good, was a fun build—I wish I could have spent a little longer on it: I could have caught some problems before they happened. But it’s a good addition to the modern armour collection. I look forward to doing Revell’s Marder IFV in the same scale, using the same pre-NATO-camo Gelbolive.

If and when I replace my studio lights, I’ll take better photos.

Thanks for looking,


Mike


Saturday, August 25, 2018

Mustang in Blue Diamonds


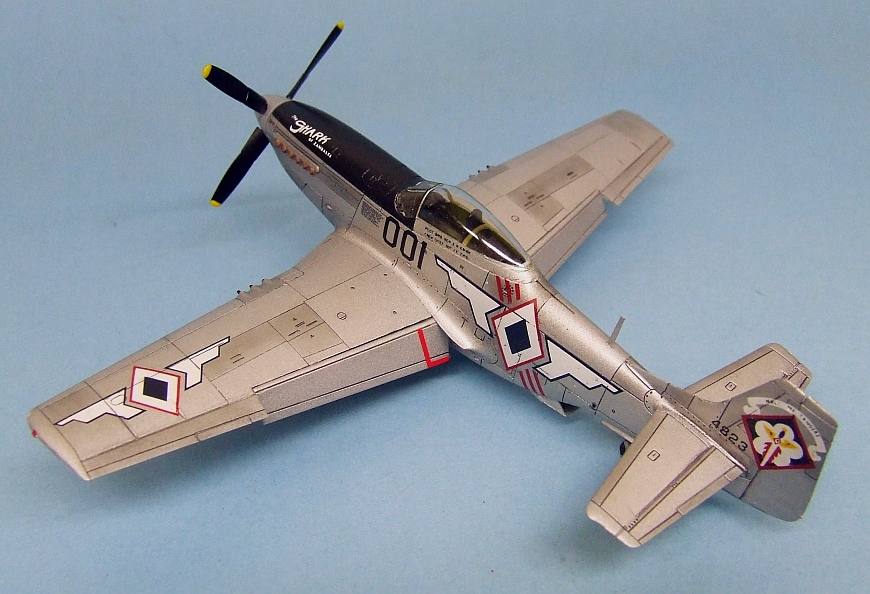
Earlier this year I completed Airfix’s 1:72 P-51D Mustang (A01004). This is the same kit I built around 2014, same original issue, though the kit has been boxed several times now with fresh marking options. This time I learned from my errors and did not try to include photoetched harness, though I succeeded in installing both joystick and radio mast unbroken. It remains to be seen if I can do that trick twice.

I have long wanted to do the varied post-war schemes and an old Superscale sheet (72-149) features the markings of the Philippine Air Force, who used Mustangs between the late ’40 and late ‘50s. The most famous of these was “Shark of Zambales,” the personal mount of the commanding general of the arm, B. N. Ebuen, and which has been the subject of numerous restorations over the years, including a standing display at the PAF museum at Villamor Airbase. Superscale included markings for a very particular phase in the original’s career, as the markings seem to differ in detail from one photograph to the next. Prolific aviation artist Gaetan Marie (check out his page here) has painted three different schemes worn by this aircraft, varying by the size, shape and colour of the shark-mouth, the scroll over the tail marking, spinner decoration, etc. and Superscale seem to have based their rendition on a single B&W photograph in which I am not prepared to swear the shark-mouth was actually applied. Angle and the nature of the filmstock make it dubious, but what’s not dubious is the unlikelihood of me applying the decals perfectly, so I left them on the sheet. I can always apply them in future if I feel justified.


The sheet must be over twenty years old and worked beautifully, I find myself thinking I’ll still be using decals from my stash decades hence, and they’ll still work as well as ever!


Another important factor, this is my first natural metal scheme in many years, as I have had the greatest difficulty in achieving a credible finish. I used Tamiya flat aluminium acrylic, overworked with 6B pencil graphite to vary the tonal values, then topcoated with Micro Satin for lustre. It feels quite good and I look forward to trying this technique again.


The landing gear of the Airfix kit is its only real disappointment – the plastic is soft and the main gear legs are irretrievably warped right on the sprue. The first time I built the kit I overlooked the problem and photographed it from angles that hid the gear, but this time I just couldn’t. I picked up the white metal replacement set from Scale Aircraft Conversions, beautiful castings in strong metal, absolutely straight, and they even supply two sets in the box so the next Airfix Mustang will get them too.


This bird came out very nicely and I look forward to adding more to my line-up – I recently picked up decal sets for postwar ANG birds and third world users, plus the Airfix edition with decals for Grenada, 1983, the last user of Mustangs in a combat role. I should think I’ll develop a long line of P-51Ds based on this kit and the ocean of decals I’ve collected over the years.


Saturday, January 20, 2018

Keeping it Simple: Academy’s Hellcat


When the weather has hit 112 F out there and you need AC and fan in combination to get through the day, you don’t want heavy, complicated projects, and knocking off some quick builds is the right medicine to break up professional commitments.


I picked up Academy’s 1:72 F6F Hellcat (#2121) on eBay many years ago and it has hung around on my shelves for the last two years or so with some pre-painting done, therefore technically started. I would like to do a USN midnight blue subject in each year, along with another from the grey-over-white era, but my last blue was Academy’s F2H Banshee in 2015 – I was amazed to find years had gone by since the last time I uncapped the blue! This Hellcat is a surprisingly good little kit, very simple to put together (so long as you’re careful with alignments, the wing to fuselage can bite you on the underside) and has engraved detail so looks the part under a coat of paint.


Construction was not difficult, fit is generally okay, though the engineering is not quite up there with the big guys. Options include the small side panel windows to do the -3 variant, and you have bombs and rockets for the -5. Clear parts are well done, with a choice of windscreens for the two variants plus clear plug-in domes for the position lights on the spine an tail light under the rudder. The engine is a decent little rendition of an R-2800 and looks okay with a black wash. The prop shaft seems a bit thick and profits from a swipe with a file. Landing gear is reasonably strong for the scale, and undetailed gun barrels are moulded into the wing halves.


I’ve had disappointing results from commercial canopy masks, they can pull up the paint as you remove them, and it’s frustrating indeed when that happens as the product adds several dollars to the build cost. This time I did it the old fashioned way, using thin-cut slivers of Tamiya tape and Gunze masking fluid to outline and fill in the areas, and the thin braces are custom decals – clear Superscale decal film oversprayed first with Interior Green, then Midnight Blue, and finally Micro Satin. I made a piece 30 x 48 mm and should be cutting strips from it for many years to come. I used my “Chopper” mini guillotine to precision-cut a single strip, which provided the four short pieces necessary (I didn’t get fancy with the 45-degree corners of the bracing strips – tis is meant to be a simple project, after all).


I went with a mixed version of USN Midnight Blue (An 607/FS 25042), as I had read and agreed with the observation that Tamiya’s shade (XF-17) was too dark. I tried the mixing ratio of XF-17 : XF-8 : XF-2 at 5:3:2, this producing a slightly brighter and lighter blue. The original was not a full gloss, so Microscale Satin was the perfect finish, right out of the airbrush. I used the Academy instrument decal and going by the way it went on the kit sheet would probably have been usable, but I intended from the start to go with Superscales for this build, 72-737 being my choice, simple markings for a -5 from an unidentified unit toward the end of the war.


The support straps running under the belly tank should be in natural metal, and if I ever locate my silver strip decals I’ll add them. Likewise with the bombs – lightened Olive Drab for scale effect, but the ordnance decals I remembered turned out to be 1:48th scale, so if I ever find smaller ones I may add them and perhaps a clear coat to dull down the weapons. In the same spirit, when I get some superglue in a fresher state I’ll look at adding a radio antenna, if I judge the mast strong enough to take the mild but constant pull of EZline.


It came out very nicely and is my first Hellcat ever – I built a Wildcat as a kid, if memory serves, but never its successor.

I can’t wait to get a Corsair into this mixed blue – it looks better, to my eye, than any I’ve had out of a jar or can so far. Mind, it’s a good job I wasn’t trying for a high gloss, or I’d have been very disappointed, as I have yet to learn the trick of keeping dust and micro-fine hairs out of the painting space.

Next up looks like being a Spit, and maybe a Phantom is impending…

Cheers, Mike


Sunday, January 30, 2011

Old Decals Still Work


They do say there’s a finite lifespan to decals, and anyone who has opened a vintage kit can attest to how fragile, faded and yellowed they can become. But decal technology has come a long way and when firms like Microscale came along they used only the best. I have had aftermarket decals perish, but not the good stuff.

The latest milestone on the Italeri Corsair was getting the markings on. I had meant to do Guy Bordelon’s plane but Italeri got the famous blue (substituting for white to ‘tone down’ the visibility for a nightfighter unit during the Korean war) too vivid. I have Superscale’s better version but before I was able to locate them I decided to go with the standard marking option in the kit, VMF(N)-513. I had applied Microscale Satin over the Tamiya XF-17 paintwork, resulting in a nice, smooth lustre, and I began on the underside for caution’s sake. The kit decals were very thin, very fragile, and the whites were translucent… Not the best, but there are always options.

Out came the big box which stores decals, most of them Superscale. The “Marines” title under the wing was sourced from sheet 72-20, and the non-backgrounded national insignia, with their separately printed red bars, from 72-12. These days, the range is way above a thousand sheets and still counting, and it must be over a decade since Krasel Industries announced they would no longer be reprinting their old releases. These two sheets date from the early 1970s and may have been printed no later than the mid-90s, so I had to wonder at first how they might perform.

They have been stored away from light and pressed firmly in their packets away from air, reasonably cool and always completely dry, and these conditions seem to be acceptable, because they worked fine. Superscales are incredibly thin and that makes them inherently fragile, these tore two or three times, but were coaxed into place with the standard Microscale system chemistry. The model was given a careful wash with a brush dipped in clean water and swabbed with a tissue to remove dried chemistry, which will otherwise show up instantly and indelibly as dull tidemarks under clear coats, then another coat of satin was applied to seal everything up.

Keep a thing twenty years and you’ll find a use, they say, and these decals replaced the kit items perfectly, reducing the somewhat translucent items to codes and serials. They do look slightly different, but not so much the casual glance would pick up the problem.

I’m glad these decals work so well after such a long time ‘on standby,’ as it were. My decal collection is considerable and I look forward to finally having the chance to use it properly, building many colourful and spectacular subjects in future.