Showing posts with label oil wash. Show all posts

Tuesday, November 29, 2011

Tracks: A Six-Part Process


It’s been the proverbial age since I last posted, what with completing my PhD, working, and a recent trip to the UK for a conference, but I’m at last back on the bench and have something work talking about.

Tank tracks are an area I’ve discussed on a few occasions, mainly to grumble about link & length and how I detest them. This time I’d like to talk about the finishing techniques that are applicable to all sorts of track approaches.

Building Tamiya’s 1:35 M1A1 (ODS) is a straightforward experience and I superdetailed with 17 corrected or missing detail items (it seems I can’t build an Abrams without adding as many missing details as I can, though I’m nowhere near a full amplification, according to the experts…) The vinyl T-156 tracks are the most accurate of kit offerings but still not correct (the guide horns are centred on the links, when they should straddle the gap between links), but I did not feel like spending the $$ for an AM set, especially as they would be L&L, which I loathe.

Never mind, I can live with the discrepancy. What about making that grey vinyl look like steel that’s been run across a desert?


It turned out to be a six-step process, starting with a base colour (above). I looked at photos of M1s in service and noted the general colour of their tracks, which of course reflects the terrain. I mixed Tamiya Acrylics Buff (XF-57) with NATO Brown (XF-68) and Dark Sea Grey (XF-54) at a ratio of 20:3:3, and coated both sides of the tracks. I tape or pin the tracks to a length of card to control them as I’m doing this.

Step 2 (also above) was the really boring one – paint the track pads and blocks into flat black (XF-1) individually. I used a small, flat sable brush and for once the Tamiya paints behaved themselves reasonably well coming off a brush. The effect does not have to be precise by any means, real tracks are so coated with filth that the point where rubber meets steel is rarely obvious to the naked eye, so I used a near-drybrushing technique across the raised areas, then blocked them in.


An oil wash was the third phase, van Dyke brown suspended in enamel thinner run into all detail areas on both sides, a fairly quick process that created some depth. It’s subtle, but it’s visible above.

The fourth step, also above, was to overspray the tracks with well-thinned Buff (one part paint to three parts thinner, which is 600% over-spec for Tamiya) to simulate dust ground into everything, and which toned down the starkness of the fresh black to a grey-beige which looks pretty good against many service photos.


The job was nearly done by this point. Drybrushing with silver to create bare metal wear on the guidehorns and some external link ends came next, and a light wash here and there of bright rust to add visual interest. Step 6 was MiG Gulf War Sand pigment powder, but that technically would go on overall when everything else on the beast was done, and in the shot above is added to just one part of the right-hand track to demonstrate how it settles into declivities. I called it done at this point and set the tracks aside for later.

Tracks are not difficult to make look good, but it does take a little thought beforehand, and the patience to work through the process when it gets a bit tedious!

Monday, January 4, 2010

Production-Lining Your Art


Most of us build more than we can finish in the short term, we all have a variety of projects on the boil at once and many of us move among them at whim, building or painting as the fancy takes us. That’s the marvellous flexibility of the hobby, really. Of course some end up back in their boxes on the shelf because we’ve lost patience with them for some reason – obstinate fit, inaccuracy, waiting for parts or decals, whatever. The only kit I’ve put aside in recent times was a Hobbycraft Corsair, and it’s rather put me off the brand.

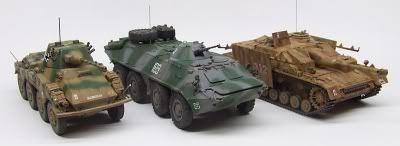
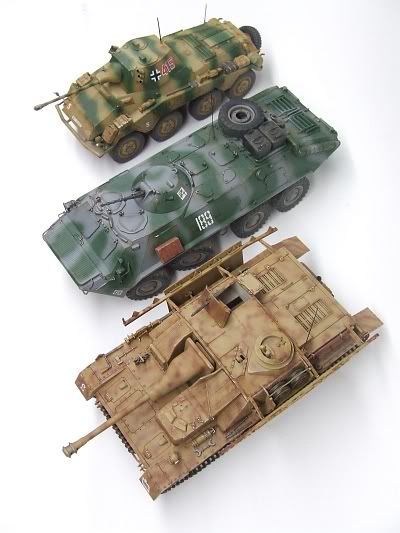
But eventually you need to clear that bench, get projects to completion, on display, and move on to new territory, though sometimes models have been in play for years. I found myself doing this recently, with a Zvezda (ex-Dragon) BTR-70 that had been unfinished in the box for about three years after being started as a ‘need-to-build-something’ project that I had thought would be a quick build, only to find the tiny Dragon parts tended to snap on the sprue, and the need to replace some with shaped wire rather consigned the beast to the shelf for a long time. Recently I got around to building a Tamiya StuG IV which has been in my stash for at least ten years, I got it from a second hand dealer in Japan, it’s the edition with all Japanese instructions (not that that’s a problem, Tamiyas really only go together one way and the diagrams are obvious.) Add to the mix the Testor edition of Italeri’s Sd.Kfz 234/2 Puma recon vehicle and I had a trio of 1:35th scale armour all clamouring to be finished more or less together. (You might have spotted them in the previous post, if sharp-eyed.)


So the solution was to do them production-line fashion. Henry Ford knew what he was doing, and while it depersonalised a craftsman into a repetitive technician, the hobby can withstand that at a small scale. Given that all three models were finally into their full paint jobs, I could tackle the finishing phases all of a piece. Each model received its fade coat, highly thinned paint misted onto the horizontal surfaces to create the impression the paintwork is faded by the elements. Then I did the oil filter weathering on them all, which was a process of washing the acrylic paints over with enamel thinner carrying dissolved artists’ oils to create tonal variety and the characteristic patterns of rust streaking. Then the pinwash to bring out details by capillary action, and tiny amounts of thicker paint to establish areas of open old rust; and finally brighter rust shades where rust is newer. The next phase is drybrushing in enamels (I can’t do it in acrylics, they simply dry too fast for me to keep up with the job and the task of endlessly cleaning and refreshing the brush) to profile edges and raised detail, making them ‘pop’ from the darker background of the paint and washing.

Then onto external fittings: tools and jerrycans on both the German subjects, all of which need to be painted and weathered before mounting, and a couple of fittings for the BTR. Next step decals – all three models could cross the bench together. Then onto the dust phase, Mig pigments brushed on in strategic locations for that touch of environment adhering to the beast. Final fittings, delicate radio antennas are often the last thing I mount, and of course the tedious process of painting a sharp division between wheel rims and tires, though that was eased somewhat with a new tool I’ll be reviewing here before long.


So there you have it – the same finishing techniques applied across the spectrum of three models in widely varying schemes, two wheeled vehicles, one on treads, different eras, three different manufacturers, but all responding to the same techniques for a satisfyingly dirty, beat-up appearance that whispers to the viewer’s subconscious that these vehicles have seen plenty of hard service. And all walked through the process from overall painting to completion side by side over the space of about a fortnight.

Now, I wonder if I should production-line build from the beginning in future? It certainly speeds up a heavy build schedule…

Look for retrospective reviews of these kits right here in the near future!