Showing posts with label finishing products. Show all posts

Saturday, July 6, 2019

It Worked!


Sometimes the manufacturers really do know what they’re talking about… I’ve been working on Tamiya’s 1:12th scale Suzuki Katana off and on, a 2017 build that’s been on the shelf (full build post to come) and the wheel rims are in bright finish, which Tamiya recommend be done with an X-11 Chrome Silver enamel paint marker pen. I’ve never used their paint markers before and ordered one up with some trepidation, thoughts of floods of paint or dried-up tips going through my mind.

I searched YouTube for how-to videos and found one out of Russia which, though I could follow not a word, was pretty self-explanatory as far as appropriate touch for applying the tip to a surface was concerned. Even so, I put the job off at least a month before there was not one other thing to do on the project before this task.

Of course, when I finally opened the marker, gave it a good shake and started the flow, it worked perfectly. The corner of the chisel-tip seated comfortably into the wheel rim and I applied the paint in short, controlled sections. Before I knew it, it was done and the parts were set aside to dry. Some commentaries have remarked that this can take a long time, into the second day and still tacky, but I find myself wondering if that indicates the paint was insufficiently agitated beforehand. This oaint was dry in an hour.
               
The bright silver rim does not show up very well in the available-light photo at top, and the marker pen, which ships in a plastic shrink-wrap, has been resealed with tape at the cap juncture, to preserve paint life. The picture below shows the front wheel, with a gunmetal finish, and the chrome rim shines beautifully in a flash shot.

When these parts are ready to be handled, I can do most of the remaining build-up, indeed the only painting left to do is the front brake units and the rubber protector around the windshield transparency (fiddly masking required on both). But this project should hopefully come together quite quickly now.

Cheers, Mike Adamson


Sunday, April 8, 2012

Detailing Wire


Using wire for detailing has a long pedigree, whether for cockpit connections, hydraulic lines on landing gear, or any application that calls for a fine, fairly rigid filamentary part.

I’ve not done much with wire, my previous project involved making fake coil-spring suspension parts, which was interesting to say the least, and I’ll post about that when I’m happy the job is done (twelve of them to do + sore fingers = finish it another time…) but as part of my Phantom building enterprise I found the need of wire.


While some kits have the ejection faceshield handgrips moulded right in, many do not, and if substituting better-detailed aftermarket seats you may be scratchbuilding the grips anyway. The resin seats by True Details are excellent and inexpensive, but the grips, the most visually engaging part of the seats both because of their signal yellow paintwork and because they are the uppermost part of the seat visible through the canopy, are not represented at all.

The seats on Fujimi’s F-4J did not imbue me with much enthusiasm so I resorted to True Details, which left me with the question of what to do for the grips. I had considered trimming them from the kit parts, which might have worked, or might have cost too much plastic in the cut, resulting in the grips being too small. Wire to the rescue…


I ordered up some 0.29mm (.011”) soft silver wire from Red Roo Models, and found it worked easily, the loops being formed by wrapping the wire with finger pressure only around the tapered tip of my scribing tool, then cutting the loops free with a craft knife. The seats were pre-drilled with a .020” twist drill to provide shallow locators, then superglue was used to mount the loops.

Painted up with acrylics (the black stripes spotted in with a fine-point pen, which is quite good enough for my eyesight at this scale!) they look pretty good, and I can see this technique satisfying the “loop question” on all replacement seats in future. In larger scale I could be more accurate (‘rounder’ loops and so on), but for now, that flash of yellow under the canopy is adequately catered to.

Monday, October 3, 2011

Product Review: Model Master Acryl Paints


The quest for less-obnoxious spray painting is never over, and while I have had great pleasure with the Tamiya acrylics range they just don’t have matches for many of the standard shades in use, whether German RLM shades or modern US Federal Standard colours. What few they do purport to match are actually very wide of the mark (for instance, their equivalents to RLM 02 grey, RLM 70 schwartzgrun, or British Sky are not satisfactory and require mixing to improve.)

The Pollyscale acrylic range is hard to find in Australia, and Humbrol acrylics are not imported, nor are Revell Aqueus. But recently, distributors have begun to bring in the Model Master Acryl range, and these are definitely worth a look. Colours are matched by precise industrial techniques, same as for the old standard MM enamels range, and the paints are supplied in the same old fashioned bottle. Some people have criticised the bottle design as hard to stir, favouring the Tamiya broad-neck type, but I have never had an issue, perhaps because I cut my teeth stirring paint in Humbrol tinlets, after which, it’s fair to say, anything is an improvement.

Obviously, my base for comparison is the Tamiya range, and on that footing, I can make the following observations:

Model Master Acryls are a virtually odourless formulation, there is no ester-smell on opening the jars. Though it seems they separate into phases when standing, a shake seems to do most of the work, they need very little stirring and recombine fully. I have sprayed light and dark shades and they seem to have equivalent covering ability. Thinning is an issue in point, these paints seem to demand 25%, compared to 50% for Tamiya, meaning you use proportionally more paint from each bottle in any given job. Any more than 25% and spatter begins to develop, which if controlled through flow rates and brush motion sets down in a somewhat pebbly fashion, drying with excess gloss. The finish seems to be somewhat harder, more durable, than that of Tamiya paints, and it can be said that the paints go on and lie down differently, though I would be hard pressed to actually describe how. They certainly dry quickly, from a wet, almost pebbly application to a dry, satiny coat in a few minutes.

Random gloss patches have been reported by others but I have yet to encounter this phenomenon with these paints; in any case, if using topcoats, it’s neither here nor there. Another general criticism is their tendency to tip-dry, blocking the airbrush, which I have encountered when spraying a fairly large amount of paint in one session (doing the template technique on a set of tank wheels, for instance), however under normal circumstances this does not seem to be a bother (nor is it affected by increasing the thinning ratio). I image it will become more of an issue in warmer weather.

One last point, these paints are entirely appropriate for applying with a brush, something Tamiya paints really do not like to do. After many years of struggling with touch-ups in the Japanese range, I can now dip a brush and have the paints go on the way enamels do, rather than the frustrating wipe-on, wipe-off effect of the others.

At this point I have used only four paints from this range. I am thinning with Tamiya thinner which is completely compatible, and cleaning up with water, between airbrush strip-and-clean sessions using Tamiya thinner and a Paasche brush set (invaluable, the best buy I ever made for ensuring the airbrush remains fully serviceable at all times.) I will be expanding my range and applications, and expect to be trying their gull, ghost and compass greys in due course.

I would recommend Model Master Acryls to anyone painting indoors and who is interested in their health. The range is very large (it takes three pages at the Testor website to present them all), and as acrylics they can be mail-ordered by air from the US or elsewhere. See the range at:

http://www.testors.com/category/136648/Acrylic_Paints
I’m happy with their performance so far, and will continue to acquire shades, but I will be using them in concert with the Tamiya range which, though it may be just familiarity with these paints over so many years, seem to be a tiny bit more user-friendly in the way they go on when sprayed.

Sunday, January 16, 2011

Product Review: Aeromaster Decals


On my recent Avia S-199 build I didn’t fancy the looks of the Hobbycraft decals and substituted Aeromasters for the first time, sheet 48-119, which is of course one of their quite old releases. I’m always interested to compare performance and took this opportunity to evaluate the brand – certainly insofar as the quality of their product whenever this sheet was printed, and there’s no knowing that. However, quality is fairly consistent at a technical level and some brands have a certain expectation attached to their name.

Research-wise, the company made some choices which I was not able to substantiate after considerable online checking, and given that their nickname in the hobby is Errormaster, I decided to go with my own research on those points.

At a quality level, the decals were very thin and in register, and freed off from their backing after 30-60 seconds immersion, depending on area. They settled into place well but did not react very enthusiastically to setting solutions. I use Micro Set and Micro Sol, which are not the strongest chemically, but even so the decals developed wrinkles which in some cases took a long time to settle down. The setting solution was applied four times, and while it seemed to draw the decals tightly into the paint, it did not induce them to draw into recessed detail.

The large national insignia were quite strong enough to be repositioned several times, including being moved with a wet finger because a brush was simply not getting them there. For the most part the decals did their job, their carrier film virtually vanishing under clear coats, but persistent tiny air bubbles were a pain. While pricking the decals and rewetting cured the worst (notably on the wing walk stripes), there were rather too many to apply this treatment overall, and close inspection still finds some bright spots here and there.

If I had one major beef it was with the fuselage band. It was not long enough to meet and the underside of the plane has a notable gap in its ID colours. The decal was designed to wrap around the curves but the fact it did not meet up suggested to me I had it on upside down, so I coaxed it away and applied it the other way up … which was even worse, so I removed it a second time and reapplied it the first way. It is a black mark that firstly it didn’t fit quite properly and secondly that the instructions were not clear about orientation, but a tribute that the decal was strong enough and the glue resilient enough, for it to be handled so much and still end up looking right. Yes it broke, but the small part was nudged into place with the rest and the eye barely sees the joint, especially under clear coating.

It's worth noting that the striped rudder decals were not used, the hobbyist was obliged to cut the curvature of the rudder into them with scissors, the same way Hobbycraft wanted you to. I'm not that clever, I'm afraid, so I masked and airbrushed them.


In the end, the fact the model looks good must be the judgement call, and I will certainly be using the brand again, delving into the dozens of sheets I have in my collection without hesitation.

Saturday, January 1, 2011

Product Review: Microscale Satin


Sometimes a product is under your nose and you don’t realise just how good it is.

The Microscale finishing system has been around since the 1970s and it’s hard to think where the hobby would be without the products churned out by Microscale and Superscale. But the clear coats they make, water-based acrylics in those no-nonsense plastic bottles, are something of a minor miracle. I’ve experimented with clears before and been largely disappointed: orangepeel finish, flats that are anything but flat, uncooperative airbrushing, not to mention the spectre of a terrific build being spoiled by a clearcoat crazing or going misty, which really renders the clear a dubious case of gilding the lily. But this was something else...

From time to time you have to experiment and working with Hobbycraft’s Avia S-199 kit was just such a build (article forthcoming). One major innovation of this project was the decision to clearcoat over flat paints rather than mixing gloss into the paint as I have previously. While this worked perfectly in enamels, in acrylics I found bright spots in the paint as if specks of clear gloss had failed to disperse evenly into the mixture. Thus the next step, try clear again.

Microscale’s clears are a joy to use. I have yet to give their flat and gloss a whirl (I have heard their flat will never generate a true flat), and in a sense satin was the friendliest possible experiment: I was trying for neither a dead flat nor a high gloss, but the perfect compromise between them, and this product delivered beautifully.

The liquid is milky in the bottle but dries crystal clear. Cleanup is with water, and I thinned the fluid for spraying with the same, by 50% or maybe a little more. It was extremely forgiving to work with, drying so quickly on the model that you can literally blow it dry with your breath as you watch. At the same time there is absolutely no tendency to tip-dry in the airbrush, which is amazing. You can slightly lift the sheen with successive coats, but not by much, the integrity of the lustre holds good.


Above, the Avia is seen after the sealant coat. The paint was sealed with an initial two coats, applied lightly, before the decals went on. Then the panel lines were accented with Promodeller wash, and the whole was sealed with another coat of Micro Satin. The sheen is even and attractive over the decals, and the panel wash, while not very contrasty the moment it was dry, jumped out into sharp relief with the wetting effect of the clear.


Decal carrier film largely disappears, indeed this is what these finishes were developed for, and combined with the Micro Set and Micro Sol decal solutions, is a straightforward means to quality decal work that should last a long, long time.

I have used a lot of this product previously in professional art, working with brushes to apply heavy protective coats to collectibles; put on in those quantities the finish is brighter, closer to gloss but not yet there.

The handy 1oz bottles hold enough for a dozen models or more, and at US$3.00 each are excellent value. I bought this one in Australia, but as a non-solvent based product it can be shipped by air along with most Microscale products – see them all at:

Microscale Industries

Saturday, January 30, 2010

Product Review: MicroScale Trimfilm (and how I don’t seem to have the knack…)


 I’ve used MicroScale Industries products for many years and have the greatest respect for the firm. Established in 1933, they’ve been serving the modelling community even longer than Kalmbach Publishing, and their decals are legendary. In the days before everyone and his uncle was churning out decals through computerised imaging systems, Krasel Industries was the big guy on the block, and when they split into MicroScale and SuperScale, many years ago, it was double the bang for your buck, one firm catering to railroaders and others, the other to the burgeoning military enthusiast marketplace. First of all, I would like to say that I have over 400 sheets of SuperScale decals in my collection, and know their quality, plus seven of MicroScale’s finishing products which I use with confidence. So why am I complaining about Trimfilm? Trimfilm was a great idea. Solid colour sheets, and sheets of generic designs, stripes, checkerboards, in a variety of colours and gauges, a mix-and-match solution for a thousand different graphical challenges. Add to these a wide range of typestyle sheets, fonts, sizes and colours, and you have a resource to rustle up detailing at the drop of a hat. That’s the theory: what about practise? Maybe practice is what I need, because I can’t get the stuff to cooperate. I tried using Trimfilm on an SF scratchbuild or two, e.g., the bold red stripes around the rear fuselage of the MEV from Thunderbirds Are Go, and found to my frustration that the half-inch red stripe material had no intention of cooperating. The thinness, so valuable in getting small decals to conform to surface contours, made the material so fragile that it shattered if I breathed on it. It tended to break up while merely detaching from the backing paper, was quite impossible to move effectively once it was on the surface, and grabbed almost at once in any case, drying decidedly lumpy over a surface wet-polished smooth. I tried several times to get the material to do what I wanted it to, then gave up and sprayed the stripes instead. Perhaps I had hold of a defective sheet, I thought, and tried other sheets and other gauges. The red stripe around the MEV is flanked by two finer black stripes and I did these with eighth-inch Trimfilm. The story was the same, and I pieced the lines together from multiple fragments of broken decal, not enjoying the process. When I came to do the wing walkway lines on my scratchbuilt F-116 fighter from Joe-90 I found myself using the same material by necessity, but having no more rewarding an experience. For black lines around the engine nacelles I had far better luck spraying flat black and masking with Tamiya tape, and for some lines circling the nacelles I actually sprayed the tape black and applied it permanently, because the tape will stretch symmetrically across a two-dimensional curve, and decal film essentially will not. This is unfortunate. Perhaps my technique is off, maybe I don’t have a sufficiently gentle touch to use this material: if it behaved like most decals usually do for me it would be great, but it didn’t (which is odd, as I’ve used SuperScale aircraft decals before and had no trouble with them). Maybe I should have reinforced them with Liquid Decal Film to keep them from shattering. I’m still drawn to the range, though, a sort of love-hate relationship. All those pre-made items are creative candy! And the typestyles suggest custom lettering on home-designed projects (though to be fair, custom made decals have made a very effective challenge to the idea of piecing logos together a letter at a time.) For now I’ll say that my Trimfilm collection lies in its box, forlorn and neglected, awaiting either a renewed sense of adventure on my part or the wisdom of those who know how to make it behave. Check out the enormous range at: http://www.microscale.com/

Thursday, January 21, 2010

Product Review: Cavalier Zimmerit


Australian firm Cavalier Model Productions has been around for quite a few years now, and besides their resin car kits and other esoteric goodies, they are perhaps most famous for their Zimmerit. Zimmerit was an antimagnetic paste applied like cement to the hulls of German armoured vehicles in the middle years of World War II (discontinued around November 1944) in response to the Russian tactic of magnetic mines which could be attached by infantrymen. Many choice modelling subjects are properly depicted with a coat of this rough, rippled stuff, and while there are many techniques for creating the effect, and some manufacturers, notably Dragon, have made forays into producing it as a moulded detail, Cavalier’s solution has been very successful and very popular.

Basically, Cavalier zimmerit is a wafer-thin sheet of moulded grey resin, as thin as paper and highly flexible. It’s delicate but captures the texture perfectly, including damage and defects in application for an amazingly realistic effect. Some 35 sets are presently available, including a batch for the new 1:48th scale armour, though most are for traditional 1:35th scale, with specific sets designed for particular kits. Fiddly parts are reproduced from kit parts with zimmerit added, so you have a complete replacement part. All sheets are cast in a uniform pale grey resin.

High utility can be found with their generic sheets too. If your vehicle is not covered by their sets of pre-formed parts, you can buy a generic sheet (there are four different patterns available) and you’ll more than likely have all you need for your project.

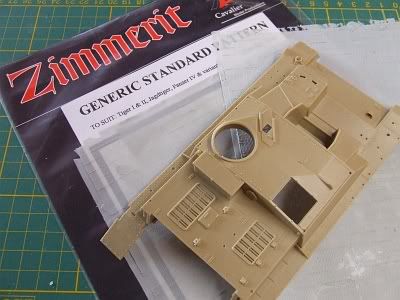
That’s what I did, working on Tamiya’s old (but still excellent) StuG IV kit (35087), as mentioned in the last post. No specific set has been produced for this kit, so I ordered up set CV-118, generic standard pattern zimmerit, and basically cut the parts as required. The set is very generous, containing two 15.5cm x 21cm sheets, and the whole project took me around half a sheet: that’s great value, panning out at about Aus$5 to zim each of potentially four models.
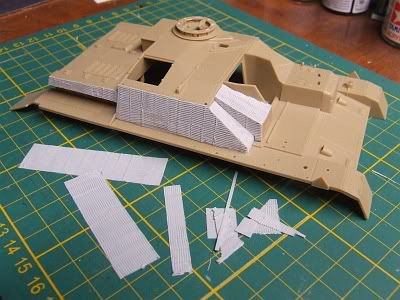


Starting from one symmetrical corner of the sheet, I began by measuring up needed panels and cutting them out with knife and straightedge. I cut them a fraction large, especially allowing the inclined edges of panels to lie inside the edges of the pieces I was cutting (photo, below). The method in this madness will soon become apparent. One needs to remember the orientation of the pattern, check references and see which way the pattern runs on which surfaces, and cut components accordingly.
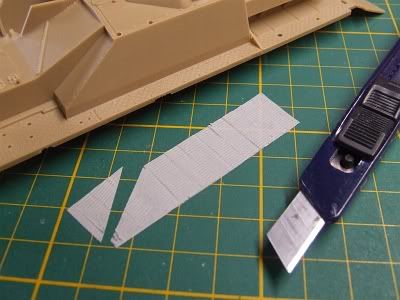


There are several suitable adhesives to use with this resin, five-minute epoxy, for instance. I used regular superglue as, given the fact I would be trimming the edges afterward, absolute precision was not called for. If using one of the pre-formed sets, I would use slow-cure gel superglue, for its strength and because it allows time to both spread the glue completely over the back of the sheet (as in the next photo) and to slip, or remove and replace, the piece once in place to refine the fit. As each piece was secured, simply by pressing carefully into place (second next photo), the slight excess left at the edges was trimmed with a sharp blade, creating an essentially perfect fit (third next photo). Any points on the edges that were not fully secured were glued down with thin CA, brushed on sparingly, then the edges were lightly filed to virtually blend the resin sheets together.


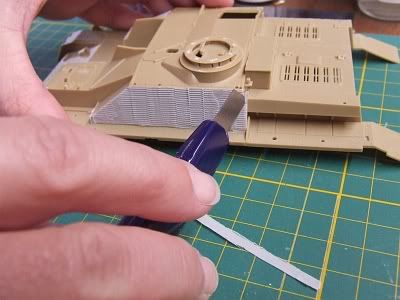


It is worth doctoring the zimmerit as well, you can score and chip the edges in high-wear areas, the likely contact zones, to create damage, chunks of the cement-like matter either chipped away by contact with branches or obstructions, or shattered free by the impact of shot. It’s as easy as cutting in with a knife or the edge of a file.

The sets come with a zimmerit tool, a cast resin ‘rake’ for custom work using one of the standard techniques. Basically, in areas where the zimmerit doesn’t quite fit, or edges where the juncture of sheets did not come out as perfectly as you might have wished, you can paint on some thinned putty, wait until it’s firming up, then score the pattern into it to match the resin sheets around about.
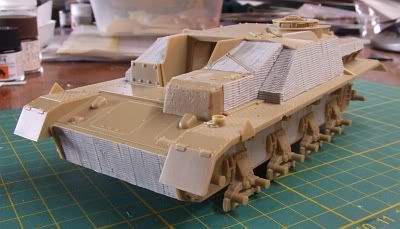


The complete zim job on this model took several hours to do, and it was my first outing with the product -- I’ll probably be quicker in future. Here she is with some paint on, late in the finishing stage:
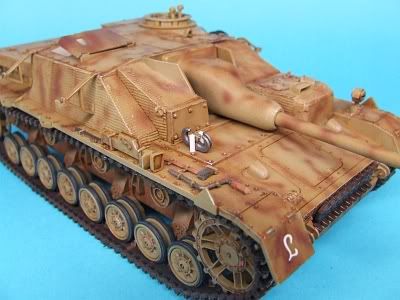


I couldn’t be happier with the result, and look forward to more Cavalier zimmerit-enhanced German armour models to come.

You can find some sheets at better hobby stores, but for the full range go to:

http://www.cavaliermodels.com/Zimmerit.html

Here you’ll find an historic article on the stuff, including reference photos, plus a listing of all available sets. At Aus$19.99 each they are a good buy, and domestic postage of $3.95 is no blow to the wallet.

This is a first-rate product, highly recommended, and proudly Australian!

Sunday, January 10, 2010

Product Review: Alliance Model Works Painting Masks


 Now here is a truly good idea! The template painting method for wheels has been around for quite a while and it makes a slow, tedious, “iffy” job into a quick, accurate one, but one painful truth is that models are a scale depiction of reality and as such it’s always a lottery as to whether artists’ circle templates, which are produced on whole millimetre increments (they don’t seem to make half-mil sizes) ever match closely the size of the wheels. After you’re done spraying you always need to take a fine brush and clean up those edges by hand, hoping the ridge of the rim will guide the brush adequately to fool the eye. For a Panzer IV, with 36 wheels (counting the spares), all of which should correctly be rimmed both sides because you can see the hub area of the rearmost of each wheel pair from oblique angles, that’s a formidable task. But Alliance Model Works have come to the rescue with photoetched painting masks, circle templates designed to fit the rims of specific kits from specific manufacturers.  

 I ordered their set for WWII Wermacht tanks and other vehicles on eBay. #Lw3574, “German Vehicle Wheel Mask Set” comes attractively packaged in a conventional plastic and card sleeve, containing a sheet of instructions on the use of the product and no less than three frets of etched stainless steel, plus one ‘loose’ mask for a total of 54 templates for roadwheels, return rollers, and the steering wheels of halftracks, plus even the wheels of some towed fieldguns. These are precision-made items designed to fit exactly over the rims of kits by Tamiya, Dragon and others, which means no more touch-ups: once spraying is done, you should be finished the job. As soon as I saw these gleaming, individually-plastic wrapped frets I smiled and said to myself, “if these work as advertised, a hard job just became easy.”  


 I tested them on the Tamiya StuG IV crossing my bench at the time. I had delayed doing the wheels til last, and I was very glad I had. The first step was to paint all the tyres black, for which I mixed Tamiya XF-63 Panzer Grey with X-18 Satin Black for a low-lustre tyre black (1:1) and sprayed the wheels on the sprue for ease of handling, with their mating faces masked with Humbrol Maskol and some wet tissue. So far so good. Then I cut the protective plastic over the appropriate PE sheet and test fit a wheel hub into the “Tamiya Panzer IV” template. Well, I certainly hope it fits the new-tool Tamiya IVs, because it sure doesn’t fit the old ones! Why can’t anything ever be easy? Would it have been too difficult to have the new and old-tool kits (which are still widely available under more than one label) catered to, side by side? I had a choice: use the specified template, biased to slip around the rim on one side only, then come back for a second pass to get the other side of the rim with the template biased the opposite way, or find another template which was large enough and fit close enough to do. Compromise is not what you expect from a precision product, and not what was advertised, but I guess the company is playing to the high end of the market, and nobody said anything about the vintage of the kits catered to by this specific set: there may be another set with the older Tamiya Panzer IVs among it’s many template sizes. I don’t know, I haven’t checked – yet. The good news is the template for Dragon’s Panzer III is quite close enough to do. I stripped the protective plastic away and test fit a hub, finding the clearance quite snug enough for my purposes. The rear wheel of the old Tamiya IV seems to be a smaller rim diameter, but the backs of the wheels are not going to be seen much, so some overspray won’t make any difference. I could have taken the template from the PE sheet but for ease of handling and storage I decided to leave them all of a piece. This is how I’m used to handling plastic circle templates to do the job in the past. I masked close round the hole with tape to keep the product clean overall, then trimmed the wheels from the sprue, leaving the attachment points to be dabbed into the mixed black at a later point (before weathering).  


 I mixed Tamiya XF-60 at 1:0.5 and shot at my usual pressure for the Paasche #3 tip and needle, and did two mixings, one for the fronts, one for the backs, and had enough to double coat a fair few hubs in each batch. The metal sure collects overspray, moreso perhaps than plastic templates seemed to, I had to keep wiping the paint away with a moistened tissue, but that’s to be expected and no problem to deal with. The best news is they work great. Any remaining degree of “wiggle room” is due to the fact I’m using them on a kit they were not designed for, but they’re a lot closer to right than standard template sizes, so the job was right in the end. I know how well they’ll perform when I build a Dragon IV, or III, or whatever else actually on the sheets comes up for building. They were on special but not cheap: still, as a precision tool that will serve me for many years, I consider it one of my better investments. Now when I build German armour, I will reach for these masks as a reflex, and the prospect of the running gear will not be a detraction from the fun of the project. Look at the finished job (mains and spare wheels, prior to fitting the stand-off skirts) and there was no hair-tearing involved in getting there:  


Very highly recommended – I suddenly find myself considering collecting any other mask sets they offer, American armour, Russian armour, they all have rims to paint! Check out the product at http://alliancemodelworks.com/ There’s a retrospective look at the old Tamiya Sturmgeschutz coming next time, watch this space…

Wednesday, December 9, 2009

Product Review: Eduard Masks


 There are all sorts of tools and supplies in the modelling hobby, and it’s a fair criticism to ask if the modern hobbyist is well-served or merely gadget-dependent. When we need to mask something we use tape, like any tradesman, plus cut paper and card sections for big areas, and we may also use a liquid latex masking medium, an aid brought over from the graphic arts. I always masked my canopies with tiny slivers of tape, but there are some curved that just don’t want to be masked around. A three dimensional shape needs to be expressed in two dimensions, and that’s a hit or miss proposition unless you’re a spatial dynamics expert. Another trick is to spray the hull color on some clear decal film, cut fine strips and apply the canopy struts as decals, and there’s a lot to be said for that technique. There have been a few ideas over the years, including precut vinyl negative masks which are to be sprayed in the final colour and applied, but Eduard might have hit the best formula with their masking technology. Eduard Masks are die-cut adhesive shapes matched to the intended kit at very fine resolution, and the principle of their use is dead easy: peel them off their waxed backing paper, stick them on, spray, peel off when done. If engineering firms go by the old “KISS principle,” (which stands for Keep It Simple, Stupid!), then they’ve probably hit the money. If the hundreds of sets in their range are anything to go by, modellers agree. 


 I’ve used four sets so far and have several more in hand. Though the principle is simple, it takes a fine hand and a keen eye to get them into place precisely. Without magnifying specs I’d have no hope, though that’s more a comment on my vision than the product. The masks seem to be a vinyl or paper material, and their adhesive is quite strong, they won’t move until you want them to, and then they come away without leaving a residue. They can be repositioned, though with care as they will crease and denature if handled roughly. They fully cover smaller panels and outline larger areas, which are then filled in with liquid or tape.  


 Once located to your satisfaction, spray the cockpit interior colour, then overcoat with the camo or framing colours, and when fully dry tease up a corner with the point of a knife and draw the masks away with tweezers. You might also want to hold the canopy down with a finger as you do so. The adhesive is strong enough to pull a clear part off if attached only with clear parts cement.  


 Masks are also supplied for other parts of the model, such as wheel rims and formation lights, and some armour sets have been produced to help with the fiendish job of painting the tires of tank wheels. Hopefully we will see this range continue to grow, as their utility is considerable. Can you re-use a set? I’ve not tried yet, but if you peel them off carefully and return them to their original positions on the backing sheet, it might be possible. Two uses would be good, as they do cost a few dollars, a nonreimbursable expense on the cost of doing a model which is far greater than that of the paint one uses, and often comparable to that of a selection of AM decals. Probably the best tribute I can pay to the product is that when I decide a particular model is on my schedule, I check if Eduard have masks for it and order them up in plenty of time, just as I would order AM decals or resin bits or whatever, and that makes them a tool of choice for this particular finishing operation. I recommend them to any hobbyist with a steady hand and a magnifying glass. Eduard Masks are available in hobby shops and through many online outlets, I always order mine from Squadron Mailorder, Carolton, Texas.

Saturday, December 5, 2009

Acrylics or Enamels?


 It has to be the biggest question in model painting today, beyond choice of brushes or airbrushes, beyond colour selection: which type of paint is best for your project? There are modellers who have switched entirely to water-based acrylics for all spray work, for the health benefits: nontoxic paints are a major factor and not to be taken lightly. When you’re used to the light, sweet smell of acrylics and their water cleanup, to start spraying solvent-based paints and their spirit cleanup is a rude reminder of just how frequently and casually we poison ourselves with the things we invite into our environment. Got a spray booth with a ducted exhaust fan? Good for you, but most of us make do with an open window and sometimes it’s just not enough.

Like many modellers, I have both types of paint in stock. I first bought acrylics when tackling vinyl subjects in the early 90s, and I must say the Tamiya paints I bought have been extraordinarily long-lived. They’re still good over 15 years later, all they need is a stir. They haven’t made the old, large bottles in many years, possibly because people discovered the paint lasted remarkably well, and for the rate of usage a smaller quantity was just fine. I have scores of Tamiya shades, plenty of useful colours, and my collection grows gradually. But I also have hundreds of enamels, the ubiquitous Humbrol range and Testor Model Master (which despite being superb quality, with an easy-stir jar and an enormous selection of specialty-matched shades, is getting hard to find in Australia, as Humbrol and Tamiya have grabbed the popularity).

I have not brush painted a model in 30 years, but today when I spray enamels I do so outside, which is a nuisance. Acrylics I can use indoors with simple ventilation, which makes them easy and convenient. But what about detail painting by brush? This is where the real applicability of the paints comes to the fore. Acrylics spray superbly but they don’t brush worth a damn--at least the Taniya variety. You can thin them a little and that helps, but the drying rate is like lightning and in one minute a brush is unusable -- clean it and start over. This seems a characteristic of the Tamiya range in particular, they are by far the most available here and I have sampled no others at this time (but I’ve heard others dry even faster…)

By comparison, dipping a fine brush in enamel paint provides familiar flow and control, and one can concentrate on the finesse of the task rather than fighting the characteristics of the medium. The same thing applies when airbrushing, though on a longer timescale. When used to the tip-drying characteristics of enamel, acrylics can bite you: you must keep the job moving when you’re working with the nontoxic paints, and when it’s done be sure you’re finished and clean the AB at once. This tends to lead to wasted paint, as when forgotten bits are noticed you need to mix more, and if using a syphon-bottle AB there is a minimum amount the airbrush will actually pick up from the jar. If working in enamels you have the extra working time to consider the job from all angles, turn the thing around again, look at it in different light, go 30 seconds or more and be sure the paint will still flow normally when you press the trigger.

My impression is that enamels and acrylics will continue to share the marketplace. Enamels flow on so smoothly they are a joy to use, they are a ‘friendlier’ medium than acrylics, you can polish their finish just like automotive paints (which ironically have all been acrylics for the last 25 years at least), and the range of precision-matched shades is enormous. The major manufacturers must have churned out over a billion bottles and tinlets in the last 40 years, in fact probably far more, Humbrol alone used to produce 25 million tinlets a year in the 1980s, if I remember correctly, and that’s an awful lot of paint in collections out there. I personally have tins that date from that era and the contents still slosh. But if acrylics were friendlier, dried slower, brushed better, and were available in hundreds more shades, precision-matched to historic sources, I would be using them more often. I have no wish to poison myself, and while the chemistry involved with acrylics is almost certainly not 100% harmless, it’s a significant improvement.

Saturday, August 8, 2009

Product Review: Berkshire Junction's EZ Line


 Model railroading firm Berkshire Junction came up with a winner when they developed EZ Line. It was meant for adding in-scale power and communication lines, even wire fences, to railroad layouts, but this product has many uses.

As the product blurb explains, it is an elastic polymer with 700% stretch, and given that the spool comes with 100 feet of line, that’s a lot of finished product! It comes in five stock colours, white, charcoal, green, rust and rope, but the thread takes acrylic paint perfectly so if you can’t get the colour you need for a particular job it’s no disaster. When I ordered I could only get rust, so I use Tamiya XF-1, diluted with thinner, to create black antenna cables on aircraft.

The thread is very thin! When stretched it seems hair-thin, and that’s almost scary. Obviously, the tighter you draw it, the thinner it becomes, and that’s something to keep in mind. The extreme elasticity means there is very little ‘pull’ to it, which places it within the grabbing strength of superglue, and even my first fumbling attempt was pretty successful.

I rigged the antenna wire on my 1:48th scale Hasegawa Bf 109 K-4 (see the final roundup on that project, coming next post), and found the line worked very well, though you need patience and dexterity, and a decent pair of tweezers. I located the forward end into a tiny hole drilled in the fuselage top, simply fixing it with a drop of CA in the hole, and when it was dry I threaded it through the loop antenna and drew it (mildly) tight across the stub mast on the tailplane, dabbed it with CA and held it in place for a couple of minutes until I dared release it. It held no bother, and I trimmed the loose end with small scissors. The cross-cable was done the same way, seated into a fine drilling in the fuselage and, when dry, drawn very mildly up against a spot of glue placed on the first cable, and held. When dry I trimmed the end, and it was done. The cross-cable inevitably deflects the main cable down, which is not technically accurate: I’ll need to play with this product a bit more to figure out how to use it best.


Apparently it is very popular with biplane enthusiasts for rigging, and that’s a job I look forward to with some trepidation, though also interest, as I’m sure a well-rigged biplane will look great on the shelf! Shipbuilders have been encountering great success using this product for elements of rigging. Another project that comes to mind is a PBY Catalina, using EZ Line for those enormously long radio antennas between the tailplane and the wingtips.

The elastic thinning of the line also means it is equally appropriate for 1:72nd scale, simply draw the thread a little tighter to get greater scale thinness.

All in all, though comparatively expensive, this is a very versatile product, and the name tells all, it really is easy to use. I don’t think my tools draw will ever be without EZ Line from now on. See EZ Line and many other products at: http://www.berkshirejunction.com I ordered mine in Australia online through Red Roo: http://www.redroomodels.com/ where the price is currently Aus$26 per spool, plus shipping.

Monday, June 22, 2009

Product Review: Microscale Micro Metal Foil Adhesive


South Australia is slightly over the edge of the world. You can’t get stuff here... I inquired at the biggest hobby shop in town about a polishing kit to develop a glass-like shine on gloss enamels and was told that, while they had heard of them, there was no point stocking them, as nobody (presumably besides myself) would ever buy one in this town. Just the same, Model Master Enamels are going out of stock here at mainstream stores, they’re just not popular enough compared with Humbrol Enamels or Tamiya Acrylics, so the biggest shop in town is not going to restock, and they never had the full range anyway. If you need precise matches to historic colours, you’re off to a specialist stockist...

So I actually had a bit of luck lately when I needed Microscale’s Micro Metal Foil Adhesive. It was the right product for the job, and this time it turned out the shop actually did have in stock what I needed. I call it blind luck, as of all Microscale’s wide range of great finishing products, this was the only one they actually stocked (and no, their nearest competitor has never heard of the range...)

Rant aside, this is a good product! It smells like PVA white glue, looks like it, albeit water-thin, but it grips like PVA never did. And it seems to be water-based, as you can clean up with water until it’s cured, and with paint thinner afterward. It dries pretty quickly, a minute or two and it’s off provided you’re only using a small amount. 


 It’s easy to use. Cut a piece of foil, brush the glue onto the back and wait until the ‘milky’ appearance has gone, then apply it to your model. There’s some slippage time, but if you time it just right it’ll grab pretty quick. Applying it firmly over a smooth surface, you can then burnish the foil to a smooth, gleaming finish. In my case, I was applying crumpled gold foil to a Lunar Module to replicate the gold Mylar thermal insulation of the Descent Stage, so a burnished final appearance was not involved. This was just as well, as I found the glue did not hold very well on the small sticking area of tiny, curved surfaces, so my application did not wrap tightly to the struts. In context it created a suitably bulky, ‘packed’ appearance just like the original, but I found you need to work with larger diameters of tubing to get a firm, tight contact between foil and plastic. 


 Nevertheless, I was impressed. As with every Microscale product I’ve tried (with the exception of Trimfilm, but that’s another story), it works as advertised, is very economical and non-messy. This is a recommended product.


As a water-based formula it’s okay to send through the post (like Talon Acrylics), as US airmail won’t touch so many hobby products any more. That’s another post too...