Showing posts with label Italeri. Show all posts

Friday, February 18, 2011

Doing It (Not So) Tough


I had thought that I would be calling this “Doing It Tough,” but in the end it wasn’t that hard. I bought Italeri’s M110 SP Howitzer (#291) on sale from Squadron probably 12 years ago, certainly not less than ten, and had a go at a few parts many years ago. It ended up back in the stash because I had nowhere to store a finished model at that time.

I seem to be enjoying a run of completions on old projects lately, and there are a few more to come. This one took a fair bit of effort but nothing out of the ordinary, and a few concessions to the kit’s failings as well as acknowledging my own skills and where they were either not adequate or where I was unwilling to invest the time, eyesight and elbow-grease to achieve that extra standard of realism that is the grail of the hobby.

Italeri comes in for some flak, and not without reason, but that doesn’t mean all their kits can be pigeonholed easily. In recent years their packaging and breadth of subject matter have been impressive, as have their claims to realism and accuracy. Older kits suffer the same maladies no matter what company one considers, and, as with Hobbycraft and early Dragon, Italeri’s kits are best assessed on a one by one basis. Verlinden produced a conversion set (#423) to build the early (short barrel) A1 or late (long barrel) A2, plus stowage boxes, to be mounted on the recoil spade, that Italeri did not include.


The M110 is dated 1996, but the molds may perhaps be older. Certainly the chassis is in common with the M107 which appeared in a couple of editions from the same firm in the 90s. The parts breakdown is fairly normal, though the large number of small parts can be off-putting for some. Here and there were structures that were never going to work, such as the shell trays on the recoil spade bearers: there is insufficient room between their swivel points and the rear of the hull to fit them in their standard orientation.


Construction was generally straight forward, the dark green plastic reacted well to glue and worked well when I dressed the long seams of the barrel with adzed superglue and filler. There were many small, fiddly parts around the gun cradle and tail end, and the instructions were not terribly clear, the illustrations drawn rather small and difficult to see, so that things that should have been obvious were mysteries almost to the finish.

That said, the model went together in an entirely normal fashion. The gun swivel dropped in the same way as a tank turret but the tolerances were very close, even with the surfaces masked to preserve plastic-to-plastic sliding contact they needed filing a bit to get them to seat properly after painting. The small parts, handles and projections, were quite fragile, one had to be repaired twice.


The installation of the drive wheels was not engineered in a foolproof way and I ended up with one frozen in position. That’s no biggie, it’s not as if the tracks are ever going to roll, but having them mobile during track installation eases things. The tracks themselves were well-detailed both sides and took paint well. Italeri tracks are often criticised for lacking detail and being too stiff, but these were quite acceptable, though of course, like any vinyls, are never going to lie down along the top of the roadwheels like the tracks on the real thing. Perhaps someone makes a replacement set for this chassis, but buying tracks that cost more than the kit tends to stick in my craw.


The paintjob was all acrylic, Tamiya XF-62 Olive Drab, with shade and fade coats as per standard, then black and brown oil pinwash and enamel drybrushing in lightened olive and bare metal silver. Orange enamel was pinwashed here and there for bright rust, and MiG Europe Dust pigment was liberally applied last of all.

Italeri made a number of concessions to simplicity, such as molding in the hydraulic and electrical cables around the gun cradle as solid, raised detail, and not all of them are there either. I had considered using fine wire to replace the kit details, but after reviewing every reference picture I could find on the web, as well as some taken for me at a US exhibit, I decided not to. I either would not know where to begin, or where to stop, and in the absence of a Dremmel the idea of carving away all that raised detail added up to (probably) just sore fingers and a mess.


Decals are another area of contention. The Italeri decals are quite matt, and provide markings for four countries, all over standard Olive Drab, but the stern plate of the vehicle is a very cramped place to put markings. Either the model crowds the details too much or the decals are too big, because there was no way the German markings would ever fit into the space available. I used the US marking option and even they barely fitted.


But on the whole, the model had few surprises and was well within my capabilities to produce a decent, if simplified here and there, rendition of this important piece of Western allied artillery from the Cold War to recent times. Examples change hands on eBay for sometimes steeper prices these days, less perhaps because it’s a particularly great kit than because it may be the only kit. I would love to see Tamiya, Dragon or Trumpeter tackle this subject matter!

Thursday, February 3, 2011

It’s Good To Finish


The Italeri Corsair is done, which unless I am mistaken constitutes my first finished Italeri kit ever. In some ways it was excellent, in some ways a PITA. The wing alignment defeated me long ago, but now it was nothing to break a sweat about. All the same, this kit had a way of fighting me right to the finish.

Such as… Why are the holes for the drop tank pegs too small, so you have to file them out after the paintjob has been so carefully applied? The pitot tube was moulded with the wing, and there was no way it was going to survive the years. .020” microrod to the rescue, and a little superglue. Same with that row of antennas around the fuselage, it might make sense to fit them before painting but the handling that comes from that point onward is still enough to do for them. They were finagled back into place with CA at the finish, and one which disintegrated before it could even be installed with replaced with 7mm of .020” rod. The original was a blade antenna, this one is rod. Tough.

The canopy masked nicely, but I could have wished it unmasked a bit cleaner. What is it with clear plastic and its ability to gather scratches?


The gear bays were masked after main painting and sprayed with a homebrew interior green (Tamiya XF3 and XF5 at 3:2, works every time), then overspray was touched up on the hull (yes, there was overspray no matter how much masking I used… Like this: )


The tires were brush painted in NATO black, the rim is moulded high enough to guide the brush and inconsistencies are invisible against Dark Sea Blue. Another problem, the main gear seemed to want to sit a bit knock-kneed, so I cut a 50mm spacer bar from styrene strip and braced them apart while the gel CA set up overnight. Now they stand straight...

The gear bays were given a quick black oil wash, then I added a little MiG dust in them, and did the exhaust streaking with their Black Smoke and Vietnam Earth pigments; only the red earth shows up, as you might expect. Hmph – and why is it that you discover when you’re finished that you could use MiG pigments to take fingerprints, because they certainly only show up on the model as you’re putting the finishing touches to it!


One day I might get around to chipping paint with silver but for now I’m just happy to have the project somewhere I’m willing to call the finish line. It’s great to call a completion, file the unused decals and plans, bin the empty sprues and bags, and wipe down the bench ready for the next kit, it brings a sense of progress which few other moments do. This is my first completed Corsair in many years, but I’m sure it won’t be the last, the bent-wing bird is way too much fun to leave alone for long!


Sunday, January 30, 2011

Old Decals Still Work


They do say there’s a finite lifespan to decals, and anyone who has opened a vintage kit can attest to how fragile, faded and yellowed they can become. But decal technology has come a long way and when firms like Microscale came along they used only the best. I have had aftermarket decals perish, but not the good stuff.

The latest milestone on the Italeri Corsair was getting the markings on. I had meant to do Guy Bordelon’s plane but Italeri got the famous blue (substituting for white to ‘tone down’ the visibility for a nightfighter unit during the Korean war) too vivid. I have Superscale’s better version but before I was able to locate them I decided to go with the standard marking option in the kit, VMF(N)-513. I had applied Microscale Satin over the Tamiya XF-17 paintwork, resulting in a nice, smooth lustre, and I began on the underside for caution’s sake. The kit decals were very thin, very fragile, and the whites were translucent… Not the best, but there are always options.

Out came the big box which stores decals, most of them Superscale. The “Marines” title under the wing was sourced from sheet 72-20, and the non-backgrounded national insignia, with their separately printed red bars, from 72-12. These days, the range is way above a thousand sheets and still counting, and it must be over a decade since Krasel Industries announced they would no longer be reprinting their old releases. These two sheets date from the early 1970s and may have been printed no later than the mid-90s, so I had to wonder at first how they might perform.

They have been stored away from light and pressed firmly in their packets away from air, reasonably cool and always completely dry, and these conditions seem to be acceptable, because they worked fine. Superscales are incredibly thin and that makes them inherently fragile, these tore two or three times, but were coaxed into place with the standard Microscale system chemistry. The model was given a careful wash with a brush dipped in clean water and swabbed with a tissue to remove dried chemistry, which will otherwise show up instantly and indelibly as dull tidemarks under clear coats, then another coat of satin was applied to seal everything up.

Keep a thing twenty years and you’ll find a use, they say, and these decals replaced the kit items perfectly, reducing the somewhat translucent items to codes and serials. They do look slightly different, but not so much the casual glance would pick up the problem.

I’m glad these decals work so well after such a long time ‘on standby,’ as it were. My decal collection is considerable and I look forward to finally having the chance to use it properly, building many colourful and spectacular subjects in future.

Wednesday, January 26, 2011

Attitude: Resisting the Fiddly


Perhaps it’s the same phenomenon I was discussing last time, a mental blockage that keeps you from either seeing a solution or, just as importantly, implementing it.

I began building a Hasegawa Kyofu Rex seaplane a week or two back, a project I’ve wanted to do for ages and finally found an excuse to as another test subject for trying out those acrylic topcoats. The model fell together like a dream, there are only 37 parts in the plane and a few more in the handling trolly (the German would be dockwagon). The acrylics are all lined up and ready to go, the only obstacle was masking the canopy. Eduard make a set for this kit’s bigger brother, Tamiya’s 1:48 scale equivalent, but for the one-piece canopy of the little guy I was on my own.

Well, slivers of tape must be coaxed into place with fine tools, obviously. But it took me a week or so to commit to the task. I felt like Sgt. Pinback being told it was time to feed the alien, in Dark Star… “Ohhhhh, I don’t wanna do that… I have to do everything ‘round here…” Maybe it’s my deteriorating eyesight, or persistent memories of being frustrated by such tasks before, but it took resurrecting that Corsair a few days ago to get me to the job. Eduard makes Corsair masks but it would be weeks before I could get hold of them and they cost money, a few slivers of tape are immediate and essentially cost nothing.


So, the mind sees the necessity, the heart deals with the angst, and the hands and eyes do the job. A couple of hours work spread out through the whole day so there’s no chance to go stale on the task, and I had both canopies outlined. From there it’s easy enough to backfill the areas with tape. One concession to the approach is that it’s obliged to be a two-part finishing process: main struts will be painted, fine secondaries, simply too small or intersecting in complex ways with the others, will be slivers of decal, which will be made from clear sheet at the painting stage.

The pre-cut masks are so convenient you forget grass-roots techniques like these. I’ve not made slivers of decal for canopy struts in 15 years, so it’ll be an interesting experiment to see how they work – or don’t. If they don’t, I’ll figure out some other solution.

Sunday, January 23, 2011

Attitude: Another Skill That Evolves


Back in the 90s I considered myself a pretty good modeller. Well over 20 years in the hobby, airbrushing for a decade and a half, I knew my way around kits pretty good; but when a kit company fell down on the job my ability to think around a problem really extended no further than filler putty and hope.

Italeri has been described as one of those companies, like Hobbycraft, that perennially spoils the ship for a hap’eth o’ tar. Near enough is good enough, it has been said, and there are plenty of examples that bear out the worth of this observation. Even in later years, with the adoption of technologies for engraved detail, better decal production and attention to the wants of modellers, Italeri could still make mysterious blunders.

I read the review in FSM of their 1:72 F4U-5N (#044, dated 1994), and Paul Boyer made a marvellous job of it. I would have expected nothing less from a modeller of his abilities! I bought the kit off the shelf and was quite impressed with it, and had it almost complete when a problem I had not expected reared its head. The wings appeared to be out of alignment. I puzzled over it for a long time, held it to the light, compared it to drawing tools and graph sheets, and sure enough my eye was telling me true. My set of the tail surfaces was correct to within a degree or two, but the wings were off. It may have been my fault, but the whole wing structure sloped up to the right by some degrees. I had fitted the wing first, believed I had it right, and did not notice the problem until I installed the tails.

I tussled with the problem for ages. It had taken a lot of work to get the wing seated properly and the joints sealed up neatly, what could I do about that mismatch on the angle? Maybe I should just accept the error and finish the model, nobody but me would ever know the problem was there… But that seemed like either cheating or admitting defeat.

Eventually I forgot about that unfinished Corsair among the kits on my shelves as I went on to new and better projects, learned many new skills, got into scratchbuilding, honed my techniques on armour, amassed an impressive stash, and so forth. Fast-forward a number of years…

My great gloss finish dilemma and the accompanying clearcoat debarkal have taken many twists and turns but eventually they seem to have sorted themselves out. On a recent trip to the LHS I spotted Tamiya’s XF-17, which appears to be a close match to FS 35042, Flat Sea Blue, and therefore the right shade for late war Corsairs. My present experimental approach is one suggested long ago by Paul Boyer in a review of Future Floor Polish (unavailable in Australia to this day): paint the model in flat paints, they’re easier to apply and dry much quicker, then bring up the lustre with a coat of clear gloss. I have the flat blue, the gloss will be arriving next week by air, all I need is a subject to test it on.

I searched my log for Corsairs, Hellcats and Avengers and was about to go stash-diving when I noticed the Italeri box on the shelf… I pulled it out and looked at that wonky wing, frowned and reassured myself with the grid on my cutting mat that my eyes were telling me true – and of course they are, they always were.

Experience counts for much. Without a qualm, I flexed the wing, sprung it away from the old glue and filler, rubbed down the filler to clean up the joints, filed the mating surfaces clean, and corrected the angle. How? .020” plastic strip a few millimetres long shimmed inside the joint on the starboard side ahead of the wing, plus about half that much filed away from the portside joint, was just enough to push the wing down and into proper alignment, while leaving the mismatch at fore and after on the underside within the ability of a lick of filler and some sanding to hide.

Back in the mid-90s that would never have occurred to me, and looking back I don’t know why. Perhaps it was still a mindset that looked on the engineering of the model company as being so far in excess of anything an enthusiast could bring to bear that it must, perforce, be correct, which leaves the mismatch of parts that has always dogged the industry as a conundrum. Perhaps the real difference between me then and now is that today I will re-engineer as required, and in those days I had not yet grasped how, or indeed how simple it can be.

I’ll post pics when this Corsair is done. Better late than never…

Monday, January 4, 2010

Production-Lining Your Art


Most of us build more than we can finish in the short term, we all have a variety of projects on the boil at once and many of us move among them at whim, building or painting as the fancy takes us. That’s the marvellous flexibility of the hobby, really. Of course some end up back in their boxes on the shelf because we’ve lost patience with them for some reason – obstinate fit, inaccuracy, waiting for parts or decals, whatever. The only kit I’ve put aside in recent times was a Hobbycraft Corsair, and it’s rather put me off the brand.

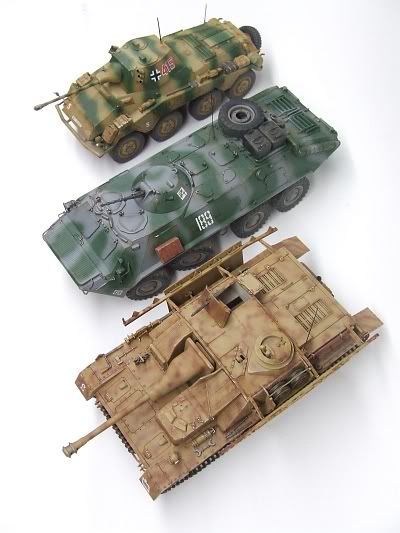
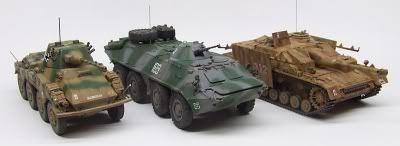
But eventually you need to clear that bench, get projects to completion, on display, and move on to new territory, though sometimes models have been in play for years. I found myself doing this recently, with a Zvezda (ex-Dragon) BTR-70 that had been unfinished in the box for about three years after being started as a ‘need-to-build-something’ project that I had thought would be a quick build, only to find the tiny Dragon parts tended to snap on the sprue, and the need to replace some with shaped wire rather consigned the beast to the shelf for a long time. Recently I got around to building a Tamiya StuG IV which has been in my stash for at least ten years, I got it from a second hand dealer in Japan, it’s the edition with all Japanese instructions (not that that’s a problem, Tamiyas really only go together one way and the diagrams are obvious.) Add to the mix the Testor edition of Italeri’s Sd.Kfz 234/2 Puma recon vehicle and I had a trio of 1:35th scale armour all clamouring to be finished more or less together. (You might have spotted them in the previous post, if sharp-eyed.)


So the solution was to do them production-line fashion. Henry Ford knew what he was doing, and while it depersonalised a craftsman into a repetitive technician, the hobby can withstand that at a small scale. Given that all three models were finally into their full paint jobs, I could tackle the finishing phases all of a piece. Each model received its fade coat, highly thinned paint misted onto the horizontal surfaces to create the impression the paintwork is faded by the elements. Then I did the oil filter weathering on them all, which was a process of washing the acrylic paints over with enamel thinner carrying dissolved artists’ oils to create tonal variety and the characteristic patterns of rust streaking. Then the pinwash to bring out details by capillary action, and tiny amounts of thicker paint to establish areas of open old rust; and finally brighter rust shades where rust is newer. The next phase is drybrushing in enamels (I can’t do it in acrylics, they simply dry too fast for me to keep up with the job and the task of endlessly cleaning and refreshing the brush) to profile edges and raised detail, making them ‘pop’ from the darker background of the paint and washing.

Then onto external fittings: tools and jerrycans on both the German subjects, all of which need to be painted and weathered before mounting, and a couple of fittings for the BTR. Next step decals – all three models could cross the bench together. Then onto the dust phase, Mig pigments brushed on in strategic locations for that touch of environment adhering to the beast. Final fittings, delicate radio antennas are often the last thing I mount, and of course the tedious process of painting a sharp division between wheel rims and tires, though that was eased somewhat with a new tool I’ll be reviewing here before long.


So there you have it – the same finishing techniques applied across the spectrum of three models in widely varying schemes, two wheeled vehicles, one on treads, different eras, three different manufacturers, but all responding to the same techniques for a satisfyingly dirty, beat-up appearance that whispers to the viewer’s subconscious that these vehicles have seen plenty of hard service. And all walked through the process from overall painting to completion side by side over the space of about a fortnight.

Now, I wonder if I should production-line build from the beginning in future? It certainly speeds up a heavy build schedule…

Look for retrospective reviews of these kits right here in the near future!

Friday, June 19, 2009

Accuracy, Out of Inaccuracy

Aurora -- the name brings back rosey-eyed memories of many an afternoon spent with glue and paint as a child, not that I could afford many Auroras. I remember a shop that stocked them in the early 1970s, the square-box edition with those imposing paintings, their movie monsters series in particular. I bought their King Kong and was very impressed by that powerful figure. I’ve often wondered what I could do with that kit with my current techniques.
 

 But the Aurora I’m thinking of is somewhat different. It was said by a reviewer that Aurora’s aircraft were always suspect, and the older the kits the more likely they were to be suspicious as to their accuracy and fit. Aurora’s B-58 Bomber (#375) was tooled in 1958, I managed to find an unmade 1958 example (long box) on eBay, for a reasonable price (some parts had been assembled, several were painted, and they were detached from their sprues). I needed it to mold off some parts to build some SF studio replicas -- TV FX miniatures built in the 60s which used B-58 parts from this kit -- and in that much it will suit its purpose perfectly. But the kit itself is a...disaster!

It’s the wrong shape. Not one single part of it is accurate. Not the proportional sizes, not the contours. The engines are way too fat, the tailplane is all over the map, the wings are the wrong size. There are raised decal guides on the surface... How this model could have remained in production for so long is a total amazement. Revell’s and Monogram’s early offerings may not have been up to scratch by modern standards but they were rather better than this. Italeri’s #1142 is by far the best B-58 in the scale, no wonder it fetches the prices it does on eBay these days: maybe Italeri will take notice of this and reissue the kit again, as they did about five (?) years ago.
 

 Here’s a comparison, the Aurora (top) and Italeri (bottom) engines, the latter being accurate and in fact the larger scale!


 And here are the fuselages and tails, Aurora at the top, then Lindberg and Italeri at the bottom. They seem like three different aircraft.


And on the subject of scale -- the classic Aurora is always reputed to be 1:64th, but the stated scale is ‘5/32nd” (to the foot)’, which goes through the calculator thus: 12” x 1/32nd” = 384/32nds, divided by 5 = 76.8th scale. This is almost the same as Lindberg’s (somewhat better) kit, which compared to the real aircraft scales out at 1/78th, and accounts for why the parts are smaller than Italeri’s (which is a -- more accurate -- 1:72). Unless Aurora tooled a larger B-58 (as they tooled a much smaller one at 1:180th, released these days by Addar), I’m mystified at the general air of confusion surrounding this kit.
 

 Incidentally, Lindberg’s has also been deemed 1:64, which it isn’t. The stated scale is 3/16th”=1’, which calculates out at 1/64th okay, but when you measure the components and compare them to the real aircraft, it’s noticeably the smallest of the three.

Will I ever assemble the Aurora Hustler? No. But I’ll use plenty of castings from those components to build entirely accurate replicas of the science fiction craft which used its parts: therein lies actual accuracy, which, ironically, stems from inaccuracy as its basis!