Showing posts with label resin. Show all posts

Saturday, July 31, 2010

In-Box Review: Fantastic Plastic's Retooled “Beta-1”


Resin is an almost ubiquitous medium these days, used by professionals and enthusiasts alike, and often the line between them blurs away to nothing as skills grow and shoestring operations are replaced by full-on limited-production model firms. They're not just 'garage kits' now, they have in fact become a force to be reckoned with.

Fantastic Plastic is one of the success stories of the modern limited-run marketplace, specialising in science fiction, 'realspace' and 'paper' aeroplanes, with high quality kits patterned by master craftsmen and featuring the highest quality resin moulding and casting technology. These kits aren't cheap but they certainly deliver unusual subject matter.

It's not only Moebius and Polar Lights that resurrect classic subjects and recreate lost lines. Fantastic Plastic has had dozens of subjects through its catalogue in the last few years, and they recently released an eagerly awaited kit that brings to life an old 'what if' subject, a mid-Cold War design by the old Hawk company based on theoretical studies by Convair for a nuclear-propulsion bomber, presumably to replace the B-52 sometime around the end of the 1960s. Little could military planners have dreamed in those days that the B-52 would still be in service well into the 21st century.

Nuclear propulsion was a 1950s technological darling, something which worked on paper and was kicked around by 'backroom boys' but never saw the prototyping shop to the best of aviation historians' knowledge. The idea was that nuclear energy created heat which was passed to ingested air to create a ramjet effect without consuming liquid fuel, thus allowing an aircraft to remain in flight for long periods, indeed for as long as crew fatigue parameters would allow, and a whole slew of designs came along from major aircraft firms in the late 1950s.

Kit company Hawk cashed in on the public fascination with this extremely sci-fi concept and designed their “XAB-1,” the B-1 of an earlier era, as the flagship guardian of the West, intended to cruise for long periods on nuclear deterrent patrol, ready to head for targets in Russia if the world ever tipped into DEFCON-1... It's interesting to look back on how this nightmare scenario generated business for lots of people, and the kit industry's perpetual association with militaria is a prime example.


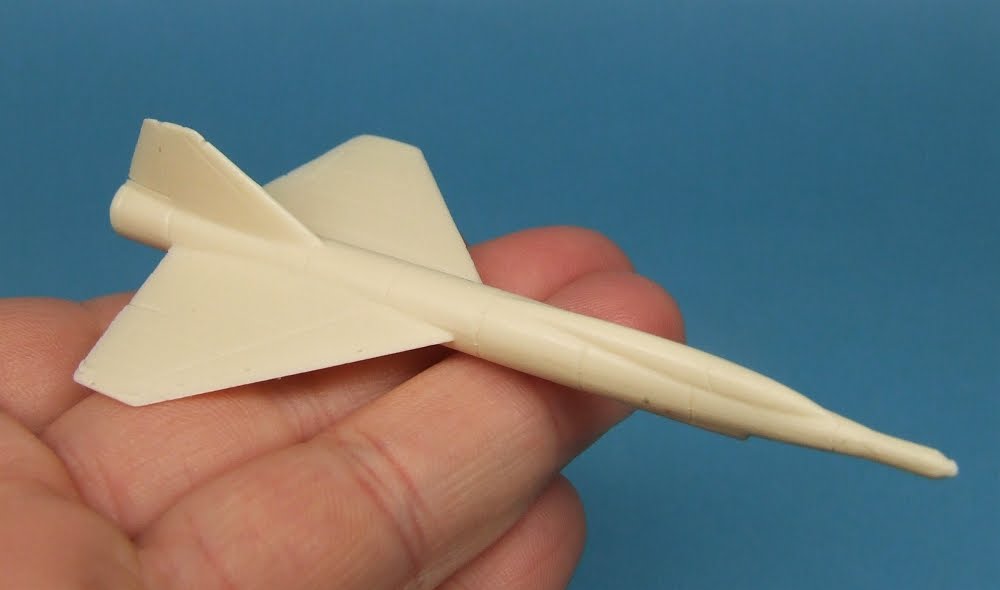
Hawk's original kit was injection moulded at 1:188th scale, and has become a collector's item. Rare unbuilt examples change hands at fabulous prices, a 1964 example is going at auction as I write this, they have become investment properties that one could never afford to build. Fantastic Plastic comes to the rescue with a fully retooled kit in pressure-cast resin, mastered by Scott Lowther and cast by Masterpiece Models, enlarged to 1:144th scale and featuring finely recessed panel lines in the modern style. The kits has a pencil-slim fuselage 17” long, landing gear which may be built deployed or retracted, waterslide decals by Jbot, and features photographic instructions. There is no cockpit detail, no detail in the wheelwells, and a few inconsistencies and flash in the resin to be cleaned up, but these are minor considerations. The original featured red plastic exhaust flames, a juvenile gimmick which has been dropped in this entirely serious 'take' on the subject, while the original's two 'parasite fighters' are also included as superb single-piece resin castings.

The kit comes packaged in a sturdy white card box, whose lid is decorated with a printed colour label featuring digital artwork combing the model with a realistic sky and CGI exhaust efflux, something of a Fantastic Plastic trademark. Inside, the largest castings, such as the one-piece wing and the right and left halves of the fore and aft fuselage sections, are loose in the box, the rest of the 45 parts being collected in a ziplock bag. Many parts are supplied with their pour-stubs already cleaned up.

The hollow-cast parts have alignment pegs and holes, allowing them to be snapped together exactly the same way as injection moulded parts, but curiously some of the pegs and holes don't match up, such as instances of opposing pegs. One needs to do some trimming of pegs and drilling of holes as part of the clean-up phase, but the good news is that the resin, while completely rigid, is soft to cut and works very readily. Go gently and adjustments should take almost no time at all.


There is no clear part for the cockpit canopy, and in so small a scale the model gets away with this. I have long harboured an interest in scratchbuilding this beast in 1:72nd scale, she would be a monster 34” long and 22” in span, and would definitely have a cockpit interior and clear parts. The interesting thing is that the layout of the super-streamlined nose virtually forbids a side-by-side pilot crew configuration, which is widely known (now) to be the only workable one for long duration flight.


I will be building this kit shortly as a review for a major magazine, so look for retrospective comments on Fantastic Plastic's Beta-1 in about a month's time. For now, the kit can be purchased for US$105 from Fantastic Plastic's online store, check it out at:

http://www.fantastic-plastic.com/ConvairXAB-1CatalogPage.htm

Thursday, January 21, 2010

Product Review: Cavalier Zimmerit


Australian firm Cavalier Model Productions has been around for quite a few years now, and besides their resin car kits and other esoteric goodies, they are perhaps most famous for their Zimmerit. Zimmerit was an antimagnetic paste applied like cement to the hulls of German armoured vehicles in the middle years of World War II (discontinued around November 1944) in response to the Russian tactic of magnetic mines which could be attached by infantrymen. Many choice modelling subjects are properly depicted with a coat of this rough, rippled stuff, and while there are many techniques for creating the effect, and some manufacturers, notably Dragon, have made forays into producing it as a moulded detail, Cavalier’s solution has been very successful and very popular.

Basically, Cavalier zimmerit is a wafer-thin sheet of moulded grey resin, as thin as paper and highly flexible. It’s delicate but captures the texture perfectly, including damage and defects in application for an amazingly realistic effect. Some 35 sets are presently available, including a batch for the new 1:48th scale armour, though most are for traditional 1:35th scale, with specific sets designed for particular kits. Fiddly parts are reproduced from kit parts with zimmerit added, so you have a complete replacement part. All sheets are cast in a uniform pale grey resin.

High utility can be found with their generic sheets too. If your vehicle is not covered by their sets of pre-formed parts, you can buy a generic sheet (there are four different patterns available) and you’ll more than likely have all you need for your project.

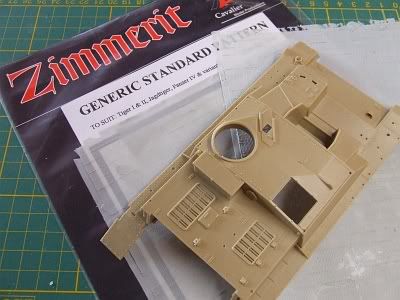
That’s what I did, working on Tamiya’s old (but still excellent) StuG IV kit (35087), as mentioned in the last post. No specific set has been produced for this kit, so I ordered up set CV-118, generic standard pattern zimmerit, and basically cut the parts as required. The set is very generous, containing two 15.5cm x 21cm sheets, and the whole project took me around half a sheet: that’s great value, panning out at about Aus$5 to zim each of potentially four models.


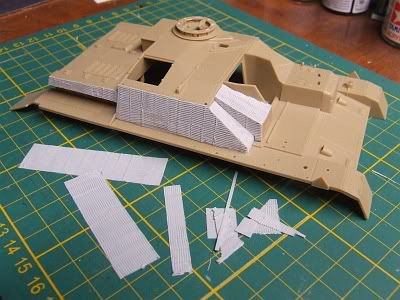
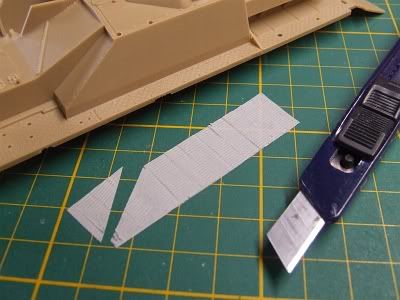
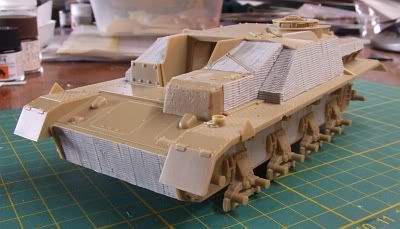
Starting from one symmetrical corner of the sheet, I began by measuring up needed panels and cutting them out with knife and straightedge. I cut them a fraction large, especially allowing the inclined edges of panels to lie inside the edges of the pieces I was cutting (photo, below). The method in this madness will soon become apparent. One needs to remember the orientation of the pattern, check references and see which way the pattern runs on which surfaces, and cut components accordingly.


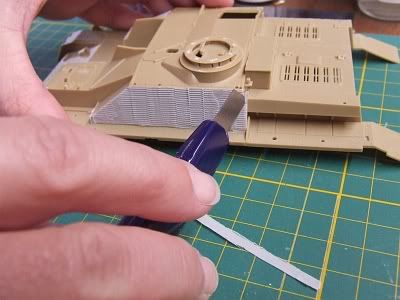
There are several suitable adhesives to use with this resin, five-minute epoxy, for instance. I used regular superglue as, given the fact I would be trimming the edges afterward, absolute precision was not called for. If using one of the pre-formed sets, I would use slow-cure gel superglue, for its strength and because it allows time to both spread the glue completely over the back of the sheet (as in the next photo) and to slip, or remove and replace, the piece once in place to refine the fit. As each piece was secured, simply by pressing carefully into place (second next photo), the slight excess left at the edges was trimmed with a sharp blade, creating an essentially perfect fit (third next photo). Any points on the edges that were not fully secured were glued down with thin CA, brushed on sparingly, then the edges were lightly filed to virtually blend the resin sheets together.


It is worth doctoring the zimmerit as well, you can score and chip the edges in high-wear areas, the likely contact zones, to create damage, chunks of the cement-like matter either chipped away by contact with branches or obstructions, or shattered free by the impact of shot. It’s as easy as cutting in with a knife or the edge of a file.

The sets come with a zimmerit tool, a cast resin ‘rake’ for custom work using one of the standard techniques. Basically, in areas where the zimmerit doesn’t quite fit, or edges where the juncture of sheets did not come out as perfectly as you might have wished, you can paint on some thinned putty, wait until it’s firming up, then score the pattern into it to match the resin sheets around about.


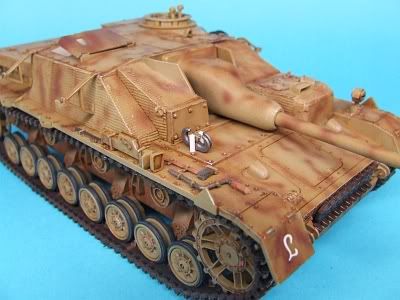
The complete zim job on this model took several hours to do, and it was my first outing with the product -- I’ll probably be quicker in future. Here she is with some paint on, late in the finishing stage:


I couldn’t be happier with the result, and look forward to more Cavalier zimmerit-enhanced German armour models to come.

You can find some sheets at better hobby stores, but for the full range go to:

http://www.cavaliermodels.com/Zimmerit.html

Here you’ll find an historic article on the stuff, including reference photos, plus a listing of all available sets. At Aus$19.99 each they are a good buy, and domestic postage of $3.95 is no blow to the wallet.

This is a first-rate product, highly recommended, and proudly Australian!

Friday, June 12, 2009

Minute Details: Resin Replacements or Go With the Kit Bits?


 I was working on the Hasegawa 1:48 F-104C and found myself thinking what great engineering it features. So many options, so much detail! The recessed surface detail is incredible, and the five-part wings boggle the mind when you’re used to those thin, thin Starfighter wings having been single-part castings in (probably) every kit before. What really made me stop and think was when I was assembling the 13-part ejector seat. The seat itself fits back against the fixed guide assembly, and until you add glue, it actually slides on the very rails which in the real thing constitute the ramp to guide the rocket projectile (the seat) out of the cockpit. I find myself asking, why would I bother going to the expense of replacing this seat with a single block of molded resin?  


 Sure, I have the Black Box conversion set to modify the kit to Canadian standard, and the resin cockpit is fantastic, with molded in seat and harness and such. The proportions do look rather different when you compare the tubs, and the knee-jerk is to say the resin one must be the accurate one, because, well, it’s an aftermarket resin! (Ever tried stuffing a Verlinden transmission and final drives into a Panzer IV hull? I’ve heard it can reduce a seasoned pro to tears, which suggests either the hull or the AMs are inaccurate: they can’t both be right, or they’d fit.) But unless you’re building an open cockpit to show off all that detail, it does tend to get lost in the gloom. There’s satisfaction in knowing all the details are there, but frustration in spending a long time creating it, only to have it disappear when the project is finished. For a closed cockpit I would most definitely go with the kit parts, and for open ones too under most circumstances. I will certainly be building more Hasegawa Starfighters in the years ahead, the subject is just too appealing to ignore! The kit itself has such a wealth of detail that sometimes resin is ‘gilding the lilley,’ as it were, while older (and more affordable kits) which cry out for a resin helping hand, are almost universally ignored, which doesn’t seem fair... This is a theme for another post.

Monday, May 25, 2009

Product Review: Barnes Pinkysil moulding silicon and Barnes Easycast casting resin


 Moulding and casting have been around for thousands of years but only in the 20th century and the advent of synthetic resins did they move out of the hands of foundrymen and the most gifted artisans, and into those of hobbyists and enthusiasts for engineering in miniature. The theory of three dimensional reproduction is far from rocket science and some basic arithmetic and a steady hand are all it really takes to generate copies of objects.

My previous experience includes learning the art at the Palaeontology laboratory of Flinders University of South Australia many years ago, where as an after-classes project I reproduced the skull of a Tasmanian devil in fibre-reinforced epoxy, out of plaster-backed two-part skin moulds. That was a complex job which took me weeks at an hour or two per session. More recently, I’ve worked in high-definition Alumilite resin out of Dow HS-III moulds for repetitive components needed for scratchbuild projects. Difficulty in obtaining these supplies in Australia at this time lead me to look for alternatives, and I came across the following excellent supplies.

Barnes Pinkysil is an addition-cure silicon mouldmaking rubber with a mixing ratio of 1:1 by weight. It has a short working time, only six minutes pot-life before it begins to gel, so from adding part B to the part A already in the mixing cup, you’ll be finished making your mould in six minutes or never, less if the weather is against you! It was a hot day when I did my mould-making, so I cooled the chemistry for ten minutes in the fridge, which got me around eight minutes. It also has a rapid demould time, as little as twenty minutes, though leaving it an hour will help ensure maximum mould life -- anywhere up to a hundred pulls, even more, which is excellent value. The rubber catches extremely fine detail and cures to a solid consistency, with 400% elastic distortion at the tear. The colour is of course bubble-gum pink.

Hand in hand goes Barnes Easycast, aptly named as it is truly free of mess and fiddling. No pre-heating the mould, no talcum-powdering the mould to encourage bubbles to move away from the surface, in fact very few bubbles in evidence at all. Mix by volume in a measuring cup, stir with any old thing (a popsicle stick is just fine), and after about forty seconds the exothermic property makes itself felt. When the container is getting warm you know it’s time to stop stirring and pour. You have a nominal pot life of two minutes, I try to have the castings poured in a count of 90 to 100 seconds from commencing stirring, as the mixture gels and changes to white rapidly after that point. Demould the castings in twenty minutes or less, again depending on the heat of the day and the thickness of your castings: thin sections and edges cure last.

The cured resin, snow-white in colour, has a slightly flexible character, not an issue with chunky castings but it might be a problem with thin, fine shapes. The material is then workable with all standard techniques: it can be sanded, ground, sawed, drilled, and accepts all regular paints and primers. One word of caution if bonding separate castings to make a whole structure: superglue bonds Easycast instantly -- no slippage time at all, so if your parts accidentally flop together while you’re still applying the glue, it’s adios muchachos. Ask me how I know... It’s a good job it’s so easy to mix a couple of drams more and pour it into the moulds, you can have replacement parts while you’re thinking about it with other systems. 


I took the shot above while making the parts for the Arrowhead project, posted last week. Note another casting curing at the same time. The darker chemistry is the resin, the lighter the catalyst. Below is the pattern, the mould, a pair of fresh castings and a completed structure made from the previous pull.  


 Pinkysil is not rated a hazardous substance according to national standards, Easycast is. Normal safety precautions apply, hand and eye protection, general cleanliness of the work area, and wash up before eating or drinking. The chemistry is flammable, so appropriate cautions apply with regard to sources of ignition.

Another recommended product is F-720 Dry Air Blanket by Chemlube, an inexpensive way to extend the life of your chemistry. It’s just what is sounds like – a liquefied gas which expresses from the can as 100% moisture free and inert. A two-second squirt into your resin bottles when capping them for the last time at the end of a session ensures zero moisture in the airspace of the containers, therefore nothing to contaminate the resin over time. 


 Between these products, you can be turning out excellent mouldings the same day you set up your pattern. At a current cost of around Aus twenty-something dollars each for a half-kilo (1 lb) pack, it’s extremely good value, and the small quantity ensures you can use up your supplies within their shelf life. If you’re working with bigger quantities, package sizes increase up to industrial volumes, but the general hobbyist will probably find the small packs more than adequate.

I bought mine from:
Adelaide Moulding and Casting Supplies
735B Marion Rd
Ascot Park, South Australia 5043
Ph: (08) 8277 7278

AMCS offer online discounts, which guarantee your savings against larger quantities of other chemistry coming longer distances from industry-oriented suppliers.

Double thumbs-up, superb products which I’ll be using in future.