Showing posts with label Trumpeter. Show all posts

Saturday, July 24, 2010

Recently Completed: Trumpeter SA-2 -- Finishing That Shelf-Sitter


After a long and particularly busy hiatus (involving submission of a PhD thesis, beginning a new job and continuing with past endeavours), I find the itch to resume blogging about my favourite pass-time, and going by the traffic World in Miniature has been generating, fresh posts will probably be most welcome!

In the last few months I've been very busy on the hobby bench, working on a round dozen projects. The trouble with spreading yourself so thin is that no particular project moves along very quickly even though you seem to be working as many hours. The great thing about having some older, unfinished projects is that you can get them off the bench with comparatively minimal work, and that was the case with Trumpeter's SA-2 Guideline missile kit.


I began this item probably two years ago, and did almost all the construction at the time. I was very happy with the fit, the cylindrical missile parts lined up very nicely and joints were dressed with the old superglue and adzing technique, always the best and quickest way. The alignment of the sixteen fins were more problematical, a right-angle jig would be a great help, as I doubt I got any of them at exactly 90 degrees. Still, 89 is close enough to satisfy the eye from most angles.

The thing that stopped me at the time was “Russian Green.” What shade is it? I have an old tin of Humbrol Russian Armour Green, which is no longer in the range, and I'm hoarding it. Besides, these days I try to paint in acrylics whenever I can, especially for armour subjects as it's not only far less toxic (and fairer to the family where the stink is concerned), it also lends itself perfectly to oil wash weathering afterward.


I did some research online, found my way to chat boards and such, and found that there were actually several shades of camouflage green in simultaneous use in the Soviet military, and any of them would be used in any particular context on the basis of what supplies were available. One common shade has been calculated to a Federal Standard value of 34098, and given that 34097 is a standard US shade, available in model paint ranges, I decided this was close enough for me. Tamiya XF-58 matches FS 34097, so that became my launcher shade.

Still, that alone was not enough to get me to pull the box off the shelf and get to it. As I'm sure I've mentioned in some previous post, I use a commercial compressed gas cylinder to power my airbrush, and I recently had a negative experience: for the first time in 15 years, I had a defective cylinder. I picked it up and seemingly overnight the fill had dropped from 15 bars to 10. I thought I had maybe failed to safety the main tap correctly, and heaved a sigh of frustration, but the next time I came to it the reading was 8, and I knew I'd safetied it properly that time. I talked to the company and they agreed to exchange it (they checked it and my gauges and the tank was definitely leaking). There was a weekend in the way, however, so I did some spraying and tried to use up whatever air I had available. The SA-2 was one of the kits that got some long-overdue attention.


I sprayed the launcher's six subassemblies with a good coat of XF-58, then I could do the standard armour weathering techniques I've developed. The big idea with this kit is that the launcher and missile are, literally, two different kits. In Soviet markings the installation is typical of the air defence settup found in North Vietnam, and this offers interesting finishing possibilities. The launcher stood in the tropical heat, dust and rain of Vietnam for years, and despite maintenance it would suffer the extremes of climate. Naturally, it would display rust and dust, and general dirt, just like any piece of heavy equipment. The missile, however, would not, being transported to the launcher site, loaded and fired long before weathering could set in. Also, the missiles themselves probably received more protection from the elements than the launchers.

So, I pursued them as separate projects. The missile was a painting experiment also. The pale grey shade used on the missiles seems to have no Western equivalent, so I mixed it. It was not the flat camo of the launcher, but either gloss or semigloss. I've had problems spraying gloss, and was not convinced the missiles were full gloss anyway, so I mixed 50% X-2 Gloss White with 30% XF-2 Flat White and 20% XF-66 Flat Light Grey. On reflection the finish is not quite bright enough and the shade not quite light enough, next time I build one I'll raise the gloss white to 60% and drop the grey to 10%, which should be a better mix. Nevertheless, I'm happy with this one, the grey certainly looks pale against the launcher green. Weathering was kept to a minimum, a thin black oil pinwash around raised details and recessed panel lines simply to make the structures visually 'pop.'


The missile is covered with stencil decals, more than forty of them. Many of them group adjacent Russian data placards, and they can be fiddly: I mangled only one decal in the process, and decided for ease to separate out elements from one or two others, which both extended the time involved and simplified getting a correct positioning. I was still decalling as I wrote the first draft of this post.

Speaking of decals, Trumpeter's printer, Cartograf, in Italy, have done a remarkable job on them. I don't think I have ever seen kit decals snug down into the surface so tight, and with carrier film that literally vanished against the lustre of my paint mix. The dried decal transparent areas are faintly lighter than the background, that's the only thing that gives them away. Placement instructions could have been more explicit, though. There is one interesting gaff, one of the red stripe markings that circles the body, just back of the juncture to the nose, is incorrect. Under a magnifying glass you can see that, instead of Russian stencil data, it says in English “NO PHOTO SORRY” – presumably a notation from the research team during creation of the decal sheet which, as it was not in Chinese, accidentally made its way through quality checking all the way to manufacture. Having omitted this one, I used a few bits of stripping from it to help repair the mid-body wrap-around decal that I mangled somewhat.


Final details involved spraying a grey-black mix to simulate the scorching of the rocket efflux on the blast deflector, brush-painting inside the rocket motor with a dark metallic enamel, fitting a few tiny parts on the launcher, including a few that fell/broke off during handling, then I could get some MiG “Vietnam Earth” pigment onto the launcher. This is good stuff! I can't wait to apply it to some Vietnam-era US armour.

Mating the two stages was an interesting job. A snug fit to start with, the paint on the alignment runners made it extra-snug, so I worked the boost stage carefully onto its guide, then slipped the upper stage onto its own guide and glued them together actually on the ramp.


It's the only kit I've built in many years which uses every last part and decal: there are no alternatives provided. However, three small decals, 8, 9 and 15, don't appear in the instructions: 8 and 9 are the starboard side counterparts of 7 and 10 and go at the base of the small aft fins on the second stage. 15 I haven't spotted anywhere.

All in all, this was a very pleasing model that built well and looks sharp on the shelf. I'm not sure if it's still in production but examples change hands on eBay for reasonably attractive prices these days. As a companion to Revell's re-released Nike Hercules missile, a similar vintage and role of weapon, and in fairly close scales too, it makes a most interesting display of Cold War technology.

PS: Yes, a part fell off the launcher and was not reattached before I did the photos, a sharp eye will spot the absence in the photos above. So, sue me...

Monday, March 1, 2010

Monochrome, Pt 2


 As promised, here’s another look at “triple value monochrome,” with the Trumpeter 1:35 M1126 Stryker as the subject. I started this one along with the Strv 103B as back to back projects, and both have built well (review posts coming up in due course), and both are now at the same stage, they’ve been through the paintshop and are waiting on the weathering process, decals, hull tools and antennas. The first thing that strikes you about the NATO Green is just how grey it really makes the Swedish scheme look. When I mixed the Swedish shade it seemed particularly green to me, now it seems quite grey. Nevertheless, both shades were given the same treatment, and by the same ratios. The fade coat, applied to the middle of panels and hatches, was NATO Green (Tamiya XF-67) lightened with 20% flat white (XF-2) and thinned by the standard 50%, or maybe a tad more. Likewise, the shadow coat, applied to the underside, under overhanging structures and in a subtle post-shade effect around the line of hatches and divisions in the armour, was mixed the same way, using 20% flat black (XF-1). The photos were taken at this stage. The gradient from lightened to darkened across the base colour value seems quite steep at this point, and the temptation is to think maybe only 10% tinting should have been used. But the washes to follow have the effect of darkening the cumulative value of the model, as well as drawing all the tonalities together, so I’m not concerned at this point. If the values turn out to be too contrasting I can always slap on some more wash over the highlights to pull them back. Drybrushing will be a slightly different operation, as it’ll take place in enamels (I’ve not learned the trick of brush painting Tamiya acrylics yet… Unlike the Citadel range for Warcraft miniatures, they’re not formulated specifically for brush painting, and while they airbrush like a dream I’ve learned to switch to enamels when it’s time to break out the sables.) So I’ll be mixing an equivalent tinted shade, perhaps starting with FS 34127 Forest Green or FS 34102 Medium Green, then lightening with white to profile edges. I had hoped to have this batch of models finished at this time, but real life has a way of intruding… I better stop writing and get back to the bench!

Wednesday, February 17, 2010

Taming Brass


I had something of a pleasant surprise today: my latest AFV is decked out with photoetched brass, something I would never have expected. Brass has never behaved for me and I didn’t expect it to this time. But… That Trumpeter M1126 Stryker came with a beautiful fret in the box, and I thought I might as well give it a shot, as there were alternate plastic parts if the brass wasn’t cooperative. I’ve used PE before, of course, I’ve added screens and grills on three previous models, but folding brass has so far defied me. Maybe I started out on the wrong foot… The Airwaves set I picked up for my Academy Merkava II was simply too hard to fold with the old standby, two single-edge razor blades, and I had not heard of the annealing trick at the time, so the PE more or less ended up back in the packet with a big question mark hanging over it. With those memories, I approached the Trumpeter brass with trepidation, worked on basic theory and gave it a go, open to the possibilities but expecting nothing in particular.  


 Well… It cut where it was meant to cut, filed where filing was necessary, and folded where folding was called for. In moments, it seemed, some very tidy brass structures were on my bench. The only pain was the pedestal for the forward wire cutter which did not match the size of the recess in the hull, which needed filing out to accept it, and that may have been my fault for folding into the guides in the brass, instead of away from them. No matter, the fit was quickly adjusted with files. The only brass part for which I opted to use the plastic instead was the small shield part that goes behind the weapon station on the commander’s cupola, and that’s because the component is simply the wrong size. The plastic part fits (and was moulded remarkably thinly), the brass part never will. Similarly, the support under the starboard jerry can holder will also simply not fit: the locator slot is set too far back, the fold points result in a structure that would hold the rack away from the hull if located there. I filed the tab away and tried again but the support structure interfered with the plastic components directly below. The plastic equivalent was moulded as part of the plastic version of the rack, and I considered cutting it away… Another option would be to scratch the support from some light stock, which may be the easiest route. 


I found something of a lesson in this; one automatically assumes that hi-tech metal parts must be “better” than the plastic ones, but their accuracy can only be as great as the information on which they are based, and if they are the wrong size or shape they will never fit properly, no matter how sophisticated their manufacture. The cya bond between brass parts is surprisingly quick and strong, but the bond between brass and plastic seems lamentably weak: this model must be handled with the greatest care. If the brass parts, with the exception of the securely-snugged-down engine grills, end up falling off, I may retro to the plastic parts in the end, but the experiment has been very much worthwhile.  


 All told, I feel more charitable toward photoetch today than before. It’s a learning curve, for sure, to fold and trim tiny pieces of brass and steel, and I don’t see myself ever using much of what’s out there, especially when it crosses that line between adding necessary detail and “gilding the lily,” or what’s worse, overcomplication for the sake of it, but I can certainly see myself using etch at this level, to reproduce scale thickness and make from fine sheet metal those structures which are made from light sheet metal on the real deal. I don’t for a moment consider myself a brass-tamer yet, another few successful metal detailing outings and I might start to think of myself as one, but I’ve made a start… I find myself thinking about that Lion Roar set of turret armour for late Panzer IVs I picked up last year, and can actually see me getting my clumsy fingers around the job after all! More on the Stryker when the paint goes on.

Monday, February 15, 2010

Monochrome, and When It Isn’t


 There are some techniques that “take a bit of getting comfortable with,” and some that take a bit of nerve to try out. Pre- and post-shading I’ve not yet given a whirl. The idea of blacking the panel lines of an aircraft to show through the actual colour coats as a subtle shadow around the lines, like a dark halo to each side of the final line accent, is a great one, but it takes a surprising degree of guts to try it out, when models already come out pretty good on less drastic techniques. And as for post-shading, even after 31 years of air painting, I don’t trust my airbrush not to make a mess at the last minute… I started fading paint on the top surfaces of tanks about two years ago, and I’ve faded seven models so far. Mostly disruptive schemes with dirt and rust on top, the fading is subtle and delivers a pleasing effect. For only the second time I’m doing a single colour vehicle, and the fade-and-shade routine seems to be becoming more natural, just a part of the process. The shot above is an overview of Trumpeter’s 1:35 Strv 103B, Sweden’s famous “S-tank,” the only fixed-gun MBT to see service. I’ll review this very good kit fully when it’s finished, for now I’d like to talk about the process of fooling the eye with the paintwork. I mixed the base colour from Tamiya acrylics and got a good solid coat on, then mixed a batch lightened with a 20% addition of white. It took this much to get a visible result, the green was a powerful pigment. I laid this mixture on, well thinned, with subtle spotting and stroking in the centre of panels and areas, the typical pattern for sun-fading and general wearing away of paint. Then I mixed some more and darkened it with a 20% addition of black, and applied that to the undersides, the hull behind the running gear, under the bow, tail and stowage bins, and under the topmost portion of the dozer blade, the idea being to encourage the eye to see shadow where shadows would most naturally fall. The photo is taken at this point, and the variation in tonality is actually more visible in the image than it is to the naked eye. The next round of work will be oil pinwashing followed by enamel drybrushing, my standard armour finishing process, and I expect the overall effect to blur together into a pleasing optical illusion. Do real tanks display fading this way? Peacetime tanks that get regularly serviced? Maybe not, but the eye tends to expect these tricks, and when you get used to them, a model finished in parade-clean condition has the disturbing quality of a toy. Tanks should be dirty, they should be rusty and their paint should be faded by the elements in which they serve, and this logic has created a suite of visual queues without which armour models don’t seem quite right. This is not really true, certainly not all the time, but that’s maybe the theme for another post entirely. The question is whether you can paint a model one colour overall and have it look convincing to the naked eye. I would say probably not. So long as it is subtly done, the fade-and-shade routine automatically imparts a tonal gradient between highlight and shadow which are close but perceptible, and provide a narrow “reference range” against which the much starker contrast of the dark pinwash in corners and angles around details, and the light drybrushing that profiles the sharp edges of structures, become part of an overall spectrum of tonality that tie the model visually together. That’s the theory, it seemed to work on the Japanese Type 74 I featured back in the early days of this blog, and I’ll know pretty soon if it works on the Strv 103B. My next project up is Trumpeter’s M1126 Stryker, another monochrome subject, and I’ll do it the same way, with one extension: I’ll use the darkened version of the base colour to generate a soft post-shade effect around all the divisions in the Stryker’s external plating. Combined with the fade coat applied to the middle of all the panels, this effect will either look great or like a patchwork quilt (in which case I’ll zap on another coat of NATO Green and start again…) I’ll sequel this post with another look at the “triple-value monochrome” trick when I do that job, and there’ll probably be something soon about natural metal finishes for aircraft, if the approach I’m trying on a Tamiya F-84 works like it should…

Tuesday, July 14, 2009

Why do so many companies have trouble with tracks?


Tracks... All armoured vehicles over a certain weight have them. They come in endless styles, narrow ones, broad ones, cleated tracks, padded tracks, live track, dead track... Amtracks with ‘swimming grousers,’ Shermans with ‘snow grousers,’ Panzers with Ostketten. The fascination with modelling tanks brought with it the challenge of companies producing realistic tracks, and most modellers would say they’ve never really achieved 100% accuracy no matter what approach they’ve taken.

There are traditional flexible vinyl tracks, single-piece, to be joined around the running gear, and they do a generally good job. In the early 1970s they tended to be poorly detailed and possibly undetailed on one side, though today molding technology and computerised machining of the molds means they can be highly detailed both sides. The ones above are from Tamiya’s 1:35th scale King Tiger, Ardennes. The drawback is that the relative stiffness of the vinyl means the tracks don’t develop a sag between the return rollers, or lie along the top of large diameter wheels, like real tracks do. 


 Then there are individual-link or link-and-length tracks, which call for cleanup and assembly. For some modellers these are the best, though for others they are a nightmare whose tedious nature more than forgives the lack of sag in the vinyls. Above are the indie links made by Academy to compliment their issue of the early Tamiya Panzer IV-derived tanks (all the models on the box are of Tamiya origin). And below are ModelKasten’s set for the above-mentioned King Tiger. 


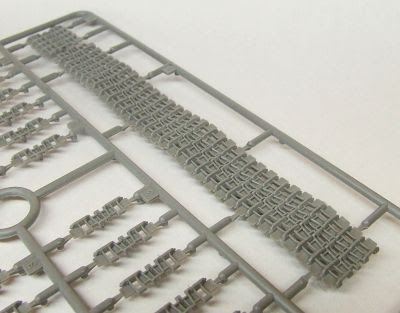
If sag is your thing, Trumpeter got ambitious a few years ago and produced superbly machined link-and-length tracks for their KV-1 series of kits in which the sag over the return rollers was molded right in, and even the most die-hard anti-L&L builder must feel tempted by these amazing pieces of injection work:  


Then come the workable tracks from AM companies, whitemetal, plastic or resin with wire pivots taking the place of the real track bolts, and which will hang, sag and roll like real (dead) track -- for a price.  


Dragon came up with Magic Tracks, a soft styrene type in which the links click-fit and will hold their shape until you can hit them with liquid cement, lending themselves to being shaped to any configuration of suspension. This is a neat idea and probably the most innovative. Vehicles with skirts tend to make that perfect hang and sag of the return length superfluous though: you can’t see it, so why sweat blood on it? And tight tracks don’t sag anyway. But tightness raises the question of why some companies don’t seem to be able to get it right in the most profound sense. 


I’m talking about early Trumpeter. I was really attracted to the Chinese Type 89 tank Destroyer, and was building along quite satisfactorily -- until I came to the tracks. They were half an inch too short (below) to link up around the running gear, and no amount of coaxing was going to change that: snapping off the portside idler wheel convinced me to give up. I tried heat treatment, stretching them by heating them with a hair drier, and hanging them with weights, but after half a dozen exhaustive treatments, using all the heat my hands could tolerate, one track had grown about one link’s worth, as the vinyl shrank again upon cooling. I was fed up and shelved the project. That late-mold Tamiya StuG III I reviewed last time was both a pleasure and a relief to build instead.


 Of course I didn’t give up entirely. The Type 89 shares the same chassis with the 122mm MBRL and the Type 83 SP artillery, I have them all, and all I would need is a single extra length of track to complete them. Cut out a few links and splice them in with superglue and thread as necessary, and suddenly the tracks will go round the running gear and meet as they should. I emailed Trumpeter, seeking to buy a spare length of track, got a reply asking me to forward photographs of the parts involved... Then nothing. Hey, I tried, but their aftermarket support at this point is as dodgy as their English, which is curious given their truly ambitious products and their dedicated assault on the affluent end of the Western marketplace. Their more modern products are of higher quality, I would certainly hope the tracks are the right length given the price they charge for their new armour.

And what about Dragon? That other Chinese company often considered to have eclipsed Tamiya as king of 1:35th scale? Early Dragon is beset by far too many microscopic parts which vanish into the carpet, and by the sort of over-thought engineering that has Dragon airplane models glide into waist bins beside the benches of grown modellers sobbing with frustration at their sheer unfriendliness and inaccuracy of fit. This is the antithesis of Tamiya’s philosophy, and while Tamiya’s earlier products may not be acceptably accurate or sufficiently detailed for today’s more mature taste, you can mostly rely on them to build well. “Buildability” was Mr. Tamiya’s watchword, and is sure to have contributed to the company’s historic success.


My only experience with early Dragon is in the reboxing of their classic Russian armour models when the molds were obtained by Zvezda. Their BTR-70 built fine, only a few grab handles needed to be replaced with brass because they broke before I could remove them from the sprue (because the parts were finer than their sprue attachments!) But their T-72 is another matter. It may be Zvezda’s plastic: the link and length tracks are brittle and the plastic really does not like to react with superglue (a bit like Chinese plastic in that respect). Thus trying to piece those tracks together promised to be an exercise in frustration. The Zvezda T-72B with Explosive Reactive Armour is easily the most detailed tank model I have ever built, and it sits unfinished in its box because there is no way I’ll mess around with that job, and the only AM T-72 tracks I can locate are far more expensive than the kit was. My prayer, thrown to the gods of styrene, is that AFV Club will finally produce high quality vinyl replacements in their expanding range of sell-alone tracks.

Which brings me back to my lament, why can’t companies with all the expertise and the million-dollar computer-assisted design and manufacture, get the tracks right? Properly detailed, that fit the sprockets exactly, articulate with each other, and take a realistic paintjob? If it has to be link-and-length, then the plastic had better respond well to glue, you certainly can’t stitch them together. And if they’re vinyl then is it too much to ask that they be the right length?

These criticisms don’t apply to modern Tamiya products, modern Dragon, or, as far as I know, current Trumpeter or Revell-Germany. But they can all be criticised for their sometimes exorbitant prices. I know, I know—I want it all ways, tracks that fit and an affordable price. I’m just out of touch with reality...