Showing posts with label Mustang. Show all posts

Wednesday, January 23, 2019

Recently Completed: Airfix 1:72 P-51D Mustang (A01004A)


This is the “8th Air Force” edition of Airfix’s new-tool Mustang kit, featuring markings for one of the famous “Blue-Nosed Bastards of Bodney.” Structurally it’s the same kit I built in 2014 and 2018. No luck with the joystick this time, and the radio mast is scratch built as always. I used SAC whitemetal landing gear as a matter of course.


I used Model Master Acryl Interior Green for the first time, and sprayed a shade to represent the plywood cockpit floor as well, something of a first for a detail seen so little (I generally do the canopy closed.) The “Bodney blue” was straight Tamiya XF-8, glossed with Microscale clear, maybe a touch too dark, but fairly close – closer than the Humbrol “French Blue” which is recommended in the plans.


I used the same graphite weathering technique as last time to vary the panel shades of the natural metal finish. It may not be perfect but it’s not bad and it’s certainly quick – an hour’s gentle masking and brushing with powdered 6B lead and the job was done. It also avoids the possibility of firmer masking pulling up previous paint or of anything going wrong with a second application of paint, if varying the metallic with a mixed shade.

The canopy was masked from scratch using Tamiya tape and Gunze fluid, which worked brilliantly on the main hood but on the windscreen it pulled the paint off the narrow struts. I rectified this by making strip decal with clear film – spraying interior green, then blue, then clear, and cutting fine strips with my Chopper II guillotine.


Speaking of the windscreen, the part does not fit as snugly as it might – you can have it tight into the lower curve on one side or the other but not both unless using a hot glue to make it grab before you release the seating pressure – but that will craze the plastic. I used white glue as a gap-filler on the left, which was not terribly successful.

It’s been observed that the drop-tanks in this kit are not very good, certainly they lack the prominent median ridge of the real thing, and I left them off this build, though I might transplant the better-detailed tanks from an Academy bird, if practical.


I love how the finished model feels “busy” to the eye. Consider the left fuselage side – the basic metallic, selectively darkened with graphite, then overlaid with clear, accented panel lines and the decals, all pulled together with final clear – there’s a lot going on to catch the eye in a very small space. The same goes for the wings – technically they should be a uniform aluminium shade and the panel lines should be filled and smoothed, as they were on the original, but it would make for an awfully plain display. This is where artistic license gets in the way of historical accuracy.


This kit was assembled before the end of 2018 but I knew there was no way I could get it finished in time to include it in last year’s tally. Painting was a fairly straight forward process but included one or two backtracks, all of which cost time. I have three more of this edition, plus a couple of other editions of the kit, and look forward to adding to my Mustang line-up in future.

Cheers, Mike Adamson


Saturday, August 25, 2018

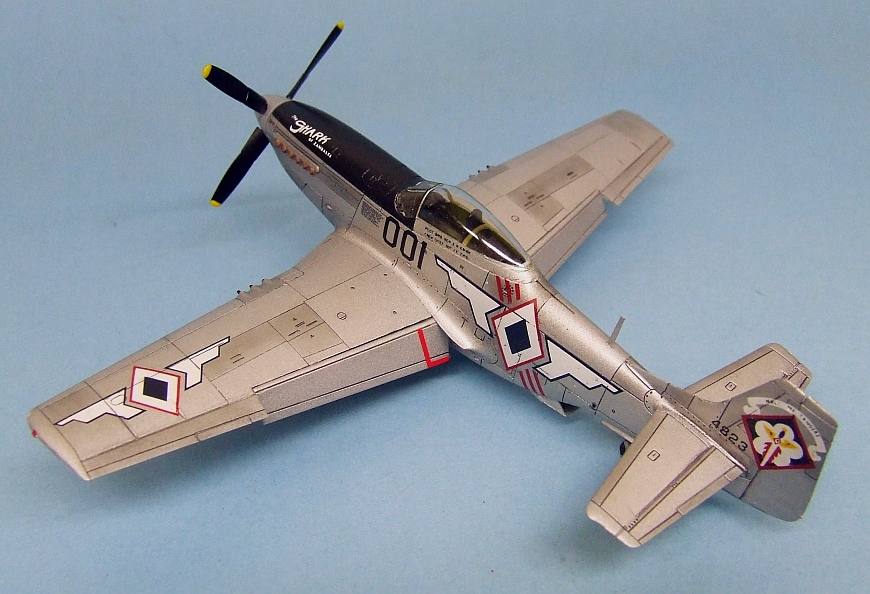
Mustang in Blue Diamonds


Earlier this year I completed Airfix’s 1:72 P-51D Mustang (A01004). This is the same kit I built around 2014, same original issue, though the kit has been boxed several times now with fresh marking options. This time I learned from my errors and did not try to include photoetched harness, though I succeeded in installing both joystick and radio mast unbroken. It remains to be seen if I can do that trick twice.

I have long wanted to do the varied post-war schemes and an old Superscale sheet (72-149) features the markings of the Philippine Air Force, who used Mustangs between the late ’40 and late ‘50s. The most famous of these was “Shark of Zambales,” the personal mount of the commanding general of the arm, B. N. Ebuen, and which has been the subject of numerous restorations over the years, including a standing display at the PAF museum at Villamor Airbase. Superscale included markings for a very particular phase in the original’s career, as the markings seem to differ in detail from one photograph to the next. Prolific aviation artist Gaetan Marie (check out his page here) has painted three different schemes worn by this aircraft, varying by the size, shape and colour of the shark-mouth, the scroll over the tail marking, spinner decoration, etc. and Superscale seem to have based their rendition on a single B&W photograph in which I am not prepared to swear the shark-mouth was actually applied. Angle and the nature of the filmstock make it dubious, but what’s not dubious is the unlikelihood of me applying the decals perfectly, so I left them on the sheet. I can always apply them in future if I feel justified.


The sheet must be over twenty years old and worked beautifully, I find myself thinking I’ll still be using decals from my stash decades hence, and they’ll still work as well as ever!


Another important factor, this is my first natural metal scheme in many years, as I have had the greatest difficulty in achieving a credible finish. I used Tamiya flat aluminium acrylic, overworked with 6B pencil graphite to vary the tonal values, then topcoated with Micro Satin for lustre. It feels quite good and I look forward to trying this technique again.


The landing gear of the Airfix kit is its only real disappointment – the plastic is soft and the main gear legs are irretrievably warped right on the sprue. The first time I built the kit I overlooked the problem and photographed it from angles that hid the gear, but this time I just couldn’t. I picked up the white metal replacement set from Scale Aircraft Conversions, beautiful castings in strong metal, absolutely straight, and they even supply two sets in the box so the next Airfix Mustang will get them too.


This bird came out very nicely and I look forward to adding more to my line-up – I recently picked up decal sets for postwar ANG birds and third world users, plus the Airfix edition with decals for Grenada, 1983, the last user of Mustangs in a combat role. I should think I’ll develop a long line of P-51Ds based on this kit and the ocean of decals I’ve collected over the years.


Saturday, September 5, 2009

Kit Review: Tamiya F-51D Korean War #61044


 It may seem odd to review a kit released nearly 13 years ago, but there’s always room for a retrospective. For many years Hasegawa’s P-51D was the standard, and it remains a very good and entirely competitive kit, but Tamiya’s builds somewhat easier and is superbly detailed. The Hasegawa cockpit is slightly better, but unless you have the canopy open you really can’t tell what’s in the pit anyway.

The 81-part kit features optional parts for the Inglewood or Dallas canopies, Hamilton-Standard or Aeroproducts propellers (blades and spinner cones), and features 6 5” HVARs and a choice of 2 500lb bombs or 2 75-US gallon droptanks for the wing racks. The kit comes with decals for three aircraft of Korean vintage, the famous FF-943 (“Was that too fast?”) of the 12th FBS, 18th FBG; the CO’s aircraft of the 18th FBG; and “Buckeye Blitz” of the 36th FBS, 8th FBW.  


 The clear parts are crystal clear and barely-distorting, while the overall fit of the model is outstanding. I needed only a little filler on the underside seam where the fuselage halves trap the cockpit/radiator assembly. The cockpit is quite adequately detailed for the scale, and while no harness is included, not even as a decal (as with Tamiya’s Corsair), there is a gunsight glass and the canopy frame brace. The propeller seats back onto a stub which engages a poly cap trapped between the hub parts, which means the prop can be mounted in the final assembly round, after all major handling is done, minimising the chances of breakage.  


 Tamiya must use very high-pressure injection moulding, as the sprue attachment points are as small as technically possible. They are also located in carefully-considered locations where the inevitable inconsistencies where the sprue is cut and filed back show as little as possible.

Alignment and fit are of a very high standard and the kit pretty much builds itself, certainly for any experienced modeller it should be a breeze. There were no problem areas to speak of. The decals were thin and opaque and reacted well to setting solutions, but were not particularly ‘sticky’: three small stencils simply disappeared during subsequent handling, underlining the desirability of clearcoats.  


 I finished the model in Humbrol enamels, mixing #11 Silver Fox 7:3 with #56 Flat Aluminium to create a weathered metal look evocative of the beating the aircraft took from the severe weather conditions in Korea. The yellow accents were sprayed in a mix of Tamiya Acrylics (XF-3 Yellow, warmed with XF-7 Red and brightened with X-22 Clear Gloss). The prop blades, anti-glare panel and rudder trim tab were sprayed XF-1 Flat Black. The cockpit and gear bay interiors were sprayed Interior Green, mixed 1:1 from Tamiya XF-3 and XF-5 Green. The overall recessed panel lines were accented with ProModeller Dark Dirt panel wash, and the natural metal finish was varied with graphite, burnished into the paint with a stiff brush, and masked (with the greatest care!) with Tamiya tape. MiG pigments were used to add dust to the gear bays and underside, plus gun carbon and exhaust staining.  


 This was a very enjoyable build, the model looks proud in the display case, and I’m sure I’ll be building many more, working through my decal stash to collect the elegant Mustang in many of her historically famous schemes.