Showing posts with label Dragon. Show all posts

Friday, July 5, 2024

In Appreciation of Palmtop Panzers


Many years ago I dismissed 1:72nd scale armour as too small to take seriously, calling them “palmtop panzers.” Well—even then I had a sneaking interest, as I’d seen some wonderful dioramas in the scale, but working so small evoked memories of Airfix OO/HO scale (87th ?) back in the 70s, and for a 1:35th scale modeller it was hard to imagine going back to the little guys.

But the wheel turns eventually, and I tackled a small scale armour kit for for a group build in the second quarter of 2024. I did some stash-diving and pulled out Dragon’s 1:72 Jagdtiger, and at once could appreciate that they had packed in much of the detail one expects to find in a larger kit. The mouldings were sharp and attractive, a photoetched fret was included for the engine deck grills, and assembly was generally straight forward.


Small scale equals a quick build—the main structure was done in no time. The painting was the big deal, really, as order of priority comes into play no matter the scale, and I found I was investing the model with all the same techniques as I would apply to the larger, standard size kit. This was especially true of the running gear, which was sprayed, clear-coated, shade/dirt coated on the back of the wheels, wash-detailed, then treated with graphite to simulate the resilient steel rims. The one-piece tracks were sprayed with a deep umber acrylic mix, drybrushed with metallic and finished with MiG pigment dust... In other words, all the same tricks that I would use at larger scale.

This kit is of the Henschell suspension type, with eight pairs of roadwheels arranged on double bogie units. The bogies were keyed for proper alignment but the fit was loose enough for the keyways not to be effective. I ended up push-fitting the bogies and idlers, then looping the connected tracks into place and meshing the drive sprockets into the tracks, then securing them to the final drives with a spot of superglue.

I chose a scheme from a Squadron volume, and only long after committing to it did I realise the vehicle in question had Porsche suspension—nine axles, like the King Tiger (P), not eight. Hey-ho, I’ll build this subject again at 1:35th scale and do it more justice!

If I have a specific criticism of this kit, it’s the alignment of the hull top and bottom. I must have tried twenty times to find their natural mate-up, but couldn’t. There are two internal pillars meant to mesh with receivers, and two mysterious screws which are not mentioned in the instructions but might have something to do with the pillars... As nearly as I could manage, I still needed to file away the top of one of the pillars to get the parts anywhere near fitting, and this left a fore-and-aft misalignment of about 1.5mm. The result was an “overbite” at the front of the hull, and a gap where the engine deck meets the transom (which I doctored with a strip of 010” plasticard. It’s not too noticeable at small scale, though in real life it would be a four-inch mismatch!


I sprayed Tamiya Acrylics overall, using the new-take shades, XF-87 and -88, which behaved very nicely. I lightened them at a ratio of three parts colour to one part white, to obtain a scale colour effect, as I was very conscious of how small the thing was going to be. After a little touching up to fix overspray, I overcoated with Microscale Flat, leaving a low lustre to accept the decals, which were then sealed the same way. Dragon provides two styles of balkenkreutzer and a large selection of turret numbers in both red and black, so you can get close no matter what subject you fancy.

As with 1:35th scale Dragon armour, you end up with loads of spare parts—a sprue of detail parts was clearly in common with other Tiger kits, and one ends up with hatches, tow cables, U-connectors, spare bow MG, AA MG, track plates and more.

Overall, I’d have to say I really enjoyed this kit, and it won’t be my last “palmtop panzer.” I must finish the Revell Pz. III I was referring to all those years ago, and I have several more Dragon kits, collected over twenty years back. It’s a good job I have them in the stash—I checked the price of small scale armour and you’re looking at $40 or more at hobby shop rates these days!

Photos were taken with my phone and processed through Irfanview. Still hoping to renew that studio lighting and get back to fully controlled miniature photography!


Wednesday, November 24, 2010

Breaking Your Dragon Virginity


Over the years I have noticed a certain progression in armour modellers, from easy scales to more challenging ones, and from easier builds to the more difficult. Dragon is a case in point, a company which from its inception some twenty years ago set out to find unprecedented detail levels through complex plastic engineering.

Many modellers call building your first Dragon kit 'breaking your Dragon virginity,' and it seems to be a somewhat accurate notion, but to be fair there is Dragon, and there is Dragon.

I have in fact already built two early Dragons, both Russian armour reboxed by Zvezda, and I was frustrated by a trend toward too many small parts and too few positive location devices. I did not really count these as they were from the company's first five years or so, and any firm goes through an evolution in approach and engineering.

I'm rating Dragons's StuG III Ausf. F/8, in the old Imperial Series, as my first genuine Dragon, and this is perhaps a less than perfect first choice as the Imperials are known for being both complex and, by many standards, over-thought. The object was to create the maximum number of variants from the same set of moulds, resulting in a huge number of parts in any box, with many sprues in common between kits and scores of parts unused on any particular project. For instance, though this is a Sturmgeschuts, there are enough parts to construct a Panzer III turret in the box, along with many other elements. My impression is that if I was to carefully inventory what unused parts I have and buy a batch of bits through Dragoncare (if they're available), I could more than likely build a Panzer III as well.

To look at the plethora of individually bagged sprues in the box is an impressive experience, then you start to build and inevitably compare the engineering with other firms and eras. The large number of parts is derived at least in part from tiny details being molded individually rather than as part of larger units, but as some variants have such details and some do not, you find either holes to open as locators (if you're lucky) or merely raised lines to indicate where the parts go. In any other context I would have rated the latter as very amateurish indeed, especially in view of the very high shelf price Dragon has always commanded. If you're paying the big bucks you expect less of a fight and better fit.

The superstructure is a case in point. Individual panels in the roof cater to the evolution of the StuG's fighting compartment so that a common core casting can be detailed for a number of marks, but the fit of those parts is far from great. While cast detail provides tight panel lines and rivet runs in some places, separate parts conjure gaps only an inch or two away which would have been fatal flaws in the real machine. Likewise, the engineering of the canon mount is weak, a multi-part structure to which the gun will glue at the end of assembly but which depends totally on the strength of your adhesive to hold the pivots in place in a friction-fit. I reinforced the assembly with strip styrene and superglue to be a bit more confident of the canon not simply falling out one day.

And what do you do when two parts are trying to occupy the same space? The instructions are not sufficiently explicit on assembly order, the way that details crowd around the superstructure and relate to the hull top, and a strip on the glacis (bullet splashguard?) which is supplied with a locator tab and slot was around 1mm too close to the superstructure for the frontal armour to fit. After filing and fiddling for a while I shrugged and ground away the strip's locating tab. It can lie 1mm forward of where it's supposed to be: no one will ever know the difference.

The Imperials did not necessarily venture into photoetch and I'll need to source engine grills for this one. Despite an inevitable negative comparison of Dragon in the 90s to Tamiya (of almost any era) when it comes to simple building pleasure, I would have to say this is going to be a good looking model on the shelf. Assuming I can conquer the individual track links... I've never tried before! I have a few other Imperials in my stash and now know what to expect, and look forward to building more recent Dragon engineering too.

I'll post a full review when this kit is finished. For now, I have some plastic to wrestle with...

Monday, January 4, 2010

Production-Lining Your Art


Most of us build more than we can finish in the short term, we all have a variety of projects on the boil at once and many of us move among them at whim, building or painting as the fancy takes us. That’s the marvellous flexibility of the hobby, really. Of course some end up back in their boxes on the shelf because we’ve lost patience with them for some reason – obstinate fit, inaccuracy, waiting for parts or decals, whatever. The only kit I’ve put aside in recent times was a Hobbycraft Corsair, and it’s rather put me off the brand.

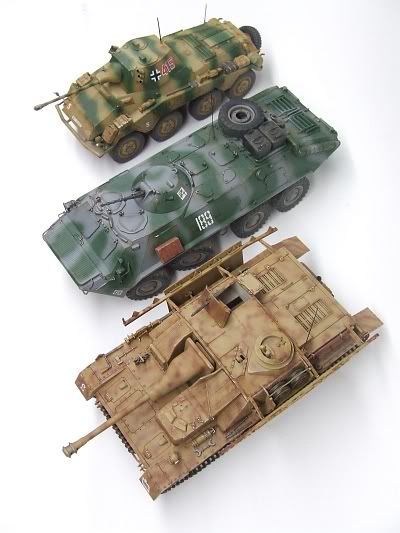
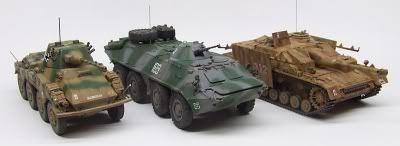
But eventually you need to clear that bench, get projects to completion, on display, and move on to new territory, though sometimes models have been in play for years. I found myself doing this recently, with a Zvezda (ex-Dragon) BTR-70 that had been unfinished in the box for about three years after being started as a ‘need-to-build-something’ project that I had thought would be a quick build, only to find the tiny Dragon parts tended to snap on the sprue, and the need to replace some with shaped wire rather consigned the beast to the shelf for a long time. Recently I got around to building a Tamiya StuG IV which has been in my stash for at least ten years, I got it from a second hand dealer in Japan, it’s the edition with all Japanese instructions (not that that’s a problem, Tamiyas really only go together one way and the diagrams are obvious.) Add to the mix the Testor edition of Italeri’s Sd.Kfz 234/2 Puma recon vehicle and I had a trio of 1:35th scale armour all clamouring to be finished more or less together. (You might have spotted them in the previous post, if sharp-eyed.)


So the solution was to do them production-line fashion. Henry Ford knew what he was doing, and while it depersonalised a craftsman into a repetitive technician, the hobby can withstand that at a small scale. Given that all three models were finally into their full paint jobs, I could tackle the finishing phases all of a piece. Each model received its fade coat, highly thinned paint misted onto the horizontal surfaces to create the impression the paintwork is faded by the elements. Then I did the oil filter weathering on them all, which was a process of washing the acrylic paints over with enamel thinner carrying dissolved artists’ oils to create tonal variety and the characteristic patterns of rust streaking. Then the pinwash to bring out details by capillary action, and tiny amounts of thicker paint to establish areas of open old rust; and finally brighter rust shades where rust is newer. The next phase is drybrushing in enamels (I can’t do it in acrylics, they simply dry too fast for me to keep up with the job and the task of endlessly cleaning and refreshing the brush) to profile edges and raised detail, making them ‘pop’ from the darker background of the paint and washing.

Then onto external fittings: tools and jerrycans on both the German subjects, all of which need to be painted and weathered before mounting, and a couple of fittings for the BTR. Next step decals – all three models could cross the bench together. Then onto the dust phase, Mig pigments brushed on in strategic locations for that touch of environment adhering to the beast. Final fittings, delicate radio antennas are often the last thing I mount, and of course the tedious process of painting a sharp division between wheel rims and tires, though that was eased somewhat with a new tool I’ll be reviewing here before long.


So there you have it – the same finishing techniques applied across the spectrum of three models in widely varying schemes, two wheeled vehicles, one on treads, different eras, three different manufacturers, but all responding to the same techniques for a satisfyingly dirty, beat-up appearance that whispers to the viewer’s subconscious that these vehicles have seen plenty of hard service. And all walked through the process from overall painting to completion side by side over the space of about a fortnight.

Now, I wonder if I should production-line build from the beginning in future? It certainly speeds up a heavy build schedule…

Look for retrospective reviews of these kits right here in the near future!

Tuesday, July 14, 2009

Why do so many companies have trouble with tracks?


Tracks... All armoured vehicles over a certain weight have them. They come in endless styles, narrow ones, broad ones, cleated tracks, padded tracks, live track, dead track... Amtracks with ‘swimming grousers,’ Shermans with ‘snow grousers,’ Panzers with Ostketten. The fascination with modelling tanks brought with it the challenge of companies producing realistic tracks, and most modellers would say they’ve never really achieved 100% accuracy no matter what approach they’ve taken.

There are traditional flexible vinyl tracks, single-piece, to be joined around the running gear, and they do a generally good job. In the early 1970s they tended to be poorly detailed and possibly undetailed on one side, though today molding technology and computerised machining of the molds means they can be highly detailed both sides. The ones above are from Tamiya’s 1:35th scale King Tiger, Ardennes. The drawback is that the relative stiffness of the vinyl means the tracks don’t develop a sag between the return rollers, or lie along the top of large diameter wheels, like real tracks do. 


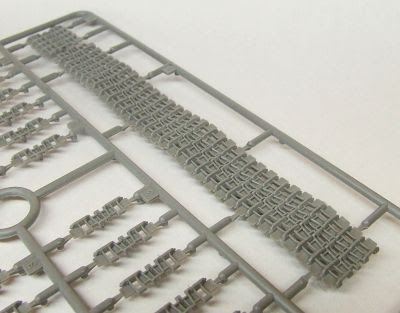
 Then there are individual-link or link-and-length tracks, which call for cleanup and assembly. For some modellers these are the best, though for others they are a nightmare whose tedious nature more than forgives the lack of sag in the vinyls. Above are the indie links made by Academy to compliment their issue of the early Tamiya Panzer IV-derived tanks (all the models on the box are of Tamiya origin). And below are ModelKasten’s set for the above-mentioned King Tiger. 


If sag is your thing, Trumpeter got ambitious a few years ago and produced superbly machined link-and-length tracks for their KV-1 series of kits in which the sag over the return rollers was molded right in, and even the most die-hard anti-L&L builder must feel tempted by these amazing pieces of injection work:  


Then come the workable tracks from AM companies, whitemetal, plastic or resin with wire pivots taking the place of the real track bolts, and which will hang, sag and roll like real (dead) track -- for a price.  


Dragon came up with Magic Tracks, a soft styrene type in which the links click-fit and will hold their shape until you can hit them with liquid cement, lending themselves to being shaped to any configuration of suspension. This is a neat idea and probably the most innovative. Vehicles with skirts tend to make that perfect hang and sag of the return length superfluous though: you can’t see it, so why sweat blood on it? And tight tracks don’t sag anyway. But tightness raises the question of why some companies don’t seem to be able to get it right in the most profound sense. 


I’m talking about early Trumpeter. I was really attracted to the Chinese Type 89 tank Destroyer, and was building along quite satisfactorily -- until I came to the tracks. They were half an inch too short (below) to link up around the running gear, and no amount of coaxing was going to change that: snapping off the portside idler wheel convinced me to give up. I tried heat treatment, stretching them by heating them with a hair drier, and hanging them with weights, but after half a dozen exhaustive treatments, using all the heat my hands could tolerate, one track had grown about one link’s worth, as the vinyl shrank again upon cooling. I was fed up and shelved the project. That late-mold Tamiya StuG III I reviewed last time was both a pleasure and a relief to build instead.


 Of course I didn’t give up entirely. The Type 89 shares the same chassis with the 122mm MBRL and the Type 83 SP artillery, I have them all, and all I would need is a single extra length of track to complete them. Cut out a few links and splice them in with superglue and thread as necessary, and suddenly the tracks will go round the running gear and meet as they should. I emailed Trumpeter, seeking to buy a spare length of track, got a reply asking me to forward photographs of the parts involved... Then nothing. Hey, I tried, but their aftermarket support at this point is as dodgy as their English, which is curious given their truly ambitious products and their dedicated assault on the affluent end of the Western marketplace. Their more modern products are of higher quality, I would certainly hope the tracks are the right length given the price they charge for their new armour.

And what about Dragon? That other Chinese company often considered to have eclipsed Tamiya as king of 1:35th scale? Early Dragon is beset by far too many microscopic parts which vanish into the carpet, and by the sort of over-thought engineering that has Dragon airplane models glide into waist bins beside the benches of grown modellers sobbing with frustration at their sheer unfriendliness and inaccuracy of fit. This is the antithesis of Tamiya’s philosophy, and while Tamiya’s earlier products may not be acceptably accurate or sufficiently detailed for today’s more mature taste, you can mostly rely on them to build well. “Buildability” was Mr. Tamiya’s watchword, and is sure to have contributed to the company’s historic success.


My only experience with early Dragon is in the reboxing of their classic Russian armour models when the molds were obtained by Zvezda. Their BTR-70 built fine, only a few grab handles needed to be replaced with brass because they broke before I could remove them from the sprue (because the parts were finer than their sprue attachments!) But their T-72 is another matter. It may be Zvezda’s plastic: the link and length tracks are brittle and the plastic really does not like to react with superglue (a bit like Chinese plastic in that respect). Thus trying to piece those tracks together promised to be an exercise in frustration. The Zvezda T-72B with Explosive Reactive Armour is easily the most detailed tank model I have ever built, and it sits unfinished in its box because there is no way I’ll mess around with that job, and the only AM T-72 tracks I can locate are far more expensive than the kit was. My prayer, thrown to the gods of styrene, is that AFV Club will finally produce high quality vinyl replacements in their expanding range of sell-alone tracks.

Which brings me back to my lament, why can’t companies with all the expertise and the million-dollar computer-assisted design and manufacture, get the tracks right? Properly detailed, that fit the sprockets exactly, articulate with each other, and take a realistic paintjob? If it has to be link-and-length, then the plastic had better respond well to glue, you certainly can’t stitch them together. And if they’re vinyl then is it too much to ask that they be the right length?

These criticisms don’t apply to modern Tamiya products, modern Dragon, or, as far as I know, current Trumpeter or Revell-Germany. But they can all be criticised for their sometimes exorbitant prices. I know, I know—I want it all ways, tracks that fit and an affordable price. I’m just out of touch with reality...