Showing posts with label enamel. Show all posts

Friday, March 9, 2012

Brain Cells? We Don’t Need No Stinkin’ Brain Cells!


After a lifetime in the hobby you can become inured to the stink of the chemistry. Enamel paints, liquid glue designed to be a plastic solvent, cyanoacrylate glue, even the supposedly nontoxic acrylics which have a pleasing odour but can be rather not-good-for-you in an enclosed space.

I recently began to experience headaches after airbrushing. As readers of this blog will know, I more or less retired enamels a couple of years ago for reasons of toxicity, and because dragging the whole rig outside to spray was too much trouble. However, even with a window open and some moving air, after sessions spraying acrylics I was starting to get persistent headaches, and that tells me I was suffering mild toxicity effects. I’ve completed half a dozen models in the last two months so there has been more painting packed into a shorter time than any other in the last year, so perhaps a problem was due to show up. A paper dust mask was not stopping much so the only solution was to buy a professional respirator mask.

As it happened, I was on the last gasp of my compressed air cylinder and needed a changeover, so when I took the tank into the depot I asked about masks and was shown an excellent unit made by 3M Corporation. This is the real deal, with chemical scrubber cartridges and dust filters, and a fully sealed fit to the face. When you’re breathing through this you’re on cleaned air only!

I trialled it promptly and the results of are as follows: easy fit and adjustment, comfortable to wear, not too heavy, does not obstruct the fit of glasses. No faintest whiff of chemical odour penetrates the mask, and breathing is easy and regular. The most important point is that after two good sessions of painting no headache had occurred, which seems to demonstrate the point.

The chemical scrubber cartridges come in a sealed package because they are permanently reactive with air and will exhaust. The tip from the retailers is that whenever the mask is not in use the cartridges are removed and sealed in ziplock bags with as much air squeezed out as possible. Hopefully this will extend filter life to a reasonably economical degree.

The whole rig (mask, chemical cartridges, dust filter pads) set me back Aus$80, which is a fair bit of cash, but how do you put a price on your health? I would like to still be building models when I’m 90, and doing so with as many brain cells left alive as possible!

Thursday, September 30, 2010

Product Review: Tamiya Masking Tape


I remember building Revell's prototype F-16 when I was a kid, in the early 1970s, the one painted up in red, white and blue. The kit was molded in white so I let the white areas be raw plastic, and masked the hard-edge red and blue. I used cellotape, which over raw plastic had nothing to pull up and gave razor-sharp demarcations. I was very impressed with the edge work, less so with the finish of flat enamels slathered on thickly with a brush, and which somehow managed to migrate under the tape where it crossed detail.

Not long afterward I tackled Monogram's B-52D, painting the whole thing with a brush in Humbrol enamels. The white underside took coat after coat and must have looked like it had been done with a roller... Due to the size I used automotive masking tape and of course discovered the necessity of de-gluing the back. Even over well-cured, thick enamel the tape had a de-surfacing effect that was not attractive. I had planned to mask and paint the walkway stripes over the NMF but after early experiments abandoned the idea. Somehow paint would always migrate under, no matter how well-burnished the tape edge seemed to be...

I used to think joint dressing was the biggest drag in the hobby, but since the advent of both cyanoacrylate glue and better-engineered kits joints have become simply a part of the process, not the disfiguring headache they once were, and the necessity of masking the paintjob has rather moved to the fore as the most time-consuming task in reaching a really good result.

Household/automotive paper tape is not designed for delicate paints and you need to seriously de-glue it to stand a chance. Scotch brand invisible mending tape is not very sticky and produces a very sharp edge. The problem with these two is they are not very flexible, they don't deform easily around corners. In the US there is the blue 'painters' tape,' but I'm not aware of it (or an equivalent) in Australia. To be fair, I've not checked out hardware stores for the item, but there's not much point when you have an item like Tamiya tape in the tool draw.

If there was a perfect product for this application, I'd have to say Tamiya have nailed it. Their tape is low-tack, burnishes down tight, deforms readily, and peels off clean. I have yet to have it pull up sprayed acrylics or enamels over any properly prepared surface (the only time I had it take paint off right through to the plastic was attributable to a deposit left on the surface of the model by the cleaning agent I had used to degrease it). The tape is also essentially re-usable, I have used the same pieces of tape on multiple projects, simply by transferring them to another plastic surface where they can stick for weeks or months and again peel off cleanly.

The tape comes in a variety of widths from narrow to broad so you have the option of curving lines or bulk coverage. I usually put a strip down on my cutting mat and slice it up with a razor knife and steel rule into ultra-narrow pieces or shapes as the job calls for. The dispenser rolls are a good idea, too.

The FW 190 I have on the bench at the moment was masked in both hard and soft contexts. The unit markings featured yellow rudder, cowl and fuselage bands, and rather than go with the kit decals for these items I sprayed them at the same time as the rudder. After overnight curing I masked them with strips of Tamiya tape and carried on with the rest of the paintjob. Several days went by, then I removed the hard masks and discovered perfectly sharp edges, and perfect protection of the underlying paint from later applications.

The big resin Beta-1 bomber featured in the last couple of posts was also fully masked with Tamiya tape, a long and complex operation, but one which went off essentially without a hitch. The colour demarcations are as tight and sharp as you could possibly wish for, with absolutely no paint bleed-under or de-surfacing on removal.

Tamiya tape is an indispensable tool in my kit, and I recommend it without reservation.

Monday, January 4, 2010

Production-Lining Your Art


Most of us build more than we can finish in the short term, we all have a variety of projects on the boil at once and many of us move among them at whim, building or painting as the fancy takes us. That’s the marvellous flexibility of the hobby, really. Of course some end up back in their boxes on the shelf because we’ve lost patience with them for some reason – obstinate fit, inaccuracy, waiting for parts or decals, whatever. The only kit I’ve put aside in recent times was a Hobbycraft Corsair, and it’s rather put me off the brand.

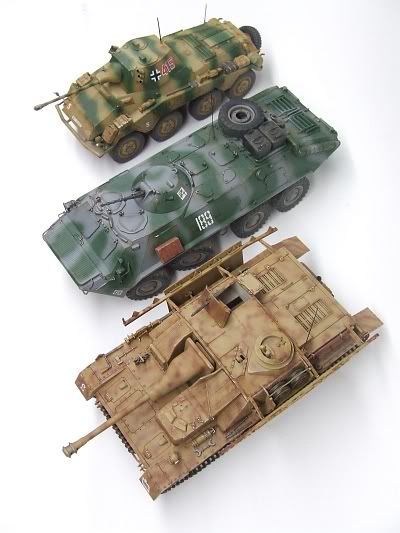
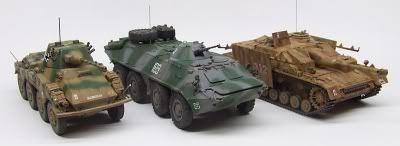
But eventually you need to clear that bench, get projects to completion, on display, and move on to new territory, though sometimes models have been in play for years. I found myself doing this recently, with a Zvezda (ex-Dragon) BTR-70 that had been unfinished in the box for about three years after being started as a ‘need-to-build-something’ project that I had thought would be a quick build, only to find the tiny Dragon parts tended to snap on the sprue, and the need to replace some with shaped wire rather consigned the beast to the shelf for a long time. Recently I got around to building a Tamiya StuG IV which has been in my stash for at least ten years, I got it from a second hand dealer in Japan, it’s the edition with all Japanese instructions (not that that’s a problem, Tamiyas really only go together one way and the diagrams are obvious.) Add to the mix the Testor edition of Italeri’s Sd.Kfz 234/2 Puma recon vehicle and I had a trio of 1:35th scale armour all clamouring to be finished more or less together. (You might have spotted them in the previous post, if sharp-eyed.)


So the solution was to do them production-line fashion. Henry Ford knew what he was doing, and while it depersonalised a craftsman into a repetitive technician, the hobby can withstand that at a small scale. Given that all three models were finally into their full paint jobs, I could tackle the finishing phases all of a piece. Each model received its fade coat, highly thinned paint misted onto the horizontal surfaces to create the impression the paintwork is faded by the elements. Then I did the oil filter weathering on them all, which was a process of washing the acrylic paints over with enamel thinner carrying dissolved artists’ oils to create tonal variety and the characteristic patterns of rust streaking. Then the pinwash to bring out details by capillary action, and tiny amounts of thicker paint to establish areas of open old rust; and finally brighter rust shades where rust is newer. The next phase is drybrushing in enamels (I can’t do it in acrylics, they simply dry too fast for me to keep up with the job and the task of endlessly cleaning and refreshing the brush) to profile edges and raised detail, making them ‘pop’ from the darker background of the paint and washing.

Then onto external fittings: tools and jerrycans on both the German subjects, all of which need to be painted and weathered before mounting, and a couple of fittings for the BTR. Next step decals – all three models could cross the bench together. Then onto the dust phase, Mig pigments brushed on in strategic locations for that touch of environment adhering to the beast. Final fittings, delicate radio antennas are often the last thing I mount, and of course the tedious process of painting a sharp division between wheel rims and tires, though that was eased somewhat with a new tool I’ll be reviewing here before long.


So there you have it – the same finishing techniques applied across the spectrum of three models in widely varying schemes, two wheeled vehicles, one on treads, different eras, three different manufacturers, but all responding to the same techniques for a satisfyingly dirty, beat-up appearance that whispers to the viewer’s subconscious that these vehicles have seen plenty of hard service. And all walked through the process from overall painting to completion side by side over the space of about a fortnight.

Now, I wonder if I should production-line build from the beginning in future? It certainly speeds up a heavy build schedule…

Look for retrospective reviews of these kits right here in the near future!

Saturday, December 5, 2009

Acrylics or Enamels?


 It has to be the biggest question in model painting today, beyond choice of brushes or airbrushes, beyond colour selection: which type of paint is best for your project? There are modellers who have switched entirely to water-based acrylics for all spray work, for the health benefits: nontoxic paints are a major factor and not to be taken lightly. When you’re used to the light, sweet smell of acrylics and their water cleanup, to start spraying solvent-based paints and their spirit cleanup is a rude reminder of just how frequently and casually we poison ourselves with the things we invite into our environment. Got a spray booth with a ducted exhaust fan? Good for you, but most of us make do with an open window and sometimes it’s just not enough.

Like many modellers, I have both types of paint in stock. I first bought acrylics when tackling vinyl subjects in the early 90s, and I must say the Tamiya paints I bought have been extraordinarily long-lived. They’re still good over 15 years later, all they need is a stir. They haven’t made the old, large bottles in many years, possibly because people discovered the paint lasted remarkably well, and for the rate of usage a smaller quantity was just fine. I have scores of Tamiya shades, plenty of useful colours, and my collection grows gradually. But I also have hundreds of enamels, the ubiquitous Humbrol range and Testor Model Master (which despite being superb quality, with an easy-stir jar and an enormous selection of specialty-matched shades, is getting hard to find in Australia, as Humbrol and Tamiya have grabbed the popularity).

I have not brush painted a model in 30 years, but today when I spray enamels I do so outside, which is a nuisance. Acrylics I can use indoors with simple ventilation, which makes them easy and convenient. But what about detail painting by brush? This is where the real applicability of the paints comes to the fore. Acrylics spray superbly but they don’t brush worth a damn--at least the Taniya variety. You can thin them a little and that helps, but the drying rate is like lightning and in one minute a brush is unusable -- clean it and start over. This seems a characteristic of the Tamiya range in particular, they are by far the most available here and I have sampled no others at this time (but I’ve heard others dry even faster…)

By comparison, dipping a fine brush in enamel paint provides familiar flow and control, and one can concentrate on the finesse of the task rather than fighting the characteristics of the medium. The same thing applies when airbrushing, though on a longer timescale. When used to the tip-drying characteristics of enamel, acrylics can bite you: you must keep the job moving when you’re working with the nontoxic paints, and when it’s done be sure you’re finished and clean the AB at once. This tends to lead to wasted paint, as when forgotten bits are noticed you need to mix more, and if using a syphon-bottle AB there is a minimum amount the airbrush will actually pick up from the jar. If working in enamels you have the extra working time to consider the job from all angles, turn the thing around again, look at it in different light, go 30 seconds or more and be sure the paint will still flow normally when you press the trigger.

My impression is that enamels and acrylics will continue to share the marketplace. Enamels flow on so smoothly they are a joy to use, they are a ‘friendlier’ medium than acrylics, you can polish their finish just like automotive paints (which ironically have all been acrylics for the last 25 years at least), and the range of precision-matched shades is enormous. The major manufacturers must have churned out over a billion bottles and tinlets in the last 40 years, in fact probably far more, Humbrol alone used to produce 25 million tinlets a year in the 1980s, if I remember correctly, and that’s an awful lot of paint in collections out there. I personally have tins that date from that era and the contents still slosh. But if acrylics were friendlier, dried slower, brushed better, and were available in hundreds more shades, precision-matched to historic sources, I would be using them more often. I have no wish to poison myself, and while the chemistry involved with acrylics is almost certainly not 100% harmless, it’s a significant improvement.