Saturday, January 30, 2010

Product Review: MicroScale Trimfilm (and how I don’t seem to have the knack…)


 I’ve used MicroScale Industries products for many years and have the greatest respect for the firm. Established in 1933, they’ve been serving the modelling community even longer than Kalmbach Publishing, and their decals are legendary. In the days before everyone and his uncle was churning out decals through computerised imaging systems, Krasel Industries was the big guy on the block, and when they split into MicroScale and SuperScale, many years ago, it was double the bang for your buck, one firm catering to railroaders and others, the other to the burgeoning military enthusiast marketplace. First of all, I would like to say that I have over 400 sheets of SuperScale decals in my collection, and know their quality, plus seven of MicroScale’s finishing products which I use with confidence. So why am I complaining about Trimfilm? Trimfilm was a great idea. Solid colour sheets, and sheets of generic designs, stripes, checkerboards, in a variety of colours and gauges, a mix-and-match solution for a thousand different graphical challenges. Add to these a wide range of typestyle sheets, fonts, sizes and colours, and you have a resource to rustle up detailing at the drop of a hat. That’s the theory: what about practise? Maybe practice is what I need, because I can’t get the stuff to cooperate. I tried using Trimfilm on an SF scratchbuild or two, e.g., the bold red stripes around the rear fuselage of the MEV from Thunderbirds Are Go, and found to my frustration that the half-inch red stripe material had no intention of cooperating. The thinness, so valuable in getting small decals to conform to surface contours, made the material so fragile that it shattered if I breathed on it. It tended to break up while merely detaching from the backing paper, was quite impossible to move effectively once it was on the surface, and grabbed almost at once in any case, drying decidedly lumpy over a surface wet-polished smooth. I tried several times to get the material to do what I wanted it to, then gave up and sprayed the stripes instead. Perhaps I had hold of a defective sheet, I thought, and tried other sheets and other gauges. The red stripe around the MEV is flanked by two finer black stripes and I did these with eighth-inch Trimfilm. The story was the same, and I pieced the lines together from multiple fragments of broken decal, not enjoying the process. When I came to do the wing walkway lines on my scratchbuilt F-116 fighter from Joe-90 I found myself using the same material by necessity, but having no more rewarding an experience. For black lines around the engine nacelles I had far better luck spraying flat black and masking with Tamiya tape, and for some lines circling the nacelles I actually sprayed the tape black and applied it permanently, because the tape will stretch symmetrically across a two-dimensional curve, and decal film essentially will not. This is unfortunate. Perhaps my technique is off, maybe I don’t have a sufficiently gentle touch to use this material: if it behaved like most decals usually do for me it would be great, but it didn’t (which is odd, as I’ve used SuperScale aircraft decals before and had no trouble with them). Maybe I should have reinforced them with Liquid Decal Film to keep them from shattering. I’m still drawn to the range, though, a sort of love-hate relationship. All those pre-made items are creative candy! And the typestyles suggest custom lettering on home-designed projects (though to be fair, custom made decals have made a very effective challenge to the idea of piecing logos together a letter at a time.) For now I’ll say that my Trimfilm collection lies in its box, forlorn and neglected, awaiting either a renewed sense of adventure on my part or the wisdom of those who know how to make it behave. Check out the enormous range at: http://www.microscale.com/

Thursday, January 21, 2010

Product Review: Cavalier Zimmerit


Australian firm Cavalier Model Productions has been around for quite a few years now, and besides their resin car kits and other esoteric goodies, they are perhaps most famous for their Zimmerit. Zimmerit was an antimagnetic paste applied like cement to the hulls of German armoured vehicles in the middle years of World War II (discontinued around November 1944) in response to the Russian tactic of magnetic mines which could be attached by infantrymen. Many choice modelling subjects are properly depicted with a coat of this rough, rippled stuff, and while there are many techniques for creating the effect, and some manufacturers, notably Dragon, have made forays into producing it as a moulded detail, Cavalier’s solution has been very successful and very popular.

Basically, Cavalier zimmerit is a wafer-thin sheet of moulded grey resin, as thin as paper and highly flexible. It’s delicate but captures the texture perfectly, including damage and defects in application for an amazingly realistic effect. Some 35 sets are presently available, including a batch for the new 1:48th scale armour, though most are for traditional 1:35th scale, with specific sets designed for particular kits. Fiddly parts are reproduced from kit parts with zimmerit added, so you have a complete replacement part. All sheets are cast in a uniform pale grey resin.

High utility can be found with their generic sheets too. If your vehicle is not covered by their sets of pre-formed parts, you can buy a generic sheet (there are four different patterns available) and you’ll more than likely have all you need for your project.

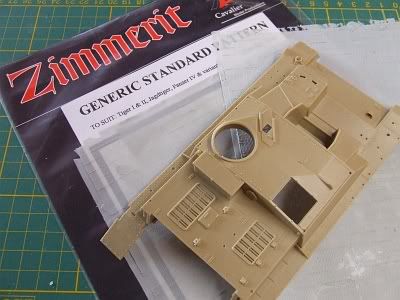
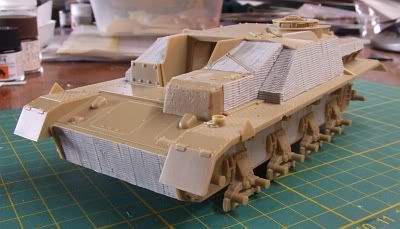
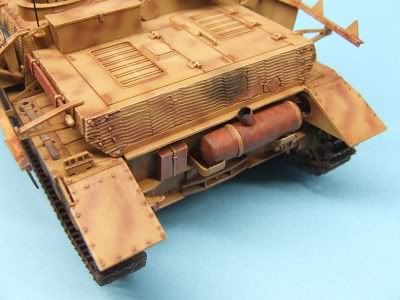
That’s what I did, working on Tamiya’s old (but still excellent) StuG IV kit (35087), as mentioned in the last post. No specific set has been produced for this kit, so I ordered up set CV-118, generic standard pattern zimmerit, and basically cut the parts as required. The set is very generous, containing two 15.5cm x 21cm sheets, and the whole project took me around half a sheet: that’s great value, panning out at about Aus$5 to zim each of potentially four models.


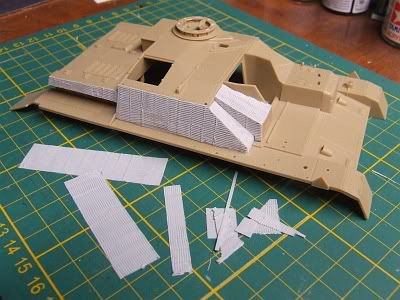
Starting from one symmetrical corner of the sheet, I began by measuring up needed panels and cutting them out with knife and straightedge. I cut them a fraction large, especially allowing the inclined edges of panels to lie inside the edges of the pieces I was cutting (photo, below). The method in this madness will soon become apparent. One needs to remember the orientation of the pattern, check references and see which way the pattern runs on which surfaces, and cut components accordingly.


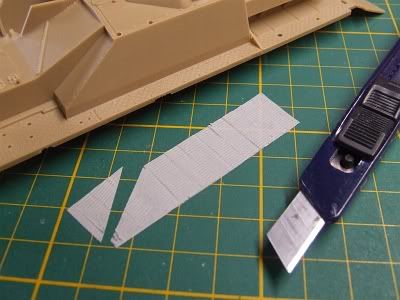
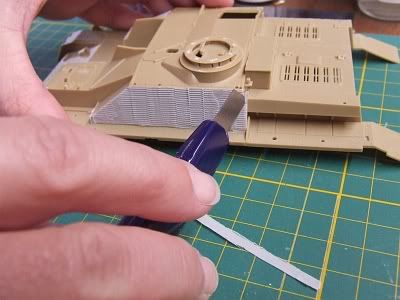
There are several suitable adhesives to use with this resin, five-minute epoxy, for instance. I used regular superglue as, given the fact I would be trimming the edges afterward, absolute precision was not called for. If using one of the pre-formed sets, I would use slow-cure gel superglue, for its strength and because it allows time to both spread the glue completely over the back of the sheet (as in the next photo) and to slip, or remove and replace, the piece once in place to refine the fit. As each piece was secured, simply by pressing carefully into place (second next photo), the slight excess left at the edges was trimmed with a sharp blade, creating an essentially perfect fit (third next photo). Any points on the edges that were not fully secured were glued down with thin CA, brushed on sparingly, then the edges were lightly filed to virtually blend the resin sheets together.


It is worth doctoring the zimmerit as well, you can score and chip the edges in high-wear areas, the likely contact zones, to create damage, chunks of the cement-like matter either chipped away by contact with branches or obstructions, or shattered free by the impact of shot. It’s as easy as cutting in with a knife or the edge of a file.

The sets come with a zimmerit tool, a cast resin ‘rake’ for custom work using one of the standard techniques. Basically, in areas where the zimmerit doesn’t quite fit, or edges where the juncture of sheets did not come out as perfectly as you might have wished, you can paint on some thinned putty, wait until it’s firming up, then score the pattern into it to match the resin sheets around about.


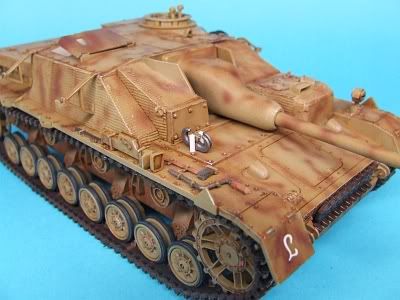
The complete zim job on this model took several hours to do, and it was my first outing with the product -- I’ll probably be quicker in future. Here she is with some paint on, late in the finishing stage:


I couldn’t be happier with the result, and look forward to more Cavalier zimmerit-enhanced German armour models to come.

You can find some sheets at better hobby stores, but for the full range go to:

http://www.cavaliermodels.com/Zimmerit.html

Here you’ll find an historic article on the stuff, including reference photos, plus a listing of all available sets. At Aus$19.99 each they are a good buy, and domestic postage of $3.95 is no blow to the wallet.

This is a first-rate product, highly recommended, and proudly Australian!

Thursday, January 14, 2010

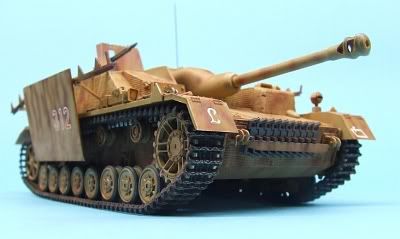
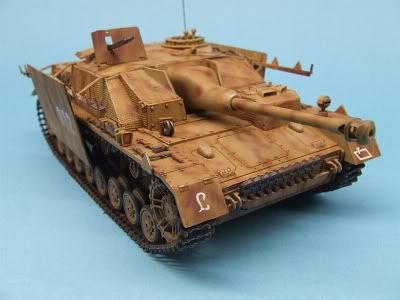
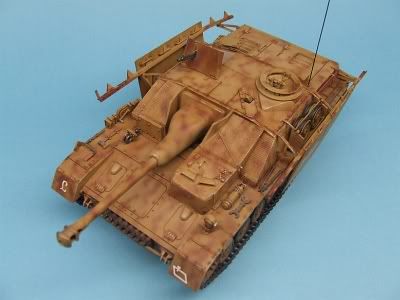
Recently Completed: Tamiya StuG IV


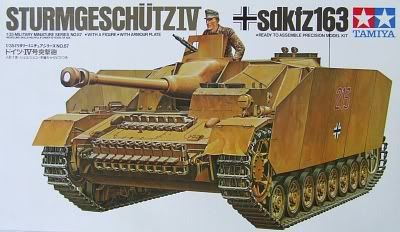
This kit (#35087) has been around for a very long time, thirty years or more, and in general one expects toolings of that age to fall down on the job by comparison to the new stuff. In recent years it was widely speculated that Tamiya were backing out of the 1:35th scale armour game, leaving it to the prolific releases of Dragon and Trumpeter that were making such an onslaught in the marketplace, but among Tamiya’s updatings to get new life from old moulds there have been a series of gems, their T-55, JS-3, Char B-1, Leclerc, and the brand new ISU-152. Tamiya has always been characterised by “buildability first,” catering to the younger or less experienced modeller by engineering their models to build well, something Dragon started to do with their “Smart Kit” range about thirty years after Mr. Tamiya made it policy. So just how do older kits build?


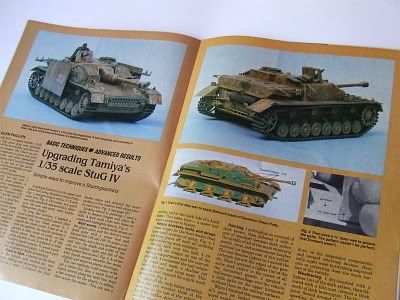
I wanted to do this one for many years. I was inspired by Glen Phillips’ build-up and detailing techniques in the May 1991 FineScale Modeler, and hunted out a StuG IV which I bought from a second hand dealer in Japan, but it was many years before I could get around to it. For one thing, I had to figure out how to make an airbrush spray fine lines, as the rotbraun mottle was far finer than anything I had ever sprayed before, and these skills did not come easily. And there was the matter of Zimmerit, a prepossessing task when it involves plastering putty all over a model and scraping it to make that characteristic ridged pattern.

The second problem was the easier to solve. Cavalier Model Products to the rescue – see my upcoming review of the brilliant Cavalier product for the low down on how to get a superb rippled finish on your German armour, if you’ve not already used this terrific texturing medium.

The first was solved about a year ago when I did some experiments to spray a more convincing, true-to-the-research, disruptive scheme on my Academy Tiger I Early, and I found that I had a formula for getting tight edges and fine demarcations (at last) from my Paasche VL.


Armed with these and other tools (such as the Alliance Model Works photoetched mask set for tank wheel rims, reviewed last time), I built the old StuG and was very pleasantly surprised. The parts fit was excellent throughout, there were no dramas, no fights, except for one track which would not couple. I shaved away the pins and superglued the ends together, problem solved; I’m not sure I even class that as a problem.

The kit has lots of options: two lengths of spare track to mount in a couple of possible locations; schkurtzen standoff armour and mounting rails, none, one or two radio antennas, moulded concrete frontal slabs for late-serving vehicles, open or closed hatches, a figure, deployed or stowed MG shield, posable scissors-sighting gear, plus a suite of divisional insignia and several sets of vehicle numbers, allowing you to either follow the kit suggestions for final subject vehicles or do your own research and paint it however you like. There’s plenty you can do with this kit to build several and never have two look even substantially similar.


Another thing I like is the fact that all the wheels rotate, with the exception of the return rollers. Some later kits don’t do this, and while link-and-length tracks are of course rigid, and Tamiya engineered their early-era kits in the days when motorisation for “toy appeal” was in, it’s always somewhat cool to see your model’s running gear actually work on a rough surface.

In terms of accuracy, there were a few details that Tamiya missed out, probably due to the limitations of moulding. The kit belongs to the era of open sponsons, and if you’re having any open hatches it’s a good idea to do a bit of scratchbuilding and close the hull to avoid a see-through effect if viewing from above. The standoff plates and rails are overscale, of course, they were in reality 5mm armour plate but if you multiply the kit parts by their stated scale you find they would be more like 30mm or more. There are photoetched replacements for many vehicles out there, plates and racks alike, but I simply sanded mine down on wet’n’dry paper to thin them a little. The plates are cast as single units but they were in reality separate plates along the hull. You can cut the plates from their neighbours to get this effect as an irregularity in the way they hang from the mounts.


The age of some of the components is probably close to forty years, as the lower hull is shared in common with their other Panzer IV kits and Pz. IV-derived subjects (Brumbar, FlakPanzer, Jagdpanzer etc.), the earliest of which were definitely early 1970s releases.

I would have to say this kit, while simple by today’s standards, is remarkably good. It builds a sturdy, appealing product, is a project which early-career modellers can tackle adequately due to the builder-friendly design, and there are quite enough options and room for scratchbuilding to keep experts happy also. There are uncountable numbers of Pz. IV accessories on the market, and many would be appropriate for the StuG, such as damaged roadwheels, better-quality external tools, photoetched fittings, replacement tracks, and decal sets for a wider choice of markings and schemes.


It took quite a lot of methodical work to get it finished, but I can’t say there was a particularly difficult bit anywhere in the project, and I will certainly be building others. My next StuG IV will be minus zimmerit and skirts, and be wearing three-tone ambush camo. In conclusion, I recommend this kit to any modeller: beginners should find it a bit of a challenge but by no means impossible, while styrene experten may find it a refreshing simplification compared to Dragon’s policy of ‘never use one part where five will do.’ As an older kit it’s also cheaper by far than the new-tool products, around half the shelf price, though they change hands often enough on eBay for a fraction of that.

Sunday, January 10, 2010

Product Review: Alliance Model Works Painting Masks


 Now here is a truly good idea! The template painting method for wheels has been around for quite a while and it makes a slow, tedious, “iffy” job into a quick, accurate one, but one painful truth is that models are a scale depiction of reality and as such it’s always a lottery as to whether artists’ circle templates, which are produced on whole millimetre increments (they don’t seem to make half-mil sizes) ever match closely the size of the wheels. After you’re done spraying you always need to take a fine brush and clean up those edges by hand, hoping the ridge of the rim will guide the brush adequately to fool the eye. For a Panzer IV, with 36 wheels (counting the spares), all of which should correctly be rimmed both sides because you can see the hub area of the rearmost of each wheel pair from oblique angles, that’s a formidable task. But Alliance Model Works have come to the rescue with photoetched painting masks, circle templates designed to fit the rims of specific kits from specific manufacturers.  

 I ordered their set for WWII Wermacht tanks and other vehicles on eBay. #Lw3574, “German Vehicle Wheel Mask Set” comes attractively packaged in a conventional plastic and card sleeve, containing a sheet of instructions on the use of the product and no less than three frets of etched stainless steel, plus one ‘loose’ mask for a total of 54 templates for roadwheels, return rollers, and the steering wheels of halftracks, plus even the wheels of some towed fieldguns. These are precision-made items designed to fit exactly over the rims of kits by Tamiya, Dragon and others, which means no more touch-ups: once spraying is done, you should be finished the job. As soon as I saw these gleaming, individually-plastic wrapped frets I smiled and said to myself, “if these work as advertised, a hard job just became easy.”  


 I tested them on the Tamiya StuG IV crossing my bench at the time. I had delayed doing the wheels til last, and I was very glad I had. The first step was to paint all the tyres black, for which I mixed Tamiya XF-63 Panzer Grey with X-18 Satin Black for a low-lustre tyre black (1:1) and sprayed the wheels on the sprue for ease of handling, with their mating faces masked with Humbrol Maskol and some wet tissue. So far so good. Then I cut the protective plastic over the appropriate PE sheet and test fit a wheel hub into the “Tamiya Panzer IV” template. Well, I certainly hope it fits the new-tool Tamiya IVs, because it sure doesn’t fit the old ones! Why can’t anything ever be easy? Would it have been too difficult to have the new and old-tool kits (which are still widely available under more than one label) catered to, side by side? I had a choice: use the specified template, biased to slip around the rim on one side only, then come back for a second pass to get the other side of the rim with the template biased the opposite way, or find another template which was large enough and fit close enough to do. Compromise is not what you expect from a precision product, and not what was advertised, but I guess the company is playing to the high end of the market, and nobody said anything about the vintage of the kits catered to by this specific set: there may be another set with the older Tamiya Panzer IVs among it’s many template sizes. I don’t know, I haven’t checked – yet. The good news is the template for Dragon’s Panzer III is quite close enough to do. I stripped the protective plastic away and test fit a hub, finding the clearance quite snug enough for my purposes. The rear wheel of the old Tamiya IV seems to be a smaller rim diameter, but the backs of the wheels are not going to be seen much, so some overspray won’t make any difference. I could have taken the template from the PE sheet but for ease of handling and storage I decided to leave them all of a piece. This is how I’m used to handling plastic circle templates to do the job in the past. I masked close round the hole with tape to keep the product clean overall, then trimmed the wheels from the sprue, leaving the attachment points to be dabbed into the mixed black at a later point (before weathering).  


 I mixed Tamiya XF-60 at 1:0.5 and shot at my usual pressure for the Paasche #3 tip and needle, and did two mixings, one for the fronts, one for the backs, and had enough to double coat a fair few hubs in each batch. The metal sure collects overspray, moreso perhaps than plastic templates seemed to, I had to keep wiping the paint away with a moistened tissue, but that’s to be expected and no problem to deal with. The best news is they work great. Any remaining degree of “wiggle room” is due to the fact I’m using them on a kit they were not designed for, but they’re a lot closer to right than standard template sizes, so the job was right in the end. I know how well they’ll perform when I build a Dragon IV, or III, or whatever else actually on the sheets comes up for building. They were on special but not cheap: still, as a precision tool that will serve me for many years, I consider it one of my better investments. Now when I build German armour, I will reach for these masks as a reflex, and the prospect of the running gear will not be a detraction from the fun of the project. Look at the finished job (mains and spare wheels, prior to fitting the stand-off skirts) and there was no hair-tearing involved in getting there:  


Very highly recommended – I suddenly find myself considering collecting any other mask sets they offer, American armour, Russian armour, they all have rims to paint! Check out the product at http://alliancemodelworks.com/ There’s a retrospective look at the old Tamiya Sturmgeschutz coming next time, watch this space…

Monday, January 4, 2010

Production-Lining Your Art


Most of us build more than we can finish in the short term, we all have a variety of projects on the boil at once and many of us move among them at whim, building or painting as the fancy takes us. That’s the marvellous flexibility of the hobby, really. Of course some end up back in their boxes on the shelf because we’ve lost patience with them for some reason – obstinate fit, inaccuracy, waiting for parts or decals, whatever. The only kit I’ve put aside in recent times was a Hobbycraft Corsair, and it’s rather put me off the brand.

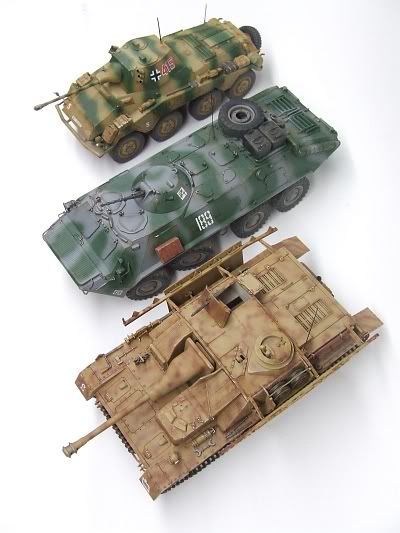
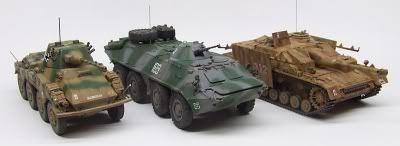
But eventually you need to clear that bench, get projects to completion, on display, and move on to new territory, though sometimes models have been in play for years. I found myself doing this recently, with a Zvezda (ex-Dragon) BTR-70 that had been unfinished in the box for about three years after being started as a ‘need-to-build-something’ project that I had thought would be a quick build, only to find the tiny Dragon parts tended to snap on the sprue, and the need to replace some with shaped wire rather consigned the beast to the shelf for a long time. Recently I got around to building a Tamiya StuG IV which has been in my stash for at least ten years, I got it from a second hand dealer in Japan, it’s the edition with all Japanese instructions (not that that’s a problem, Tamiyas really only go together one way and the diagrams are obvious.) Add to the mix the Testor edition of Italeri’s Sd.Kfz 234/2 Puma recon vehicle and I had a trio of 1:35th scale armour all clamouring to be finished more or less together. (You might have spotted them in the previous post, if sharp-eyed.)


So the solution was to do them production-line fashion. Henry Ford knew what he was doing, and while it depersonalised a craftsman into a repetitive technician, the hobby can withstand that at a small scale. Given that all three models were finally into their full paint jobs, I could tackle the finishing phases all of a piece. Each model received its fade coat, highly thinned paint misted onto the horizontal surfaces to create the impression the paintwork is faded by the elements. Then I did the oil filter weathering on them all, which was a process of washing the acrylic paints over with enamel thinner carrying dissolved artists’ oils to create tonal variety and the characteristic patterns of rust streaking. Then the pinwash to bring out details by capillary action, and tiny amounts of thicker paint to establish areas of open old rust; and finally brighter rust shades where rust is newer. The next phase is drybrushing in enamels (I can’t do it in acrylics, they simply dry too fast for me to keep up with the job and the task of endlessly cleaning and refreshing the brush) to profile edges and raised detail, making them ‘pop’ from the darker background of the paint and washing.

Then onto external fittings: tools and jerrycans on both the German subjects, all of which need to be painted and weathered before mounting, and a couple of fittings for the BTR. Next step decals – all three models could cross the bench together. Then onto the dust phase, Mig pigments brushed on in strategic locations for that touch of environment adhering to the beast. Final fittings, delicate radio antennas are often the last thing I mount, and of course the tedious process of painting a sharp division between wheel rims and tires, though that was eased somewhat with a new tool I’ll be reviewing here before long.


So there you have it – the same finishing techniques applied across the spectrum of three models in widely varying schemes, two wheeled vehicles, one on treads, different eras, three different manufacturers, but all responding to the same techniques for a satisfyingly dirty, beat-up appearance that whispers to the viewer’s subconscious that these vehicles have seen plenty of hard service. And all walked through the process from overall painting to completion side by side over the space of about a fortnight.

Now, I wonder if I should production-line build from the beginning in future? It certainly speeds up a heavy build schedule…

Look for retrospective reviews of these kits right here in the near future!

Saturday, January 2, 2010

I Know Where Everything Is… Really!


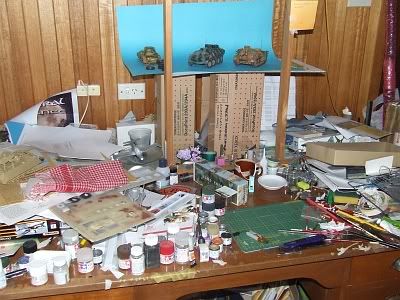
Quick! How many unfinished models can you spot in the picture above? No, it’s not easy, is it?

Finishing a couple of projects calls for clearing the bench to set up proper lighting and get the gallery photos, and it’s only then that you realise what a pigstye you’ve been working among. I mean, some people have clean, neat, tidy work benches – but so far I’ve not been one of them, and in fairness to myself I can’t say my hobby has really suffered. It’s odd the way the brain maps your bench, you seem to know which quadrant you put any particular tool down in last, and whereabouts in what chronological order down which stack you’ll probably find things sandwiched together.

Then comes the phase where you clean the bench, tidy everything up and then you’ve had it because you can’t find a thing!

Acrylic paints in that box, enamels in that box, tools back in the tool drawer, scratchbuilding supplies back in their drawer, sort bits from three open kits back into the boxes they belong in… Take stock of which project(s) to finish next.

Do you ever loose things completely? Other than into the jaws of the carpet monster? I don’t think I ever have, unless you count the pairs of scissors that keep vanishing, but that’s natural enough. Scissors always vanish, always have and always will. When it comes to kit bits, it’s a rare one that’s flown the coup, and sometimes due to plain bad luck – thinking that tiny part that fell off and was put carefully aside is actually a mote of dust and blowing it casually who-knows-where a split second before remembering it was a part to be reattached. That’s dumb, but probably not the dumbest thing one can do on a modeller’s bench…

With New Year’s Day it’s fitting to clean the bench. When I have a proper workshop I’ll be able to keep it neater (I say, smiling hopefully), but for now, I’ll make the best of the considerable space and resources I’ve managed to assemble, and allow myself an uncluttered workspace slightly larger than the A4-size cutting mat that forms my centrepiece at this time.

So Happy New Year, and let’s hope for some bench time as the world swings back into the working week as of Monday!

Tuesday, December 29, 2009

I Feel Like Building A Model… NOT Painting It!


 Have you ever had the feeling that one part of your artistic creativity is in conflict with another? There have been occasions when I had a spare hour or two and found myself staring at the projects underway and realising that every single one was at some point which obliged me to set up my airbrush and start pushing various colours through to spot-paint detail parts, which means far more cleaning of the airbrush and its jars, and far more mixing of paint, than actual painting. There are times when you just want to build. One problem with aircraft, much as I love them, is that you’re pretty much obliged to paint that wretched cockpit first. Struggle with tiny details, drybrush the controls, put on decals perhaps, create instrument lenses with blobs of Clear Parts Cement, and suchlike. And frankly, there are times you don’t want to be bothered with all that, but just get to the engineering of the piece, tidying up the parts and bringing them together just so, then perhaps doctoring the joint lines with whatever technique you prefer. Perhaps that’s one of the drawcards of armour modelling. Unless you have a perverse desire to open hatches all the time, the inside of a tank is a mystery to the viewer and can be conveniently ignored, which means most of a tank can be built before you need to start painting, and that’s attractive. Building the barrel and turret, mounting suspension swing arms and other lower hull details, dressing the upper hull with hatches, grills, any number of parts that can go on before you need to paint anything… Then join the hull, do some joint work if needed, and you’re into masking the locators for tools and such, masking the mating ring of the turret and all the axles. Oh yes, there’s lots to do before you need put down the first colour. The Academy M981 above falls into this category: I just wanted to enjoy building, and a relatively complex, multi-part armoured vehicle fit the bill to a T. I put it together months ago, and when a slot comes up in my painting schedule it'll finally see it's three-colour camouflage.  


 Right now I have 20 models in progress, at some stage or other. I could be mottling the camo of that Tamiya Me 262, or I could be prepping for the natural metal finish of that F-84 Thunderjet. But over the last week or so I’ve been wash-and-drybrush detailing three armour kits. The time comes when you have to paint what you’ve built and production line modelling is a way of getting through them. Base colour, camo pattern, fade coat, oil filter weathering, pinwash, drybrush profiling, decals, dust coat… I’ll get back to aircraft shortly, I have at least seven to finish in the next two months or so, but you know, when the fiddly details have got me at my wits’ end, I’ll take a break from being an artist, and be an engineer again for a few relaxing sessions. One thing I’m certain of: whatever I build on that day, the odds are it’ll have tracks under it! Hoping you all had a wonderful festive season and that the New Year brings everything you could hope for! Cheers, Mike/Thunderbolt379

Sunday, December 20, 2009

What’s in a Stash...?


 The Immortal Bard certainly did not have plastic modelling in mind when he coined the line so freely paraphrased for the title above, but it makes for an interesting question. The modeller’s stash... The “styrene ceiling” that has been collecting dust in the attic since you moved into that house not long after you were married (out of sight, out of mind, at least for one’s other half if said half is less than tolerant of the hobby), or the pile of boxes jammed onto the top shelf in the hall closet, or the packing case in the basement. Or the tea chests in the shed. A shed can be a good thing, for more than powertools and a place for sawing timber. A modeller’s kit stash however represents changing interests and availability over time -- I mean, how long has that collection been amassing for? We buy kits at a far faster rate than we can build them, and many of us pride ourselves on the stature of our collection. The oldest kits in my stash (meaning the date of my acquiring them, not their date of manufacture or reissue) probably date from the late 80s/early 90s, I had quite a few older Hasegawas from the 1980s that I traded off to a dealer about that time, along with an unfinished Revell Cutty Sark dating from about 1975. But even the oldest parts of my stash have probably spent no more than 20 years in my care. So in 20 years, where have trends in the market and variations of interest taken me? A burgeoning interest in armour, the odd ship here and there, a major emphasis on larger scales, dinosaurs when they were in vogue, even a few space and SF subjects. (A few? I’ll build all those AMT Star Trek kits eventually...) What about the role of eBay? I recently passed the 5th anniversary of my first tremulous venture into online bargain-hunting, and in those five years my stash has grown faster than ever before, with kits I never imagined I would snag for reasons of cost alone. But good quality kits at genuine savings are a daily event on eBay, and gradually many gaps in my collection were filled in. All of what you see here are eBay transactions.  


 I imagine most modellers go through a ‘flesh-out-the-stash’ phase, when the allure of bargains allays the fear of unwarranted luxury expense coming back to bite one when there are bills to be met. But, sometime down the track, there are indeed those whose tastes and interests change so drastically over the years that they realise the investment their stash represents by offering them for sale, either piecemeal through eBay as a seller, or by moving the whole lot to a trader. Trading in collections was a brisk business before the current economic downturn, and resulted in more great bargains for buyers further down the line, as individual kits moved from Stash A to Stash B and profit accrued for the facilitator. Hopefully things will recover and this system will become profitable again. That’s business, and everybody comes out of it happy. I would certainly never have afforded a great many kits in my stash any other way. One day I’ll have a dedicated modelling room, like you see in the pages of FSM, with a properly-lit workbench, bookcases for reference materials, drawers and cabinets for every last tool and accessory supply I could need, paint racks for the hundreds of shades I have in stock, and of course a spraybooth and silent compressor, and a permanent photographic area for recording my work in progress. Display cases for the finished product, of course, go without saying. And I would hope that an entire wall in this room would be shelving for my stash, from floor to ceiling, the whole thing brought together in one place rather than in the cardboard cartons it presently occupies: it would look like a well-stocked hobby shop and the great thing is, it’s all already paid for! Here’s one of two small rooms my packaged stash occupies: have I mentioned lately how much I appreciate the support and interest of my better half? 


I’m not preening here, I know there are modellers out there with much more extensive stashes than mine, in size, in quality, by any reasonable form of measurement, and the stash is what it’s all about. What interests the modeller, how your interests change over time, and how you dip into that stash as the years go by to build that special item at long last -- these questions are the mystique of having the collection. Some folks ask me why I don’t sell the lot at once if they’re worth money, and ‘do something with it.’ I answer them that I am doing something with it: I’m enjoying being a collector!

Monday, December 14, 2009

The Great Phantom Showdown


 I love Phantoms. I’ve always loved them, ever since I was a kid and the F-4 was the real-life big kid on the block. I remember a McDonnell-Douglas add on the back cover of an aviation magazine from the late 1970s that praised the Phantom as “The Warbird of the Free World.” That magazine is still somewhere in my collection, if I ever get a chance to look through the old stash I’ll probably find infinite anecdotes. I also remember reading an article on the development of the F-4, it was probably in an old Aeroplane Monthly or Aviation News, that said the military brass thought the plane they were being offered in 1958 was downright ugly, “a great jagged juggernaut, massive as a WWII bomber, clumsy as a goose with its downswept tails…” That’s a verbatim quote, the words stuck in my memory thirty years ago. I shook my head as a young teen to read that: to me the F-4 was a beautiful aircraft, and I still think so today. Heck, my sister in law was a USAF crew chief and the F-4E was her plane. 


 Modellers tend to agree that the F-4 is, or was, a special plane. 5257 of them, in 13 major variants, not counting recon subtypes, and the markings of at least 15 services, gives enormous scope for variety, and model companies were not slow to recognise this. Early Phantoms were like any early kits, they left a lot to be desired, but by the late 1980s moulding technology was up to the challenge of creating really well-fitting kits, and the firms had recognised that modellers wanted models that not only looked good, they were as close to accurate as possible. At that point the challenge was on. Hasegawa and Fujimi, two of the Shizuoka City giants, went at it head to head in the late 1980s and into the 1990s, a direct challenge for the market dollar on the subjects the model building public most wanted. They each delivered F-14 Tomcats by the bushel, they both fielded squadrons of A-4 Skyhawks, and Fujimi offered up all the major marks of A-7 Corsair as well. But it was in the area of the F-4 Phantom II that perhaps their greatest race occurred.


 By the early 1990s Hasegawa had released all the major variants in 1:72nd scale, and most of them in 1:48th as well, while Fujimi concentrated mostly on 1:72, with a few forays into larger material. Historically, Hasegawa won the battle, their product was more accurate, their packaging slicker, their decals better quality, and the market was willing to wear the fact their product was also correspondingly more expensive. But that’s not to say Fujimi’s product doesn’t have a lot going for it. Consider the most basic comparison: both Hasegawa and Fujimi standardised on recessed panel lines in the late 1980s, and all their quality late-tool Phantoms have fine engraved detail throughout. Hasegawa had better cockpits, and arguably better selections of subject matter, with their multitudinous releases of common parts wrapped in different boxes, decals and painting instructions for every one-off special commemorative scheme that came along, as well as a wide range of standard schemes and squadron markings from around the world. But Hasegawa’s philosophy was to break down the parts in a way that yielded maximum utility between variants, which forced decisions such as separate fin cap parts, and a break in the fuselage just behind the intakes to facilitate different nose sections, the area in which most variety between marks was found. Fujimi tooled the fuselage and tail for each major variation complete and provided a varying tray-like part for the underside of the nose, plus separate scabbed-on parts for scanners, intakes and antennas. This means a Fujimi is a simpler build with fewer seams, and that’s attractive. 


 Hasegawa never got around to retooling the British Phantoms with wider engine bays to accommodate their Rolls-Royce Spey turbofans, but Fujimi did: their F-4K, F-4M, FG.1, FGR.2 and F.3 kits feature generally proper proportions and dimension for the British fleet, and in 1:72nd scale they’re the only game in town if you discount Hasegawa’s old-tool F-4K and M (which featured raised detail throughout), and Matchbox’s old FGR.2, which most serious modellers today will do on account of its way overscale recessed detail. Various options are included in each brand’s product, deployed flaps, positionable surfaces, openable canopies, and different degrees of detail in wheelwells and afterburners, but the averagely-sighted person would have to look twice to decide which kit a model was built from. Given Fujimi’s essentially complete range of variants and their slightly lower shelf price (often much lower today on eBay, though in the early 1990s Fujimi was a notoriously expensive brand, certainly here in Australia), Hasegawa’s top spot is not universally secure and Fujimi have a great many fans for their late-tool product.  


 It is said that Fujimi have not released a genuinely new military aircraft product since their “war on Hasegawa” ran out of steam in the 90s, but there are a great many kits out there in circulation that are fun to build and for which there are oceans of aftermarket accessories, certainly piles of great decals, and unless one is peering into cockpits and wheel wells with a magnifying glass the differences cease to be apparent about 18 inches back, so it stands to reason both brands will continue to compete in the marketplace for the Phantom Phanatic’s modelling buck. Given Hasegawa’s agreement with Revell/Revell-Germany, and the lower price for which Revell can rebox Hasegawa’s toolings (hence the Revell items in the pics above), quality Phantoms are probably easier to get hold of than ever before. I’ll be building 1:72nd scale F-4s from both stables during 2010, and will be retrospectively reviewing and comparing them right here at World in Miniature, so stay tuned.

Wednesday, December 9, 2009

Product Review: Eduard Masks


 There are all sorts of tools and supplies in the modelling hobby, and it’s a fair criticism to ask if the modern hobbyist is well-served or merely gadget-dependent. When we need to mask something we use tape, like any tradesman, plus cut paper and card sections for big areas, and we may also use a liquid latex masking medium, an aid brought over from the graphic arts. I always masked my canopies with tiny slivers of tape, but there are some curved that just don’t want to be masked around. A three dimensional shape needs to be expressed in two dimensions, and that’s a hit or miss proposition unless you’re a spatial dynamics expert. Another trick is to spray the hull color on some clear decal film, cut fine strips and apply the canopy struts as decals, and there’s a lot to be said for that technique. There have been a few ideas over the years, including precut vinyl negative masks which are to be sprayed in the final colour and applied, but Eduard might have hit the best formula with their masking technology. Eduard Masks are die-cut adhesive shapes matched to the intended kit at very fine resolution, and the principle of their use is dead easy: peel them off their waxed backing paper, stick them on, spray, peel off when done. If engineering firms go by the old “KISS principle,” (which stands for Keep It Simple, Stupid!), then they’ve probably hit the money. If the hundreds of sets in their range are anything to go by, modellers agree. 


 I’ve used four sets so far and have several more in hand. Though the principle is simple, it takes a fine hand and a keen eye to get them into place precisely. Without magnifying specs I’d have no hope, though that’s more a comment on my vision than the product. The masks seem to be a vinyl or paper material, and their adhesive is quite strong, they won’t move until you want them to, and then they come away without leaving a residue. They can be repositioned, though with care as they will crease and denature if handled roughly. They fully cover smaller panels and outline larger areas, which are then filled in with liquid or tape.  


 Once located to your satisfaction, spray the cockpit interior colour, then overcoat with the camo or framing colours, and when fully dry tease up a corner with the point of a knife and draw the masks away with tweezers. You might also want to hold the canopy down with a finger as you do so. The adhesive is strong enough to pull a clear part off if attached only with clear parts cement.  


 Masks are also supplied for other parts of the model, such as wheel rims and formation lights, and some armour sets have been produced to help with the fiendish job of painting the tires of tank wheels. Hopefully we will see this range continue to grow, as their utility is considerable. Can you re-use a set? I’ve not tried yet, but if you peel them off carefully and return them to their original positions on the backing sheet, it might be possible. Two uses would be good, as they do cost a few dollars, a nonreimbursable expense on the cost of doing a model which is far greater than that of the paint one uses, and often comparable to that of a selection of AM decals. Probably the best tribute I can pay to the product is that when I decide a particular model is on my schedule, I check if Eduard have masks for it and order them up in plenty of time, just as I would order AM decals or resin bits or whatever, and that makes them a tool of choice for this particular finishing operation. I recommend them to any hobbyist with a steady hand and a magnifying glass. Eduard Masks are available in hobby shops and through many online outlets, I always order mine from Squadron Mailorder, Carolton, Texas.