Wednesday, September 30, 2009

The Immortal Classics: Polar Lights’ Seaview


There are always kits we remember from childhood, or kits we never knew when they were available but heard about long after. Aurora’s Seaview, from Voyage to the Bottom of the Sea, is one of those for me.

I only heard about it 15 years after the molds were lost in the neo-legendary Amtrak wreck that destroyed so many of the old classics, when it was featured as the very first instalment in the “Classic Kits” series in FineScale Modeler. I checked around to see if anyone had one and located one at Hobby Bounties in Singapore: if I remember correctly, the price was equivalent to $1000 Australian dollars in the early 1990s, the highest price I personally have ever seen on a classic kit. Needless to say, I didn’t buy it! My memory may be playing tricks, but I remember it being a three-figure sum of some sort.

Imagine my excitement when I heard several years later that Aurora-retool firm Polar Lights, in the course of recreating many of the lost classics, were resurrecting the Seaview!

I determined to have one at once, but it never happened. The kit was ‘new stock’ and thus ‘around’ and there was no urgency to buying it if dollars were tight for other reasons. In the odd way things happen, the retool has itself become a traded commodity and I recently picked one up on eBay for a good price. The precise recreation of the original is amazing, the actual box art and design from 1967, the identical plans with a few extras to denote the 2002 issue. 


Here’s a piece of history brought back to life and itself now a thoroughgoing legend in its genre, something few would have ever expected to happen, the remanufacture of a classic. Of course, there are many who would point out that in regenerating a classic product one regenerates all the shortcomings of that product. It’s the 1961 movie version of the sub, not the configuration of the series (which itself varied in detail between the 110 episodes), the detail level is sparse, and at around 13” long she’s not very big. A resin update set was made for it to build the series window configuration and the Flying Sub hangar: the AM guys will always ride to the rescue! There have of course been plenty of much larger versions produced in resin in the last decade and a half, and we now have Moebius’s ultimate kit, injection molded and nearly 40” long, for which a plethora of after market add-ons have been produced – even including complete radio control and power system to build a sea-going Seaview that will dive in your swimming pool!

Next to that, the old classic pales to insignificance, but you know what? Nobody will build the operational boat, or even the 40-inch display masterpiece, in a weekend, and have it on shelf or desk, beautifully airbrushed and weathered, by Sunday night. And there’s the fun part: there are many small scale submarine kits and this one falls right in to that range as a science fiction classic that has sailed on in the hearts of it’s fans for all 45 years since the series premiered (on September 14, 1964, at 7:30 PM, EDT, on the ABC Network, for those who like their facts - with thanks to those who keep track of such things!) So there’s room for all the versions and all the kits.  

I have only one criticism: Polar Lights molded it in black plastic. Maybe they were being true to the original, but black is very difficult to work with, and I find it rather depressing. It’s a good job she’ll be a quick build, I can get her into some nice grey primer, and relax into painting and weathering thereafter.

I finally have that Seaview I always wanted! The companion piece to the Aurora 1:64th scale Flying Sub that was reissued by Monogram in the late 1990s and which has been part of my stash ever since. And … I guess it’ll tide me over until I can assemble the big bucks to tackle the Moebius masterpiece. So keep watch and I’ll post a review when I build her.

Saturday, September 26, 2009

Persnickety on the Details


Should we build in details we can’t see?

When I was a junior I used to take a strange pride in adding details to the interior of models, so that I could say the seats and radios inside that bomber fuselage were present, and maybe even painted some colour which more than likely was not correct. But they were there, as if the model came ever closer to depicting the real thing with such additions. Maybe it does, but surely that principle has been taken a bit far these days.

I’m thinking of the engines in Trumpeter’s jet kits, in which considerable time and effort has been invested, serving to jack up their already high prices that yard further. Not only that, the fuselage does not assemble properly if the engine is not inside, meaning you can’t invest time in finishing the engine and then displaying it alongside the aircraft: finish it realistically or not, it must disappear inside if the model is to be assembled complete, the most-usual state for the aircraft, and that seems a perverse logic. 


 The built-in option is to display the engine with the tail of the aircraft separated, in maintenance mode, but not every modeller wants to do this, and certainly not with every entry into his or her big-scale jets collection, any more than every modeller wants to fold the wings of carrier planes merely because that feature is engineered into some kits (which don’t build cleanly if you don’t take that option, which is at least as perverse as the engine business…)

But we’re all guilty of this to some degree. I religiously fill and smooth off the holes in the bottom of tank models for the controls of motorized versions, so popular long ago and still made by Trumpeter (I have quite a few of their motor/battery packs in my stash now, and am not quite sure what to do with them!) But there are other details that sometimes get by.  


 Having a hard time finding a few bench hours, I was recently stalled by the painting stage of various projects and just wanted to do some gluing, so I broached a subject I’d been looking at for a while, Academy’s M981 FISTV, a laser designator vehicle for guided munitions that fought in Desert Storm, based on the M113 A3 chassis. The model assembles from multiple subassemblies which can be tackled as small projects evening by evening, but the first thing I spotted was the raised company logo on the bottom of the hull. I usually scrape and sand this away so I’m comfortable in the knowledge that my tanks don’t say Tamiya on the bottom, or whatever, but it occurred to me that in all my years I’ve never actually picked up one of my tanks and looked under it.

So who cares? Am I enough of a bean counter to be bothered if the logo is there? This time, no. But, perversely, I blanked and filled the holes as well, done carefully with two rounds of filler for a good job. If I can be motivated to do one, why not both?

It seems to be a question of steam – how much enthusiasm is there on the night? I just wanted to get to the swing arm assembly, I would need to carve away the logo with a blade parallel to the belly plates first, and the bone in my head rebelled at that … so this one has an Academy logo on the bottom. But no motor holes – they I could tackle later!  


 Academy produced a complete engine for their 1:48th scale Sabre which disappears when the fuselage is closed, and there are many tank interior kits which are visible only through hatches, so where should the line be drawn? It’s a very individual thing, I think, and a question we can only answer for ourselves. For myself I have begun to buck at the thought of investing hours and eyesight in cockpit details that are obscured by a canopy which is distortive or simply not clear enough, or trying for details that are at the edges of my own visual resolution, but that’s just me. There are plenty of modellers who set up their vision aids and go to work on minute photoetched bits which will barely be visible, a scale realism they want, to bring their work closer to an accurate replica of the real thing, and this is a skill and a dedication to be applauded.

Where does that leave the modeller’s own sense of persnicketiness? That is probably the ultimate personal aesthetic, and what drives us, in many ways. How we face the challenges of the kit, what compromises we make and how much work we’re willing, or able, to invest in a project in return for what we learn from it and the pleasure of both the build and displaying the model ever after. So long as that equation balances up for each of us, relative to our skills and resources at any particular time, then we’ve been true to our hobby and done our best.

“Rivet-counters,” however, are a whole other matter, and a whole other post!

Saturday, September 5, 2009

Kit Review: Tamiya F-51D Korean War #61044


 It may seem odd to review a kit released nearly 13 years ago, but there’s always room for a retrospective. For many years Hasegawa’s P-51D was the standard, and it remains a very good and entirely competitive kit, but Tamiya’s builds somewhat easier and is superbly detailed. The Hasegawa cockpit is slightly better, but unless you have the canopy open you really can’t tell what’s in the pit anyway.

The 81-part kit features optional parts for the Inglewood or Dallas canopies, Hamilton-Standard or Aeroproducts propellers (blades and spinner cones), and features 6 5” HVARs and a choice of 2 500lb bombs or 2 75-US gallon droptanks for the wing racks. The kit comes with decals for three aircraft of Korean vintage, the famous FF-943 (“Was that too fast?”) of the 12th FBS, 18th FBG; the CO’s aircraft of the 18th FBG; and “Buckeye Blitz” of the 36th FBS, 8th FBW.  


 The clear parts are crystal clear and barely-distorting, while the overall fit of the model is outstanding. I needed only a little filler on the underside seam where the fuselage halves trap the cockpit/radiator assembly. The cockpit is quite adequately detailed for the scale, and while no harness is included, not even as a decal (as with Tamiya’s Corsair), there is a gunsight glass and the canopy frame brace. The propeller seats back onto a stub which engages a poly cap trapped between the hub parts, which means the prop can be mounted in the final assembly round, after all major handling is done, minimising the chances of breakage.  


 Tamiya must use very high-pressure injection moulding, as the sprue attachment points are as small as technically possible. They are also located in carefully-considered locations where the inevitable inconsistencies where the sprue is cut and filed back show as little as possible.

Alignment and fit are of a very high standard and the kit pretty much builds itself, certainly for any experienced modeller it should be a breeze. There were no problem areas to speak of. The decals were thin and opaque and reacted well to setting solutions, but were not particularly ‘sticky’: three small stencils simply disappeared during subsequent handling, underlining the desirability of clearcoats.  


 I finished the model in Humbrol enamels, mixing #11 Silver Fox 7:3 with #56 Flat Aluminium to create a weathered metal look evocative of the beating the aircraft took from the severe weather conditions in Korea. The yellow accents were sprayed in a mix of Tamiya Acrylics (XF-3 Yellow, warmed with XF-7 Red and brightened with X-22 Clear Gloss). The prop blades, anti-glare panel and rudder trim tab were sprayed XF-1 Flat Black. The cockpit and gear bay interiors were sprayed Interior Green, mixed 1:1 from Tamiya XF-3 and XF-5 Green. The overall recessed panel lines were accented with ProModeller Dark Dirt panel wash, and the natural metal finish was varied with graphite, burnished into the paint with a stiff brush, and masked (with the greatest care!) with Tamiya tape. MiG pigments were used to add dust to the gear bays and underside, plus gun carbon and exhaust staining.  


 This was a very enjoyable build, the model looks proud in the display case, and I’m sure I’ll be building many more, working through my decal stash to collect the elegant Mustang in many of her historically famous schemes. 


Friday, August 28, 2009

Big Models for the Big Boys


 No, I don’t mean radio control. I don’t mean those two-stroke motors that seem to be revving at ear-splitting volume in hobby shops every time you go in to find that bottle of paint you need, and I don’t mean the endless shock absorbers, steering gear and offroad tyres that seem to take forever for shop staff to sort out for the people permanently in line ahead, hogging the counter... I’ve nothing against RC, really -- but that’s another post!

No, I mean BIG MODELS. That Dragon or Trumpeter 1:35 Leopold railway gun. Italeri’s new 1:35th scale German Schenllboot. Andrea’s gigantic 1:32nd scale U-boat. Revell’s old B-1 bomber in 1:48th scale. Monogram’s classic 1:72nd scale B-36. Airfix’s 1:24th scale Harrier. Heller’s 1:100th scale sailing ships. And so on...  


 Is it the mystique of the very large that attracts us? Is it the possibility of acres of minute detail? Is it the childlike thought of having a bigger one than the next modeller? Or is it that some subjects just can’t be done justice to any smaller? The state of modern tooling suggests 1:48th scale is a good benchmark for realism, incorporating a fair detail resolution against the real thing and a general simplicity of construction, so demanding bigger is not necessarily the answer (though consider the detail found on Tamiya’s F-4s in 1:32nd scale... Bigger sometimes is just plain better).

There’s the status aspect. Bigger models are more expensive, and modellers at both an advanced skill level and approaching the rollover time of life are a major part of the target demograph that can actually afford them. (“Do we have to go on that cruise next winter, Martha? I had a hankering for Trumpeter’s 1:16th scale King Tiger...” After which the hobbyist probably slept on the couch.)  


 But what about really big: those limited-edition monsters that sometimes appear. Of course, I’m thinking about the 80cm K(E), the Dora, the biggest gun ever fired in anger. It first appeared at European toy fairs about four years ago, a 1:35th scale kit initially researched and designed by Heller IIRC, but after the demise of the company it was taken over (if I’m understanding correctly) by an independent firm, and molded in a limited edition of 1000 copies, in China. As a $1000 kit, that’s a million dollars turnover in one property, though it has been permanently discounted to US$700 for the last two years or so. At the present exchange rate, that’s nearly a grand in Australian money. It would take a seriously dedicated hobbyist to square away the funds for that (though to be fair, the cost is still significantly lower than Tamiya’s RC tanks and trucks. In England there is a hobby finance company that loans out funds against them as if you were buying basic transport to get to work.) That brings to mind Tamiya’s RC Tiger 1 and the costs involved, over $1500 Australian some years ago. I remember casting an eye on it longingly and my sister saying “you’ll look ridiculous driving to work in that on Monday.” The implication being you could buy a car for that price.  


 But does larger scale really mean more detail? It means a different feel, that’s for sure. Compare tanks in 1:72nd, 1:35th and 1:16th scales. Between the first two scales there is a wealth of difference, and it takes a surgeon’s hands to make a 72 -- they don’t call it Braille Scale for nothing -- really look the part. It can be done, there are brilliant mini-masterpieces out there, and better kits than ever before to work with. But 35 seems to be the charm, the perfect balance point at which the techniques that come naturally to hand find their best and simplest expression. Academy have those big 25th scale Panthers and Jagdpanthers, and Tamiya have just reissued their 1:25th scale Tiger and Chieftain, for the first time in something like thirty years (SF modellers will be rubbing their hands as the latter has been fetching US$60 on eBay and is needed for some studio replicas). The AM guys must have thrown prayers of thanks skyward when these kits were re-released, the accessory sets are already hitting the market… 1:16th scale is a new situation completely, in which the delicacy of touch one evolves for 35th generates effects that are almost invisible at a normal viewing distance: one must learn to weather with a broader brush, a heavier hand.

In the end, perhaps it is personal choice, as with every aspect of the hobby. The lifetime 1:72nd scale aircraft builder will fit a lot more of them into a display case than the ship modeller who builds at 1:96th, and the armour modeller who prefers Braille Scale will have far more space and funds than the 1:35th scale builder, but these are practical matters, and the aesthetic of the thing probably ultimately commands the decision. We like what we like, and that’s the end of it. There’s a certain undeniable fascination to palm-top Panzers, but part of me has a hard time taking them seriously.  


 Of course, it could be simpler... It could be that we start out affording small models and fill shelves with them, and they gradually get bigger as we get older, in proportion to the thickness of our glasses. By the time we retire our eyesight is so shot we have to build the big ones: we have no choice, we just can’t see the teensy ones anymore! Okay, extracting tongue from cheek... Normal service resumes next post!


I have the Harrier in my stash and would have photographed those huge parts but it's in a carton on the bottom and I didn't fancy excavating down to find it...

Saturday, August 22, 2009

Where would we be without superglue?


When I was a kid the standard household tube glue in England was called Bostik, and if I remember correctly my earliest Airfix kits (bagged, Series 1, chosen from the front window of the newsagent at the end of the street -- ah, what a memory!) were assembled with this stuff. It was stinky, it was stringy, and it blobbed, but it was all there was! When I came to Australia with my family in 1971 the model glue of choice here was Britfix, I think there was a ‘77’ on that name but it’s too long ago to be sure. It was stinky, it was stringy, and it blobbed, in fact in every meaningful way it was Bostik in a different tube, so while it left something to be desired, it was familiar.

These were the days when parts had to be left for ages to dry, clamped and rubber-banded, even overnight, and one would cautiously remove the bands to see if things had actually set or if the model would fall apart when moved. This, despite Britfix actually being rated a ‘welding’ glue, i.e., solvent-based. Landing gear was fragile beyond words and the glues available took a mature touch to get them to cooperate--little wonder all my fighter planes as a kid were built gear-up.

I was 12 when I first encountered Testors Liquid Cement, and I thought Christmas had come. A strong cement (note, the word ‘glue’ had abruptly become old-fashioned), which applied neatly with that handy brush built into the bottle cap (praise be to the engineer who thought of something truly practical!), and which dried essentially invisible. And it had grip! The first model I tackled with it was Monogram’s 1:72 B-52, ambitious for an early teen if I say so myself. Things remained static for many years, then. ‘Superglue’ was a mysterious and dangerous substance around which the words ‘skin graft’ floated. I remember being with my dad when he bought a tube one day (mid-70s, I guess) and the retailer cautioning him about it sticking fingers together, that it was indestructible and a skin graft would be required if this dreaded accident occurred.

The truth was a closely guarded secret in marketing terms, I only heard the facts recently. I thought it was miraculous back in the 90s when I bought some PicApart, a simple water-based solvent that dissolves cyanoacrylate, but of course the chemists who invented the stuff (in the 1960s, I heard, as a battlefield surgical tool for sticking wounds together when there was no time for stitches!) had always known its strengths and weaknesses. Acetone is the principle solvent, which is why it’s a fair bet so many macho hobby guys who build powerful, filthy tanks, rusted to perfection and draped with the battle flags of fascists and communists, have a bottle of nail polish remover hidden somewhere in their workshops. Probably behind the bottle of brake fluid they use to strip old paint, but that’s another post! 

At first I resisted using superglue, it seemed too strong, liable to melt plastic or lock up parts in the wrong order. Meah... It you want severe, try Revell Contacta Professional, in the precision applicator, I’ve never seen plastic disintegrate like it before or since. (Except that fine component in a Hobbycraft kit that dissolved before my eyes under the assault of old fashioned Testors Liquid Cement, but that’s another post too...) I think I began to use superglue after reading Paul Boyer’s Basic Techniques/Advanced Results series of articles in FSM in the early 90s, and realised that a precise parts-fit coupled with superglue in the seam created a rock-solid joint which could be dressed with a knife blade and sand paper and -- wallah! -- the seam was invisible. This was the holy grail of finishing skills at the time, how to defeat the appearance of the model being a model.

I developed that skill in the decade following until it was easy as breathing. When my brother in law came down from the States many years ago he looked at my models and the first thing he said was ‘I can’t see how it went together... How did you do that?’ (I rarely preen, but that was an occasion.) The model I think was Horizon’s 1:30th scale vinyl T. rex, a model which took ingenuity and a swag of different techniques as I had never built a vinyl before … and never seen gaps like those either. Superglue to the rescue (and shims, putty and plasticine). Another kudo...

What would we do without superglue? Joints would all need putty again, unless the fit was precise enough to be closed up firm with liquid cement alone (old kits and limited-run subjects would be a lot less popular). Rubber bands and clamps would be in demand. “Allow to dry overnight” would reappear in instructions, and kitchen tables would be commandeered with stacks of books and paint bottles carefully balancing models in the dark hours while landing gear dried (shhh, tiptoe past in case it moves!), then there would be a giddy experimental moment the next day when the set was tried out and the hobbyist held his or her breath to see if that carefully finished fighter’s landing gear would collapse under it. Nostalgia, with a certain jaundiced outlook -- and maybe superglue isn’t solely responsible for remedying these ills, I’m sure a competent builder could put a quality modern kit together with the tube glue still rated safe for junior modellers, and come up with a perfectly good result. But a touch of the cya sure makes things easier!

Friday, August 14, 2009

Shopping Smart/Modelling on a Budget


Back at the time of Desert Storm there was speculation that the rocketing price of crude would drive up the base price of styrene and make the hobby more expensive, but those fears did not seem to emerge, at least not clearly from the background chatter of multiple other variables all conspiring to make it more expensive to build models. After all, everything is more expensive, that’s inflation, why should the hobby be any different? Hobbies are luxury pass-times for those with disposable income, after all. But how many of us are in a position to dispose of the kind of chunks of income the hobby field seems to have no qualms about asking these days?

There are companies that play shamelessly to the highest end of the market -- Trumpeter, for instance, by the ambitiousness of their projects and their catering to big-scale enthusiasts, not for their detail and research accuracy, and after 15 years in the game they still come second to the engineering quality and design acumen of Tamiya, Hasegawa and Revell Germany. There are less-ambitious companies working in more traditional scales, though, and their prices remain stingers: Airfix’s new Hawker Nimrod, long-awaited and eagerly-anticipated, hit the shelves in Australia at $99.99. That’s a big no-can-do, pard, for a lot of builders. That’s possibly why the new fancy releases are sitting there on the shelf at my LHS, and the bulk of the stock has barely changed in three years. Also possibly a big reason the shop changed hands and is now concentrating on R/C and railroading instead.

Plastic kits are too expensive. If they were half the price I’d buy a lot more. If they were half the price the shop would sell a lot more, which would be better than selling hardly any, but here we see the distributor-mechanism. Kits have an infinite shelf-life. They’re not date-sensitive, they have no use-by, they don’t get sent back and pulped... They sometimes gain value with age. If the distributor owns the stock, it never will go out on special. Mark-downs are virtually unknown here. The price is the price and if the customer can’t afford it, the stock gathers dust until the shop closes -- but the kits go back to the distributor. Last year a local toystore chain gave up carrying kits for the same reasons, and held a distributors’ sale at the warehouse. I looked in but the mark-downs were simply not enough to tempt me to buy, but I noticed a retiree leaving with a Tamiya 1:350th scale Enterprise he’d paid about $200 for. Ah, rollover…

So where do I find the kits to keep my stash ever-expanding? Simple. eBay. I joined eBay about five years ago and in that time 95% of all my kit purchases have been through that medium. In the header pic (some ready-use items, not the actual stash) of the 69 items on those shelves, 57 came via eBay. The other 12 are through Squadron Mailorder in Carolton, Texas, who had my order every month in the years before eBay was born. I cleared a huge collection of Superscale decals in the days they regularly cycled through the range at 99c. But the days of specials like that are always numbered, and eBay gives you the chance to wander amongst the wares of the world, almost like an ancient marketplace. You can find retailers in places like Hong Kong, Beijing and Seoul that offer the big brands at serious savings (though lately they are almost all hiking their profits by cheating the purchaser on the postage -- there’s no diplomatic way to say it, it’s cheating pure and simple, and to be fair there are plenty in the West who do the same).

The best bargains are most often at auction: resellers who buy up old collections and kick off the bidding at just a couple of dollars. It takes a modicum of skill to play the auction game, but you can learn it easily enough, and you need to be aware of only two things. 1) If the kit is on general release then you’re trying to beat the price at which you could buy it locally: be aware of that price and know what you’re willing to spend, all-up, for the item in the condition offered. If the bidding runs beyond that point, don’t be pig-headed, just let it go. If it’s an old classic then be guided by your instincts, only you know what you’re willing to pay for a collectable. 2) Postage -- it’s no use getting a great bargain on the item and finding out the postage takes all the cream away from the deal. You might as well have bought it locally, paid the extra and taken it home with you rather than waiting weeks (months even) and hoping at doesn’t go missing.

The US really messed things up when they did away with surface mail a few years back, it must have hurt US trade at many levels. It took the greatest bargain and made it ho-hum, what else can you call it when the postage to mail a kit to Australia is double what you won it for? And it’s a cynical act of big government in any case, to support an airline system failing due to fuel price increases. Well, when airmail is the only option, we learn to optimise that too. You do that by having a friend in the country of origin who will accept eBay purchases for you, then will combine them in the most compact shipping carton possible (remember, it’s not just by weight that they charge, it’s by linear dimensions too). A friend -- who will charge you actual shipping costs, not mark up the postage by many dollars to shore up his or her own fortunes as a seller. That way you lose on the domestic postage to get the item to reception point, and save on the international shipping of several items in one unit.

You have to ‘box clever’ as my late Dad used to say. The hobby, though better-served and bigger than ever before, has suffered from the global recession, runaway inflation and national debt, and more than ever it’s a rich man’s pass-time. I could spend thousands setting up the workshop of my dreams, but until that many dollars are both earned and not required for other things, I’ll make do with the one I have, which is not bad: it has most of the tools I want, most of the paints, and is supported by a healthy stash of subject matter assembled by careful collecting. We may not ‘haggle’ in today’s Western marketplace, but you can still find a way to get what you want without paying top whack.


Monday, August 10, 2009

Final Review: 1:48 Hasegawa Bf 109 K-4


 With the K-4 finally done (okay, maybe there are one or two details I missed – I blush, I forgot the wingtip formation lights, so she’ll be coming out of the display case for a quick spot of red and green…) I can finish my work in progress articles with a roundup of this kit’s qualities. Hasegawa’s kit #09063 (JT63) is quite the gem. It has many unused parts from other variants, different cockpit sidewalls, the droptanks and underwing gunpods of G-series bomber-destroyers, three different tail wheel struts, three different instrument panels. You need to keep a careful eye on the instructions to make sure you select the right parts for the variant you’re building.  


 Marking options are supplied for two aircraft, Yellow 4, “Ingeborg,” of II/JG 3, March 1945, and a second contemporary airframe. Markings include a full suite of stencil data, even including the Werk numbers which may or may not have been carried on the tail of Yellow 4, depending on the sources you consult. I was originally a little put out with the engineering of the cockpit, but from that point onward the model literally fell together. The propeller attachment could have been smarter, trying to accurately align the fuselage halves while trapping an un-glued rotation piece in a channel at the front end was quite impossible for my dexterity and I settled for gluing it in place as a fixed stub, thus creating a non-turning finished prop. Parts alignment was superb for the most part, my only criticism is a tiny fore-and-aft mismatch on fuselage right and left detailing, which is only really visible where the aft fuselage segments are delineated on the underside. The flaps were marred by a long sink mark on the upper surfaces, which was only visible in certain lighting, virtually guaranteeing the parts were mounted before the problem was noticed. Similarly, the leading edge slats can be mounted open or closed, and while the deployed configuration adds visual interest the separate parts come with the usual penalty for assembling them closed: they don’t fit as well into their bays as the slats of the real plane would.  


 But these are minor quibbles, really. The surface detailing is accurate for a K-4, the hatches and access panels are in the right places, the Erla Haube looks convincing, and with a few extra details scratched together (the radiator pitch rods, battery bay hatch and flap ribs which I covered in my first post on this kit) it builds into a visually convincing model. I could have added hydraulic lines from fine wire but I was out of time and application on the project, that’s something for future builds. Another detail which I had meant to use was Quickboost’s exhausts, beautifully cast with open throats and midline weld seams, however they did not provide the locator slot for the glare shields of the late-series 109s, molded as separate kit parts, and I didn’t fancy scratching this detail at so late a stage. The resin AMs ended up in the drawer against a future build.  


 The decals went down actually quite nicely, reacting well with Microscale chemistry, though the spiralschnauze tried to curl up on the paper and was broken into pieces to be applied, and the big open crosses silvered somewhat. The 60 or so decals make a visually ‘busy’ aircraft, even if the real “Ingeborg” may not have carried a full suite of stencils (references and reconstructions do not, as you would expect, always agree.) Promodeller panel wash and MiG pigments created the worn appearance, the carbon stains and dust that denote a service aircraft being hard-flown, and EZ Line provided the radio antenna. Without going to the extent of AM cockpit and wheels, opening the canopy etc, this model makes a sweet display piece that really captures, the gutsy, brutish yet still graceful lines of the ever-more powerful ultimate Messerschmitt 109. I would recommend this kit to anyone with a few builds under his or her belt: while the multi-tone camouflage will be a challenge and the many decals will certainly occupy more than a couple of evenings, the basic soundness of the kit engineering will foster an attractive finished product if approached with care, forethought, and above all, patience. 


Saturday, August 8, 2009

Product Review: Berkshire Junction's EZ Line


 Model railroading firm Berkshire Junction came up with a winner when they developed EZ Line. It was meant for adding in-scale power and communication lines, even wire fences, to railroad layouts, but this product has many uses.

As the product blurb explains, it is an elastic polymer with 700% stretch, and given that the spool comes with 100 feet of line, that’s a lot of finished product! It comes in five stock colours, white, charcoal, green, rust and rope, but the thread takes acrylic paint perfectly so if you can’t get the colour you need for a particular job it’s no disaster. When I ordered I could only get rust, so I use Tamiya XF-1, diluted with thinner, to create black antenna cables on aircraft.

The thread is very thin! When stretched it seems hair-thin, and that’s almost scary. Obviously, the tighter you draw it, the thinner it becomes, and that’s something to keep in mind. The extreme elasticity means there is very little ‘pull’ to it, which places it within the grabbing strength of superglue, and even my first fumbling attempt was pretty successful.

I rigged the antenna wire on my 1:48th scale Hasegawa Bf 109 K-4 (see the final roundup on that project, coming next post), and found the line worked very well, though you need patience and dexterity, and a decent pair of tweezers. I located the forward end into a tiny hole drilled in the fuselage top, simply fixing it with a drop of CA in the hole, and when it was dry I threaded it through the loop antenna and drew it (mildly) tight across the stub mast on the tailplane, dabbed it with CA and held it in place for a couple of minutes until I dared release it. It held no bother, and I trimmed the loose end with small scissors. The cross-cable was done the same way, seated into a fine drilling in the fuselage and, when dry, drawn very mildly up against a spot of glue placed on the first cable, and held. When dry I trimmed the end, and it was done. The cross-cable inevitably deflects the main cable down, which is not technically accurate: I’ll need to play with this product a bit more to figure out how to use it best.


Apparently it is very popular with biplane enthusiasts for rigging, and that’s a job I look forward to with some trepidation, though also interest, as I’m sure a well-rigged biplane will look great on the shelf! Shipbuilders have been encountering great success using this product for elements of rigging. Another project that comes to mind is a PBY Catalina, using EZ Line for those enormously long radio antennas between the tailplane and the wingtips.

The elastic thinning of the line also means it is equally appropriate for 1:72nd scale, simply draw the thread a little tighter to get greater scale thinness.

All in all, though comparatively expensive, this is a very versatile product, and the name tells all, it really is easy to use. I don’t think my tools draw will ever be without EZ Line from now on. See EZ Line and many other products at: http://www.berkshirejunction.com I ordered mine in Australia online through Red Roo: http://www.redroomodels.com/ where the price is currently Aus$26 per spool, plus shipping.

Friday, July 31, 2009

Hasegawa Bf 109 K-4: Soft-Masking the Camouflage


The Hasegawa K-4 has certainly been gestating a long time, what with professional commitments and a month’s jury service, but she’s on the last lap now. I just completed the paintwork and for the first time I’ve tried the technique of soft-masking.

The late-war German camouflage patterns were a simplified, time-saving exercise. Gone were the masked, hard-edge patterns from the early war years, replaced with free-handed patterns on the horizontal surfaces and ever more complex freehand disruptive schemes on the fuselage sides. The challenge here is to reproduce that scheme with smooth graduations between the colours at a resolution which is a fair scale representation of the feather of the original sprayguns. There are many approaches, and while you can change down to a fineline tip and needle on your airbrush, and adjust the thinning ratio of the paint and the pressure delivery to the AB, these techniques take a lot of mastering. Soft-masking leaves the paint operation alone and addresses the problem directly on the model.

The idea is to mask the camo but support the masks clear of the surface by around an eighth of an inch, so that the cloud of paint passing the edge lands on the surface in a tight but still diffuse edge, creating a resolution often difficult by regular means. The first step is to prepare the paint scheme: 


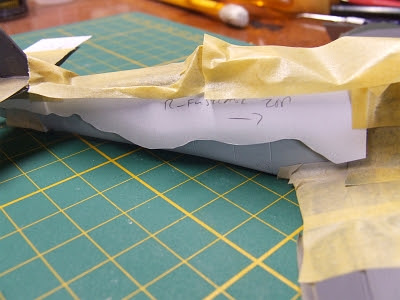
 I sprayed the underside LM 76 first, and when that was thoroughly dry I masked the edges of the flying surfaces, including the wavy-edge demarcation at the leading edge, using Tamiya tape. The card masks are photographed with the model at this stage.  


I masked the sides of the fuselage to protect the 76 and the RLM 75 grey topside colour was then sprayed on the horizontal surfaces and left to harden. Then I cut rectangles from white 120-gsm cardstock large enough to cover each area of the grey to be protected. The card pieces were laid onto the wings and tail, fuselage and nose, and the shape was roughly drawn on in pencil, then cut out with small scissors. At this point it's worth noting that Hasegawa "kicked" the grey/green pattern on the left wing: reverse them, grey areas for green areas, to get the historically correct pattern. I kept the positive and negative area masks for the fuselage sides as I was pretty sure I would need both. 


 Above: The card masks were attached loosely to the model with rolled out strips of blu-tac (the same stuff as you use to put up posters) and then extra bits of tape were used to link them together where necessary. With the fuselage sides masked I went on to spray the 75 on the upper parts:  


The three masks crossing the fuselage crest were made on the fly, matching with the horizontal masks already in place:  


Lastly the RLM 83 green was sprayed overall, and when dry the masks were carefully removed. 


The blu-tac develops considerable grab, so it’s important to remove it carefully. The mask crossing the canopy was so firmly attached that it pulled the canopy right off, so it will be reattached in the final round of work. A soft eraser removes some slight residue remaining on the paint. From this point I touched up as necessary, including applying the negative masks to protect the camo on the upper parts of the fuselage, so I could touch up over some overspray darkening the 76, 


then I removed those masks once more, revealing the virtually complete paintjob:  


The definition between the colours could have been softer, I thought, to be more clearly soft-masked rather than hard-masked, but overall I’m very pleased with the result. While labour-intensive, it was a lot less traumatic than trying for fineline airbrush effects can often be. Now, onto the small details and the decals!

Thursday, July 23, 2009

Warning — Rant: After-Market Parts and the Cynicism of Gilding the Lilly


 I have Revell’s classic 1:48th scale Grumman Cougar on the shelf. It’s the only time that this subject has been done in this scale. The copyright of the edition is 1985 but the kit engineering is a good twenty years earlier. It has raised surface detail, including the so-popular rivets of the time, not much going on inside the intakes, and a single piece cockpit insert combining pilot, seat, floor, panel and detail behind the seat (which, to be fair, is more than many got in those days). It ohh-soo needs a resin cockpit, and resin wheel well inserts, and some of those Seamless Suckers to back the intakes, not to mention weighted tires and maybe a crystal clear vacform hood that can be posed open, a set of vinyl masks, and of course a wide selection of marking options released by the decal guys.

Where are they?

There’s an echoing void. I can sand back the detail and rescribe the bird, sure, and I could use Panther accessories (assuming they’ve been produced for the newer Trumpeter Panther), and piece together my markings from generic sheets, masks and careful paintwork. Yes, that’s a valid approach, and nothing a modeller wouldn’t have to do if the AM industry was less active than it is. My point is just that: the AM industry is volatile in its ability to churn out product, but the choice of product and how it is marketed seem to play—cynically—only to certain parts of the hobby. 


 The pics above are the collection of AMs I put together for a single project. I know what you’re thinking – for a bloke who complains about AMs, I seem to have a lot of them. And I’m not really complaining, just having a bit of a whinge… I mean, where would we be without companies like Eduard, Legends, Verlinden, Mig Productions, Coree and the like? It could be said Francios Verlinden started the AM industry thirty years ago, giving modellers things they really wanted (to make up for the shortfalls in commercial kits between affordable practicality and actual accuracy). That was a great thing, and transformed the hobby, allowing more modellers to build truly spectacular models without needing to evolve the skills of a master machinist with infinite time and resources to do so.

The market proved to be an accommodating one, and the quality race was on: the kit companies raised their own game, in one generation injection molded plastic has gone from often clunky to often breathtaking, and the resin and photoetch guys have kept pace, not simply providing alternatives but striving to correct and outdo their plastic counterparts.

Yet there comes a point when this process becomes cynical.

 Tasca burst on the injection mold scene in 2003 with a Panzer II in 1:35th scale, and reviewers ran out of superlatives... Not just accuracy of outline and a high parts count, with individual molding of detail parts for maximum accuracy and realism, but a fineness of detail resolution never seen before (and probably nowhere else even now), such as butterfly bolts (wingnuts) rendered in actual, crisp detail though the parts were less than 1mm in size. The model featured working plastic torsion bar suspension, something done elsewhere since (AFV Club’s Tiger I, IIRC, featured the same), but which at the time was a jaw-dropper. Surely no finer or more ambitious plastic engineering had ever been attempted, and what more could a modeller ask for? Especially at the comparably high price the kit commanded (and still does).

Well, after-markets. You have to have a photoetched detail set to make it better... Or so say the guys who make them, and have the gall to offer an expensive fret of etched metal because the reviewers who raved about the kit were obviously wrong to praise it so highly. Hey, scrape away that incredible styrene molding, stick on some of our metal, then it’ll really be accurate!


 You see the same thing with aircraft. The finest kits are the ones for which ‘updates’ are offered, or corrections, kits which already feature some of the best components on the market and build into pretty darn good models just as they are, while older, or more affordable, kits that could really do with a helping hand, are pretty much ignored. True Details produced a host of fine parts for a wide variety of subjects many years ago, but their productivity has been much lower in recent times, and that could be symptomatic of the same thing: the marketplace that must have its AMs doesn’t buy cheapy kits and oldies to start with, and we can expect the AM companies to have done painstaking market research to properly target their products. 


It is as it is. If you want to make an expensive kit even more expensive then they’re ready and willing to take your money -- that’s the nature of a commercial enterprise. And it’s true that there are modern kits which do indeed fall down on the job: Trumpeter’s new 1:32nd scale Grumman Bearcat faired pretty well in it’s review in the pages of FineScale Modeler, but others were not so kind to it, one English magazine’s build-up feature laid bare the bones of that particular skeleton and after that I lost my enthusiasm for scraping together the asking price. Maybe with a comprehensive AM set to fix the problems it might be worth the effort, if such a set could correct the engineering deficiencies of, for instance, the wingfolds (perfect if depicting them folded, but the fit is hopeless for the extended configuration, which is, after all, the most likely form in which most buyers would choose to depict the aircraft).

I guess the point I’m making is simply this: while I acknowledge that the top end of the market is a legitimate place to play to, it would be nice if the AM guys aimed a bit lower at times too. Not necessarily that old Cougar, she’s a rarity these days, of course she is (to tell the truth it’s an awful kit by modern standards, and in the cold light of day I don’t think it’s actually worth saving!), and any product must have a big enough potential market to justify its existence. But bits and pieces to trick out kits that actually need it would be nice. (And yes, Eduard and others have gone round and diligently produced PE sets for, e.g., thirty-year old Tamiya armour, which blunts my argument somewhat, even if the sets are often more expensive than prices at which you can pick up the kits!)

But I like the Quickboost approach best: replacement parts for an ever-growing range of items, with superior detail at an affordable price, and so light-weight they mail for free from many companies... Yeah, now there’s my idea of an AM outfit!

Rant over, normal services will be resumed as of the next post!