Australian firm Cavalier Model Productions has been around for quite a few years now, and besides their resin car kits and other esoteric goodies, they are perhaps most famous for their Zimmerit. Zimmerit was an antimagnetic paste applied like cement to the hulls of German armoured vehicles in the middle years of World War II (discontinued around November 1944) in response to the Russian tactic of magnetic mines which could be attached by infantrymen. Many choice modelling subjects are properly depicted with a coat of this rough, rippled stuff, and while there are many techniques for creating the effect, and some manufacturers, notably Dragon, have made forays into producing it as a moulded detail, Cavalier’s solution has been very successful and very popular.
Basically, Cavalier zimmerit is a wafer-thin sheet of moulded grey resin, as thin as paper and highly flexible. It’s delicate but captures the texture perfectly, including damage and defects in application for an amazingly realistic effect. Some 35 sets are presently available, including a batch for the new 1:48th scale armour, though most are for traditional 1:35th scale, with specific sets designed for particular kits. Fiddly parts are reproduced from kit parts with zimmerit added, so you have a complete replacement part. All sheets are cast in a uniform pale grey resin.
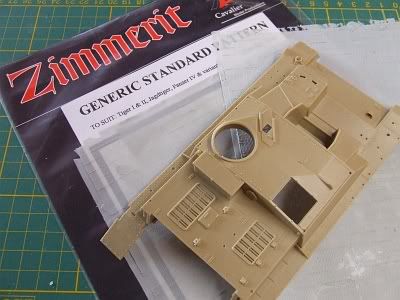
High utility can be found with their generic sheets too. If your vehicle is not covered by their sets of pre-formed parts, you can buy a generic sheet (there are four different patterns available) and you’ll more than likely have all you need for your project.
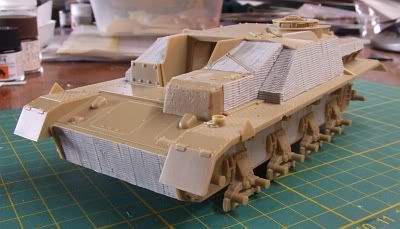
That’s what I did, working on Tamiya’s old (but still excellent) StuG IV kit (35087), as mentioned in the last post. No specific set has been produced for this kit, so I ordered up set CV-118, generic standard pattern zimmerit, and basically cut the parts as required. The set is very generous, containing two 15.5cm x 21cm sheets, and the whole project took me around half a sheet: that’s great value, panning out at about Aus$5 to zim each of potentially four models.
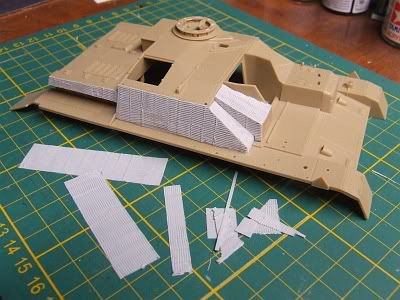
Starting from one symmetrical corner of the sheet, I began by measuring up needed panels and cutting them out with knife and straightedge. I cut them a fraction large, especially allowing the inclined edges of panels to lie inside the edges of the pieces I was cutting (photo, below). The method in this madness will soon become apparent. One needs to remember the orientation of the pattern, check references and see which way the pattern runs on which surfaces, and cut components accordingly.
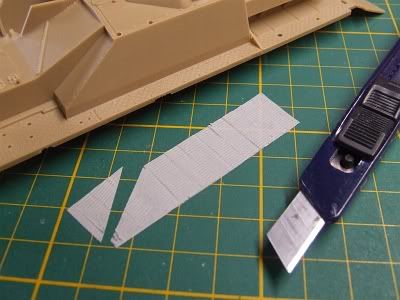
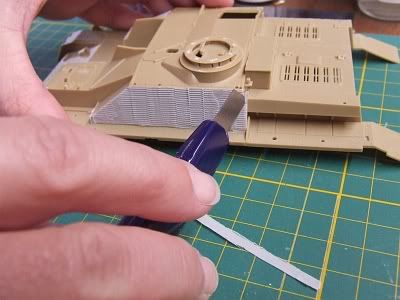
There are several suitable adhesives to use with this resin, five-minute epoxy, for instance. I used regular superglue as, given the fact I would be trimming the edges afterward, absolute precision was not called for. If using one of the pre-formed sets, I would use slow-cure gel superglue, for its strength and because it allows time to both spread the glue completely over the back of the sheet (as in the next photo) and to slip, or remove and replace, the piece once in place to refine the fit. As each piece was secured, simply by pressing carefully into place (second next photo), the slight excess left at the edges was trimmed with a sharp blade, creating an essentially perfect fit (third next photo). Any points on the edges that were not fully secured were glued down with thin CA, brushed on sparingly, then the edges were lightly filed to virtually blend the resin sheets together.


It is worth doctoring the zimmerit as well, you can score and chip the edges in high-wear areas, the likely contact zones, to create damage, chunks of the cement-like matter either chipped away by contact with branches or obstructions, or shattered free by the impact of shot. It’s as easy as cutting in with a knife or the edge of a file.
The sets come with a zimmerit tool, a cast resin ‘rake’ for custom work using one of the standard techniques. Basically, in areas where the zimmerit doesn’t quite fit, or edges where the juncture of sheets did not come out as perfectly as you might have wished, you can paint on some thinned putty, wait until it’s firming up, then score the pattern into it to match the resin sheets around about.
The complete zim job on this model took several hours to do, and it was my first outing with the product -- I’ll probably be quicker in future. Here she is with some paint on, late in the finishing stage:
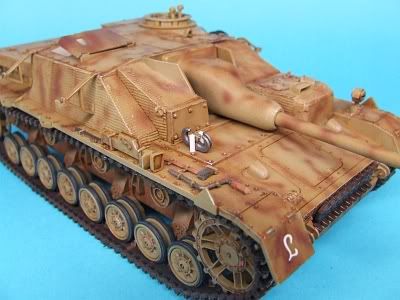
I couldn’t be happier with the result, and look forward to more Cavalier zimmerit-enhanced German armour models to come.
You can find some sheets at better hobby stores, but for the full range go to:
http://www.cavaliermodels.com/Zimmerit.html
Here you’ll find an historic article on the stuff, including reference photos, plus a listing of all available sets. At Aus$19.99 each they are a good buy, and domestic postage of $3.95 is no blow to the wallet.
This is a first-rate product, highly recommended, and proudly Australian!


No comments:
Post a Comment