Showing posts with label Product Review. Show all posts

Thursday, February 2, 2012

Kit Review: Fujimi 1:72 British Phantom F-4K (H-8)


About two years ago I posted about the face-off between Hasegawa and Fujimi in the late ‘80s to mid ‘90s period, and particularly their battle for the Phantom marketplace (see The Great Phantom Shootout.) It’s taken me a while but I finally have a review of the Fujimi product to offer.

This particular kit, though undated, is contemporary with their Phantom FG.1 “Silver Jubilee” kit (H-6) which was reviewed in FineScale Modeler in August 1987, and is substantially the same kit with different markings (offering 767 Squadron, FAA, c. 1969-1971, based at RNAS Yeovilton, one of the original units that worked up the Phantom for the Royal Navy. Their distinctive yellow eagle on the tailplane is quite unique and attractive).

Having worked on a couple of other Fujimi Phantoms (as yet unfinished) I was impressed that the company had refined their moulds and engineering approach to simplify construction so the model exhibits minimal seams, and lines up very comfortably. The kit is highly detailed, featuring finely recessed panel lines and tiny elements such as the pressure sensors in the intakes. The cockpit features raised instruments, for which a decal option is offered, and the seats are perhaps the best styrene representations of MB.7s I have seen to date. There are a number of alternate parts on the trees, as Fujimi, like Hasegawa, always pushed its mouldings for maximum versatility, in this case giving you the option of the hyper-extended nose gear leg, open canopies (a single piece canopy is provided for the closed option, which unfortunately does not fit very well at the front, leaving a noticeable gap around the windshield) and open engine auxiliary air doors (which fit so poorly they cannot be posed in the closed position without looking phony). Three other marking options are included, featuring the short-lived 700P Squadron (which only received five planes) and the fleet-service 892 “Omega” Squadron, plus an aircraft of the Phantom Training Flight that replaced 767 in 1972 when they transferred from RNAS Yeovilton to RNAS Leuchars in Scotland.

See the web for histories of the squadrons involved: ACIG Database for a general history of Phantoms in British service; and a close-up on 892 Sq. at Wikipedia. Wikipedia also offers a very useful look at international operators of the Phantom which touches on 767 Sq. FAA.


Parts breakdown is logical and straightforward, with full fuselage halves (as opposed to Hasegawa’s answer to covering the variants, their fuselages being separated into forward and rear sections, which inescapably gives you an extra seam to deal with), and the wing roots are a close, tight fit, requiring minimal dressing. The fuel dump at the tail is moulded with the fuselage halves and is so delicate that if you can avoid breaking it off, you’re a better modeller than most (this is a pet peeve of mine regarding most 1:72 Phantoms, I even wrote to Quickboost to suggest they produce a resin replacement, they would be sure to sell thousands of them…)

Detailing is correct for the British bird, with the recontoured fuselage to accommodate the Rolls Royce Spey engines, slotted tailplanes, and a choice of 600 gallon tank or Vulcan gunpod for the centreline hardpoint. I had been going to mount the gun, but the central pylon is moulded with the wing undersurface, and situated in the declivity between the engine bays makes carving it away impossible without a powertool. I ended up leaving the centre station empty but going with a full battery of missiles, so the aircraft is configured for a medium-range combat air patrol/interception sortie.

Eduard’s Phantom canopy masks are designed for the Hasegawa kits, and while the Fujimi may be very similar, I was more confident to go with a set of vinyls designed specifically for these kits, made in Canada. I've mislaid the backing sheet so can't quote the maker -- unfortunately, as they are an excellent product that worked very well. I mostly airbrushed Tamiya Acrylics, XF-2 for the underside, and substituted XF-63 German Grey for the Dark Sea Grey. Gunze 333 is an exact match but can be hard to find here; Gunze is also a brand I have no experience using so far. XF-63 may be a tad dark, but RN Phantoms look a different shade in every picture, from pale grey to royal blue… The metallic areas were painted with Model Master Chrome Silver enamel as my metallic acrylics have been misbehaving lately. The radome was Tamiya X-18 Satin Black, the afterburners X-10 Gunmetal. With prepainting thoroughly dry a long round of masking ensued to protect metallic areas, intakes, canopy and radome, then the underside was sprayed, along with gear bays, doors, struts, pylons, rails, tanks and missiles. Another round of masking established the wrap-around of the topside grey under the leading edge, then the XF-63 went on. Main coats were allowed to dry overnight before further attention. Next was to unmask the last round only, do any touchups required, then get arty with black and dark brown oil washes, laid on with a small flat sable brush. This simulated the Phantom’s characteristic oil leaks that stain the pure white of the underside from the front of the engine bays backward, and behind the flaps and airbrake junctures. This was a surprisingly easy task, and when complete and dry I laid on a coat of Micro Satin acrylic clear to protect everything.


The panel lines on the underside were accented with Promodeller Dark Dirt, as were lines on all the other white-painted items. The topside could have been treated with their Black wash, but I was in two minds about whether it was necessary, given the way the clear makes the panel lines visible. If I change my mind I can always treat them in future. More clear sealed the panel lines, and I tackled the decals.

The decals as supplied in the kit are extensive, with hundreds of items of stencil data complimenting the unit markings. The kit plans are fairly inaccurate in terms of placement, especially as data placement varied among the four units on offer and they only wanted to provide one full set of data drawings. The boxtop art is in fact far more accurate and I followed it in conjunction with photographs sourced from the web. Three kinds of ejector triangles are supplied, and the plans recommend large ones with heavy white outlines. None of my reference photos show this type, and I used the regular, borderless style.

A major difference is that the plans suggest the underwing serials for 767 Squadron should be wholly situated on the fixed portion, however photographs clearly show that all aircraft of 767 Squadron have serials overlapped the folding outer panel by a large margin, which translates into a discrepancy of nearly two metres! I have in fact so far found only a single reference photograph that shows a British Phantom of the period without the serials overlapping the outer wing panels (an RAF FGR.2 in the camouflage era). I have found at least two examples of profile art showing 892. Sq. planes without evidence of serials on the outer panels, but artwork can be based on incorrect information. 767 Sq. is firmly supported by the photographic evidence and if the serials are correctly positioned according to these sources, some stencil data supplied in the kit must be omitted as it is designed to be used with serials positioned closer in... The jury is out, as they say, but I’m going with the photos for this subject.


The big underwing serials are also potentially hairy to apply as they cross the attachment points for the outer pylons and fractionally overlap the gear doors as well. Obviously, the pylons go on after decaling is complete, for which one may be glad the fit is pretty excellent and tiny dabs of CA at the locator pegs alone will do the job. All serials begin “XT 8…” so these characters are supplied as one decal, with a set of extra digits to depict any of the four aircraft. The parts that overlap open gear bays, well that’s up to your creativity. Cut the decals and apply the slivers to the doors? Shave away the overhang and paint the disembodied bits?

All this is excellent and quite clever, the decals separate cleanly, albeit after a lengthy soak, but I can honestly say I have never seen decals “silver” so badly. Not all of them, certainly, but many, and mostly the tiny stencils. Even over clearcoating and using the Microscale chemistry they were not all that keen to conform to underlying detail, and after a day’s drying the silver bloom in the clear film was a great disappointment. The needle-prick method helped, but was by no means a cure. Using a sharp blade and Future also failed to improve matters. Decaling took four days, a total of 154 items being applied (plus a dozen pieces of coloured strip from an AM source for the missiles, and fragments of the large numbers that ended up on the bay doors), and while it’s pretty comprehensive, some of the decals are also out of register. The British roundels are perfect, but the yellow in the eagle is notably “over the line” and some small items backed with white show a distinct rim of their base. I did check online for an AM sheet depicting Phantoms of 767 Sq. but could not find any currently in production, nor early FAA stencil data, and I also wanted to get this project off the bench, so persevered. I found stencil data by AirDoc, but only for RAF birds in the camo and grey era, so again the kit sheet was the practical alternative.


I made a mistake when clearcoating the decal work, in underestimating the tenacity of the decal fluid residues. I did not wash the model adequately and though the fluids are invisible against the paint they show up instantly a clear is applied. There is also zero you can do about it other than strip the whole job and start again, which I was not willing to do. There are random flat patches in the finish now, though I managed to spot the problem and properly wash remaining areas, so the left wing at least is free of the issue.

Fitting the landing gear when all painting was complete reveals a lack of proper alignment. The assemblies are detailed and look great but there is no way to adjust their alignment. When they drop into the locator holes, that’s it, and the main gear plus retraction struts sit toed-in and canted in, which looks wrong. To combat this in future I would assemble the legs and struts, trim the locator pin from the strut and seat it with CA wherever it falls when the gear is straight, and leave it at that. Retraction struts are also supplied for the inner doors but I left them off as there is no way I could see for them to ever line up with their locators. The small doors are also very weak and I could not count how many times they simply fell off in the course of handling.


This model is not one of my best and some of the problems can be attributed to the kit, some to my own skills. It looks good on the shelf, but under the magnifying glass the issues with uneven paint, masking problems, decal silvering and residues, and visible gaps where the pylons meet the wing despite all filing and pushing and pulling, plus the gear stance, make this one a learning piece. Applying the lessons learned here to a larger scale may return a much better result.


In conclusion, the Fujimi F-4K is a good kit, though not a perfect one, and a skilful builder with experience working with paints and decals can produce a very nice looking model, though there will be a fiddle in a few places. The kit counts as “vintage” but can be picked up on eBay from time to time for reasonable prices.

Friday, December 30, 2011

Kit Review: Tamiya #35156 M1A1 (ODS) MBT


What is there to say about this kit that hasn’t been said before? Probably nothing. But it’s a good one and deserves to be revisited. It’s commonly available and while the accuracy brigade are quick to point out the many flaws (more in the nature of omissions than flaws, really) it builds with typical Tamiya ease straight from the box and the finished model captures the stance and feel of the Abrams.

The M1 Abrams Main Battle Tank is one of a handful of vehicles that seem to have reached a plateau in the development of armour. No new MBT has been designed in America in 33 years, there has been no need because the M1 is largely invulnerable to other tanks, is invariably lethal to them, and after three decades in service is as much an institution as the M16 rifle (which has been around for five). In that time model companies have produced a lot of kits, some better than others, some more buildable than others, but not a single one is 100% accurate, not even Dragon with its patented slide-mould technology. Experts have done the work for the modeller having an attack of AMS (Advanced Modeller Syndrome), you can compare several of the top kits at Vodnik’s site, while a complete list of necessary modifications to accurise any particular kit, assembled by those highly versed in the m1’s anatomy and evolution, can be found here as a downloadable .pdf. On the basis of that .pdf, there are a great many details I overlooked, but I’m not quite so afflicted with AMS that I am up to putting 1:35th scale split-pins and retaining chains on bolts. I can’t build an Abrams without doing at least some superdetailing, and I have done more on this one than previously, around 18 physical additions, plus AM decals and every finishing trick I can think of.


This kit was a retooling of Tamiya’s early-production M1 of 1982, produced about a decade later to reflect vehicles used during Operation Desert Storm in 1991. Basically it is an early generic M1A1, identified as such by the 120mm main gun, revised MRS, main sight, ammo blowout panels and crosswind sensor, smoke grenade stowage boxes, long turret stowage bins, and of course the “bustle rack” for crew gear stowage. The only hull modifications are the NBC environment panel on the port flank (which is missing an important detail) and the cutaway rear panels of the skirt armour.

Assembly is largely based on the 1982 original and the kit falls together as well as it ever did, the only hitch being a tiny mismatch in the upper hull to rear hull joint line, which calls for a bit of finesse and maybe a lick of filler. It’s largely up to you how much superdetailing you want to do, some details are easier than others. Drilling out the solid-moulded towing lugs fore and aft is a no-brainer, and adding missing bolt heads from slivers of styrene rod is another easy one. Relocating the portside grab handle on the forward hull about a scale foot forward to its proper location is another easy one. I also floored the bustle rack with Voyager's photoetched wire mesh part, a distinct improvement on the vinyl mesh supplied in the kit.


Tamiya missed a host of details. The “Z-springs” that tension the hinged forward mudguards are still absent and are easily made from bent spring steel wire. On the NBC panel, a triangular fillet is needed, with a hole drilled to represent the crew heater drain; likewise, the cabin heater intake is missing from the port flank hull and can be made up from a few small pieces of plasticard. On the starboard flank, under the edge of the turret, the bilge pump outlet is missing (only Trumpeter seem to have nailed this detail), and it can be scratched from card and brass tube. A bracket was missed from the hinges of the rear engine bay doors, and some plates and lift lugs too, all easily scratched from cardstock and wire.


A major criticism is the running gear (above), as the return rollers and idler axle detail are entirely spurious. I had been going to rebuild it all, including the track tensioning piston on each side, but realised that it would be wasted effort. This tank has side skirts and not one item I just mentioned is ever going to be seen, so why bother? The T-156 track is not accurate, the guidehorns should be between links rather than centred on them, but, that said, Tamiya’s T-156 track is the most accuarate in any kit, whether vinyl or styrene (according to Vodnik), and the only replacement set is both very expensive and of the dreaded individual link variety, so I was very happy to overlook this point (as discussed in my previous post).


Assembly was largely trouble-free and the most fiddly and frustrating jobs were late in the process. The barrel of the 7.62mm MG was snapped on the sprue, as was one of the tow cables, and they required very delicate repair with cya, and the antennas are fully scratched. The shorter mast I always make from .015” wire, but the heavier, taller mast I make by scraping .035” rod thinner toward one end, then bending it and CA’ing it into place. The tiedown is usually a plaited bungee chord, and for that I used spandex thread (EZ-line, rather simpler than unpicking elastane thread from a pair of nylons, like I did last time I built an Abrams!), twisted repeatedly, and this took three attempts and a large part of an afternoon. Tying knots with tweezers is my least favourite thing (barring L&L tracks…), but it makes a pretty realistic tie-down. The plastic balls on then ends of the masts are made by dipping the tip repeatedly into paint, and the flexible spring-type mounting at the base of the big mast was done with strips of tape, painted metallic. Trumpeter moulded this part properly, and Academy did so, on other subjects; I doubt their Abrams kits feature them as they were cloned from Tamiya’s.

I used Echelon decals which went on without a hitch (but for one which flicked away from the scissors and vanished) and my only criticism is that they are rather glossy. For that reason I held off on a final round of Mig pigments as I’ll see if I can source a decent clear flat to take the shine off the decals first. One task in pigments that came out very nicely was the burned metal on the transom above the exhaust vents (below), accomplished in seconds with two shades, Vietnam Dust and Black Smoke.


To this day Tamiya provide only tiny scraps of clear plastic for the periscopes, a great let down. I replaced them with styrene inserts and painted them all gold to suggest the prismatic tone of the real deal, but I was not very happy with the way they turned out. I would prefer to look for an aftermarket substitute in future.

Overall paintwork was Testor Model Master Acryl #4812 US Army/Marines Gulf War Sand, a non-FS shade originally mixed from available supplies in-theatre. It went on very well indeed, though my surface prep could have been better, I found myself respraying some spots around the front end when masking took the paint straight off. The tracks, as detailed in a separate post, were done with mainly Tamiya Acrylics.


The finished model looks the part and has enough extra detail to satisfy my desire for accuracy without breaking the bank re my bench hours, or my pocketbook. I could go on, but… Who looks under a tank model to know if the hull bottom is accurate? To be fair, the next Abrams I build will be Trumpeter’s HA and one of the Dragon offerings with all kinds of fine detail, including non-slip texturing moulded in: I ignored the necessity this time as there were some –A1s in Desert Storm which had not received the coating when they went to the Persian Gulf, so I can claim at least some accuracy. I’m happy with the model, my first Gulf War armour, and feel this kit, despite its age and legacy of parts from 1982, captures the design well enough to provide a solid basis for superdetailing, while avoiding the fit and assembly issues reported of at least some of the kits which offer superior detail right out of the box.

Tuesday, October 5, 2010

Kit Review: Tamiya 1:48 Fw 190 F-8


This kit is 15 years old, #39 in Tamiya's expanding 1:48th scale aircraft range, and while there would be many reviewers quick to point out that the kit is "showing it's age" in ways, I would sooner concentrate on the ways in which this kit is still a very good one, and a very pleasing build. Some might point to Dragon's and Eduard's offerings as being far more detailed, with hatches that display engines and guns, but I would point to the sheer unfriendliness of those kits to build, their susceptibility to misalignment of the major components if key elements of their multitudinous internal fittings are not mounted with exact precision, something many builders only discover retrospectively after doing it wrong the first time.


In contrast, Tamiya offers a basic cockpit and engine, the latter of which is pretty much invisible behind the prop and fan (as is going to be the case with any closed-cowl 190), and the cockpit looks just fine through a closed canopy. Add some harness hardware, that would be about all you'd need to up-detail the cockpit, unless opening the hood.


The cockpit features raised instrument detail which responds very well to drybrushing, and a gunsight which is clearly visible through the windscreen. A choice of standard or Galland Haube (blown) canopies is provided, both crystal clear. The prop mounts on a poly cap, a Tamiya trademark, which allows it to be slipped into place at the very end, easing not only painting and decaling, as the spiralschnauze really needs to be applied to the spinner cone before the prop is built up.

There are some stores options for this, the dedicated ground attack variant of the 190. Twin underwing pallets for R4 unguided rockets are optional vs a quartet of well-molded SC50 bombs and their pylons, while a 300L droptank and rack are provided for the centreline station.


The Tamiya kit builds beautifully. Buildability is a dependable trait for Tamiya and even so early in their series, only a few kits after switching to recessed panel lines as standard, the parts fall together very neatly indeed. The main fuselage and wing parts are super-accurate and align correctly on their pins; the tail surfaces literally snap into place and their tabs and slots are size-coded so you can't get the surfaces on upside down. The engine cowling is a single moulding into which the completed engine sits before the unit fits back onto the fuselage and the gunbay cover drops into place.

A separate insert for the wheelwell brings up the possible detail level, while separate parts for the retraction struts, locking to the legs at fixed pivot pins, assures the main gear will almost fall into correct alignment, a boon when one considers the forward rake and toe-in on the Focke-Wulf undercarriage that can be a challenge on some kits. This is standard engineering that will be found throughout Tamiya's 190 range.


Similarly, the single-piece lower wing surface assures the correct dihedral and a gentle flexed fit for the wing to fuselage joint, often the major issue with joint dressing but here requiring no attention at all. Overall, the joints were dressed with a little adzing and wet sanding over superglue assembly, while some joints were closed with liquid cement on natural panel lines,. Filler was used in only a couple of places, such as behind the engine cowl, down by the wing roots, and to eliminate discontinuities where sprue attachment points fell.

The decals provide for four aircraft, all interesting choices, including the famous Black 10 of 2/SG4 in tropical camouflage for the Italian campaign of 1944, Green Double Chevron of SG2 in March '45, White 7 of I/SG2, in Hungary during the winter of '44 to '45, and Red 2 of I/SG2 in a zebra-pattern winter camo over standard RLM 74/75/76, in early '45. In 1995 Tamiya was recommending mixing rations to reach RLM equivalents from their acrylics range, while later kits offer matches from the Tamiya enamels range.


Their formula for RLM 76 (XF-2 Flat White plus XF-23 Pale Blue plus XF-66 Light Grey ata ratio of 7:1:2, provides a virtually perfect match for the original, lacking only lustre, and an addition of 25 to 30% X-22 Clear Gloss approximates the sheen of the original RLM colours. Unfortunately, their suggested formulas for the 74 and 75 are miles off, and I experimented to find a decent fit. For 74 they recommend XF-24 Dark Grey and XF-27 Schwartzgrun at 3:2, but this was too dark and too green, especially compared to the Model Master enamel equivalent. I reduced the ratio to 3:1 and added 1 part Flat White as well, then brought up the lustre with 30% Clear Gloss. For the 75, Tamiya suggests XF-51 Khaki should be a component, but as 75 has no green hue at all this mystifies me. I mixed it from scratch, starting with XF-24 Dark Grey and adding Flat White at a ratio of 2:1, then adding 30% Clear Gloss. On reflection this was too much gloss, as darker shades reflect more strongly than lighter ones, and 20% would have been ample. The final shades were acceptably similar to the Model Master enamel equivalents, though I have to say the acrylics are both more delicate and lack a certain 'gutsiness' that the solvent-based paints have. I mixed the RLM 04 Yellow also, warming and lightening XF-3 Yellow slightly (it could have gone still lighter...)

The camouflage was soft-masked using light card, while hard edges were acheved with Tamiya tape. This was my first time doing an all-acrylic multi-tone paintjob and I was quite pleased with the result, not pleased enough to say I'll retire enamels, but pleased that I can pursue a build like this in weather which forbids taking the hobby outside to spray solvent-based paints.


If there was any particular shortcoming to the kit, it was the decals. Two sheets are provided, one large, one small, with all the stencil data on the small sheet along with a few squadron markings. The small sheet was glossy and the glue was both slow to release from the backing paper and quick to dissolve thereafter, resulting in decals that were not predisposed to lying down invisibly. Even when gauging the soaking time correctly, some of the decals were prone to wrinkling, calling for considerable skill with solvent and setting solutions to get them to even out and pull into surface detail. I'm very glad I painted the block colour areas of the scheme I chose, as the decal version of those areas I am certain would have been unnecessarily difficult to apply and not looked half as good. There are, of course, aftermarket decal sets for the Fw 190 almost beyond reckoning, many of them probably being released with this very kit in mind, so this is perhaps the least of concerns.

Finishing tricks included carbon staining and dust applied with MiG Productions powder pigments, and an antenna wire made from Berkshire Junction EZLine.


I'm sorry this kit is out of production. Hopefully it will be reissued at some point, and until then one must haunt eBay with a watchful eye to catch it when it changes hands from time to time. My verdict on the Tamiya Fw 190 F-8 is that it is a very pleasant build with few challenges, which can be both tackled by a beginner and enjoyed by a master, and which certainly captures the stance and look of Kurt Tank's masterpiece fighter.

Saturday, January 30, 2010

Product Review: MicroScale Trimfilm (and how I don’t seem to have the knack…)


 I’ve used MicroScale Industries products for many years and have the greatest respect for the firm. Established in 1933, they’ve been serving the modelling community even longer than Kalmbach Publishing, and their decals are legendary. In the days before everyone and his uncle was churning out decals through computerised imaging systems, Krasel Industries was the big guy on the block, and when they split into MicroScale and SuperScale, many years ago, it was double the bang for your buck, one firm catering to railroaders and others, the other to the burgeoning military enthusiast marketplace. First of all, I would like to say that I have over 400 sheets of SuperScale decals in my collection, and know their quality, plus seven of MicroScale’s finishing products which I use with confidence. So why am I complaining about Trimfilm? Trimfilm was a great idea. Solid colour sheets, and sheets of generic designs, stripes, checkerboards, in a variety of colours and gauges, a mix-and-match solution for a thousand different graphical challenges. Add to these a wide range of typestyle sheets, fonts, sizes and colours, and you have a resource to rustle up detailing at the drop of a hat. That’s the theory: what about practise? Maybe practice is what I need, because I can’t get the stuff to cooperate. I tried using Trimfilm on an SF scratchbuild or two, e.g., the bold red stripes around the rear fuselage of the MEV from Thunderbirds Are Go, and found to my frustration that the half-inch red stripe material had no intention of cooperating. The thinness, so valuable in getting small decals to conform to surface contours, made the material so fragile that it shattered if I breathed on it. It tended to break up while merely detaching from the backing paper, was quite impossible to move effectively once it was on the surface, and grabbed almost at once in any case, drying decidedly lumpy over a surface wet-polished smooth. I tried several times to get the material to do what I wanted it to, then gave up and sprayed the stripes instead. Perhaps I had hold of a defective sheet, I thought, and tried other sheets and other gauges. The red stripe around the MEV is flanked by two finer black stripes and I did these with eighth-inch Trimfilm. The story was the same, and I pieced the lines together from multiple fragments of broken decal, not enjoying the process. When I came to do the wing walkway lines on my scratchbuilt F-116 fighter from Joe-90 I found myself using the same material by necessity, but having no more rewarding an experience. For black lines around the engine nacelles I had far better luck spraying flat black and masking with Tamiya tape, and for some lines circling the nacelles I actually sprayed the tape black and applied it permanently, because the tape will stretch symmetrically across a two-dimensional curve, and decal film essentially will not. This is unfortunate. Perhaps my technique is off, maybe I don’t have a sufficiently gentle touch to use this material: if it behaved like most decals usually do for me it would be great, but it didn’t (which is odd, as I’ve used SuperScale aircraft decals before and had no trouble with them). Maybe I should have reinforced them with Liquid Decal Film to keep them from shattering. I’m still drawn to the range, though, a sort of love-hate relationship. All those pre-made items are creative candy! And the typestyles suggest custom lettering on home-designed projects (though to be fair, custom made decals have made a very effective challenge to the idea of piecing logos together a letter at a time.) For now I’ll say that my Trimfilm collection lies in its box, forlorn and neglected, awaiting either a renewed sense of adventure on my part or the wisdom of those who know how to make it behave. Check out the enormous range at: http://www.microscale.com/

Thursday, January 21, 2010

Product Review: Cavalier Zimmerit


Australian firm Cavalier Model Productions has been around for quite a few years now, and besides their resin car kits and other esoteric goodies, they are perhaps most famous for their Zimmerit. Zimmerit was an antimagnetic paste applied like cement to the hulls of German armoured vehicles in the middle years of World War II (discontinued around November 1944) in response to the Russian tactic of magnetic mines which could be attached by infantrymen. Many choice modelling subjects are properly depicted with a coat of this rough, rippled stuff, and while there are many techniques for creating the effect, and some manufacturers, notably Dragon, have made forays into producing it as a moulded detail, Cavalier’s solution has been very successful and very popular.

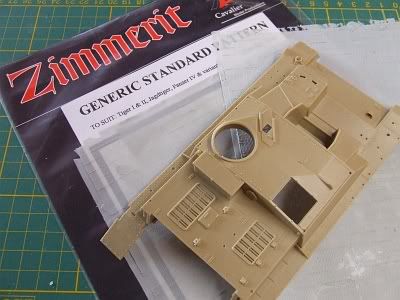
Basically, Cavalier zimmerit is a wafer-thin sheet of moulded grey resin, as thin as paper and highly flexible. It’s delicate but captures the texture perfectly, including damage and defects in application for an amazingly realistic effect. Some 35 sets are presently available, including a batch for the new 1:48th scale armour, though most are for traditional 1:35th scale, with specific sets designed for particular kits. Fiddly parts are reproduced from kit parts with zimmerit added, so you have a complete replacement part. All sheets are cast in a uniform pale grey resin.

High utility can be found with their generic sheets too. If your vehicle is not covered by their sets of pre-formed parts, you can buy a generic sheet (there are four different patterns available) and you’ll more than likely have all you need for your project.

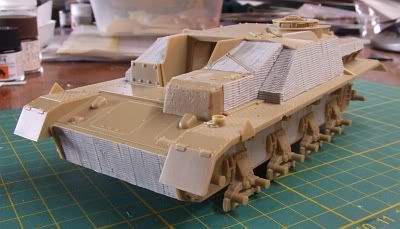
That’s what I did, working on Tamiya’s old (but still excellent) StuG IV kit (35087), as mentioned in the last post. No specific set has been produced for this kit, so I ordered up set CV-118, generic standard pattern zimmerit, and basically cut the parts as required. The set is very generous, containing two 15.5cm x 21cm sheets, and the whole project took me around half a sheet: that’s great value, panning out at about Aus$5 to zim each of potentially four models.


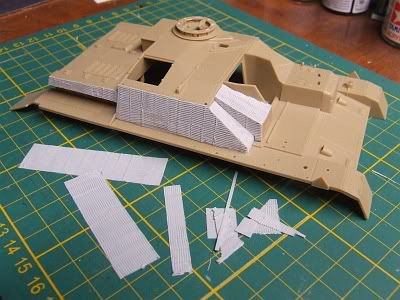
Starting from one symmetrical corner of the sheet, I began by measuring up needed panels and cutting them out with knife and straightedge. I cut them a fraction large, especially allowing the inclined edges of panels to lie inside the edges of the pieces I was cutting (photo, below). The method in this madness will soon become apparent. One needs to remember the orientation of the pattern, check references and see which way the pattern runs on which surfaces, and cut components accordingly.


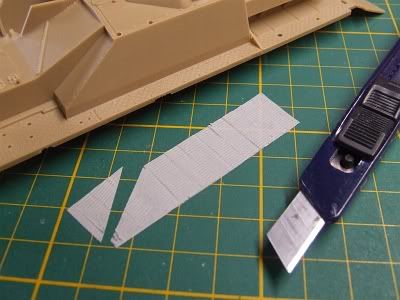
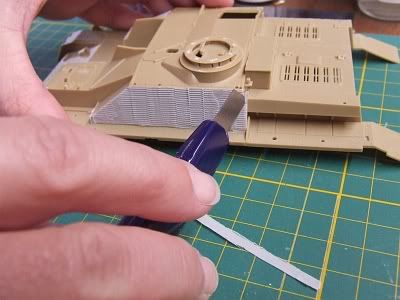
There are several suitable adhesives to use with this resin, five-minute epoxy, for instance. I used regular superglue as, given the fact I would be trimming the edges afterward, absolute precision was not called for. If using one of the pre-formed sets, I would use slow-cure gel superglue, for its strength and because it allows time to both spread the glue completely over the back of the sheet (as in the next photo) and to slip, or remove and replace, the piece once in place to refine the fit. As each piece was secured, simply by pressing carefully into place (second next photo), the slight excess left at the edges was trimmed with a sharp blade, creating an essentially perfect fit (third next photo). Any points on the edges that were not fully secured were glued down with thin CA, brushed on sparingly, then the edges were lightly filed to virtually blend the resin sheets together.


It is worth doctoring the zimmerit as well, you can score and chip the edges in high-wear areas, the likely contact zones, to create damage, chunks of the cement-like matter either chipped away by contact with branches or obstructions, or shattered free by the impact of shot. It’s as easy as cutting in with a knife or the edge of a file.

The sets come with a zimmerit tool, a cast resin ‘rake’ for custom work using one of the standard techniques. Basically, in areas where the zimmerit doesn’t quite fit, or edges where the juncture of sheets did not come out as perfectly as you might have wished, you can paint on some thinned putty, wait until it’s firming up, then score the pattern into it to match the resin sheets around about.


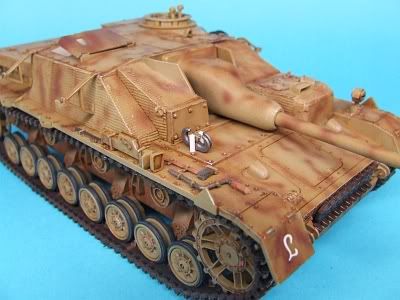
The complete zim job on this model took several hours to do, and it was my first outing with the product -- I’ll probably be quicker in future. Here she is with some paint on, late in the finishing stage:


I couldn’t be happier with the result, and look forward to more Cavalier zimmerit-enhanced German armour models to come.

You can find some sheets at better hobby stores, but for the full range go to:

http://www.cavaliermodels.com/Zimmerit.html

Here you’ll find an historic article on the stuff, including reference photos, plus a listing of all available sets. At Aus$19.99 each they are a good buy, and domestic postage of $3.95 is no blow to the wallet.

This is a first-rate product, highly recommended, and proudly Australian!

Sunday, January 10, 2010

Product Review: Alliance Model Works Painting Masks


 Now here is a truly good idea! The template painting method for wheels has been around for quite a while and it makes a slow, tedious, “iffy” job into a quick, accurate one, but one painful truth is that models are a scale depiction of reality and as such it’s always a lottery as to whether artists’ circle templates, which are produced on whole millimetre increments (they don’t seem to make half-mil sizes) ever match closely the size of the wheels. After you’re done spraying you always need to take a fine brush and clean up those edges by hand, hoping the ridge of the rim will guide the brush adequately to fool the eye. For a Panzer IV, with 36 wheels (counting the spares), all of which should correctly be rimmed both sides because you can see the hub area of the rearmost of each wheel pair from oblique angles, that’s a formidable task. But Alliance Model Works have come to the rescue with photoetched painting masks, circle templates designed to fit the rims of specific kits from specific manufacturers.  

 I ordered their set for WWII Wermacht tanks and other vehicles on eBay. #Lw3574, “German Vehicle Wheel Mask Set” comes attractively packaged in a conventional plastic and card sleeve, containing a sheet of instructions on the use of the product and no less than three frets of etched stainless steel, plus one ‘loose’ mask for a total of 54 templates for roadwheels, return rollers, and the steering wheels of halftracks, plus even the wheels of some towed fieldguns. These are precision-made items designed to fit exactly over the rims of kits by Tamiya, Dragon and others, which means no more touch-ups: once spraying is done, you should be finished the job. As soon as I saw these gleaming, individually-plastic wrapped frets I smiled and said to myself, “if these work as advertised, a hard job just became easy.”  


 I tested them on the Tamiya StuG IV crossing my bench at the time. I had delayed doing the wheels til last, and I was very glad I had. The first step was to paint all the tyres black, for which I mixed Tamiya XF-63 Panzer Grey with X-18 Satin Black for a low-lustre tyre black (1:1) and sprayed the wheels on the sprue for ease of handling, with their mating faces masked with Humbrol Maskol and some wet tissue. So far so good. Then I cut the protective plastic over the appropriate PE sheet and test fit a wheel hub into the “Tamiya Panzer IV” template. Well, I certainly hope it fits the new-tool Tamiya IVs, because it sure doesn’t fit the old ones! Why can’t anything ever be easy? Would it have been too difficult to have the new and old-tool kits (which are still widely available under more than one label) catered to, side by side? I had a choice: use the specified template, biased to slip around the rim on one side only, then come back for a second pass to get the other side of the rim with the template biased the opposite way, or find another template which was large enough and fit close enough to do. Compromise is not what you expect from a precision product, and not what was advertised, but I guess the company is playing to the high end of the market, and nobody said anything about the vintage of the kits catered to by this specific set: there may be another set with the older Tamiya Panzer IVs among it’s many template sizes. I don’t know, I haven’t checked – yet. The good news is the template for Dragon’s Panzer III is quite close enough to do. I stripped the protective plastic away and test fit a hub, finding the clearance quite snug enough for my purposes. The rear wheel of the old Tamiya IV seems to be a smaller rim diameter, but the backs of the wheels are not going to be seen much, so some overspray won’t make any difference. I could have taken the template from the PE sheet but for ease of handling and storage I decided to leave them all of a piece. This is how I’m used to handling plastic circle templates to do the job in the past. I masked close round the hole with tape to keep the product clean overall, then trimmed the wheels from the sprue, leaving the attachment points to be dabbed into the mixed black at a later point (before weathering).  


 I mixed Tamiya XF-60 at 1:0.5 and shot at my usual pressure for the Paasche #3 tip and needle, and did two mixings, one for the fronts, one for the backs, and had enough to double coat a fair few hubs in each batch. The metal sure collects overspray, moreso perhaps than plastic templates seemed to, I had to keep wiping the paint away with a moistened tissue, but that’s to be expected and no problem to deal with. The best news is they work great. Any remaining degree of “wiggle room” is due to the fact I’m using them on a kit they were not designed for, but they’re a lot closer to right than standard template sizes, so the job was right in the end. I know how well they’ll perform when I build a Dragon IV, or III, or whatever else actually on the sheets comes up for building. They were on special but not cheap: still, as a precision tool that will serve me for many years, I consider it one of my better investments. Now when I build German armour, I will reach for these masks as a reflex, and the prospect of the running gear will not be a detraction from the fun of the project. Look at the finished job (mains and spare wheels, prior to fitting the stand-off skirts) and there was no hair-tearing involved in getting there:  


Very highly recommended – I suddenly find myself considering collecting any other mask sets they offer, American armour, Russian armour, they all have rims to paint! Check out the product at http://alliancemodelworks.com/ There’s a retrospective look at the old Tamiya Sturmgeschutz coming next time, watch this space…

Wednesday, December 9, 2009

Product Review: Eduard Masks


 There are all sorts of tools and supplies in the modelling hobby, and it’s a fair criticism to ask if the modern hobbyist is well-served or merely gadget-dependent. When we need to mask something we use tape, like any tradesman, plus cut paper and card sections for big areas, and we may also use a liquid latex masking medium, an aid brought over from the graphic arts. I always masked my canopies with tiny slivers of tape, but there are some curved that just don’t want to be masked around. A three dimensional shape needs to be expressed in two dimensions, and that’s a hit or miss proposition unless you’re a spatial dynamics expert. Another trick is to spray the hull color on some clear decal film, cut fine strips and apply the canopy struts as decals, and there’s a lot to be said for that technique. There have been a few ideas over the years, including precut vinyl negative masks which are to be sprayed in the final colour and applied, but Eduard might have hit the best formula with their masking technology. Eduard Masks are die-cut adhesive shapes matched to the intended kit at very fine resolution, and the principle of their use is dead easy: peel them off their waxed backing paper, stick them on, spray, peel off when done. If engineering firms go by the old “KISS principle,” (which stands for Keep It Simple, Stupid!), then they’ve probably hit the money. If the hundreds of sets in their range are anything to go by, modellers agree. 


 I’ve used four sets so far and have several more in hand. Though the principle is simple, it takes a fine hand and a keen eye to get them into place precisely. Without magnifying specs I’d have no hope, though that’s more a comment on my vision than the product. The masks seem to be a vinyl or paper material, and their adhesive is quite strong, they won’t move until you want them to, and then they come away without leaving a residue. They can be repositioned, though with care as they will crease and denature if handled roughly. They fully cover smaller panels and outline larger areas, which are then filled in with liquid or tape.  


 Once located to your satisfaction, spray the cockpit interior colour, then overcoat with the camo or framing colours, and when fully dry tease up a corner with the point of a knife and draw the masks away with tweezers. You might also want to hold the canopy down with a finger as you do so. The adhesive is strong enough to pull a clear part off if attached only with clear parts cement.  


 Masks are also supplied for other parts of the model, such as wheel rims and formation lights, and some armour sets have been produced to help with the fiendish job of painting the tires of tank wheels. Hopefully we will see this range continue to grow, as their utility is considerable. Can you re-use a set? I’ve not tried yet, but if you peel them off carefully and return them to their original positions on the backing sheet, it might be possible. Two uses would be good, as they do cost a few dollars, a nonreimbursable expense on the cost of doing a model which is far greater than that of the paint one uses, and often comparable to that of a selection of AM decals. Probably the best tribute I can pay to the product is that when I decide a particular model is on my schedule, I check if Eduard have masks for it and order them up in plenty of time, just as I would order AM decals or resin bits or whatever, and that makes them a tool of choice for this particular finishing operation. I recommend them to any hobbyist with a steady hand and a magnifying glass. Eduard Masks are available in hobby shops and through many online outlets, I always order mine from Squadron Mailorder, Carolton, Texas.

Monday, October 5, 2009

Product Review: Experts’ Choice Custom Decal Papers


 Custom decals: there was a time the thought used to turn modellers green with envy, or shuddering with foreboding at the thousand things that might go wrong, but in the age of the digital revolution it’s no longer a big deal. All you need to be is computer savvy, and a bit adventurous.

Unless you have very deep pockets, you will not be making decals equivalent to the silkscreened commercial product, but you can finagle things to get close. The Alps printers that deliver an opaque white ink make commercial image quality possible, and are used by the ‘garage’ firms, but for those of us with shallower bank accounts there are clear and white decal paper stocks from a variety of manufacturers.

I first began experimenting with custom decals for my F-116 SF scratchbuild project a few years ago, and refined the techniques at the electronic level. Basically, designing the decals is as simple – or as complex – as driving the software, so that’s the first hurdle. If you can drive your graphics package well enough to make the designs you need, half the battle is won. The fictional F-116 needed stencil data and I had intended to raid a SuperScale sheet for black data from the F-15E, but it didn’t seem to fit. I needed stencils which told a technical story all over the hull, Caution - APU Exhaust, Do Not Operate if Vent Port Obstructed, Ensure Grounding Provisions, Jacking Point, and so forth, dozens of them, all over the aircraft where maintenance placards would logically be located. I did some experiments in Page Plus Professional V.10 and found that 1- to 2-point lettering was still distinctly legible and a reasonable approximation of the lettering of an aircraft 72 times larger.

The aircraft required colour decals as well, organizational flashes and the triangular national insignia of a service which does not exist. My sister made them in about ten minutes flat, in the same program, and we were ready to rock. The media I chose was the decal papers from the Experts’ Choice range (a name which tends to engender trust!). I mail ordered their clear decal film for laser printers, item #123 (for the all black data) and their white film for inkjet printers, item #120, for the insignia which featured a white area. Luckily the insignia’s straight-edge shape lent itself to cutting free of the sheet with a razor knife.

The clear film worked remarkably well. I did a number of test shots on paper and when I was happy with the design work I rolled a sheet of decal material. The stencil data was made as easily as that, and was brushed over with MicroScale Liquid Decal Film to seal the toner down. I cut the designs close using small scissors and they went on readily, reacting well to MicroScale DecalSet and DecalSol. Here is a photo of another decal sheet with all-black markings on clear film for a variety of SF scratchbuild projects: the WASP Arrowhead received the top set, which is why they’re missing from the sheet!  


 The F-116 had a long white text legend down each side of the cockpit and to do this I changed tactics slightly. I had looked at the possibility of using MicroScale white lettering but did not trust my ability to line them up and space them correctly. I settled for a sheet of small white rubdown decals by Letraset, and applied them to the clear decal film. I brushed liquid film over them, cut them out and applied the legends as single units.

If the colour decals had behaved as well as these, my job would have been a lot easier. I was building the model on a deadline at the finish and I did a number of ‘ghosters,’ modelling sessions which run right through the night, at least partially because the colour decals simply would not behave. They would not free off their backing without a very long time soaking in very hot water and a lot of coaxing with soft brushes and solvent. This meant that the majority disintegrated before they were willing to move: it was a good job I made up several sets of decals on the one sheet, I certainly worked through a lot of them to get four insignia and two flashes to take. I spoke to the company and the only suggestion they could come up with was that it was a freak incompatibility between the paper and (both) of my colour printers. 


Here’s the finished F-116, showing the black stencil data, white rubdown decals, plus colour insignia and ‘danger’ flashes. The white stripes were done with Microscale Trimfilm.  


To be fair, I have seen ‘garage’ decal firms with a high profile and a good reputation put a caveat on their work, drawing the user’s attention to the fact that they are not commercially manufactured decals and don’t behave the same way, so it may be more common than many might prefer to admit that custom decals are a hit-or-miss proposal.

The Experts’ Choice packs contain three sheets each of US letter-size paper and, at less than $2 per sheet, are excellent value. If your printers and their inks are fully compatible then you can have all kinds of decaling adventures, creating the markings of your dreams: clear sheets for solid printing to overlie a painted backing of the necessary colour, white sheets where white is a necessary element of a complex design and you are confident you can cleanly cut away every scrap of white surrounding the graphic. You can fudge this by being clever, such as by edging the design with a digital equivalent of the background colour so the trim doesn’t need to be exact for the decal edges to essentially vanish into the surface.

Custom decals are fun and open a new world of marking options, limited only by your graphics package and your skills (and the luck of the draw when it comes to compatibility, and that’s the only real downside). Otherwise, these are excellent products and highly recommended. You can find them at: http://www.Bare-Metal.com/

Saturday, September 5, 2009

Kit Review: Tamiya F-51D Korean War #61044


 It may seem odd to review a kit released nearly 13 years ago, but there’s always room for a retrospective. For many years Hasegawa’s P-51D was the standard, and it remains a very good and entirely competitive kit, but Tamiya’s builds somewhat easier and is superbly detailed. The Hasegawa cockpit is slightly better, but unless you have the canopy open you really can’t tell what’s in the pit anyway.

The 81-part kit features optional parts for the Inglewood or Dallas canopies, Hamilton-Standard or Aeroproducts propellers (blades and spinner cones), and features 6 5” HVARs and a choice of 2 500lb bombs or 2 75-US gallon droptanks for the wing racks. The kit comes with decals for three aircraft of Korean vintage, the famous FF-943 (“Was that too fast?”) of the 12th FBS, 18th FBG; the CO’s aircraft of the 18th FBG; and “Buckeye Blitz” of the 36th FBS, 8th FBW.  


 The clear parts are crystal clear and barely-distorting, while the overall fit of the model is outstanding. I needed only a little filler on the underside seam where the fuselage halves trap the cockpit/radiator assembly. The cockpit is quite adequately detailed for the scale, and while no harness is included, not even as a decal (as with Tamiya’s Corsair), there is a gunsight glass and the canopy frame brace. The propeller seats back onto a stub which engages a poly cap trapped between the hub parts, which means the prop can be mounted in the final assembly round, after all major handling is done, minimising the chances of breakage.  


 Tamiya must use very high-pressure injection moulding, as the sprue attachment points are as small as technically possible. They are also located in carefully-considered locations where the inevitable inconsistencies where the sprue is cut and filed back show as little as possible.

Alignment and fit are of a very high standard and the kit pretty much builds itself, certainly for any experienced modeller it should be a breeze. There were no problem areas to speak of. The decals were thin and opaque and reacted well to setting solutions, but were not particularly ‘sticky’: three small stencils simply disappeared during subsequent handling, underlining the desirability of clearcoats.  


 I finished the model in Humbrol enamels, mixing #11 Silver Fox 7:3 with #56 Flat Aluminium to create a weathered metal look evocative of the beating the aircraft took from the severe weather conditions in Korea. The yellow accents were sprayed in a mix of Tamiya Acrylics (XF-3 Yellow, warmed with XF-7 Red and brightened with X-22 Clear Gloss). The prop blades, anti-glare panel and rudder trim tab were sprayed XF-1 Flat Black. The cockpit and gear bay interiors were sprayed Interior Green, mixed 1:1 from Tamiya XF-3 and XF-5 Green. The overall recessed panel lines were accented with ProModeller Dark Dirt panel wash, and the natural metal finish was varied with graphite, burnished into the paint with a stiff brush, and masked (with the greatest care!) with Tamiya tape. MiG pigments were used to add dust to the gear bays and underside, plus gun carbon and exhaust staining.  


 This was a very enjoyable build, the model looks proud in the display case, and I’m sure I’ll be building many more, working through my decal stash to collect the elegant Mustang in many of her historically famous schemes.