Showing posts with label Microscale. Show all posts

Sunday, March 3, 2019

Recently Completed: Tamiya 1:48 F4U-1 Corsair (Birdcage), #61046


As a modeller who tends to have something like three dozen uncompleted projects at any one time, it’s always nice to get an older one past the finish line. This was a 2017 build that’s been playing shelf queen waiting for final details and paintwork ever since (it was a matter of display space, which opened up not long ago when I boxed for storage a batch of projects from around five years ago.)

This is the 1996 kit from the grand masters in Shizuoka City, and a sweet build it is. It can pull the odd surprise, but overall is a pretty friendly kit. To wit – the ovoid transparencies for rearward view on the fuselage sides are incorrectly identified in the plans, the numbers are reversed – swap them port and starboard and the parts fit perfectly. Interestingly, the masks for these parts on the Eduard sheet are also reversed!

The cockpit is quite well detailed, and if the canopy is to be closed you’ll see little enough. I used the decal seat harness supplied, and painted everything a dark bronze-green, as research suggested the cockpit shade of the time was somewhere about FS 34092.


I decided to depict a bird from VMF-213, companion squadron to -214, which became  the Black Sheep, when they entered combat in the Solomons campaign in February, 1943, the first Corsairs in-theatre. This is the two-tone scheme, which later gave way to three-tone, and finally to overall Sea Blue Gloss and its variations. I’m currently enjoying the 1976 series Black Sheep Squadron, which, though unavoidably compromised at a historical detail level, gives you a look at Corsairs in the field and the kind of effects the conditions created in their appearance. Solomons Corsairs were battered and heavily weathered by the elements, caked with dust and mud – one can certainly go to town on the weathering process, though I fancied something a little cleaner. Okay, a bird fairly fresh on the line!


The Tamiya Corsair is very well engineered, when it came out I recall reviewers raving about its click-fit precision. It’s not quite that easy, the folding wing option is a PITA to avoid an obvious joint line if building with wings extended, as I always do. The landing gear is very solidly engineered and fits into big receivers, but somehow the legs managed to be at different angles, meaning the wheels were a few millimetres out of alignment…


The paintwork is Tamiya Acrylics, mixed as per kit specifications – XF-18 + XF-2 (3:1) for the topside blue-grey, and XF-19 + XF-2 (2:1) for the underside grey, with soft-masked demarcations. I used Miscroscale Satin to seal both the paint and the following Florey washes, and Flat as the final low lustre after decals.


I made standby decals in case the masks pulled the paint off the canopy struts, but they were unneeded. This means I have 1943 blue-grey over black, with clear, decal material in stock in case any future USN/Marines project develops the issue!

Decals in this edition were by Scalemaster, printed by Vitachrome, and behaved generally well – I say generally as they did not offer to pull into engraved detail at all and did not seem to react very well with Microscale chemistry, wrinkling patchily. The roundel on the right fuselage side broke up somewhat after application and refused to settle in, being still wrinkled when dry. I removed it with the old tape trick, and replaced it with an identical item from a Superscale sheet; the blue is a fractionally different shade, but nothing the eye really catches. The Superscale item of course snugged down perfectly – I’d expect nothing else.


Oil wash and Mig pigments comprise the weathering – when I get a Prismacolour silver pencil I’ll take a crack at chipping but I aborted the attempt in paint when it became clear I had no control over the process at all. My hands seemed to do anything they liked, and I knew to quit before I made a mess.


The radio antennas were rigged with EZline, usually the last task of a model and not my favourite activity. I set the long piece first, pegged the mast end and managed to hold the thread in tweezers to secure the tail end (despite cramp in my right thumb…), then pegged the fuselage end of the short piece to dry over night. The upper juncture of the lines I found I did not have the dexterity for, no way could I hold the line in tweezers long enough for superglue to get hold. I made up a contraption of tweezers, two bulldog clips, a sanding block, a CD and two thicknesses of card that brought the end of the short piece into contact with the long, and left it to set. The applications of glue created a thick spot on the line, which suggests a ceramic insulator or some such, but of course there was nothing there on the real plane. The line was painted with black, some hull blue was used to touch up around the glue points and clear flat added to even out the lustre.


I hope to fit the 1000-pounder on the centreline rack, but the olive drab I sprayed it a year or more ago is very dark under a clear coat, dark enough for black decals to probably be waste. I’ll respray it in lightened olive drab when I next mix that shade, then apply the ProModeller decals for WWII ordnance and hang the bomb.

So, some work to do on her in future – hang the bomb, add the missing pitot probe (the entire project was complete and photographed when I spotted the omission – d’oh!) plus do the above-mentioned chipping.


Last year I built all 72nd scale for reasons of storage space, and it’s nice to get back to something larger. I’ll be completing a 1:32nd scale Bf 109 in the months ahead, too – at least that’s the plan!

Cheers, Mike Adamson


Saturday, August 25, 2018

Mustang in Blue Diamonds


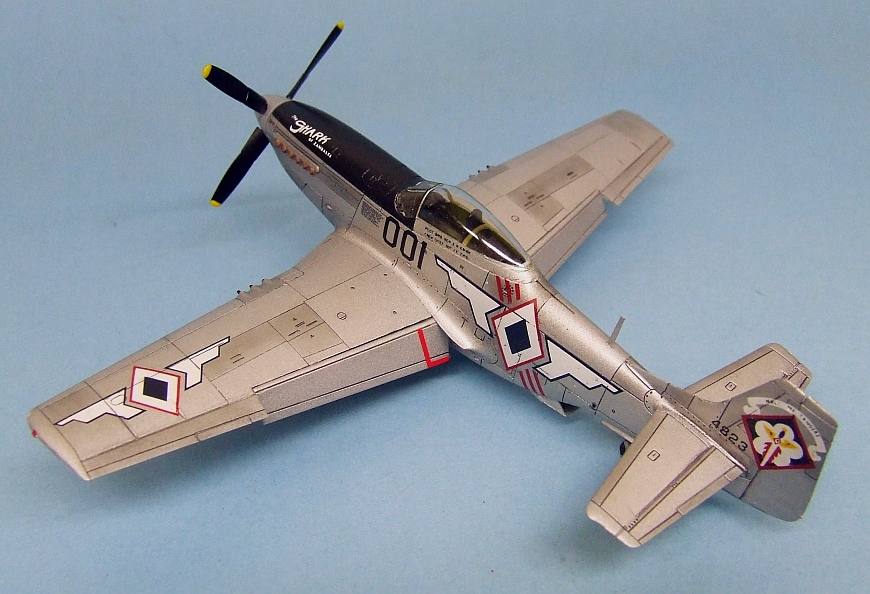
Earlier this year I completed Airfix’s 1:72 P-51D Mustang (A01004). This is the same kit I built around 2014, same original issue, though the kit has been boxed several times now with fresh marking options. This time I learned from my errors and did not try to include photoetched harness, though I succeeded in installing both joystick and radio mast unbroken. It remains to be seen if I can do that trick twice.

I have long wanted to do the varied post-war schemes and an old Superscale sheet (72-149) features the markings of the Philippine Air Force, who used Mustangs between the late ’40 and late ‘50s. The most famous of these was “Shark of Zambales,” the personal mount of the commanding general of the arm, B. N. Ebuen, and which has been the subject of numerous restorations over the years, including a standing display at the PAF museum at Villamor Airbase. Superscale included markings for a very particular phase in the original’s career, as the markings seem to differ in detail from one photograph to the next. Prolific aviation artist Gaetan Marie (check out his page here) has painted three different schemes worn by this aircraft, varying by the size, shape and colour of the shark-mouth, the scroll over the tail marking, spinner decoration, etc. and Superscale seem to have based their rendition on a single B&W photograph in which I am not prepared to swear the shark-mouth was actually applied. Angle and the nature of the filmstock make it dubious, but what’s not dubious is the unlikelihood of me applying the decals perfectly, so I left them on the sheet. I can always apply them in future if I feel justified.


The sheet must be over twenty years old and worked beautifully, I find myself thinking I’ll still be using decals from my stash decades hence, and they’ll still work as well as ever!


Another important factor, this is my first natural metal scheme in many years, as I have had the greatest difficulty in achieving a credible finish. I used Tamiya flat aluminium acrylic, overworked with 6B pencil graphite to vary the tonal values, then topcoated with Micro Satin for lustre. It feels quite good and I look forward to trying this technique again.


The landing gear of the Airfix kit is its only real disappointment – the plastic is soft and the main gear legs are irretrievably warped right on the sprue. The first time I built the kit I overlooked the problem and photographed it from angles that hid the gear, but this time I just couldn’t. I picked up the white metal replacement set from Scale Aircraft Conversions, beautiful castings in strong metal, absolutely straight, and they even supply two sets in the box so the next Airfix Mustang will get them too.


This bird came out very nicely and I look forward to adding more to my line-up – I recently picked up decal sets for postwar ANG birds and third world users, plus the Airfix edition with decals for Grenada, 1983, the last user of Mustangs in a combat role. I should think I’ll develop a long line of P-51Ds based on this kit and the ocean of decals I’ve collected over the years.


Wednesday, March 14, 2012

Kit Review: Tamiya 1:48 Gloster Meteor F.3 (Kit #61083)


The Gloster Meteor was Britain’s first service jet fighter and the Mk. 3, evolving beyond initial teething troubles, was deployed forward to Belgium before the cessation of hostilities in the west. The Meteors did not encounter the Me 262 in action, which may be a good thing as analysis generally comes down in favour of the Messerschmidt being the faster, more advanced design.

The type has not been all that well served by kit makers. Airfix produced it in the early days of the company in 1:72, Dragon tooled a new Meteor F.3 to the same scale in 2010, to a high standard and garnering excellent reviews, and there are limited-run and resin specialist kits of some of the later marques, but Tamiya’s F.1 and F.3 kits are pretty much alone to this day if we’re talking large scale and loads of detail.

Tamiya’s eighty-third release in its 1:48 aircraft series came out in 2002, and I can only describe it as a delight to build. The mouldings are high quality and fit is near-perfect, though the one-piece lower wing and separate top wing sections can bite you a little bit when dropping in the engines and fuselage. Take lots of time to study the sequence “dry” and only commit to glue when you are absolutely sure.


The cockpit could be accused of being spartan, with a decal seatbelt, but not much is visible through the canopy if closed, and Tamiya offer some great twists, such as a cast metal weight which is installed in the fuselage to bring the centre of gravity forward and avoid the model being a tail-sitter (much more precise than loading it up with lead sinkers or whatever and hoping you’ve glued in enough!) and landing gear which locks very solidly into place to be sure of carrying the necessarily greater weight of the previous item, as well as ensuring its own perfect alignment. The engines are nicely detailed and can be left visible either via detachable parts for the top of the nacelles or the supplied clear equivalents.

Decal options include one of the aircraft deployed to Belgium, which were painted gloss white for recognition purposes, as they were in essence only there to gather experience, they were not intended to fight; plus two camouflaged options from perhaps later in 1945. The kit will also build the F.4 model, as it includes the teardrop-shaped conformal fuel tank characteristic of early Meteors, and while some reviewers have finished their F.3s with this tank, it did in fact first appear on the following version.


Assembly was quite straight forward with the exception of that previously mentioned fiddle with lining up the wings and fuselage to close tolerances, and if I have a particular criticism it is that the gear bays, moulded in with the top wing halves, generate distinct and quite wide gaps in a place they are impossible to really do anything with. The side walls of the bays are also undetailed, and I would not be surprised if there was an etched metal set out there that plates the bay walls, hides the joint lines and beefs up the detail level in one go.

I used a number of finishing techniques on this one, starting with pre-shading all panel lines in black. I used Humbrol enamels for the Medium Sea Gray underside and Dark Sea Gray topside, but by then I had really had enough of the solvent fumes and the model lay fallow for a while. I soon discovered that Tamiya had already produced very close equivalents for these shades plus the topside RAF Green 2 as XF-81, 82 and 83, providing an acrylic option for late-war RAF subjects, and I decided at once to complete the model in acrylics.


Camouflage was masked with innumerable pieces of tape, the hard-edge wavy scheme being drawn onto de-tacked tape laid onto the demarcation zones. These pieces were then peeled off carefully and the wavy lines cut with scissors. They were reapplied, then the gray areas backfilled with more tape. The process took at least three days to complete, which is one reason I put it off for so long.

Next, I refreshed the preshading in the remaining areas, then overcoated with the green. When everything was comfortably dry, I unmasked everything but the canopy, nosed gear bay and engine intakes, touched up as needed, and coated the model with Microscale Satin. I had intended to use Promodeler Dark Dirt weathering wash, which was fine for the underside, but against the topside camouflage their Black was necessary to stand out as tonally different. More Satin sealed the accenting.


At this point I brought out the Eagle Strike Late War RAF Roundels (48136) set I bought, replacing the kit insignia as the fuselage roundels were slightly off register. I found the ES set included three sheets and decided to use the full suite as the colours were much truer than those on the kit sheet. They behaved very well and laid down into recessed detail tightly with Microscale chemistry.

Squadron codes and serials came from the kit sheet, along with the stencil data, which is exceptionally small and fine. In all there are eighty decals on the model, though the stencils largely disappear unless viewing from very close range. The model was carefully washed with soap and water in an effort to remove the invisible decal residues, even bathed with saturated tissues, which was mostly successful; a little more Satin was misted on over the decals to seal them. I had considered drawing the lustre down and experimented with Microscale Flat, but could distinguish zero difference between them (I have heard this on forums, their Flat is notorious for being semi-gloss) and having no other flat to hand I decided lustre was good!


A few jobs remained, painting, assembling and installing the landing gear and oil wash weathering the detail in the gear wells; removing my from-scratch masking of the canopy and hooking out the tissue protecting the intakes and nosegear well; fitting the jet exhausts; painting and adding the radio mast and pitot tube; and painting and glossing the formation lights. The clear parts for the three vertical lights on the underside will be added when the clear sprue shows up again on my chaos of a bench…

Tamiya brought their signature quality to this under-celebrated subject and I would recommend it to anyone wanting a larger, highly detailed replica of this subject in its immediate post-WWII configuration. One or two aspects are tricky but there is nothing even a moderately experienced builder should not be able to handle, and the seasoned modeller can turn out a really impressive piece incorporating aftermarket cockpit dress-up sets and decals, as a stand-alone display or diorama subject.

Thursday, February 2, 2012

Kit Review: Fujimi 1:72 British Phantom F-4K (H-8)


About two years ago I posted about the face-off between Hasegawa and Fujimi in the late ‘80s to mid ‘90s period, and particularly their battle for the Phantom marketplace (see The Great Phantom Shootout.) It’s taken me a while but I finally have a review of the Fujimi product to offer.

This particular kit, though undated, is contemporary with their Phantom FG.1 “Silver Jubilee” kit (H-6) which was reviewed in FineScale Modeler in August 1987, and is substantially the same kit with different markings (offering 767 Squadron, FAA, c. 1969-1971, based at RNAS Yeovilton, one of the original units that worked up the Phantom for the Royal Navy. Their distinctive yellow eagle on the tailplane is quite unique and attractive).

Having worked on a couple of other Fujimi Phantoms (as yet unfinished) I was impressed that the company had refined their moulds and engineering approach to simplify construction so the model exhibits minimal seams, and lines up very comfortably. The kit is highly detailed, featuring finely recessed panel lines and tiny elements such as the pressure sensors in the intakes. The cockpit features raised instruments, for which a decal option is offered, and the seats are perhaps the best styrene representations of MB.7s I have seen to date. There are a number of alternate parts on the trees, as Fujimi, like Hasegawa, always pushed its mouldings for maximum versatility, in this case giving you the option of the hyper-extended nose gear leg, open canopies (a single piece canopy is provided for the closed option, which unfortunately does not fit very well at the front, leaving a noticeable gap around the windshield) and open engine auxiliary air doors (which fit so poorly they cannot be posed in the closed position without looking phony). Three other marking options are included, featuring the short-lived 700P Squadron (which only received five planes) and the fleet-service 892 “Omega” Squadron, plus an aircraft of the Phantom Training Flight that replaced 767 in 1972 when they transferred from RNAS Yeovilton to RNAS Leuchars in Scotland.

See the web for histories of the squadrons involved: ACIG Database for a general history of Phantoms in British service; and a close-up on 892 Sq. at Wikipedia. Wikipedia also offers a very useful look at international operators of the Phantom which touches on 767 Sq. FAA.


Parts breakdown is logical and straightforward, with full fuselage halves (as opposed to Hasegawa’s answer to covering the variants, their fuselages being separated into forward and rear sections, which inescapably gives you an extra seam to deal with), and the wing roots are a close, tight fit, requiring minimal dressing. The fuel dump at the tail is moulded with the fuselage halves and is so delicate that if you can avoid breaking it off, you’re a better modeller than most (this is a pet peeve of mine regarding most 1:72 Phantoms, I even wrote to Quickboost to suggest they produce a resin replacement, they would be sure to sell thousands of them…)

Detailing is correct for the British bird, with the recontoured fuselage to accommodate the Rolls Royce Spey engines, slotted tailplanes, and a choice of 600 gallon tank or Vulcan gunpod for the centreline hardpoint. I had been going to mount the gun, but the central pylon is moulded with the wing undersurface, and situated in the declivity between the engine bays makes carving it away impossible without a powertool. I ended up leaving the centre station empty but going with a full battery of missiles, so the aircraft is configured for a medium-range combat air patrol/interception sortie.

Eduard’s Phantom canopy masks are designed for the Hasegawa kits, and while the Fujimi may be very similar, I was more confident to go with a set of vinyls designed specifically for these kits, made in Canada. I've mislaid the backing sheet so can't quote the maker -- unfortunately, as they are an excellent product that worked very well. I mostly airbrushed Tamiya Acrylics, XF-2 for the underside, and substituted XF-63 German Grey for the Dark Sea Grey. Gunze 333 is an exact match but can be hard to find here; Gunze is also a brand I have no experience using so far. XF-63 may be a tad dark, but RN Phantoms look a different shade in every picture, from pale grey to royal blue… The metallic areas were painted with Model Master Chrome Silver enamel as my metallic acrylics have been misbehaving lately. The radome was Tamiya X-18 Satin Black, the afterburners X-10 Gunmetal. With prepainting thoroughly dry a long round of masking ensued to protect metallic areas, intakes, canopy and radome, then the underside was sprayed, along with gear bays, doors, struts, pylons, rails, tanks and missiles. Another round of masking established the wrap-around of the topside grey under the leading edge, then the XF-63 went on. Main coats were allowed to dry overnight before further attention. Next was to unmask the last round only, do any touchups required, then get arty with black and dark brown oil washes, laid on with a small flat sable brush. This simulated the Phantom’s characteristic oil leaks that stain the pure white of the underside from the front of the engine bays backward, and behind the flaps and airbrake junctures. This was a surprisingly easy task, and when complete and dry I laid on a coat of Micro Satin acrylic clear to protect everything.


The panel lines on the underside were accented with Promodeller Dark Dirt, as were lines on all the other white-painted items. The topside could have been treated with their Black wash, but I was in two minds about whether it was necessary, given the way the clear makes the panel lines visible. If I change my mind I can always treat them in future. More clear sealed the panel lines, and I tackled the decals.

The decals as supplied in the kit are extensive, with hundreds of items of stencil data complimenting the unit markings. The kit plans are fairly inaccurate in terms of placement, especially as data placement varied among the four units on offer and they only wanted to provide one full set of data drawings. The boxtop art is in fact far more accurate and I followed it in conjunction with photographs sourced from the web. Three kinds of ejector triangles are supplied, and the plans recommend large ones with heavy white outlines. None of my reference photos show this type, and I used the regular, borderless style.

A major difference is that the plans suggest the underwing serials for 767 Squadron should be wholly situated on the fixed portion, however photographs clearly show that all aircraft of 767 Squadron have serials overlapped the folding outer panel by a large margin, which translates into a discrepancy of nearly two metres! I have in fact so far found only a single reference photograph that shows a British Phantom of the period without the serials overlapping the outer wing panels (an RAF FGR.2 in the camouflage era). I have found at least two examples of profile art showing 892. Sq. planes without evidence of serials on the outer panels, but artwork can be based on incorrect information. 767 Sq. is firmly supported by the photographic evidence and if the serials are correctly positioned according to these sources, some stencil data supplied in the kit must be omitted as it is designed to be used with serials positioned closer in... The jury is out, as they say, but I’m going with the photos for this subject.


The big underwing serials are also potentially hairy to apply as they cross the attachment points for the outer pylons and fractionally overlap the gear doors as well. Obviously, the pylons go on after decaling is complete, for which one may be glad the fit is pretty excellent and tiny dabs of CA at the locator pegs alone will do the job. All serials begin “XT 8…” so these characters are supplied as one decal, with a set of extra digits to depict any of the four aircraft. The parts that overlap open gear bays, well that’s up to your creativity. Cut the decals and apply the slivers to the doors? Shave away the overhang and paint the disembodied bits?

All this is excellent and quite clever, the decals separate cleanly, albeit after a lengthy soak, but I can honestly say I have never seen decals “silver” so badly. Not all of them, certainly, but many, and mostly the tiny stencils. Even over clearcoating and using the Microscale chemistry they were not all that keen to conform to underlying detail, and after a day’s drying the silver bloom in the clear film was a great disappointment. The needle-prick method helped, but was by no means a cure. Using a sharp blade and Future also failed to improve matters. Decaling took four days, a total of 154 items being applied (plus a dozen pieces of coloured strip from an AM source for the missiles, and fragments of the large numbers that ended up on the bay doors), and while it’s pretty comprehensive, some of the decals are also out of register. The British roundels are perfect, but the yellow in the eagle is notably “over the line” and some small items backed with white show a distinct rim of their base. I did check online for an AM sheet depicting Phantoms of 767 Sq. but could not find any currently in production, nor early FAA stencil data, and I also wanted to get this project off the bench, so persevered. I found stencil data by AirDoc, but only for RAF birds in the camo and grey era, so again the kit sheet was the practical alternative.


I made a mistake when clearcoating the decal work, in underestimating the tenacity of the decal fluid residues. I did not wash the model adequately and though the fluids are invisible against the paint they show up instantly a clear is applied. There is also zero you can do about it other than strip the whole job and start again, which I was not willing to do. There are random flat patches in the finish now, though I managed to spot the problem and properly wash remaining areas, so the left wing at least is free of the issue.

Fitting the landing gear when all painting was complete reveals a lack of proper alignment. The assemblies are detailed and look great but there is no way to adjust their alignment. When they drop into the locator holes, that’s it, and the main gear plus retraction struts sit toed-in and canted in, which looks wrong. To combat this in future I would assemble the legs and struts, trim the locator pin from the strut and seat it with CA wherever it falls when the gear is straight, and leave it at that. Retraction struts are also supplied for the inner doors but I left them off as there is no way I could see for them to ever line up with their locators. The small doors are also very weak and I could not count how many times they simply fell off in the course of handling.


This model is not one of my best and some of the problems can be attributed to the kit, some to my own skills. It looks good on the shelf, but under the magnifying glass the issues with uneven paint, masking problems, decal silvering and residues, and visible gaps where the pylons meet the wing despite all filing and pushing and pulling, plus the gear stance, make this one a learning piece. Applying the lessons learned here to a larger scale may return a much better result.


In conclusion, the Fujimi F-4K is a good kit, though not a perfect one, and a skilful builder with experience working with paints and decals can produce a very nice looking model, though there will be a fiddle in a few places. The kit counts as “vintage” but can be picked up on eBay from time to time for reasonable prices.

Sunday, January 30, 2011

Old Decals Still Work


They do say there’s a finite lifespan to decals, and anyone who has opened a vintage kit can attest to how fragile, faded and yellowed they can become. But decal technology has come a long way and when firms like Microscale came along they used only the best. I have had aftermarket decals perish, but not the good stuff.

The latest milestone on the Italeri Corsair was getting the markings on. I had meant to do Guy Bordelon’s plane but Italeri got the famous blue (substituting for white to ‘tone down’ the visibility for a nightfighter unit during the Korean war) too vivid. I have Superscale’s better version but before I was able to locate them I decided to go with the standard marking option in the kit, VMF(N)-513. I had applied Microscale Satin over the Tamiya XF-17 paintwork, resulting in a nice, smooth lustre, and I began on the underside for caution’s sake. The kit decals were very thin, very fragile, and the whites were translucent… Not the best, but there are always options.

Out came the big box which stores decals, most of them Superscale. The “Marines” title under the wing was sourced from sheet 72-20, and the non-backgrounded national insignia, with their separately printed red bars, from 72-12. These days, the range is way above a thousand sheets and still counting, and it must be over a decade since Krasel Industries announced they would no longer be reprinting their old releases. These two sheets date from the early 1970s and may have been printed no later than the mid-90s, so I had to wonder at first how they might perform.

They have been stored away from light and pressed firmly in their packets away from air, reasonably cool and always completely dry, and these conditions seem to be acceptable, because they worked fine. Superscales are incredibly thin and that makes them inherently fragile, these tore two or three times, but were coaxed into place with the standard Microscale system chemistry. The model was given a careful wash with a brush dipped in clean water and swabbed with a tissue to remove dried chemistry, which will otherwise show up instantly and indelibly as dull tidemarks under clear coats, then another coat of satin was applied to seal everything up.

Keep a thing twenty years and you’ll find a use, they say, and these decals replaced the kit items perfectly, reducing the somewhat translucent items to codes and serials. They do look slightly different, but not so much the casual glance would pick up the problem.

I’m glad these decals work so well after such a long time ‘on standby,’ as it were. My decal collection is considerable and I look forward to finally having the chance to use it properly, building many colourful and spectacular subjects in future.

Saturday, January 1, 2011

Product Review: Microscale Satin


Sometimes a product is under your nose and you don’t realise just how good it is.

The Microscale finishing system has been around since the 1970s and it’s hard to think where the hobby would be without the products churned out by Microscale and Superscale. But the clear coats they make, water-based acrylics in those no-nonsense plastic bottles, are something of a minor miracle. I’ve experimented with clears before and been largely disappointed: orangepeel finish, flats that are anything but flat, uncooperative airbrushing, not to mention the spectre of a terrific build being spoiled by a clearcoat crazing or going misty, which really renders the clear a dubious case of gilding the lily. But this was something else...

From time to time you have to experiment and working with Hobbycraft’s Avia S-199 kit was just such a build (article forthcoming). One major innovation of this project was the decision to clearcoat over flat paints rather than mixing gloss into the paint as I have previously. While this worked perfectly in enamels, in acrylics I found bright spots in the paint as if specks of clear gloss had failed to disperse evenly into the mixture. Thus the next step, try clear again.

Microscale’s clears are a joy to use. I have yet to give their flat and gloss a whirl (I have heard their flat will never generate a true flat), and in a sense satin was the friendliest possible experiment: I was trying for neither a dead flat nor a high gloss, but the perfect compromise between them, and this product delivered beautifully.

The liquid is milky in the bottle but dries crystal clear. Cleanup is with water, and I thinned the fluid for spraying with the same, by 50% or maybe a little more. It was extremely forgiving to work with, drying so quickly on the model that you can literally blow it dry with your breath as you watch. At the same time there is absolutely no tendency to tip-dry in the airbrush, which is amazing. You can slightly lift the sheen with successive coats, but not by much, the integrity of the lustre holds good.


Above, the Avia is seen after the sealant coat. The paint was sealed with an initial two coats, applied lightly, before the decals went on. Then the panel lines were accented with Promodeller wash, and the whole was sealed with another coat of Micro Satin. The sheen is even and attractive over the decals, and the panel wash, while not very contrasty the moment it was dry, jumped out into sharp relief with the wetting effect of the clear.


Decal carrier film largely disappears, indeed this is what these finishes were developed for, and combined with the Micro Set and Micro Sol decal solutions, is a straightforward means to quality decal work that should last a long, long time.

I have used a lot of this product previously in professional art, working with brushes to apply heavy protective coats to collectibles; put on in those quantities the finish is brighter, closer to gloss but not yet there.

The handy 1oz bottles hold enough for a dozen models or more, and at US$3.00 each are excellent value. I bought this one in Australia, but as a non-solvent based product it can be shipped by air along with most Microscale products – see them all at:

Microscale Industries

Saturday, October 2, 2010

Smart Save on a Dodgy Decal


I was decalling along nicely on my new Focke-Wulf when I had a rare faux pas on one item, the green dash for the port side. I left it to soak too long and the glue, fairly resilient in the first minute or two, pretty much dissolved away so that when the decal was applied, it barely stuck and would rather curl up as it dried out.

What to do? I could paint it, maybe, but I didn't fancy another foray into paint at this stage. I remembered a few saves involving white glue, I did something with a decal many years ago, but I had no white glue to hand. The decal was drying, crisping on the model as I watched, so what did I have close by that would do the job?

I quickly rummaged in my drawers and found Micro Krystal Klear, a PVA derivative meant for attaching canopies without crazing the plastic, or making windows by exploiting the glue's surface tension. The bottle was new, rarely, if ever, opened...

I dipped a fine brush in the stuff and laid in a bead under the up-curled edges of the decal. Then I smoothed it down with the brush rinsed and wetted with water, which squeezed out excess glue and washed it away. Wallah... Couldn't be easier. The decal laid down at once and never moved again, and the glue was invisible against the surface, whatever residue was left.

The moral of this story (besides remembering your decals when they're soaking) is always have a well-stocked supply drawer, and even if it takes years to find a use for a product, rest assured it'll turn up eventually.

Now, on with those decals...

Saturday, January 30, 2010

Product Review: MicroScale Trimfilm (and how I don’t seem to have the knack…)


 I’ve used MicroScale Industries products for many years and have the greatest respect for the firm. Established in 1933, they’ve been serving the modelling community even longer than Kalmbach Publishing, and their decals are legendary. In the days before everyone and his uncle was churning out decals through computerised imaging systems, Krasel Industries was the big guy on the block, and when they split into MicroScale and SuperScale, many years ago, it was double the bang for your buck, one firm catering to railroaders and others, the other to the burgeoning military enthusiast marketplace. First of all, I would like to say that I have over 400 sheets of SuperScale decals in my collection, and know their quality, plus seven of MicroScale’s finishing products which I use with confidence. So why am I complaining about Trimfilm? Trimfilm was a great idea. Solid colour sheets, and sheets of generic designs, stripes, checkerboards, in a variety of colours and gauges, a mix-and-match solution for a thousand different graphical challenges. Add to these a wide range of typestyle sheets, fonts, sizes and colours, and you have a resource to rustle up detailing at the drop of a hat. That’s the theory: what about practise? Maybe practice is what I need, because I can’t get the stuff to cooperate. I tried using Trimfilm on an SF scratchbuild or two, e.g., the bold red stripes around the rear fuselage of the MEV from Thunderbirds Are Go, and found to my frustration that the half-inch red stripe material had no intention of cooperating. The thinness, so valuable in getting small decals to conform to surface contours, made the material so fragile that it shattered if I breathed on it. It tended to break up while merely detaching from the backing paper, was quite impossible to move effectively once it was on the surface, and grabbed almost at once in any case, drying decidedly lumpy over a surface wet-polished smooth. I tried several times to get the material to do what I wanted it to, then gave up and sprayed the stripes instead. Perhaps I had hold of a defective sheet, I thought, and tried other sheets and other gauges. The red stripe around the MEV is flanked by two finer black stripes and I did these with eighth-inch Trimfilm. The story was the same, and I pieced the lines together from multiple fragments of broken decal, not enjoying the process. When I came to do the wing walkway lines on my scratchbuilt F-116 fighter from Joe-90 I found myself using the same material by necessity, but having no more rewarding an experience. For black lines around the engine nacelles I had far better luck spraying flat black and masking with Tamiya tape, and for some lines circling the nacelles I actually sprayed the tape black and applied it permanently, because the tape will stretch symmetrically across a two-dimensional curve, and decal film essentially will not. This is unfortunate. Perhaps my technique is off, maybe I don’t have a sufficiently gentle touch to use this material: if it behaved like most decals usually do for me it would be great, but it didn’t (which is odd, as I’ve used SuperScale aircraft decals before and had no trouble with them). Maybe I should have reinforced them with Liquid Decal Film to keep them from shattering. I’m still drawn to the range, though, a sort of love-hate relationship. All those pre-made items are creative candy! And the typestyles suggest custom lettering on home-designed projects (though to be fair, custom made decals have made a very effective challenge to the idea of piecing logos together a letter at a time.) For now I’ll say that my Trimfilm collection lies in its box, forlorn and neglected, awaiting either a renewed sense of adventure on my part or the wisdom of those who know how to make it behave. Check out the enormous range at: http://www.microscale.com/

Monday, June 22, 2009

Product Review: Microscale Micro Metal Foil Adhesive


South Australia is slightly over the edge of the world. You can’t get stuff here... I inquired at the biggest hobby shop in town about a polishing kit to develop a glass-like shine on gloss enamels and was told that, while they had heard of them, there was no point stocking them, as nobody (presumably besides myself) would ever buy one in this town. Just the same, Model Master Enamels are going out of stock here at mainstream stores, they’re just not popular enough compared with Humbrol Enamels or Tamiya Acrylics, so the biggest shop in town is not going to restock, and they never had the full range anyway. If you need precise matches to historic colours, you’re off to a specialist stockist...

So I actually had a bit of luck lately when I needed Microscale’s Micro Metal Foil Adhesive. It was the right product for the job, and this time it turned out the shop actually did have in stock what I needed. I call it blind luck, as of all Microscale’s wide range of great finishing products, this was the only one they actually stocked (and no, their nearest competitor has never heard of the range...)

Rant aside, this is a good product! It smells like PVA white glue, looks like it, albeit water-thin, but it grips like PVA never did. And it seems to be water-based, as you can clean up with water until it’s cured, and with paint thinner afterward. It dries pretty quickly, a minute or two and it’s off provided you’re only using a small amount. 


 It’s easy to use. Cut a piece of foil, brush the glue onto the back and wait until the ‘milky’ appearance has gone, then apply it to your model. There’s some slippage time, but if you time it just right it’ll grab pretty quick. Applying it firmly over a smooth surface, you can then burnish the foil to a smooth, gleaming finish. In my case, I was applying crumpled gold foil to a Lunar Module to replicate the gold Mylar thermal insulation of the Descent Stage, so a burnished final appearance was not involved. This was just as well, as I found the glue did not hold very well on the small sticking area of tiny, curved surfaces, so my application did not wrap tightly to the struts. In context it created a suitably bulky, ‘packed’ appearance just like the original, but I found you need to work with larger diameters of tubing to get a firm, tight contact between foil and plastic. 


 Nevertheless, I was impressed. As with every Microscale product I’ve tried (with the exception of Trimfilm, but that’s another story), it works as advertised, is very economical and non-messy. This is a recommended product.


As a water-based formula it’s okay to send through the post (like Talon Acrylics), as US airmail won’t touch so many hobby products any more. That’s another post too...