Tuesday, September 27, 2016

Taming Etch: Take 2


My first “Taming Etch” post was several years ago and featured Trumpeter’s M1126 Stryker APC, with attention on the excellent etch fret supplied with the kit to make up the jerry can racks on the tail end. That was my first structural use of etched brass and I was quite intrigued.

It was inevitable I’d have another go, and when I tackled their AS-90 SPG, back in 2014, I invested in two etch sets from Eduard to dress it up. I didn’t use all of what was on offer but I did use maybe 80% of it, and it took a loooong time to get those fiddly parts cleaned up, bent and attached.

The photos here were taken from an angle to optimise reflection, to get the etched steel to show up against the plastic.


I guess getting into the swing of it is the trick – finding a method that works for you and making it a production-line technique. There are those fancy bending jigs out there, I’m thinking the “Etchmate,” but I doubt I’ll use enough etch to warrant investing in a specialist tool (at a specialist price.) My standby is the traditional one, two single-edge razor blades (Stanely knife blades) used to manipulate and bend on the straight fold lines.

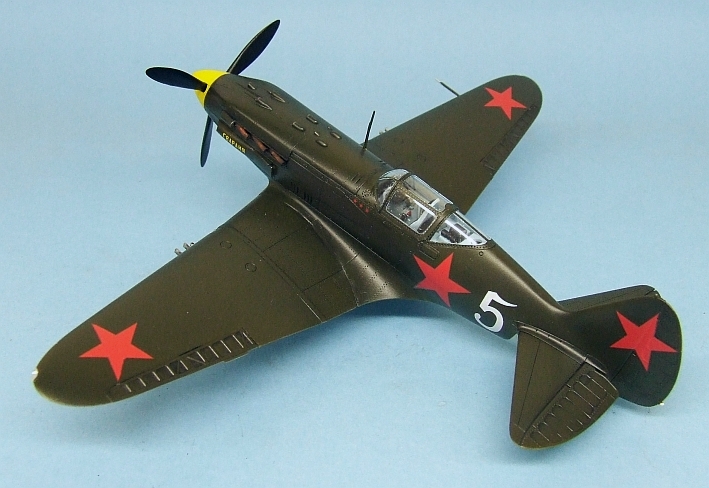
The pic below has nothing to do with etch and is included for curiosity's sake. In my post earlier this year about the Trumpeter MiG-3 kit, I mentioned I had only ever had to use C-clamps to force alignment on two models, and oddly enough both were Trumpeter  well here's the other one!


Well, lots and lots of items were done this way – the tops of the six stowage bins were etched, along with their latches, plus tie-downs and tool holders, the smoke grenade launchers, the stowage unit on the turret roof and a variety of hull fixtures. It was quite impressive to see it going together but – and this is an important but – the moment the paint went on, all the painstaking etched work flushed into the general visual impression of the project and it was as if it never existed. Unless the model is under a good light and viewed with magnification, the work invested in the metal accessories is as good as lost. There is the satisfaction of knowing the details are there and much more accurate than the kit bits, true, but whether that satisfaction is worth the cost of the sets and hours spent installing the parts – such as were willing to yield to my skill level, there were those I was simply not willing to attempt – is another matter.


It’s a different situation when the etch is, say, a grill set. It’s a detail that is likely completely absent from the kit and the easiest of all etched parts to apply. I would never build a Pz.III, Panther or Tiger without etched grills, but whether I would spend the time shaving away plastic and replacing it with folded metal is very much down to my gut feeling at the time. I might get ambitious and give it another go, or I might be impatient to get to the painting stage where I can soft-edge the camo and work up road grime and rust, which is always fun.

By the end of this project there were aspects not addressed, for instance the cargo tie-down straps that go with the stowage cage on the roof, but by that point I simply didn't want to know anything else about etch at that point. Perhaps I'll return to this project at some point, add some stowage in the cage and put the tie-downs in place, maybe do something about the shine on the decals, add some road grime, who knows.


If I was asked my overall impression of photoetched metal parts I would say they are a valuable accessory technology to the industry which is pretty much indispensable for some uses – railings, ladders and radars for ship models, for instance. But perhaps more is made of it than is warranted; that’s an individual call, of course, and if your thing is working with watchmaker’s tools and superglue by the tiny drop, then you’ll be in hog heaven. For myself, I weigh how well I can see the details in the first place against how accurate they may be, and for the most part, when it comes to things like tool clamps on tanks, I go with the plastic. Drybrushed with steel over the basic paintwork, it’s evocative, and less trying to my dexterity and sanity in the process!


Monday, August 29, 2016

Recently Completed: Tamiya Spitfire Vb


Tamiya’s 1:48th  scale Spitfires are old news – highly buildable, friendly, accurate, they vie with Hasegawa for industry standard, though (somewhat infuriatingly) the Big Guy from Shizuoka City didn’t come back to do other marks, just the Mk. I and Mk. V in b and c variants. This left the field open for Hasegawa (the other Big Guy from Shizuoka), ICM from Ukraine and the reconstituted Airfix to mop up the missing marks, a process not yet complete even now. (Off hand, I can think of at least seven marks which achieved production status which have not been kitted to date, though we do have rarities like the short-production HF Mk. VI, and the Mk. XII, first of the Griffon birds.)


I’ve had one of the Tammy Vbs on the shelf for many years, I prepainted the interior RAF grey-green so long ago it was done with Humbrol enamel, and I’m hard-put to remember exactly how long it is since I retired solvent-based paints in the name of brain cell survival. I had a yen for another Spit so pulled this one and whacked her together. The build was smooth and uneventful as you would expect from a Tammy. I didn’t bother with harness, I’m not sure if this means my flirtation with printed etch is at an end or if it depends on my temperament when the time comes – I guess I’ll find out.


The new aspect of this build was the AML vinyl mask set for the camo. I ordered them up last year as they looked pretty good and offered a relief from the tedious business of cutting tape masks for curved, hard demarcations. They are thin, backed with a low-tack adhesive, and free off from their backing sheet easily. In only one place did they lift paint, and though they took some pushing and pulling to try to line them up, they were generally very good. Here and there, the errors in location from one part to another compounded so that some particular part did not fit at all and was replaced with a swathe of Gunze masking fluid, but that was perfectly okay. The pic above shows the masks partially removed, the one below the result with the paintwork complete.


I used the Tamiya Acrylics late-war RAF matches (XF-81, -82 and -83), sealed with Micro Satin and panel lines accented and sealed with Florey washes. If there was a real challenge with this kit it was the decals, and while many builders report poor experiences with Tamiya decals I would have to say that was not the reason. Feeling somewhat mistrusting of the kit decal sheet, I considered replacing them with Techmod stencils, Eagle Strike roundels and Fantasy Printshop codes and serials. However…


It turned out the codes were the wrong size – I have the sheet of 18” letters and numbers, and the aircraft I was modelling had heavier 24” lettering. This compelled me to at least try the kit sheet and it turned out it worked perfectly, snugging into panel lines nicely. The kit decals feature a fairly good suite of stencil data but far from complete and I was tempted to busy-up the bird with the Techmod data, but… Photos of the original aircraft show it to have featured comparatively little stencil data anyway, plus the Techmod stencils are so fine I can barely see them. I concluded there was no need to go to the extent us using them for this project. Same with the roundels – the kit items were acceptably accurate in colour and laid down fine, though they took a lot of solvent to conform to surface details. The hardest part of any Spit is the underside roundels which lie over surface blisters and I have yet to have them be anything but a compromise.


The yellow leading edges are also supplied as decals, much less work than masking, but again the task of getting them to snug down is a long one. I spent three days on the decals of this kit, before finally being able to gently wash the surface to remove dried setting solutions and lay down some Micro Flat for the final finish.

I’m happy with the finished model, though I’m the first to admit I gaffed in a few places. I aligned the canopy incorrectly and didn’t notice it until the first colour went on – blame my glasses. There are stiffening ribs on the wings incorrect for the Vb and the instructions tell you to cut them away, though with other projections nearby on the wing I was not confident to remove them without making a mess of the job, so I accepted the inaccuracy. I got the wing walk stripes in the wrong place by about their own width, and the fuselage roundels should be aligned on each other – to get the codes set up at visually acceptable spacing, that turned out to be too much to ask. Other than that, I’m happy with this beast. She’s presented as early service days rather than the heavy chipping and wear seen in photos, and though the paintwork is preshaded I don’t go in for the “patchwork quilt” fading effect so popular these days – not that I wouldn’t if I could, but my AB skills are seriously not up to it!


One other point, I swear the canopy was crystal clear and flawless when it went on, but it was patchy and striated on the inside when the masking came off. I can only assume it’s the fumes from the adhesive. The problem is, the clear parts cement sold by Testors is essentially just white glue and I swear spit would have more grab. The amount of force exerted in masking and unmasking the canopy would surely overcome it. My option for the future to avoid this problem is to mask and paint the canopy off the model, and attach with the weak-as-water-glue afterward. I certainly must do something, as this element is an ongoing disappointment.

So there she is, a Tamiya classic, a generally fun build and a nice addition to the display case, canopy notwithstanding.


Saturday, August 20, 2016

Building Bigger


As I’ve ruefully mentioned before on this blog, some modellers build bigger as they get older simply because they can’t see the small ones anymore. That’s very true for me, yet I haven’t built large scale planes since I was a kid – in fact I’ve only done one 1:32 aircraft in modern times. My previous was 34 years ago!

In 2014 I tackled Hasegawa’s big scale Fw 190 A-8 and had a great deal of fun with it. There were one or two hassles – the fit of the engine cowling to the fuselage left a lot to be desired and was a tough contour to fill and sand but that was about the only structural difficulty. The decal sheet was a let-down – I had selected Hans Dortenmann’s Red 1 and as with so many Luftwaffe aircraft the markings and the camouflage scheme particulars go hand in hand. It was bad news when it turned out the sheet was unserviceable, as the paintwork was fully finished. Patching the markings together from AM sheets would have been a $60 job (three sheets required). Fortunately a friend in Europe had the same kit and was doing it in different markings and sent me his sheet, which worked perfectly.


It’s a big, beautiful bird, and at this scale the problems of airbrush mottling are minimised – overspray can still be an issue but the battle for fineness seems less acute. The cockpit was easy to detail, and the 1:32 etched harness was incredibly realistic. The outer pair of canon barrels is missing – by the time I was done I was more than slightly browned off with Hasegawa’s engineering choice to simply scab them onto the exterior as optional bits, as my confidence to get them lined up in both axes while glue dried was in negative numbers, so she’s a slightly odd-looking A-8 here. Better that than make a mess after so much work had been invested…

I didn’t weather this one heavily – weathering is a skill mated the scale and one must learn to use a heavier hand as scale increases. I’m not comfortable with really laying on filth so this bird is in very well-maintained condition – which they must have been at least some of the time.


So why so few models in this scale? Simple, somewhere to put them. You can store four, even six, 1:72nd scale models in the same area as the “footprint” of a 1:32nd scale project, and you very quickly fill display cases with the big guys. I have plenty of models in this scale and would like plenty more, but until the day comes I have some sort of storage designed to receive them – shelves of the appropriate depth and at a spacing which does not waste cubic volume with empty air – I fear I’ll have to leave them where they are, buried deep in the stash.

There’s also a lot of work in a big model, even if it’s structurally no more complicated. It certainly uses a lot more paint, you’re aware of your running supplies being used more quickly. But that’s par for the course, I can only imagine the investment in time and materials the ship guys go to when they’re building the new Trumpeter 1:200th scale battleships. Now there’s a project to conjure with – it gives a whole new meaning to the term “big scale.” It is to ships what 1:16th scale is to armour or 1:24th scale to planes.

Hmmm, that reminds me, I have an Airfix 1:24th scale Harrier hiding away in the stash. After more than forty years since the basic tooling came out it might be high time it got the full treatment… If only I had somewhere to put it!


Wednesday, June 29, 2016

The Curse of Fit


I was saving the Trumpeter MiG-3 kit so as to enjoy it to the full – my first Trumpy WWII fighter in 1:48th scale, and going by reviews I fully expected the nice mouldings in the box and a reasonable assembly. Reviewers noted the fit around the wing root intakes was fiddly and a bit challenging, but I paid little notice to this, as the older ICM kit was the one rated as difficult.

Hmmm… I can find no copyright date but something tells me it’s been around for a while, and despite the lovely surface detail and excellent fit of much of the kit, the wing roots and lower forward fuselage can only be described as appalling. The parts simply do not line up, and the quite rigid plastic resists deformation to force a line-up. We are talking serious gaps and steps.


What is there to do when alignment fails, other than get out the tools? My rattail files got a serious workout, as did the technique of adzing with the side of a knife blade to thin down plastic standing proud of its neighbouring parts, and this was one of the few kits I have ever used a C-clamp on, to force parts into alignment. Oddly enough, the first time was also a Trumpeter kit, their AS-90 SP gun, a subject I built a couple of years ago and have yet to blog about.


Superglue usually does the trick, but overnight curing was the go this time, preceded and followed by filing and adzing, then putty, as much as needed, in as many rounds as necessary, to appreciably smooth the contours. The loss of surface detail was inevitable and the price of fixing the gaps. In the picture above you see all the masking work, in both tape and fluid, plus a plasticard shim strengthening the lower rear fuselage, and which will be obscured by the cooling scoop.

It’s a shame the parts lined up as poorly as they did as the rest of the kit of very appealing indeed, and the finished item looks great on the shelf. I had meant to pick up a few more of this item but I find myself thinking I’d better build the ICM from my stash first and make a judgement call on whose engineering is really the most difficult.


A few other points of note about this kit. The transparencies looked great but reacted to the solvents and glues around them by developing striations on the inside. They were clear when they went on, then ceased to be… Nothing to be done about that. The decals behaved very well but had a patchy topcoat – dull and glossy in spots. My standard clear coats coped with this well, though.

Yes, that’s US olive drab in the photos. The aircraft I selected from the marking options was given by Trumpeter as being in this shade, and I find it perfectly reasonable that amongst the millions of tons of supplies which went to Russia under Lend Lease there was likely many thousands of gallons of US-made camouflage paint for maintenance of the tanks and planes they sent: some of it may very well have made its way onto Soviet-built hardware as general availability dictated. Also, I had Tamiya XF-62 on hand and it went on very nicely. Of course, I was finished before I remembered I should have added 20% XF-60 Dark Yellow to lighten it for a scale effect, which would have also allowed the panel wash some contrast… The underside blue is a homebrew, the shade based on the apparent hue in photographs of restored MiGs. The mix was XF-2 White plus XF-23 Light Blue plus X-14 Sky Blue at a ratio of 10:5:1. Micro Satin provided the base for panel wash and decals, and Micro Flat brought the sheen down a bit for the final tone.


I left off the radio wire: the mast is so fragile it’s a wonder it stands upright all by itself, there is no way it would take the tension of an elastic thread without conspicuously bending.

I used the Eduard mask set and for once they had no inclination to pull the paint off as they were removed. I got some bleed-under from the interior colour but not the exterior – most odd, I’ve not had this happen before. Another interesting way in which a kit can surprise you – I’m at a loss to know how landing gear with a keyed fit – square peg to square hole –  can slot home with firm precision on one leg and on the other be so loose as to literally go round in circles; or how parts superglued in place can simply fall off. One wheel so tight on its shaft it needs no glue, the other so loose it falls off even with glue… The receiver hole for the propshaft about a millimetre larger than the shaft, but no retaining device behind it… A gunsight in clear plastic with the sprue gate on the attachment process so that when you attempt to clean up the gate you snap off the process and thus have no way to mount it unless you are good at millimetre-scale scratch building. (There is no gunsight in this bird…)


Formation lights in clear plastic with no positive lock-ins, just a curved surface to sit back against a matching cutaway in the wing, with the sprue gate on the inner surface of a 3mm component. This latter makes me want to sit the kit’s designer down with the kit and a few basic tools and say “you clean up that sprue gate and fit the part, if you’re so (expletive deleted) clever!” Seriously, you could take electron micrographs of these bits. With a watchmaker’s optivisor I can see it, but I can’t manipulate it, and when applying enough force to clean up one of the parts, it vanished forever across the workbench, explaining the lack of a light lens on the starboard wingtip.

These are the kind of discrepancies the big guys worked out long ago, and this kit must be old enough for Trumpeter to have still been lower on the learning curve. In all fairness, I would like to build one of their newer planes and see how it compares. I, um, have several!


Thursday, April 28, 2016

Old Classics and Elbow Grease


We’ve all done it, I’m sure – spotted a bargain and gone for it, only to realise that saving a few bob can lay you in for a lot of work.

When Zvezda reboxed Dragon’s Pz. III/F I was more or less ready for a struggle, but the reviews mentioned the firm had tooled out new vinyl tracks so I would not be contending with L&Ls, and when a Moscow trader offered it for a song I shot off an order. In a very reasonable time a package arrived from Russia and I was able to check out the state of this particular art.

Well… I discovered recently that this kit was not actually a Dragon tool, but one of the Gunze “Hi-Tech” series from the late 80s, and to say the moulds are showing their age is an understatement. Separation lines, thickening and softening – maybe the tooling was cut in brass, which tends to blur with use. And flash, loads of flash. Even wheels with axle holes heavily flashed over, requiring drilling out… Gunze were big on sprue-gates, suggesting they were working with low-pressure moulding. To give some idea: including the spare wheels, there are 112 sprue gates to be cut and cleaned up on the roadwheels alone!


Fit is middling poor (I think pegs that go correctly into holes at the first try can be counted on one hand), and almost every part needs not just cleanup but actual modification with a file to engage even half-way with its fellows. Gunze seem to have been going the Dragon route in persistently moulding separately a plethora of small parts. Every leaf of the towing lugs, fore and aft, is a separate part, and none of them fit worth a damn. Superglue to the rescue, as ever. Fortunately the soft-ish grey styrene works quickly and responds very well to all glues, which is just as well, as it also breaks under much tension at all – ask me how I know...

The engine screens are poorly moulded plastic parts, so I replaced them with Aber brass, which fits close enough to do. Likewise the main gun barrel was so imprecise that I did not even attempt to assemble it, but ordered up an RB turned steel replacement. It was meant for a different kit and I had to drill out an aperture through four thicknesses of plastic right back into the turret to mount it, but there was no real difficulty in that, and it looks the part. The turret ring has no lock-in lugs to engage the cutaways in the receiver ring of the upper hull, but it does have a small pin which prevents the turret sitting down flush with the hull – I cut it off, of course.


By the time construction was done, the model looked acceptably like a Panzer III. This would be my first Panzer Grey paintjob, and I went the mixed route, the classic recommendation of Tamiya XF-24 Grey, and XF-8 Blue to provide the cool hue missing from XF-63 which they pack as Panzer Grey. Maestro Tony Greenland recommends adding “20% blue” to the grey, but whether that refers to a ratio of 1:4 or 1:5 is a mystery – it can be read either way. I went with 1:5, being conservative as to the hue. One thing I was sure of, I did not want to go the way of the modern trend toward a blue-grey so washed out and faded it looks like a pair of cheap jeans. Some folks are using Tamiya XF-23 Blue-Grey as their base colour and, at least to me, this cannot be right – the German name for the colour was schwartzgrau, “black-grey.” It is by definition a dark colour.

I did, however, use XF-23 for the fade coat. I always intended to do a full modulation job, so for the paler value I used a 5% solution of the pale blue-grey and misted it onto the upper surfaces. With that out of the way I could concentrate on the wash and drybrush phase, working with oils in enamel thinner as always to streak on dirt and rust (dark brown), condensation streaks (white); then unthinned oils for dirt spots and old rust (black and brown) as well as new rust (orange) and profiling all edges in pale grey (a mix of Payne’s Grey and white). Bare metal was drybrushed in silver enamel. The wheels were completed using the stencil method, which allows a distinct difference in shade between the tyre rubber and the grey hubs, though the running gear and lower hull all received a going over with a 5% solution of brown to suggest road grime, built up gradually, and this pretty much destroyed the visible difference between tyres and hubs.


Zvezda’s soft vinyl tracks have raised ejector pin marks all over them which are impossible to clean up. I shrugged and went with it, after all, if memory serves, I only gave $12 for this kit! The material does not hold paint well, acrylic flakes off with minimal abrasion, so the idea is to handle them as little as possible. In their favour, the detail moulding is very good indeed, with fine apertures clean through the tracks between the links, something I’ve not seen from vinyls before. Mounting the running gear is a process of logic, as nothing is meant to roll or turn, there are no retaining caps or whatever, so feeding the tracks around the wheels last, as I typically do with Tamiya flexibles is not an option. Forcing them past fixed wheels would strip the paint, so I joined the tracks off the model and got the drives and idlers inside the run, so as to attach them with superglue in one go, then ease the tracks to add each roadwheel separately, and finally the idlers at the top. Fiddly, but okay… Surprisingly, once all axle holes were drilled and filed out to fit at all, everything slipped into place readily and stayed put without glue – I did a dry run and the tension of the tracks, which were just the right length for a snug fit, held everything in place. Only the return rollers were glued in, everything else actually turns!


The decals are Zvezda standard – very good indeed. They free off in twenty seconds in cold water and are very thin, snugging into the surface without complaint, and their very flat finish blends them into the paintwork without need of clear coats. Applying the decals was the simplest part of the whole project.


I now have a schwartzgrau Pz III F in markings for the 2nd Panzer Division, in the Barbarossa era. It sits between Tamiya kits and looks very good on the shelf. Maybe I overdid the pigment work – too much rust? The beauty is, I can wash it off if it starts to bug me, and redo it more subtly. But for now, I think it looks quite the part, and I certainly got my money’s worth with this challenging project that resurrects some classic moulds for another airing.


Saturday, February 27, 2016

Acknowledging Your Limitations


It’s a theme I’ve visited before, maybe too often, but I guess the dawn of 2016 is something of an epiphany for me. The last thing I want this blog to become is an “old modeller’s whining space,” and I’m the first to admit that there’s been an element of that in a fair few posts, so this one is all about acknowledging where your limitations fall and agreeing to play by those rules.

In the past I would probably have stressed a lot about not being able to install the tow cables on the Brummbar I mentioned back in January. This time I’m not stressing – I know that the way it is engineered it is beyond my skills, and there is no mileage in fighting that fact. Similarly, Dragon’s edition of the Trimaster Me 262 B1a/U1, quite apart from the fight-you-all-the-way fit of the model, is an exercise in how fiddly Dragon could make the etched accessories. It’s great that there are tiny levers in the cockpit, and even grab handles inside the canopy, but when your eyesight will barely even resolve those parts with magnification, you need to agree that working with them is an unfair expectation of yourself, and try not to place so much value on it.

That said, I have to wonder if Japanese engineers are entirely serious when they design these things. Are they making kits for the virtuoso hobbyist who can tie knots with tweezers and control objects smaller than the capillary action horizon of superglue? If they are, then they must just be having a laugh at the other 99%. That’s why I love Tamiya, their bedrock policy of make it buildable for the average-skills customer. Tamiya outsells Dragon in my stash by ten or twenty to one, and it’s really no mystery as to why.

So when faced with the Me 262 canopy, having put the job off as long as I could, I examined the fit of the instrument panel that goes inside the canopy arch and found it had no location devices. It’s meant to be glued in directly, then? To a transparency? Requiring you to guide that tiny, irregularly shaped part to a solid, precisely aligned contact with the clear part, and hold it there until the glue had set? No sweat, sarge, my 53-year old tremblers can cope with that no bother… Not. So the instrument panel part and the etched grab handles do not feature on this model, just like the reinforced armour glass part inside the windscreen, and for the same reason – how to you attach it without amateurishly marring the oh-so-delicate clear parts irreparably in the process?

Enough is enough, this thing has a date with the airbrush – right after I finagle the fit of the windshield which is made obtuse by the offset location of the gunsight on this type, and further so by the compromised fit of the fuselage halves in the first place. Okay, okay, I said no more whining!

But you get my point. Eventually we build models big enough to actually see their finest details, and we gravitate to the brands that best compliment our dexterity. There is no denying that there are brilliant craftspersons out there who do the most delicate and wonderful work, and I envy then, I truly do, but if I’m going to continue to derive the same pleasure from the hobby I always have, I must know where to draw the line, and drop those microscopic detail parts back in the box. 1:32 and 1:24 are starting to look real attractive…

Thursday, January 7, 2016

The Three Dimensional Canvas Concept


Beginners sometimes look at the sophisticated armour finishes of the masters – say the so-called “Spanish school” of weathering – and wonder how they will ever get there. I certainly did. I think my first exposure to the technicalities of armour finishing was a “Showcase” spread in FineScale Modeler, an issue from 1989, featuring Francois Verlinden’s build of Tamiya’s original short-turret M1 Abrams from 1982. He built it with a simple diorama base, of course, and threw in some figures and a map table, the vehicle was depicted on a firing range as I recall. But what struck me the most was his discussion of finishing techniques – concepts such as capillary effect drawing washes around 3D detail, and drybrushing to profile edges in complimentary colours suggesting light catching the vertexes, or bare metal.

That was a long time ago, and a suite of skills develops naturally, but those were the fundamental techniques that have formed the core of my skill base to this day. In working up a Tamiya Sherman (their original tooling from the early 80s, 35-122, the old classic) I was struck by, not just what a simple and satisfying build it was, but what a “canvas” it presented for the artistic side of the hobby.


The kit went together without arguments, as you expect from Tamiya of pretty much any vintage, but when it came time to hit the paint shop, it became clear there were two complete paintjobs to be done. The first was entirely by airbrush, starting with a basecoat of Tamiya XF-62 Olive Drab, lightened for scale effect with the addition of 20% XF-60 Dark Yellow. This was then treated with fade and shade coats, the latter being XF-62 darkened with a little black to create the shadows on the underside and under the sponsons, and the former being the base mix plus white and thinned to a greater degree than normal so as to be clouded on in areas where the sun would likely have faded the paint.
                                                                                                    
With this phase complete the model was set aside for several months while other projects were underway, the reason being that I did not fancy the old Tamiya decal sheet. I invested in Archer rubdown decals for the national insignia and the irony is that when I came to use them I could not get the hang of applying rubdowns to a three dimensional surface, and ended up using the kit decals anyway, which, as it happened, worked perfectly. But that’s another story…


The second entire paintjob was applied in oils. This constitutes oil wash in brown, black, ochre, white and orange to create streaking where the rain has caused rust to mark the surface in vertical lines, dirt has liquified and run downward, and pale streaks have appeared due to who-knows-what. This was extensive, over almost the whole surface – areas were pre-wetted with Testors airbrush thinner, a technique recommended by “Panzer” Mroshko, one of the greats of the field. Whenever streaking work dried with tidemarks, the panel concerned, even if it was the entire flank of the vehicle, was rewetted with thinner to eliminate the “edges.” The markings selected were for a tank involved in the Battle of Berlin in April 1945, so it was likely to have battled through a lot of wet weather after the terrible winter of ’44-’45. Photographs of the vehicle in question show an advanced case of filth, and the idea was to reproduce the feel, if not the exact detail, of that.

After the streaking operation came the drybrushing – a mixed pale green was used to profile all edges, making them stand out to the eye. Then came the chipping, dark brown for old rust at the head of those streaks, plus brown and black for spots of dirt all over the vehicle. The final round of drybrushing was bare metal silver, the only enamel paint on the model.


It may have been the separation in time that created the feel, but it seemed like two distinct painting tasks, two different suites of skills brought to bare; when one was over it was set aside in favour of the other. Oil was drybrushed over the decals to match the rust streaks, making it seem the markings were painted on and the rusting process applied equally to all painted areas of the hull. Very little was done with powder pigments, just some carbon black and rust under the tail end.

When the model was well along in this process it seemed, in comparison to the relatively bland basic paintjob, to have come alive, taken on character, and it was no exaggeration to say that the model, once the basic scheme is down, becomes a three-dimensional canvas upon which the artist replaces the engineer, and the skills one learned with brushes long ago return to the fore.


This was a very satisfying project, and I can say with certainty that I will build a couple more of these kits, despite their age. There are a great many Sherman kits these days, engineered to far higher standard (and a far greater cost), but this certainly looks like a Sherman, and the overall pleasure of the process was exemplary.


With the exception of the tracks, that is… The old vinyls had plenty of details but were simply too long. When test-fitted, they flopped badly, so the only option was to shorten them. Many will be throwing up their hands and saying “aftermarket is better!” and they’d be right, but this is a T54E1 track and the only company that makes this one I believe is Bronco, and reviewers point out that their track does not fit the Tamiya sprockets unless the latter are widened with shims at the assembly stage. I was not about to buy AM sprockets as well, unless I absolutely had to (assuming they are also made), so first I tried slicing out two links carefully with a fresh blade and rejoining the tracks with superglue and thread. The thread probably handled most of the tension, being introduced through drill holes and the knots themselves glued hard. The finished tension it’s sure evocative of American “live track” and with the flaky, damaged paint touched up, the eye did not pick the intervention.


Saturday, January 2, 2016

Breaking Your Dragon Virginity – Take Two


Several years ago I posted a piece on my first Dragon kit, an Imperial (?) or 39/45 Series StuG III/F.8. I thought I was really going to break it that time, but after a fair bit of work that kit was part of a batch sold on…

I have in fact built some early Dragon kits reissued by Zvezda, their T-72B w/ERA and BTR-70 in Afghanistan trim, so I suppose I’ve not been a Dragon virgin in many years, but for a more sophisticated, more up-to-date outing, and perhaps one actually in a Dragon box, I have so far no real track record.


I broke that recently, with Dragon’s #6500, Brummbar Mid-Production w/Zimmerit. I have often observed that Dragon’s operating philosophy is never use one part if five will do, and this one is no exception, but construction was surprisingly straight forward. The notorious omissions and inaccuracies in the plans were not much in evidence, but the sheer complexity of what’s happening on paper means you can miss things. The driver’s periscope, for instance, can only be installed, pre-masked, from underneath, so, obviously, you need to have done this before installing the compartment to the main superstructure or the superstructure to the hull. If this was a Tamiya kit there would be a cartoon alongside the step with their sergeant-major character pointing at the parts and informing you of the assembly sequence…  Ah well, mine is shown with the periscope “in the down position,” right…

Moulding was crisp and sharp, plastic responded well to cements of various types, and as usual with Dragon kits, you get copious bits for your spares box. The decals were a nice surprise, very thin, quite matt in finish (obviating the need to mess about with clear coats if you prefer a flat finish straight from the airbrush), they freed off readily and snugged down over zimmerit with Microscale chemistry – pulling into the roughness even before the red label solution was applied. Some crosses were a tad out of register, though. You also get etched schurtzen, which, somewhat perversely, in this case might just end up applied to Stugs and the older Brummbar by Tamiya. Woven wire for the tow cables is another very nice touch, however instructions as to exactly how you’re meant to install the cable holders, when there is perhaps 1.5mm clearance under the intake assembly, a 1mm attachment hole for glue to grip on and the wire is spring steel that does not readily accept a kink, are another matter. After a great deal of fiddling and superglue I threw the cables back in the box – there is such a thing as overthinking the details.


On the downside, there were overcomplicated assembly sequences and extreme “fiddlyness” resulting in many parts being simply knocked off as one tried to pursue later assemblies. If they even had sturdier attachment points it would help, but at times Dragon seems to rely on “superglue and prayer” like some limited-run or amateur outfits, which is hardly reasonable. There are instances of pegs with no holes to go into… The jack block, for instance, and one of the tools. When Hobbycraft does this they come in for a tongue-lashing, and I see no reason why Dragon should be immune.

Overall, I think what took so long for me to finish this one were the etched parts (what a surprise) and of course the “Dragon Styrene” tracks… Much has been written about them and all of it is true. The material captures detail wonderfully, accepts paint beautifully and bonds tightly with superglue or other styrene cements, but… They’re too long. Almost everyone bemoaning DS tracks online says the same thing. It goes back to my post some years ago, why oh why do kit companies have such dire problems with tracks? If it’s not Trumpeter with their three-links-short tracks for the Type 89 family, it’s Tamiya’s inexplicably saggy yinyls for their Sherman… Perhaps the DS tracks are too long so you can distort them to create German dead-track sag – a nice theory, except their DS Sherman (live) tracks are way too long as well. The number of links on the Brummbar tracks was correct, 98 per side, but they are two or three links long to sit snugly (meaning a fresh, pre-stretched track, which incidentally is what is depicted in both the box art and the instructions). Of course, you don’t know any of this until you come to install them almost at the very end of the project, meaning everything is already painted and they’re joined up, so fancy rigging to force sag was not planned for from the get-go. Maybe I should be more cynical where tracks are concerned, expect problems, but for the price Dragon charges and its fancy-schmancy DS patented stuff, and the sweet detail they capture, you’re lulled by all the big-buck quality and actually expect them to just tension neatly into place.


No such luck. As I’ve said before, there’s a bone in my head that will not spend more for an accessory than for the kit itself, so Friuls were not an option. I’ll need to be a lot richer and have a lot more time on my hands before I go that road. Bronco’s and AFV Club’s styrene indie/workable tracks look good but are so fragile they fall apart if you breathe on them, and the fact is I have other projects to get on with, this one has had its fiddling time already. My solution was to cut the tracks apart, excise two or three links (two was plenty) and join them up again with superglue, plus drill through adjacent links and tightly bind them with black thread. I’ve done this before, on a project many years ago, so I know it works, I just hate the necessity of doing so; the fact is the DS material bonds so well that the track rejoined surprisingly well. It doesn’t cut so cleanly, so a sharp blade is recommended, and I hid the join up under the sponsons so the thread was unlikely to be seen by any who didn’t already know it was there. If you were so inclined, you could hide such a join with a dollop of mud. The real irony is that while the port side track needed shortening, the starboard was close enough to get by with and just ignore the slackness at the idler for the moment. If it gets to me, I’ll take out a link at a later date. In future I know to shorten the four-link mating tongues by two links, which will be much simpler and neater. Yes, I guess that means I’ll be building more Dragons and using more DS tracks…


The sprues for the individual spare track links did not seem to be in the box so I used links from an Academy set; they actually needed more cleanup than they got, it was not until I enlarged photographs that I saw the ejector pin marks… Blame eyesight for that one!

The model certainly looks good on the shelf, despite having shed bits of etch and been repaired several times as handling messed up over-fragile details. I used the sprayed-on road grime technique again and it has a convincing visual “feel” to my eye. It was a good kit to build, a challenge in its own way, but most kits are in one sense or another, and I’m very happy to say that my Dragon cherry has finally been popped.