Showing posts with label ProModeller. Show all posts

Wednesday, December 25, 2024

Tamiya Leopard 1A4: Like Going Home


I’ve neglected this blog for far too long, and have been so busy in recent years with my writing career that modelling has taken a back seat. I've completed only two models this year (though worked on at least five others), the first being the Dragon 1:72 Jagdtiger I posted about six months ago. Recently I got to build one that’s been on my to-do list for many years, Tamiya’s 1979 35th scale tooling of the West German Leopard 1A4 (35112).

The Leopard 1 is still in service in 2025 with some sixteen armies around the world, with new upgrades on offer from many firms, so it’s far from a period piece, despite Australia having retired our Leos in favour of reconditioned M1A1s (not a universally popular decision) many years ago.

Okay, Meng’s much newer kit is far superior, but it’s also correspondingly expensive, and I do enjoy vintage Tamiya for its own sake. The kit is straight-forward though there are one or two bits that can bite you if you’re unwary. Construction follows the standard Tamaya pattern, running gear being suggested to be assembled first, though the wheels form a subset that can be built and detailed separately from the rest and added late in the process if you work that way—I do, as it happens. Upper and lower hulls are large single piece toolings, dressed with smaller parts.


The drive wheels housings are compromised by the kit sharing tooling with the popular early motorised version. I say compromised, they are inherently weak and need to take a lot of force when the tracks are joined and tension thus comes into play. This has never been a problem, however, with superglue making a suitably strong bond.

When I began this project it felt like going home. Muscle memory would just about build it, especially as I built the Flakpanzer Gepard AA tank version back in the 90s, about my third armour kit ever. Construction proceeded without much difficulty, though there were details I wish I'd spotted. The co-axial MG in the turret is not moulded as a proper gun barrel, merely a protruding rounded shape, and I could have at least drilled out the port for appearances.

The tracks took a lot of work. One thinks that one-piece vinyls should be child's play, and they are, but the detail is very repetitious. There are 672 rubber pads—that’s four per link times 84 links per track times two. After a sprayed base coat of rust/dirt browns, every single pad was brush painted rubber black (Tamiya XF-85) by hand, rather a daunting proposition. They were then treated with a Tamiya dark brown weathering wash to create depth, and oversprayed with an ultra-thin glaze of buff (two drops to forty drops of thinner) to create a dust coat. Lastly they got a few touches of MiG powder pigment to suggest fresher rust here and there, and the guide horns were drybrushed metallic. For all this effort, the effect doesn’t really show up in pictures—I might as well have not bothered... Fully half of each track is also behind the side skirts, so I could have detailed only the middle part and saved the effort!


The wheels were masked with a combination of rubber solution and disc stickers, then sprayed rubber black for the tires. I used the template method for the faces of the wheels, a 15mm circle template fitted nicely.

The main paintwork was a mixed shade for German Army Gelbolive, a formula I found at Armorama. XF-51 Khaki Green plus XF-57 Buff plus XF-74 Japanese Olive at a ratio of 4:1:2. This seems a very good match for the original. I made a batch darker with the addition of some black as a shade coat for the underside and behind the running gear, then another batch lightened with extra buff as a fade coat to mottle/pattern the upper surfaces. With all this done, I sealed the surface with Micro Flat. Where the decals would go I splashed with Micro Satin to bring up the lustre and improve adhesion, then resealed with flat over the decals once applied.

The kit decals were quite old but worked very well indeed. They took a while to part from the backing sheet, but snugged down surprisingly well and their finish was very close to that of the paint. They were slightly out of register, so when it came to the crosses, I took some from a Supercsale sheet that were within half a millimetre of the correct size, and these, surprisingly, were glossier and needed more attention to blend in.


The pioneer tools were a fair job in their own right, with a sprayed metallic, brush painted wood tone and hull colour on the clamps, Micro Flat over the hull colour areas, brown oil wash to create a patina on the metal and a darkening effect on the wood.

Finishing techniques included Flory wash in the engraved detail, MiG pigments for dust and rust, and drybrushed metallic for abraded areas, plus the usual suite of oil techniques, being dirt spots and chipping, edge profiling and rust streaks.

I had the advantage of a research source showing the very same vehicle as the kit depicts—a 1984 partwork whose first issue featured a centre spread of the Leo by the talented Kieth Fretwell. On reflection, the kit might have actually guided the illustration, which even shows the wading -kit tower on the commander’s hatch, which is included in the kit as optional parts! I did not bother rigging a radio antenna, as photographs are quite contradictory. Many Leos are photographed without radio masts at all, others have stub antennas only. If I get a definitive source on this I can always add it later.


The Leo looks good, was a fun build—I wish I could have spent a little longer on it: I could have caught some problems before they happened. But it’s a good addition to the modern armour collection. I look forward to doing Revell’s Marder IFV in the same scale, using the same pre-NATO-camo Gelbolive.

If and when I replace my studio lights, I’ll take better photos.

Thanks for looking,


Mike


Wednesday, March 14, 2012

Kit Review: Tamiya 1:48 Gloster Meteor F.3 (Kit #61083)


The Gloster Meteor was Britain’s first service jet fighter and the Mk. 3, evolving beyond initial teething troubles, was deployed forward to Belgium before the cessation of hostilities in the west. The Meteors did not encounter the Me 262 in action, which may be a good thing as analysis generally comes down in favour of the Messerschmidt being the faster, more advanced design.

The type has not been all that well served by kit makers. Airfix produced it in the early days of the company in 1:72, Dragon tooled a new Meteor F.3 to the same scale in 2010, to a high standard and garnering excellent reviews, and there are limited-run and resin specialist kits of some of the later marques, but Tamiya’s F.1 and F.3 kits are pretty much alone to this day if we’re talking large scale and loads of detail.

Tamiya’s eighty-third release in its 1:48 aircraft series came out in 2002, and I can only describe it as a delight to build. The mouldings are high quality and fit is near-perfect, though the one-piece lower wing and separate top wing sections can bite you a little bit when dropping in the engines and fuselage. Take lots of time to study the sequence “dry” and only commit to glue when you are absolutely sure.


The cockpit could be accused of being spartan, with a decal seatbelt, but not much is visible through the canopy if closed, and Tamiya offer some great twists, such as a cast metal weight which is installed in the fuselage to bring the centre of gravity forward and avoid the model being a tail-sitter (much more precise than loading it up with lead sinkers or whatever and hoping you’ve glued in enough!) and landing gear which locks very solidly into place to be sure of carrying the necessarily greater weight of the previous item, as well as ensuring its own perfect alignment. The engines are nicely detailed and can be left visible either via detachable parts for the top of the nacelles or the supplied clear equivalents.

Decal options include one of the aircraft deployed to Belgium, which were painted gloss white for recognition purposes, as they were in essence only there to gather experience, they were not intended to fight; plus two camouflaged options from perhaps later in 1945. The kit will also build the F.4 model, as it includes the teardrop-shaped conformal fuel tank characteristic of early Meteors, and while some reviewers have finished their F.3s with this tank, it did in fact first appear on the following version.


Assembly was quite straight forward with the exception of that previously mentioned fiddle with lining up the wings and fuselage to close tolerances, and if I have a particular criticism it is that the gear bays, moulded in with the top wing halves, generate distinct and quite wide gaps in a place they are impossible to really do anything with. The side walls of the bays are also undetailed, and I would not be surprised if there was an etched metal set out there that plates the bay walls, hides the joint lines and beefs up the detail level in one go.

I used a number of finishing techniques on this one, starting with pre-shading all panel lines in black. I used Humbrol enamels for the Medium Sea Gray underside and Dark Sea Gray topside, but by then I had really had enough of the solvent fumes and the model lay fallow for a while. I soon discovered that Tamiya had already produced very close equivalents for these shades plus the topside RAF Green 2 as XF-81, 82 and 83, providing an acrylic option for late-war RAF subjects, and I decided at once to complete the model in acrylics.


Camouflage was masked with innumerable pieces of tape, the hard-edge wavy scheme being drawn onto de-tacked tape laid onto the demarcation zones. These pieces were then peeled off carefully and the wavy lines cut with scissors. They were reapplied, then the gray areas backfilled with more tape. The process took at least three days to complete, which is one reason I put it off for so long.

Next, I refreshed the preshading in the remaining areas, then overcoated with the green. When everything was comfortably dry, I unmasked everything but the canopy, nosed gear bay and engine intakes, touched up as needed, and coated the model with Microscale Satin. I had intended to use Promodeler Dark Dirt weathering wash, which was fine for the underside, but against the topside camouflage their Black was necessary to stand out as tonally different. More Satin sealed the accenting.


At this point I brought out the Eagle Strike Late War RAF Roundels (48136) set I bought, replacing the kit insignia as the fuselage roundels were slightly off register. I found the ES set included three sheets and decided to use the full suite as the colours were much truer than those on the kit sheet. They behaved very well and laid down into recessed detail tightly with Microscale chemistry.

Squadron codes and serials came from the kit sheet, along with the stencil data, which is exceptionally small and fine. In all there are eighty decals on the model, though the stencils largely disappear unless viewing from very close range. The model was carefully washed with soap and water in an effort to remove the invisible decal residues, even bathed with saturated tissues, which was mostly successful; a little more Satin was misted on over the decals to seal them. I had considered drawing the lustre down and experimented with Microscale Flat, but could distinguish zero difference between them (I have heard this on forums, their Flat is notorious for being semi-gloss) and having no other flat to hand I decided lustre was good!


A few jobs remained, painting, assembling and installing the landing gear and oil wash weathering the detail in the gear wells; removing my from-scratch masking of the canopy and hooking out the tissue protecting the intakes and nosegear well; fitting the jet exhausts; painting and adding the radio mast and pitot tube; and painting and glossing the formation lights. The clear parts for the three vertical lights on the underside will be added when the clear sprue shows up again on my chaos of a bench…

Tamiya brought their signature quality to this under-celebrated subject and I would recommend it to anyone wanting a larger, highly detailed replica of this subject in its immediate post-WWII configuration. One or two aspects are tricky but there is nothing even a moderately experienced builder should not be able to handle, and the seasoned modeller can turn out a really impressive piece incorporating aftermarket cockpit dress-up sets and decals, as a stand-alone display or diorama subject.

Thursday, February 2, 2012

Kit Review: Fujimi 1:72 British Phantom F-4K (H-8)


About two years ago I posted about the face-off between Hasegawa and Fujimi in the late ‘80s to mid ‘90s period, and particularly their battle for the Phantom marketplace (see The Great Phantom Shootout.) It’s taken me a while but I finally have a review of the Fujimi product to offer.

This particular kit, though undated, is contemporary with their Phantom FG.1 “Silver Jubilee” kit (H-6) which was reviewed in FineScale Modeler in August 1987, and is substantially the same kit with different markings (offering 767 Squadron, FAA, c. 1969-1971, based at RNAS Yeovilton, one of the original units that worked up the Phantom for the Royal Navy. Their distinctive yellow eagle on the tailplane is quite unique and attractive).

Having worked on a couple of other Fujimi Phantoms (as yet unfinished) I was impressed that the company had refined their moulds and engineering approach to simplify construction so the model exhibits minimal seams, and lines up very comfortably. The kit is highly detailed, featuring finely recessed panel lines and tiny elements such as the pressure sensors in the intakes. The cockpit features raised instruments, for which a decal option is offered, and the seats are perhaps the best styrene representations of MB.7s I have seen to date. There are a number of alternate parts on the trees, as Fujimi, like Hasegawa, always pushed its mouldings for maximum versatility, in this case giving you the option of the hyper-extended nose gear leg, open canopies (a single piece canopy is provided for the closed option, which unfortunately does not fit very well at the front, leaving a noticeable gap around the windshield) and open engine auxiliary air doors (which fit so poorly they cannot be posed in the closed position without looking phony). Three other marking options are included, featuring the short-lived 700P Squadron (which only received five planes) and the fleet-service 892 “Omega” Squadron, plus an aircraft of the Phantom Training Flight that replaced 767 in 1972 when they transferred from RNAS Yeovilton to RNAS Leuchars in Scotland.

See the web for histories of the squadrons involved: ACIG Database for a general history of Phantoms in British service; and a close-up on 892 Sq. at Wikipedia. Wikipedia also offers a very useful look at international operators of the Phantom which touches on 767 Sq. FAA.


Parts breakdown is logical and straightforward, with full fuselage halves (as opposed to Hasegawa’s answer to covering the variants, their fuselages being separated into forward and rear sections, which inescapably gives you an extra seam to deal with), and the wing roots are a close, tight fit, requiring minimal dressing. The fuel dump at the tail is moulded with the fuselage halves and is so delicate that if you can avoid breaking it off, you’re a better modeller than most (this is a pet peeve of mine regarding most 1:72 Phantoms, I even wrote to Quickboost to suggest they produce a resin replacement, they would be sure to sell thousands of them…)

Detailing is correct for the British bird, with the recontoured fuselage to accommodate the Rolls Royce Spey engines, slotted tailplanes, and a choice of 600 gallon tank or Vulcan gunpod for the centreline hardpoint. I had been going to mount the gun, but the central pylon is moulded with the wing undersurface, and situated in the declivity between the engine bays makes carving it away impossible without a powertool. I ended up leaving the centre station empty but going with a full battery of missiles, so the aircraft is configured for a medium-range combat air patrol/interception sortie.

Eduard’s Phantom canopy masks are designed for the Hasegawa kits, and while the Fujimi may be very similar, I was more confident to go with a set of vinyls designed specifically for these kits, made in Canada. I've mislaid the backing sheet so can't quote the maker -- unfortunately, as they are an excellent product that worked very well. I mostly airbrushed Tamiya Acrylics, XF-2 for the underside, and substituted XF-63 German Grey for the Dark Sea Grey. Gunze 333 is an exact match but can be hard to find here; Gunze is also a brand I have no experience using so far. XF-63 may be a tad dark, but RN Phantoms look a different shade in every picture, from pale grey to royal blue… The metallic areas were painted with Model Master Chrome Silver enamel as my metallic acrylics have been misbehaving lately. The radome was Tamiya X-18 Satin Black, the afterburners X-10 Gunmetal. With prepainting thoroughly dry a long round of masking ensued to protect metallic areas, intakes, canopy and radome, then the underside was sprayed, along with gear bays, doors, struts, pylons, rails, tanks and missiles. Another round of masking established the wrap-around of the topside grey under the leading edge, then the XF-63 went on. Main coats were allowed to dry overnight before further attention. Next was to unmask the last round only, do any touchups required, then get arty with black and dark brown oil washes, laid on with a small flat sable brush. This simulated the Phantom’s characteristic oil leaks that stain the pure white of the underside from the front of the engine bays backward, and behind the flaps and airbrake junctures. This was a surprisingly easy task, and when complete and dry I laid on a coat of Micro Satin acrylic clear to protect everything.


The panel lines on the underside were accented with Promodeller Dark Dirt, as were lines on all the other white-painted items. The topside could have been treated with their Black wash, but I was in two minds about whether it was necessary, given the way the clear makes the panel lines visible. If I change my mind I can always treat them in future. More clear sealed the panel lines, and I tackled the decals.

The decals as supplied in the kit are extensive, with hundreds of items of stencil data complimenting the unit markings. The kit plans are fairly inaccurate in terms of placement, especially as data placement varied among the four units on offer and they only wanted to provide one full set of data drawings. The boxtop art is in fact far more accurate and I followed it in conjunction with photographs sourced from the web. Three kinds of ejector triangles are supplied, and the plans recommend large ones with heavy white outlines. None of my reference photos show this type, and I used the regular, borderless style.

A major difference is that the plans suggest the underwing serials for 767 Squadron should be wholly situated on the fixed portion, however photographs clearly show that all aircraft of 767 Squadron have serials overlapped the folding outer panel by a large margin, which translates into a discrepancy of nearly two metres! I have in fact so far found only a single reference photograph that shows a British Phantom of the period without the serials overlapping the outer wing panels (an RAF FGR.2 in the camouflage era). I have found at least two examples of profile art showing 892. Sq. planes without evidence of serials on the outer panels, but artwork can be based on incorrect information. 767 Sq. is firmly supported by the photographic evidence and if the serials are correctly positioned according to these sources, some stencil data supplied in the kit must be omitted as it is designed to be used with serials positioned closer in... The jury is out, as they say, but I’m going with the photos for this subject.


The big underwing serials are also potentially hairy to apply as they cross the attachment points for the outer pylons and fractionally overlap the gear doors as well. Obviously, the pylons go on after decaling is complete, for which one may be glad the fit is pretty excellent and tiny dabs of CA at the locator pegs alone will do the job. All serials begin “XT 8…” so these characters are supplied as one decal, with a set of extra digits to depict any of the four aircraft. The parts that overlap open gear bays, well that’s up to your creativity. Cut the decals and apply the slivers to the doors? Shave away the overhang and paint the disembodied bits?

All this is excellent and quite clever, the decals separate cleanly, albeit after a lengthy soak, but I can honestly say I have never seen decals “silver” so badly. Not all of them, certainly, but many, and mostly the tiny stencils. Even over clearcoating and using the Microscale chemistry they were not all that keen to conform to underlying detail, and after a day’s drying the silver bloom in the clear film was a great disappointment. The needle-prick method helped, but was by no means a cure. Using a sharp blade and Future also failed to improve matters. Decaling took four days, a total of 154 items being applied (plus a dozen pieces of coloured strip from an AM source for the missiles, and fragments of the large numbers that ended up on the bay doors), and while it’s pretty comprehensive, some of the decals are also out of register. The British roundels are perfect, but the yellow in the eagle is notably “over the line” and some small items backed with white show a distinct rim of their base. I did check online for an AM sheet depicting Phantoms of 767 Sq. but could not find any currently in production, nor early FAA stencil data, and I also wanted to get this project off the bench, so persevered. I found stencil data by AirDoc, but only for RAF birds in the camo and grey era, so again the kit sheet was the practical alternative.


I made a mistake when clearcoating the decal work, in underestimating the tenacity of the decal fluid residues. I did not wash the model adequately and though the fluids are invisible against the paint they show up instantly a clear is applied. There is also zero you can do about it other than strip the whole job and start again, which I was not willing to do. There are random flat patches in the finish now, though I managed to spot the problem and properly wash remaining areas, so the left wing at least is free of the issue.

Fitting the landing gear when all painting was complete reveals a lack of proper alignment. The assemblies are detailed and look great but there is no way to adjust their alignment. When they drop into the locator holes, that’s it, and the main gear plus retraction struts sit toed-in and canted in, which looks wrong. To combat this in future I would assemble the legs and struts, trim the locator pin from the strut and seat it with CA wherever it falls when the gear is straight, and leave it at that. Retraction struts are also supplied for the inner doors but I left them off as there is no way I could see for them to ever line up with their locators. The small doors are also very weak and I could not count how many times they simply fell off in the course of handling.


This model is not one of my best and some of the problems can be attributed to the kit, some to my own skills. It looks good on the shelf, but under the magnifying glass the issues with uneven paint, masking problems, decal silvering and residues, and visible gaps where the pylons meet the wing despite all filing and pushing and pulling, plus the gear stance, make this one a learning piece. Applying the lessons learned here to a larger scale may return a much better result.


In conclusion, the Fujimi F-4K is a good kit, though not a perfect one, and a skilful builder with experience working with paints and decals can produce a very nice looking model, though there will be a fiddle in a few places. The kit counts as “vintage” but can be picked up on eBay from time to time for reasonable prices.

Tuesday, October 5, 2010

Kit Review: Tamiya 1:48 Fw 190 F-8


This kit is 15 years old, #39 in Tamiya's expanding 1:48th scale aircraft range, and while there would be many reviewers quick to point out that the kit is "showing it's age" in ways, I would sooner concentrate on the ways in which this kit is still a very good one, and a very pleasing build. Some might point to Dragon's and Eduard's offerings as being far more detailed, with hatches that display engines and guns, but I would point to the sheer unfriendliness of those kits to build, their susceptibility to misalignment of the major components if key elements of their multitudinous internal fittings are not mounted with exact precision, something many builders only discover retrospectively after doing it wrong the first time.


In contrast, Tamiya offers a basic cockpit and engine, the latter of which is pretty much invisible behind the prop and fan (as is going to be the case with any closed-cowl 190), and the cockpit looks just fine through a closed canopy. Add some harness hardware, that would be about all you'd need to up-detail the cockpit, unless opening the hood.


The cockpit features raised instrument detail which responds very well to drybrushing, and a gunsight which is clearly visible through the windscreen. A choice of standard or Galland Haube (blown) canopies is provided, both crystal clear. The prop mounts on a poly cap, a Tamiya trademark, which allows it to be slipped into place at the very end, easing not only painting and decaling, as the spiralschnauze really needs to be applied to the spinner cone before the prop is built up.

There are some stores options for this, the dedicated ground attack variant of the 190. Twin underwing pallets for R4 unguided rockets are optional vs a quartet of well-molded SC50 bombs and their pylons, while a 300L droptank and rack are provided for the centreline station.


The Tamiya kit builds beautifully. Buildability is a dependable trait for Tamiya and even so early in their series, only a few kits after switching to recessed panel lines as standard, the parts fall together very neatly indeed. The main fuselage and wing parts are super-accurate and align correctly on their pins; the tail surfaces literally snap into place and their tabs and slots are size-coded so you can't get the surfaces on upside down. The engine cowling is a single moulding into which the completed engine sits before the unit fits back onto the fuselage and the gunbay cover drops into place.

A separate insert for the wheelwell brings up the possible detail level, while separate parts for the retraction struts, locking to the legs at fixed pivot pins, assures the main gear will almost fall into correct alignment, a boon when one considers the forward rake and toe-in on the Focke-Wulf undercarriage that can be a challenge on some kits. This is standard engineering that will be found throughout Tamiya's 190 range.


Similarly, the single-piece lower wing surface assures the correct dihedral and a gentle flexed fit for the wing to fuselage joint, often the major issue with joint dressing but here requiring no attention at all. Overall, the joints were dressed with a little adzing and wet sanding over superglue assembly, while some joints were closed with liquid cement on natural panel lines,. Filler was used in only a couple of places, such as behind the engine cowl, down by the wing roots, and to eliminate discontinuities where sprue attachment points fell.

The decals provide for four aircraft, all interesting choices, including the famous Black 10 of 2/SG4 in tropical camouflage for the Italian campaign of 1944, Green Double Chevron of SG2 in March '45, White 7 of I/SG2, in Hungary during the winter of '44 to '45, and Red 2 of I/SG2 in a zebra-pattern winter camo over standard RLM 74/75/76, in early '45. In 1995 Tamiya was recommending mixing rations to reach RLM equivalents from their acrylics range, while later kits offer matches from the Tamiya enamels range.


Their formula for RLM 76 (XF-2 Flat White plus XF-23 Pale Blue plus XF-66 Light Grey ata ratio of 7:1:2, provides a virtually perfect match for the original, lacking only lustre, and an addition of 25 to 30% X-22 Clear Gloss approximates the sheen of the original RLM colours. Unfortunately, their suggested formulas for the 74 and 75 are miles off, and I experimented to find a decent fit. For 74 they recommend XF-24 Dark Grey and XF-27 Schwartzgrun at 3:2, but this was too dark and too green, especially compared to the Model Master enamel equivalent. I reduced the ratio to 3:1 and added 1 part Flat White as well, then brought up the lustre with 30% Clear Gloss. For the 75, Tamiya suggests XF-51 Khaki should be a component, but as 75 has no green hue at all this mystifies me. I mixed it from scratch, starting with XF-24 Dark Grey and adding Flat White at a ratio of 2:1, then adding 30% Clear Gloss. On reflection this was too much gloss, as darker shades reflect more strongly than lighter ones, and 20% would have been ample. The final shades were acceptably similar to the Model Master enamel equivalents, though I have to say the acrylics are both more delicate and lack a certain 'gutsiness' that the solvent-based paints have. I mixed the RLM 04 Yellow also, warming and lightening XF-3 Yellow slightly (it could have gone still lighter...)

The camouflage was soft-masked using light card, while hard edges were acheved with Tamiya tape. This was my first time doing an all-acrylic multi-tone paintjob and I was quite pleased with the result, not pleased enough to say I'll retire enamels, but pleased that I can pursue a build like this in weather which forbids taking the hobby outside to spray solvent-based paints.


If there was any particular shortcoming to the kit, it was the decals. Two sheets are provided, one large, one small, with all the stencil data on the small sheet along with a few squadron markings. The small sheet was glossy and the glue was both slow to release from the backing paper and quick to dissolve thereafter, resulting in decals that were not predisposed to lying down invisibly. Even when gauging the soaking time correctly, some of the decals were prone to wrinkling, calling for considerable skill with solvent and setting solutions to get them to even out and pull into surface detail. I'm very glad I painted the block colour areas of the scheme I chose, as the decal version of those areas I am certain would have been unnecessarily difficult to apply and not looked half as good. There are, of course, aftermarket decal sets for the Fw 190 almost beyond reckoning, many of them probably being released with this very kit in mind, so this is perhaps the least of concerns.

Finishing tricks included carbon staining and dust applied with MiG Productions powder pigments, and an antenna wire made from Berkshire Junction EZLine.


I'm sorry this kit is out of production. Hopefully it will be reissued at some point, and until then one must haunt eBay with a watchful eye to catch it when it changes hands from time to time. My verdict on the Tamiya Fw 190 F-8 is that it is a very pleasant build with few challenges, which can be both tackled by a beginner and enjoyed by a master, and which certainly captures the stance and look of Kurt Tank's masterpiece fighter.

Monday, August 10, 2009

Final Review: 1:48 Hasegawa Bf 109 K-4


 With the K-4 finally done (okay, maybe there are one or two details I missed – I blush, I forgot the wingtip formation lights, so she’ll be coming out of the display case for a quick spot of red and green…) I can finish my work in progress articles with a roundup of this kit’s qualities. Hasegawa’s kit #09063 (JT63) is quite the gem. It has many unused parts from other variants, different cockpit sidewalls, the droptanks and underwing gunpods of G-series bomber-destroyers, three different tail wheel struts, three different instrument panels. You need to keep a careful eye on the instructions to make sure you select the right parts for the variant you’re building.  


 Marking options are supplied for two aircraft, Yellow 4, “Ingeborg,” of II/JG 3, March 1945, and a second contemporary airframe. Markings include a full suite of stencil data, even including the Werk numbers which may or may not have been carried on the tail of Yellow 4, depending on the sources you consult. I was originally a little put out with the engineering of the cockpit, but from that point onward the model literally fell together. The propeller attachment could have been smarter, trying to accurately align the fuselage halves while trapping an un-glued rotation piece in a channel at the front end was quite impossible for my dexterity and I settled for gluing it in place as a fixed stub, thus creating a non-turning finished prop. Parts alignment was superb for the most part, my only criticism is a tiny fore-and-aft mismatch on fuselage right and left detailing, which is only really visible where the aft fuselage segments are delineated on the underside. The flaps were marred by a long sink mark on the upper surfaces, which was only visible in certain lighting, virtually guaranteeing the parts were mounted before the problem was noticed. Similarly, the leading edge slats can be mounted open or closed, and while the deployed configuration adds visual interest the separate parts come with the usual penalty for assembling them closed: they don’t fit as well into their bays as the slats of the real plane would.  


 But these are minor quibbles, really. The surface detailing is accurate for a K-4, the hatches and access panels are in the right places, the Erla Haube looks convincing, and with a few extra details scratched together (the radiator pitch rods, battery bay hatch and flap ribs which I covered in my first post on this kit) it builds into a visually convincing model. I could have added hydraulic lines from fine wire but I was out of time and application on the project, that’s something for future builds. Another detail which I had meant to use was Quickboost’s exhausts, beautifully cast with open throats and midline weld seams, however they did not provide the locator slot for the glare shields of the late-series 109s, molded as separate kit parts, and I didn’t fancy scratching this detail at so late a stage. The resin AMs ended up in the drawer against a future build.  


 The decals went down actually quite nicely, reacting well with Microscale chemistry, though the spiralschnauze tried to curl up on the paper and was broken into pieces to be applied, and the big open crosses silvered somewhat. The 60 or so decals make a visually ‘busy’ aircraft, even if the real “Ingeborg” may not have carried a full suite of stencils (references and reconstructions do not, as you would expect, always agree.) Promodeller panel wash and MiG pigments created the worn appearance, the carbon stains and dust that denote a service aircraft being hard-flown, and EZ Line provided the radio antenna. Without going to the extent of AM cockpit and wheels, opening the canopy etc, this model makes a sweet display piece that really captures, the gutsy, brutish yet still graceful lines of the ever-more powerful ultimate Messerschmitt 109. I would recommend this kit to anyone with a few builds under his or her belt: while the multi-tone camouflage will be a challenge and the many decals will certainly occupy more than a couple of evenings, the basic soundness of the kit engineering will foster an attractive finished product if approached with care, forethought, and above all, patience. 


Thursday, May 21, 2009

Product Review: Promodeller Weathering Wash. The Future of Wash Detailing?


Panel washes have always been a complicated question: you need a liquid with a low surface tension that will flow into minute recesses, carrying a pigment to contrast against underlying paint. The chemistry must be complimentary: how often have you heard a modeller bemoan the latest panel wash formula to have ruined the paintjob? You can spray acrylics and wash with enamels, and vice versa, you can use barrier clearcoats before and after wash application, and between decal applications, the variations are considerable, from the simplest to the most complex. If, like me, you like to keep finishing operations as simple as possible, reducing the possibility of something going wrong and ruining your work, then the still-new Weathering Washes made by English firm Promodeller come as a true gift. These solutions are clay-based, a very finely-ground pigment suspended in water with a small amount of detergent added to reduce surface tension and allow the pigments to flow naturally. Think of the way sanded filler debris collects in recessed panel lines, perfectly outlining them -- that’s the principle on which these washes work, and they work perfectly. Brush them on, either overall with a broad brush, or selectively with a pointed brush, allow to dry, then simply wipe away the excess. On a gloss finish, a dry paper towel is all it takes to remove the excess, leaving the recesses perfectly accented. As finishes grow duller, a softer cloth or paper with a little moisture is needed. On flat finishes you can swab the surface with a moistened Q-tip, rolling it against the direction of motion to lift the dried clay, but be warned, you won’t remove it all from the microscopic roughness of a flat finish. The effect this creates, however, is visually almost identical to post-shading, so it’s not necessarily a bad thing! A little practice and you’ll find the technique that’s best for you.


 The important thing to remember is, the clay is readily resoluble, so if you develop an effect you don’t like, it’ll wash away from all but a fully flat finish, no arguments. And clearcoats are really up to your personal taste: The Tamiya Bf 109 E-3 on which I first used the wash has none, simply the satin lustre of the RLM paints, and the wash seems very permanent, after months there is no change in its appearance. (These photos were taken before powder pigment weathering and the rigging of an antenna wire).  


 Promodeller sell four shades at the moment, Dark Dirt, Light Dirt, Black and Brown. They come in 50mL plastic bottles which will last a long time -- I’m confident I’ll accent dozens of models, both aircraft and armour, from a single purchase. You can check them out at http://www.promodeller.com and view a 20-minute instructional video online, extracted from their much-longer DVD presentation. I bought mine from Lucky Model in Hong Kong, one of the biggest mailorder firms in the Asia-Pacific region, http://www.luckymodel.com/


 Accenting panel lines, bolt and rivet detail, tight corners and divisions of any sort has, in my humble opinion, never been easier. That doesn’t mean I don’t still use oils suspended in enamel thinner for the capillary-action technique, but that method never was the right one for major panel lines. Now I can brush on the mineral wash and have the main panel divisions of an aircraft done in one sitting.

Monday, May 18, 2009

Recently Completed:WASP Arrowhead SF Conversion


This was a most enjoyable project, a conversion from a standard jet fighter kit to a design that appeared in the 1962 British animated SF series Stingray. This was the "Arrowhead" Interceptor, as used by the World Aquanaut Security Patrol, a global underwater security service armed with the latest hardware (set in 2065, that meant rockets, nukes, ultra-fast submarines, you name it).


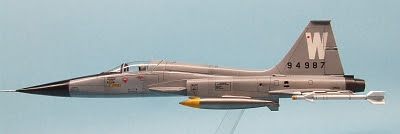
The original studio models were based on Aurora's Northrop N-156 kit, but I chose to use the more available (and better) Hawk kit of the F-5A (now released by Testor), a contemporary of the original. It took a lot of work and many months to complete. Research involved studying the eight shots in which the plane appears in one episode of the show, studying any stills I could find, then rebuilding with care.


I rescribed all the panel lines, performed plastic surgery to swap the order of wings and tail, scratchbuilt a cockpit and added a Hasegawa pilot and True details seat (I used a McDonnell ESCAPAC seat, as the seat used in the F-5A doesn't seem to be available.) The Arrowhead looks clumsy with her gear down, so I did a flight-configuration build, my first model on a stand in thirty years. I raided my scrap box for an old Airfix stand from the early 70s, and floated off the B-17 decal with MicroSet. The lateral tanks were not featured in the Hawk kit, so I found the correct kind of tank in Fujimi's early 1980s F-5A (not as good as Hawk's), and molded it off. These are resin copies. The paintjob is a variety of enamels and acrylics, and the white markings are all painted.


 I used some kit decals and the rest were custom-made using clear film and a laser printer. The wing checks were done that way, and all the stencl data. The scribed panel lines were accented with ProModeller Weathering Wash, and panel differentiation was done with graphite. It was a learning process, all models are, and I know I could have done better, having missed the odd procedural cue (doing things in the wrong order can be the kiss of death), but all in all she came out pretty good.

My Arrowhead appeared in Modelling the 21st Century Vol. 2, recently published by Happy Medium Press in the UK. Follow that link to see their amazing collection of publications for the science fiction hobby world.

Cheers, more soon, TB379