It’s been the proverbial age since I last posted, what with completing my PhD, working, and a recent trip to the UK for a conference, but I’m at last back on the bench and have something work talking about.
Tank tracks are an area I’ve discussed on a few occasions, mainly to grumble about link & length and how I detest them. This time I’d like to talk about the finishing techniques that are applicable to all sorts of track approaches.
Building Tamiya’s 1:35 M1A1 (ODS) is a straightforward experience and I superdetailed with 17 corrected or missing detail items (it seems I can’t build an Abrams without adding as many missing details as I can, though I’m nowhere near a full amplification, according to the experts…) The vinyl T-156 tracks are the most accurate of kit offerings but still not correct (the guide horns are centred on the links, when they should straddle the gap between links), but I did not feel like spending the $$ for an AM set, especially as they would be L&L, which I loathe.
Never mind, I can live with the discrepancy. What about making that grey vinyl look like steel that’s been run across a desert?

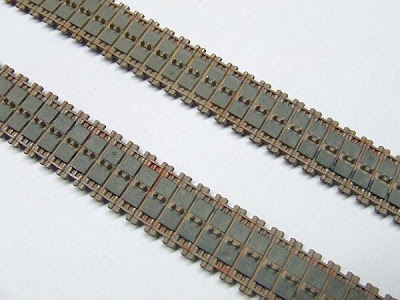
It turned out to be a six-step process, starting with a base colour (above). I looked at photos of M1s in service and noted the general colour of their tracks, which of course reflects the terrain. I mixed Tamiya Acrylics Buff (XF-57) with NATO Brown (XF-68) and Dark Sea Grey (XF-54) at a ratio of 20:3:3, and coated both sides of the tracks. I tape or pin the tracks to a length of card to control them as I’m doing this.
Step 2 (also above) was the really boring one – paint the track pads and blocks into flat black (XF-1) individually. I used a small, flat sable brush and for once the Tamiya paints behaved themselves reasonably well coming off a brush. The effect does not have to be precise by any means, real tracks are so coated with filth that the point where rubber meets steel is rarely obvious to the naked eye, so I used a near-drybrushing technique across the raised areas, then blocked them in.

An oil wash was the third phase, van Dyke brown suspended in enamel thinner run into all detail areas on both sides, a fairly quick process that created some depth. It’s subtle, but it’s visible above.
The fourth step, also above, was to overspray the tracks with well-thinned Buff (one part paint to three parts thinner, which is 600% over-spec for Tamiya) to simulate dust ground into everything, and which toned down the starkness of the fresh black to a grey-beige which looks pretty good against many service photos.

The job was nearly done by this point. Drybrushing with silver to create bare metal wear on the guidehorns and some external link ends came next, and a light wash here and there of bright rust to add visual interest. Step 6 was MiG Gulf War Sand pigment powder, but that technically would go on overall when everything else on the beast was done, and in the shot above is added to just one part of the right-hand track to demonstrate how it settles into declivities. I called it done at this point and set the tracks aside for later.
Tracks are not difficult to make look good, but it does take a little thought beforehand, and the patience to work through the process when it gets a bit tedious!


No comments:
Post a Comment