Monday, August 19, 2013

Product Review: AFV Club T-34 500mm Width Cast Links


First of all, apologies for the apparent abandonment of this blog since last year – it was not intended but an overseas trip immediately followed by moving house, then teaching at the university and a lot of other stuff ended up in time prioritisation that saw lots of things go by the wayside and hobby allocations down in general… But nothing lasts forever, and there’ll always be time for something. Lately it’s been research and prep work for major projects to come, and I had gotten out of the way of building to the extent that diving back into a project that was already fairly advanced was off-putting and I needed to start something from scratch.

I pulled Tamiya’s old Su-85 off the shelf, one of those easy-build, old-tool kits I’m so fond of, and had a great time reacquainting myself with the basic skills, the cut, file and glue skills that get us into the head-space to get more creative, and as I studied the model I decided I would add a few AM bits and pieces. The object was always to try out either the hairspray technique or a chipping fluid to do a winter camo effect, and I might invest in a turned barrel. But when researching aftermarket goodies for this kit I read about AFV Club’s indie track links for T-34s, and my interest was thoroughly aroused by the reviews. Here was a link set that was workable and simply clicked together, I’m assuming somewhat like Dragon’s “Magic Tracks,” and I found a set on offer in Hong Kong for half the price of elsewhere…

Those who have read this blog before will remember my aversion to indie tracks, my loathing of repetitive fiddling and their uncooperative nature that could reduce a professional to tears, so you’ll appreciate how good this product is when I say it has been pretty much a breeze, as far as I’ve got.

The set contains four sealed plastic packs, three of horned links on sprues (five sprues of six links each, for a total of 90 horned links) and a pack of non-horned inter-links on sprues of two. The totals allow spares, so if you spoil a few links, as is more than likely, it’s no disaster. The plastic is good quality, the detail sharply molded, and the sprue-gates clean up quickly with a file. Connection is by a pin and socket arrangement on the outer edges of the links, they click-fit and are strong enough to remain one piece so long as no strain is placed on the assembly. They are definitely “for looking at,” as the saying used to go, but certainly look the part.

Cleaning up after detaching from the sprues was by far the most time consuming factor. I would have invested an hour, an hour and a half perhaps, in assembling one track, a run of 34 of each type of link, matching the counted number of horned links on the Tamiya track and visible in profile pictures.

I went on to complete the second run and then set the project aside pending time and materials to pursue completion. Other things have demanded priority on the bench too, so I’ll be revisiting this subject at a later date. So far as assembling the tracks go, I can thoroughly recommend this product to anyone with as big an aversion to indie links as myself.


Tuesday, January 29, 2013

Product Review: Eureka XXL Replacement Tow Cables


Tow cables – most armoured vehicles carry them, those tough bowden-cable connectors used by engineers’ tractors to pull armour out of the mud. They’re not the easiest things for companies to tool out in plastic, and many solutions have been tried, including “heat and bend to shape” or Tamiya’s infamous string option. There has to be a better way, and braided picture hanging wire has often been used, yet the degree of twist is not to scale.

Polish firm Eureka XXL came to the rescue several years ago with their hand-made replacements, and it would be hard to imagine what more you could want. Typically, the end shackles are moulded in resin, while the cable itself is soft copper made just like the real thing, fine strands twisted around a heavier core wire. The copper is soft enough to bend readily, and to length-trim with a knife.

Using them is a breeze. Spray the end pieces on their resin pour block, crack them away (you don’t even need to saw or cut them free), prepaint the copper with your favourite metallic/rust effects, then superglue into one connector. Lay the cable on the vehicle, arrange with as much sag as you like, mark the correct length for the other end and trim with a knife; glue on the other end and glue to the model. But for final rust, dust and dirt effects, you’re done and the cable looks absolutely convincing because it is what it is supposed to be, spiral-braided metal.

Eureka have a huge range, and lots more for the armour fan than just cables. Check them out at:

http://www.eurekaxxl.com/

It’s been three months since my last post, during which a few models have been finished, a trip to the UK happened (including a sci-fi modelfest visit, expect a report before long!) and a house-move-from-hell which has nonetheless resulted in a better mancave than before, including a proper display case for the first time. Sorry about my lack of blogging, normal service will hopefully be resuming at this time…


Friday, September 28, 2012

Airbrush Blues


Have you ever had a period when your airbrush did exactly what you wanted it to – maybe for years – then suddenly became uncooperative? That happened to me recently, and I had to take it in for service for the first time in about three years. Some odd stuff, a deposit reaching up to the back end of the needle, and I have no idea where that came from or what it was…

It can be subtle, of course, and also blindingly obvious if you’re not locked into one way of seeing what you do. Three years ago I bought an excellent set of Paasche cleaning brushes to do the necessary on each periodic strip and clean, and everything was peachy until – and this is what happens so subtly you don’t really see it happening – the brushes wore out.

Nothing lasts forever, and the small-size brushes which you use to clean inside the mechanism gradually accumulate a deposit of paint that locks up what bristles remain, so they very slowly go from fully efficient to completely inefficient, and you need to spot that. It’s remarkable how blind we can be… This time I bought another set of generic brushes for as fraction the cost, and if they wear out quicker, it’s no disaster.

Of course, there are other stumbles to be made. For instance, “backing off the needle for storage” is a professional’s habit, and when I got my AB back from servicing I wondered why the finesse of control had disappeared. D’oh, adjust the needle, dude! And then there was the business with the siphon tube…

When everything is clean and the paint is properly thinned, but the AB won’t draw the paint up the tube, what’s happening? I took me a few moments’ puzzling to realise it was because the nylon siphon tube in the jar was no longer a snug fit around the metal pickup in the cap. Air from the jar was being drawn around the top end of the tube, defeating the vacuum effect needed to lift the paint. Solution? Easy, reverse the tube so the unstretched end makes the seal.

Ah, that’s better! Now, on with the job…!

(Sorry it’s been a while since I posted, things have been busy, to say the least. More stories coming shortly…)

Saturday, July 28, 2012

“It Was A Good Kit In Its Day, But…”

If this remark is applied to, say, the big Airfix 1:24th scale planes which have been surpassed by Trumpeter’s ambitious range, it’s perhaps accurate enough (though, I’ve heard it said that there are so many quibbles with the latter’s big Mustang that Airfix’s, for all its age, is still the better build!), but is this remark always pertinent?

In an age of fierce competition for the hobby dollar among scores, hundreds, of manufacturers at all points on the spectrum from the mega-corps/gods of injection moulding right down to the smallest garage outfit turning out etched brass and poured resin, it might seem axiomatic that every product from every firm offers itself as a target for mimicry and a standard to be outdone. In many cases, the latter is not hard, and the offerings that were state of the art half a century ago have by and large become collectors’ items, never to be built, merely hoarded and passed from hand to hand as the historical artefacts they have become. But I have my doubts as to whether that is always going to hold true.

This is because “good” is a relative term. One person’s good is another’s over-thought, over-engineered or over-priced. One need only look at Dragon’s introduction of everything from Magic Tracks to the SmartKit range to see the truth of this, because Dragon’s early policy of “never use one part where five will do” might have delivered high parts counts, allowed sophisticated detail accuracy on the limitations of the state of the art twenty years ago, and constituted a different approach than their chief competitor, but it also had its drawbacks. For every builder who patted him or herself on the back for defeating the Dragon challenge and eagerly tackling the next, another let that next kit lie a year or two, or permanently, or at best opened the next kit with curses readily at lip and ready to denounce over-engineering just as surely as others would extend the same consideration to compromised accuracy. Dragon SmartKits are an attempt to satisfy both positions, and a fairly successful one.

So we might say that the old Dragon Imperial Series kits were ‘good kits in their day” but they have been superseded. That does not mean they change hands for a song. The same goes for the Tamiya retool program from the early 90s onward: these second-generation moulds for Tigers and Panthers may be dismissed as obsolete but they continue to ride the shelves at very substantial prices, $70 or more in Australia, and while the hobby as a whole is a luxury one, that is a fair wedge of money to dismiss lightly. And of course, there are those of us who find a great deal of enjoyment in Tamiya’s previous generation of toolings, many of which remain available at around half the cost of the retools, and which, with care and artistry, some extras and scratchbuilding, can still look very attractive on the shelf.

It may come down to the old equation of “horses for courses.” How much accuracy to you demand? How much is it practical for you to pay? Are you a “rivet counter” whose yardstick for the worth of a product extends to accuracy on the most minute scale, basically to the limits of resolution of human vision? Or are you looking primarily for experience, to build your skills in construction and painting, so any kit which does not set you back too much and delivers a reasonably attractive 3D canvas on which to exercise is just fine? These are opposite ends of the spectrum, and reality usually falls between the extremes, but one wonders where one would file the case of taking an old classic kit and applying the most sophisticated skills might fall? There are plenty of kits designed in the last forty years which, with good research, patience and skill, and modern finishing supplies and paints, can return very attractive results. A little scratchbuilding goes a long way, and a few AM parts adjusted/modified for older subjects can upgrade a potential “clunker” until it sits proudly next to a kit generations younger. Sure, it took a lot more work to get it there, but isn’t that at least partially the point to it all, learning how to be craftsmen, engineers in miniature, making something, not just whacking it together?

I would point to Shep Payne’s incredible dioramas for Monogram in the early-mid 1970s. Kits in those days were a lot less sophisticated than they became in later years, and the Monogram range from the period has indeed been superseded in quality and accuracy more or less universally. But those dioramas are works of art that incorporate far more than the kits: they have theme, design, concept, execution and scratchbuilt detailing par excellence that raise them out of the ordinary. As a consequence, their day will never be done, they are a completed entity in their own right and will continue to inspire and teach the art of the diorama.

Those for whom the cutting edge is all there is we might term “kit snobs.” They’re like “wine snobs,” for whom the price and a product’s standing with other snobs are the important factors. The sort who buys the most expensive and up to date offerings, then throws away half the pieces and replaces them with even more expensive aftermarket add-ons because only with these things can their models be sooo much better. Whether that’s better than anyone else’s or simply better than their skills can deliver without the virtual “oxygen support” of the AM industry is another matter. Twenty years ago Tony Greenland was working with first generation Tamiya, Italeri and even older kits and, though he describes himself in his book as simply a competent technician, not a true artist, the models in his Panzer collection are some of the most perfect examples of the miniature art I can possibly cite. Yes he used etch, resin, whitemetal, the works, he was also a brilliant scratchbuilder and adventurous artisan whose models, though based in many cases on toolings now getting on for forty years old, stand up for visual impact and engagement, I believe, against any of the new stuff. The point I’m making is this: the skill of the craftsman is what counts, not the fanciness of the kit or the weight of extras.

So next time someone points to a kit and says “it was okay in its day,” take it with a grain of the proverbial. There’s too much one-up-man-ship and too many points of view for any statement to be an absolute, and there may be total gems from decades ago waiting for the touch of a true artisan to bring them to life. After all, if the yardstick for what makes a kit worthwhile is how little the company has left the hobbyist to do, the hobby is in trouble because the better the kit the less incentive there is for the modeller to become a craftsman. We can all be experts if all it takes to turn out a masterpiece is a few dabs of glue. Personally, I like a modicum of challenge… But not like early Dragon!

Saturday, June 23, 2012

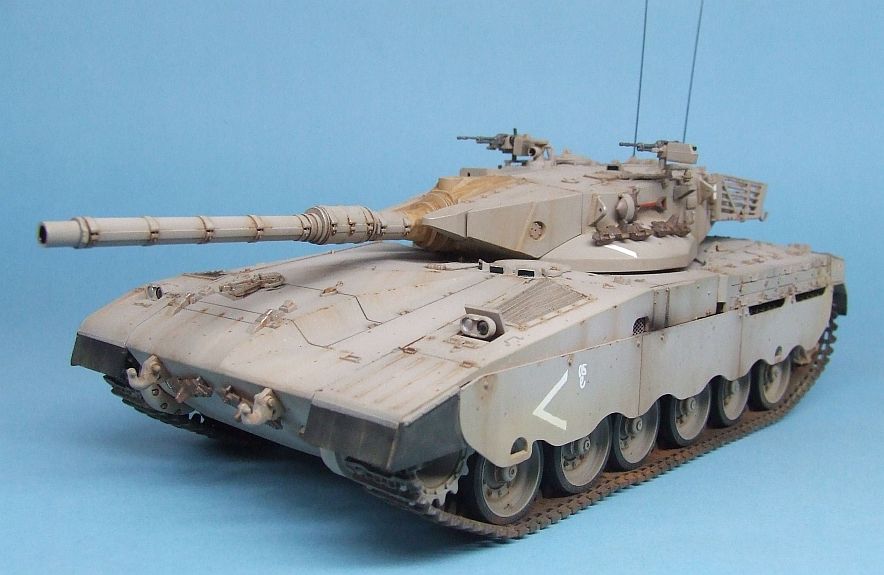
Kit Review: Tamiya Merkava Mk. 1 (35127)

There is perhaps no particular mileage in reviewing a kit released over twenty years ago, but a good kit is a good kit, and apropos of my ongoing commentaries on the great Tamiya-Academy “thing” that happened in the late 80/early 90s I find it highly significant to compare the Tamiya Merkava 1 to the later marks produced by Academy. I remember seeing the Tamiya Merk I on the shelves in the late 80s and really wanting to build it, but having all kinds of airbrush woes at the time and resisting the temptation because I just knew “what kind of mess that airbrush of mine will make all over that beautiful detailing.” I finally picked up this kit on eBay a few years back and filed it in the stash, not thinking about it after that point as a plethora of other projects took my attention. I build the Academy Merk II some time ago (it’s still waiting on decent decals, the Academy stickers disintegrated, as apparently they are wont to) so when my interest in Israeli armour was piqued and I came to check out the early Mk.1 kit the similarities fairly leapt out of the box at me. The fact is, they are not just similar, their parts are interchangeable. Yes, Academy updated the kit to Mk.II standard, with the new sideskirts, extra topside MG, appliqué armour, extra radio mast and so forth, as well as their unique vinyl tyre approach, but the guts of the kit remain an exact copy of Tamiya’s. The assembly sequence, unit by unit, is pretty much identical, and tiny inaccuracies have been reproduced, right down to the fact the skirt armour on the right hand side doesn’t want to fit, takes four goes and never lines up properly, despite the left side fitting like a breeze first time out. That is so far beyond coincidence it simply groups the basic Merkava into the same batch that Academy patterned from their competitor’s product line. Tamiya’s kit was the subject of many excellent dioramas in the past, including a quite famous one, “The Road to Beirut,” which appeared in the print media of its day and can be viewed online at Perth Military Modelling. While the stowage and figures have had plenty of aftermarket and scratchbuilding attention in this example, the kit is more or less out of the box, and shows well for the quality of the original. I found the kit to build with Tamiya’s trademark ease, more or less falling together. While there are photoetch and other accessories for this kit I was after a quick, straightforward build, and even used the black vinyl mesh supplied for the turret basket floor. It worked surprisingly well and looks fine, and when I get around to buying Verlinden’s Israeli stowage set it’ll look even more the part. The only major fix I felt compelled to make was to back some serious apertures with something – tanks are not see-through, and when both the starboard side engine exhaust louvres and a duct of some sort (which I wasn’t able to identify as all my reference materials pertain to later marks) on the portside were provided with nothing to back them, I had to get creative. I used some fine diamond-pattern etched brass mesh from EMA, and while I have no idea if it’s even close to accurate for the outlets of a Merk 1, it is visually a world of improvement. I used my standard suite of armour techniques. Tamiya Acrylics were used almost exclusively (the Sinai Grey being XF-20 Light Grey and XF-57 Buff mixed 1:1, as recommended by IDF Modelling for a 1982 Lebanon conflict-era vehicle, with two rounds of oil wash weathering, drybrushing with acrylics and enamel for bare metal, followed by Mig pigments for desert dust, ground into the decals with a stiff brush to kill their shine. I’m quite happy with the result, and while I’ll probably spot details to pick up at a later date (such as the lack of tow cables, I need to experiment with braided copper wire or picture hanging cable, as the plastic ones in the kit need to be heated and bent to go round two 90-degree corners and then drop precisely into incredibly fragile guide parts … call my a cynic but I don’t think that was ever a realistic proposition for anyone but watchmakers and brainsurgeons) I’m pleased with the dusty desert finish and general sense of knocking about that the washes, drybrushing and dust create. Many would argue that Academy’s later offerings are far better but I see them as merely incremental improvements building on a sound original, and this was a fun project that was on and off my bench in a reasonable time. I recommend it to anyone who is not a rivet-counter and who enjoys getting to grips with painting and weathering. PS: Blogger just changed the way it handles information, sorry the text crowds the photos but I have no idea what to do about it at this point...

Sunday, April 8, 2012

Detailing Wire


Using wire for detailing has a long pedigree, whether for cockpit connections, hydraulic lines on landing gear, or any application that calls for a fine, fairly rigid filamentary part.

I’ve not done much with wire, my previous project involved making fake coil-spring suspension parts, which was interesting to say the least, and I’ll post about that when I’m happy the job is done (twelve of them to do + sore fingers = finish it another time…) but as part of my Phantom building enterprise I found the need of wire.


While some kits have the ejection faceshield handgrips moulded right in, many do not, and if substituting better-detailed aftermarket seats you may be scratchbuilding the grips anyway. The resin seats by True Details are excellent and inexpensive, but the grips, the most visually engaging part of the seats both because of their signal yellow paintwork and because they are the uppermost part of the seat visible through the canopy, are not represented at all.

The seats on Fujimi’s F-4J did not imbue me with much enthusiasm so I resorted to True Details, which left me with the question of what to do for the grips. I had considered trimming them from the kit parts, which might have worked, or might have cost too much plastic in the cut, resulting in the grips being too small. Wire to the rescue…


I ordered up some 0.29mm (.011”) soft silver wire from Red Roo Models, and found it worked easily, the loops being formed by wrapping the wire with finger pressure only around the tapered tip of my scribing tool, then cutting the loops free with a craft knife. The seats were pre-drilled with a .020” twist drill to provide shallow locators, then superglue was used to mount the loops.

Painted up with acrylics (the black stripes spotted in with a fine-point pen, which is quite good enough for my eyesight at this scale!) they look pretty good, and I can see this technique satisfying the “loop question” on all replacement seats in future. In larger scale I could be more accurate (‘rounder’ loops and so on), but for now, that flash of yellow under the canopy is adequately catered to.

Wednesday, March 14, 2012

Kit Review: Tamiya 1:48 Gloster Meteor F.3 (Kit #61083)


The Gloster Meteor was Britain’s first service jet fighter and the Mk. 3, evolving beyond initial teething troubles, was deployed forward to Belgium before the cessation of hostilities in the west. The Meteors did not encounter the Me 262 in action, which may be a good thing as analysis generally comes down in favour of the Messerschmidt being the faster, more advanced design.

The type has not been all that well served by kit makers. Airfix produced it in the early days of the company in 1:72, Dragon tooled a new Meteor F.3 to the same scale in 2010, to a high standard and garnering excellent reviews, and there are limited-run and resin specialist kits of some of the later marques, but Tamiya’s F.1 and F.3 kits are pretty much alone to this day if we’re talking large scale and loads of detail.

Tamiya’s eighty-third release in its 1:48 aircraft series came out in 2002, and I can only describe it as a delight to build. The mouldings are high quality and fit is near-perfect, though the one-piece lower wing and separate top wing sections can bite you a little bit when dropping in the engines and fuselage. Take lots of time to study the sequence “dry” and only commit to glue when you are absolutely sure.


The cockpit could be accused of being spartan, with a decal seatbelt, but not much is visible through the canopy if closed, and Tamiya offer some great twists, such as a cast metal weight which is installed in the fuselage to bring the centre of gravity forward and avoid the model being a tail-sitter (much more precise than loading it up with lead sinkers or whatever and hoping you’ve glued in enough!) and landing gear which locks very solidly into place to be sure of carrying the necessarily greater weight of the previous item, as well as ensuring its own perfect alignment. The engines are nicely detailed and can be left visible either via detachable parts for the top of the nacelles or the supplied clear equivalents.

Decal options include one of the aircraft deployed to Belgium, which were painted gloss white for recognition purposes, as they were in essence only there to gather experience, they were not intended to fight; plus two camouflaged options from perhaps later in 1945. The kit will also build the F.4 model, as it includes the teardrop-shaped conformal fuel tank characteristic of early Meteors, and while some reviewers have finished their F.3s with this tank, it did in fact first appear on the following version.


Assembly was quite straight forward with the exception of that previously mentioned fiddle with lining up the wings and fuselage to close tolerances, and if I have a particular criticism it is that the gear bays, moulded in with the top wing halves, generate distinct and quite wide gaps in a place they are impossible to really do anything with. The side walls of the bays are also undetailed, and I would not be surprised if there was an etched metal set out there that plates the bay walls, hides the joint lines and beefs up the detail level in one go.

I used a number of finishing techniques on this one, starting with pre-shading all panel lines in black. I used Humbrol enamels for the Medium Sea Gray underside and Dark Sea Gray topside, but by then I had really had enough of the solvent fumes and the model lay fallow for a while. I soon discovered that Tamiya had already produced very close equivalents for these shades plus the topside RAF Green 2 as XF-81, 82 and 83, providing an acrylic option for late-war RAF subjects, and I decided at once to complete the model in acrylics.


Camouflage was masked with innumerable pieces of tape, the hard-edge wavy scheme being drawn onto de-tacked tape laid onto the demarcation zones. These pieces were then peeled off carefully and the wavy lines cut with scissors. They were reapplied, then the gray areas backfilled with more tape. The process took at least three days to complete, which is one reason I put it off for so long.

Next, I refreshed the preshading in the remaining areas, then overcoated with the green. When everything was comfortably dry, I unmasked everything but the canopy, nosed gear bay and engine intakes, touched up as needed, and coated the model with Microscale Satin. I had intended to use Promodeler Dark Dirt weathering wash, which was fine for the underside, but against the topside camouflage their Black was necessary to stand out as tonally different. More Satin sealed the accenting.


At this point I brought out the Eagle Strike Late War RAF Roundels (48136) set I bought, replacing the kit insignia as the fuselage roundels were slightly off register. I found the ES set included three sheets and decided to use the full suite as the colours were much truer than those on the kit sheet. They behaved very well and laid down into recessed detail tightly with Microscale chemistry.

Squadron codes and serials came from the kit sheet, along with the stencil data, which is exceptionally small and fine. In all there are eighty decals on the model, though the stencils largely disappear unless viewing from very close range. The model was carefully washed with soap and water in an effort to remove the invisible decal residues, even bathed with saturated tissues, which was mostly successful; a little more Satin was misted on over the decals to seal them. I had considered drawing the lustre down and experimented with Microscale Flat, but could distinguish zero difference between them (I have heard this on forums, their Flat is notorious for being semi-gloss) and having no other flat to hand I decided lustre was good!


A few jobs remained, painting, assembling and installing the landing gear and oil wash weathering the detail in the gear wells; removing my from-scratch masking of the canopy and hooking out the tissue protecting the intakes and nosegear well; fitting the jet exhausts; painting and adding the radio mast and pitot tube; and painting and glossing the formation lights. The clear parts for the three vertical lights on the underside will be added when the clear sprue shows up again on my chaos of a bench…

Tamiya brought their signature quality to this under-celebrated subject and I would recommend it to anyone wanting a larger, highly detailed replica of this subject in its immediate post-WWII configuration. One or two aspects are tricky but there is nothing even a moderately experienced builder should not be able to handle, and the seasoned modeller can turn out a really impressive piece incorporating aftermarket cockpit dress-up sets and decals, as a stand-alone display or diorama subject.

Monday, March 12, 2012

Kit Review: Academy (Tamiya) StuG IV, #1332


It was about a year ago that I was posting on building this kit and being stunned to find that Academy had thieved most of their early range from Tamiya. I mentioned one or two minor differences that appeared in the building stage, then this kit lay fallow for a long time waiting for its paintjob.

Having just this summer got back to the bench after a quite protracted absence, I have been finishing some shelf-sitters, this one being my fifth in a row. This was my first tri-tone “ambush” scheme and I enjoyed it very much.


The basic vehicle was sprayed overall with XF-60 Dark Yellow, then a slightly darkened version was applied to the hull sidewalls and underside as a shade/dirt colour. The airbrush was changed to the fine tip and needle and Redbrown (XF-64) and Dark Green (XF-26) were sprayed, following the pattern seen in the box photos. Some extra yellow was used to touch up overspray, then a pattern of blowing leaves was applied in the three colours by brush. More yellow was mixed for the fade coat, being thinned 800% overspec as a glaze which was misted onto the upper surfaces, creating the impression of faded paint, and visually tying all three colours together.


The usual suite of techniques was used, being drybrushing with lightened shades of the three main colours on all edges, then drybrushing silver to represent areas of bare metal, washes of black and dark brown oil paint to create rust streaks and dirt accumulations, some washes of orange here and there for fresh, bright rust, graphite dust around the gun muzzle, and so forth. Alliance Modelworks German Vehicle Templates were used to spray the wheel hubs, .015” wire was used for the radio mast, and the muffler was treated with applications of liquid glue and sanding dust to create the bubbled rust effect.


Another variation from the Tamiya original showed up, the spare track links on the lower forward hull had to be back-ground to reduce their thickness by a considerable amount before they would fit the rack, whereas the originals just dropped into place. There are probably other subtle differences here and there, but to all practical ends the model really is identical.


The paint scheme I used is featured on the box photos but the decals for this vehicle, of the Grossdeutschland Division by the looks of the insignia, are not featured in the kit. I brought out the spare markings from the Tamiya example I did about two years ago and did some online research for which StuG IV units were operational in the west in late ’44, and thus good candidates to be wearing the “ambush” scheme. I chose the 251st Assault Gun Brigade, whose colourful eagle badge was on the Tamiya sheet, and while this is obviously a best-guess situation, I feel it’s a reasonable one.


In conclusion, Academy’s knock-off of Tamiya’s StuG IV is an enjoyable build with a few quirks not found in the original but nevertheless a straight forward prospect for anyone with a few projects to their credit. I’m very happy with the result, it looks good, aggressive in its dust and rust, colourful in its blowing-leaves autumn paintjob, and demonstrates once again how much versatility there is in the early Tamiya kits. That’s two of these so far, and I know there’ll be more. Winter markings, full skirts, heavy weathering, mud, stowage, there are plenty of options for depicting these hard-used, hard-fighting workhorses of the Wermacht.

Friday, March 9, 2012

Brain Cells? We Don’t Need No Stinkin’ Brain Cells!


After a lifetime in the hobby you can become inured to the stink of the chemistry. Enamel paints, liquid glue designed to be a plastic solvent, cyanoacrylate glue, even the supposedly nontoxic acrylics which have a pleasing odour but can be rather not-good-for-you in an enclosed space.

I recently began to experience headaches after airbrushing. As readers of this blog will know, I more or less retired enamels a couple of years ago for reasons of toxicity, and because dragging the whole rig outside to spray was too much trouble. However, even with a window open and some moving air, after sessions spraying acrylics I was starting to get persistent headaches, and that tells me I was suffering mild toxicity effects. I’ve completed half a dozen models in the last two months so there has been more painting packed into a shorter time than any other in the last year, so perhaps a problem was due to show up. A paper dust mask was not stopping much so the only solution was to buy a professional respirator mask.

As it happened, I was on the last gasp of my compressed air cylinder and needed a changeover, so when I took the tank into the depot I asked about masks and was shown an excellent unit made by 3M Corporation. This is the real deal, with chemical scrubber cartridges and dust filters, and a fully sealed fit to the face. When you’re breathing through this you’re on cleaned air only!

I trialled it promptly and the results of are as follows: easy fit and adjustment, comfortable to wear, not too heavy, does not obstruct the fit of glasses. No faintest whiff of chemical odour penetrates the mask, and breathing is easy and regular. The most important point is that after two good sessions of painting no headache had occurred, which seems to demonstrate the point.

The chemical scrubber cartridges come in a sealed package because they are permanently reactive with air and will exhaust. The tip from the retailers is that whenever the mask is not in use the cartridges are removed and sealed in ziplock bags with as much air squeezed out as possible. Hopefully this will extend filter life to a reasonably economical degree.

The whole rig (mask, chemical cartridges, dust filter pads) set me back Aus$80, which is a fair bit of cash, but how do you put a price on your health? I would like to still be building models when I’m 90, and doing so with as many brain cells left alive as possible!

Saturday, February 25, 2012

Kit Review: Academy’s M51 Isherman (#1373)


When Academy learned their craft and got over the period when they pirated Tamiya’s range to flesh out their own (no, I will never forget or forgive that…) their inherent quality really began to shine. This kit was tooled in 1997 and shows up very nicely even now. Dragon tooled this subject, then retooled their kit (doubtless with typically Dragon over-thought engineering) and Tamiya have just issued an Isherman, probably with typically Tamiya simplified construction and great attention to detail. By and large, these models all look pretty similar when lined up – you need to be an M51 expert to pick the differences and know what they mean, and that means the older kit stands up well.


I pursued this model in subassemblies, building everything I possibly could before being obliged to move on to the main sections. Cans, stowage bin, suspension units, the turret, the engine deck and final drives were all made up long in advance, so when I came to drop the model together it was pretty much as simple as that. About two days work and she was ready for paint. There are minimal fit issues, the junction between the transmission cover and main hull at the front needed some filler, and the gap under the gun mantlet is a bit dubious (the canvas shroud behind the mantlet is perhaps the poorest part of the model and needs some pushing and pulling to get an even acceptable fit, plus there are no alignment guides at all and your down to the sticking power of glue to get it to hang together).

Options include open hatches and raised or lowered periscopes, choice of drive sprockets and stowage units, and the option of spare track on the turret sides, all of which go together for an early (Six Day War) Isherman or a late (Yom Kippur) vehicle. I built the latter.


Other than the points above, the kit did not fight me. The suspension units need filing carefully to line up level, if you stick them on as-is they will all sit up sharply at the front, which will look decidedly odd. But that’s what files are for, and while one might grumble that Tamiya’s HVSS subassemblies will probably assume their perfect alignment naturally, it really was not much of a modification to get these to line up, and the detail on the completed eight-part bogie units is excellent, even including foundry casting numbers. Suitably wash weathered, they provide an amazing visual texture when the Sherman’s twenty wheels per side (including drives, idlers and return rollers) are all lined up.

I mixed Tamiya Acrylics for the paintwork. I had obtained Model Master Acryl Israeli Sand, but cannot imagine where Testors got their research data for this paint. I have seen models finished in it and they look the least representational of the replicas out there on the net; they certainly don’t resemble either the Shermans in the museum at Latrun or colour photos of Shermans in service. The Acryl is a satin finish mustard yellow which by no definition could agree with the name “Sinai Grey.” I used the ratios published by IDF Modeling to mix a shade for the October 1973 conflict, being Tamiya XF-20 Light Grey, XF-57 Buff and XF-59 Desert Yellow (1:1:1), and airbrushed it overall, followed by shade and fade coats as usual for a monochrome subject. The result was a very pleasing drab desert scheme, which took weathering with oils and powder pigments very nicely indeed.


Academy’s decals are usually condemned as the worst in any commercial kits but I found these to behave quite well. The only major drawback was their shine, and as I was not planning on using clearcoats on this model I cut the shine by using a stiff brush to grind pigments into the decals, giving the impression of dust over the markings. It was not 100% successful, but visually very pleasing so long as the light does not catch the decals.

The kit provides a good selection of stowage in the form of ammo cans and crates, 105mm shells and an MG tripod, plus kitbags and rolled items such as groundsheets, which painted up very nicely. Unfortunately the kitbags are moulded with open backs which demands they lie against a flat surface, and they are arranged in the box photos in places where there are no tie-downs. Technically they should be hung from the rail around the rear of the turret, but if you do that you will see without much difficulty that they are open at the back. Packing the rear with some sort of putty, sculpting and repainting would fix this, but it was rather more work than I wanted to get into at this point.


A couple of wire radio masts, paint and fit the searchlight, and this beast was done. It’s one of the most textured models I’ve ever built, including an etched quality to the hull surface which suggests the original casting process.

I would recommend this kit to anyone with a few armour models under his or her belt – take it easy and enjoy the build, and don’t let it bite you in a few places!