
I was saving the Trumpeter MiG-3 kit so as to enjoy it to
the full – my first Trumpy WWII fighter in 1:48th scale, and going
by reviews I fully expected the nice mouldings in the box and a reasonable
assembly. Reviewers noted the fit around the wing root intakes was fiddly and a
bit challenging, but I paid little notice to this, as the older ICM kit was the
one rated as difficult.
Hmmm… I can find no copyright date but something tells me
it’s been around for a while, and despite the lovely surface detail and
excellent fit of much of the kit, the wing roots and lower forward fuselage can
only be described as appalling. The parts simply do not line up, and the quite
rigid plastic resists deformation to force a line-up. We are talking serious
gaps and steps.

What is there to do when alignment fails, other than get out
the tools? My rattail files got a serious workout, as did the technique of
adzing with the side of a knife blade to thin down plastic standing proud of
its neighbouring parts, and this was one of the few kits I have ever used a
C-clamp on, to force parts into alignment. Oddly enough, the first time was
also a Trumpeter kit, their AS-90 SP gun, a subject I built a couple of years
ago and have yet to blog about.

Superglue usually does the trick, but overnight curing was
the go this time, preceded and followed by filing and adzing, then putty, as
much as needed, in as many rounds as necessary, to appreciably smooth the
contours. The loss of surface detail was inevitable and the price of fixing the
gaps. In the picture above you see all the masking work, in both tape and
fluid, plus a plasticard shim strengthening the lower rear fuselage, and which
will be obscured by the cooling scoop.
It’s a shame the parts lined up as poorly as they did as the
rest of the kit of very appealing indeed, and the finished item looks great on
the shelf. I had meant to pick up a few more of this item but I find myself
thinking I’d better build the ICM from my stash first and make a judgement call
on whose engineering is really the most difficult.
A few other points of note about this kit. The
transparencies looked great but reacted to the solvents and glues around them
by developing striations on the inside. They were clear when they went on, then
ceased to be… Nothing to be done about that. The decals behaved very well but
had a patchy topcoat – dull and glossy in spots. My standard clear coats coped
with this well, though.
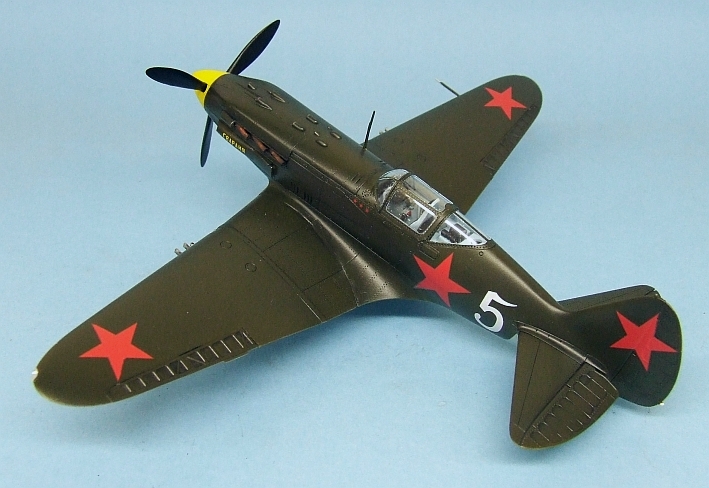
Yes, that’s US olive drab in the photos. The aircraft I
selected from the marking options was given by Trumpeter as being in this
shade, and I find it perfectly reasonable that amongst the millions of tons of
supplies which went to Russia under Lend Lease there was likely many thousands
of gallons of US-made camouflage paint for maintenance of the tanks and planes
they sent: some of it may very well have made its way onto Soviet-built
hardware as general availability dictated. Also, I had Tamiya XF-62 on hand and
it went on very nicely. Of course, I was finished before I remembered I should
have added 20% XF-60 Dark Yellow to lighten it for a scale effect, which would
have also allowed the panel wash some contrast… The underside blue is a
homebrew, the shade based on the apparent hue in photographs of restored MiGs.
The mix was XF-2 White plus XF-23 Light Blue plus X-14 Sky Blue at a ratio of
10:5:1. Micro Satin provided the base for panel wash and decals, and Micro Flat
brought the sheen down a bit for the final tone.

I left off the radio wire: the mast is so fragile it’s a
wonder it stands upright all by itself, there is no way it would take the
tension of an elastic thread without conspicuously bending.
I used the Eduard mask set and for once they had no
inclination to pull the paint off as they were removed. I got some bleed-under
from the interior colour but not the exterior – most odd, I’ve not had this
happen before. Another interesting way in which a kit can surprise you – I’m at
a loss to know how landing gear with a keyed fit – square peg to square hole
– can slot home with firm precision on
one leg and on the other be so loose as to literally go round in circles; or
how parts superglued in place can simply fall
off. One wheel so tight on its shaft it needs no glue, the other so loose
it falls off even with glue… The
receiver hole for the propshaft about a millimetre larger than the shaft, but
no retaining device behind it… A gunsight in clear plastic with the sprue gate
on the attachment process so that when you attempt to clean up the gate you
snap off the process and thus have no way to mount it unless you are good at millimetre-scale
scratch building. (There is no gunsight in this bird…)

Formation lights in clear plastic with no positive lock-ins,
just a curved surface to sit back against a matching cutaway in the wing, with the sprue gate on the inner surface of
a 3mm component. This latter makes me want to sit the kit’s designer down
with the kit and a few basic tools and say “you
clean up that sprue gate and fit the part, if you’re so (expletive deleted)
clever!” Seriously, you could take electron micrographs of these bits. With a
watchmaker’s optivisor I can see it, but I can’t manipulate it, and when applying enough force to clean up one of
the parts, it vanished forever across the workbench, explaining the lack of a
light lens on the starboard wingtip.
These are the kind of discrepancies the big guys worked out
long ago, and this kit must be old enough for Trumpeter to have still been
lower on the learning curve. In all fairness, I would like to build one of
their newer planes and see how it compares. I, um, have several!


