Monday, December 31, 2018

Recently Completed: Airfix 1:72 Hawker Typhoon Mk. Ib (A02041).


This is the first Typhoon I have ever done (though there was a Matchbox 1:72 Tempest II back in the 80s). Tooled in 2013, this kit looks very nice in the box, and as a Series 2 kit comes on four sprues and with two decal options. I had intended to do the more colourful scheme with invasion stripes, but didn’t trust such large decals not to pose grab and alignment problems that might result in tearing; plus I wanted to get this one off the bench before New Year and wasn’t in the market for surprises, or for backing up and painting the stripes.

Another good-looking addition to Airfix’s stable of British aviation in miniature, the model’s pleasing lines conceal a few challenges. I got the feeling Airfix somewhat over-thought the engineering in this kit, especially in the way the cockpit interior locates, and the cockpit floor/wheelwells part, which demands a certain order of assembly and unavoidably introduces the potential for misalignment. Fit problems I found inevitable, steps at the wingroot being the most serious, though gaps manifested on the horizontal tails too: whiteglue to the rescue. I expected the keyed landing gear to be out of alignment also, but surprisingly it was not – the wheels are flattened and bulged, and keyed to the struts, and once the model is “up on its feet” the flat spots are firmly to the ground. Assembly took a little time, and there was plenty of prepainting to do, between the prominent radiator/carburettor intake assembly, the cockpit and surrounds, landing gear, bay doors and propeller assembly.


Overall, though, the model looks the part, and once it was together the finishing techniques flowed along well enough. I used Tamiya’s accurised RAF late-WWII shades (XF-81, -82 and -83) topped with Microscale clears and Florey panel wash, finished with oil wash weathering and Mig pigments. I used the Eduard mask set for the canopy and wheels, and the AML masks for the Type A camo scheme. The set includes an extra sheet of straight strips doubtless intended for painting the invasion stripes.

The best part of the kit was the decals, they were superb and pulled into surface detail even before MicroSet was applied. Very thin, they grabbed a bit quickly, but are of solid tone, fully in-register, and seem especially accurate. They behaved much better than the sheet in the Spitfire I finished last, indeed I completed all decals, with the exception of the leading edge yellow stripes, in a single day of work.


Criticisms? The small antenna on the underside of the fuselage did not fit its locator hole – I fiddled and fumbled with it for a good twenty minutes, most of which was involved in getting hold of the tiny component, over and over and over, while applying a file to the base until it actually dropped into the receiver. The tailwheel is moulded as one part and must be seated before the fuselage is closed, which ups the odds of damage during handling and makes painting the unit a matter of a small brush and prayer. When the propeller is finally installed, the mounting calls for a cylindrical unit to be inserted between four moulded guides which “tension” it into place – why so complicated? The fuselage aperture had to be filed to accommodate the outer ring of the cylinder, and when it slid home it became apparent the outer diameter of the fuselage mouldings is larger than the outside diameter of the spinner backplate, leaving a strip of unpainted plastic exposed – yet with the prop now quite firmly in place there seems no way to tease it free again to paint the strip. Chancing getting camo green on the satin black spinner is not a risk I’m willing to take at the very finish, so it stands as-is, and angle of view will hopefully conceal the flaw for the moist part.


I have another of these, in the “Dogfight Doubles” edition with Pips Priller’s FW 190 (an unusual combination, as the Tiffie found its forté as a ground attack plane and probably never tangled with a 190, at least not on purpose) but it may be a few years before I welcome going 15 rounds with this kit again. There are some lessons learned here, of course, such as leaving the main gear bay doors off until after the struts are in place, which would make it easier to keep the doors aligned and not “toed-in” a bit.

Enjoyable? It’s always nice to see a project come together, but I would have to say I was happy to see this one leave the bench in the end. Maybe the shake’n’bake kits have somewhat spoiled me, but I had hoped for better alignment. Recommended nevertheless, to those with a little experience under their belts.


Saturday, November 17, 2018

Building Bigger


Sometimes, with the pressure of one's daily obligations, a piece of work can be produced and clean forgotten. Below is a model build-up feature I wrote years ago, and even then it was a retrospective on a project which had not been documented at time of actual completion. I was browsing for some information in old articles and came across the text, so figured it was high time this one saw the light of day!
_________________________________

As I’ve ruefully mentioned before on this blog, some modellers build bigger as they get older simply because they can’t see the small ones anymore. That’s very true for me, yet I haven’t built large scale planes since I was a kid – in fact I’ve only done one 1:32 aircraft in modern times. My previous was 34 (now 36!) years ago!


In 2014 I tackled Hasegawa’s big scale Fw 190 A-8 and had a great deal of fun with it. There were one or two hassles – the fit of the engine cowling to the fuselage left a lot to be desired and was a tough contour to fill and sand but that was about the only structural difficulty. The decal sheet was a let-down – I had selected Hans Dortenmann’s Red 1 and as with so many Luftwaffe aircraft the markings and the camouflage scheme particulars go hand in hand. It was bad news when it turned out the sheet was unserviceable, as the paintwork was fully finished. Patching the markings together from AM sheets would have been a $60 job (three sheets required). Fortunately a friend in Europe had the same kit and was doing it in different markings and sent me his sheet, which worked perfectly.


It’s a big, beautiful bird, and at this scale the problems of airbrush mottling are minimised – overspray can still be an issue but the battle for fineness seems less acute. The cockpit was easy to detail, and the 1:32 etched harness was incredibly realistic. The outer pair of canon barrels is missing – by the time I was done I was more than slightly browned off with Hasegawa’s engineering choice to simply scab them onto the exterior as optional bits, as my confidence to get them lined up in both axes while glue dried was in negative numbers, so she’s a slightly odd-looking A-8 here. Better that than make a mess after so much work had been invested…


I didn’t weather this one heavily – weathering is a skill mated t0 scale and one must learn to use a heavier hand as scale increases. I’m not comfortable with really laying on filth so this bird is in very well-maintained condition – which they must have been at least some of the time.

So why so few models in this scale? Simple, somewhere to put them. You can store four, even six, 1:72nd scale models in the same area as the “footprint” of a 1:32nd scale project, and you very quickly fill display cases with the big guys. I have plenty of models in this scale and would like plenty more, but until the day comes I have some sort of storage designed to receive them – shelves of the appropriate depth and at a spacing which does not waste cubic volume with empty air – I fear I’ll have to leave them where they are, buried deep in the stash.


There’s also a lot of work in a big model, even if it’s structurally no more complicated. It certainly uses a lot more paint, you’re aware of your running supplies being used more quickly. But that’s par for the course, I can only imagine the investment in time and materials the ship guys go to when they’re building the new Trumpeter 1:200th scale battleships. Now there’s a project to conjure with – it gives a whole new meaning to the term “big scale.” It is to ships what 1:16th scale is to armour or 1:24th scale to planes.

Hmmm, that reminds me, I have an Airfix 1:24th scale Harrier hiding away in the stash. After more than forty years since the basic tooling came out it might be high time it got the full treatment… If only I had somewhere to put it!


Saturday, November 3, 2018

Recently Completed: Airfix 1:72 Spitfire Mk. Ia (#A01071A)


Airfix and the Spitfire have been partners since the firm’s beginning, around 1954. Though the Spitfire was not the very first kit they ever produced (a farm tractor has that honour), a Battle of Britain-eraMk.1 was a very early release, followed by the classic Mk. IX in the late 60s, a Mk. V in the 80s, and so forth. In  1:48th scale Airfix has filled in many of the gaps of the available marks, their super-accurate Mk. XIV due out soon filling a major hole – though many vocal hobbyists bemoan any new Spitfire from Airfix as a missed opportunity to kit something actually new.

The subject here is the kit that’s had a lot of folk talking in the last year. A UK newspaper did a promotion with Airfix, providing coupons for free kits, and some enthusiasts managed to wrangle as many as five or six, though to be fair others missed out. Accuracy is likely to be high, given the meticulous approach of the firm these days, and the availability of the originals for study. Compromises for the scale appear minimal, though panel lines are a little heavy. The kit is a great pleasure to build. There were no real issues except for the fit of the canopy (below), which is very tight and needed a lot of careful filing and adjusting to sit down properly into the aperture. When it reached final shape it literally snapped into place. The build was otherwise uneventful. The landing gear legs are molded integrally with the gear bay doors, which in view of the warped legs of their Mustang kit, was a good idea, as these are dead straight and drop home into their receivers with a comfortable solidarity.


Cockpit detail is entirely adequate, the canopy cannot be posed open and so little is visible it makes little difference – in this writer’s opinion – if one superdetails or not.

The cockpit was painted with MM Cryl British Interior Green, the the model was airbrushed overall with Tamiya Acrylics. The underside shade is a mix of Tamiya XF-21 Sky and XF-2 White at 1:1 (and it still feels a bit too green to my eye), the Earth Dark Brown is also mixed, XF-52 Flat Earth and XF-64 German Rotbraun at 1:1 (as their straight Flat Earth seems too drab), while the green is straight XF-81, one of the group of three especially accurised RAF colours released some years back. Microscale clearcoats followed, with the final finish being flat, though MS Flat is actually quite satin in lustre. I was uncertain about the general shades until the model was finished, but once it had the brilliancy of the decals in contrast to the paintwork, I was very happy.


The decals were pretty good but I found them rather inflexible and unwilling to conform to sharp curves – it took up to ten applications of Microscale setting solution to get the flank roundels to lie down close to the top curve of the fuselage, and at least as many to get the wing roundels to draw into the gun hatch detail, though still not by 100%. Note the red gun patches are absent, there was no way they would curl around the leading edge. If I find some decal material more willing to conform, I’ll add them at some point – I did not fancy backing up and painting them with the model essentially done.


The canopy was masked with the Eduard set, which behaved perfectly, plus Gunze masking fluid, and the camouflage was masked using the AML set for the type B+ scheme. Florey wash and MiG pigments provided the finishing suite. The antenna wire was rigged with EZ-Line, always the last job I do because it is typically frustrating in its delicacy, and so hard to line up accurately at this scale.


There’s not really enough weathering for a battle-used aircraft in the thick of it. The pigments don’t adhere well to a hard, bright surface, they are far better seen against flat where they can get a grip on the fine irregularity. The oil streaking on the underside is also very restrained – Merlins leaked oil notoriously and Spitfires became filthy beyond words on the underside during sustained action. However, I seem to have developed a great sensitivity to mineral spirits, as just enough to wet the brush and do the job in a few minutes left me with a cracking headache for the evening. I didn’t think the job was big enough to be worth pulling out the twin-cartridge respirator, but I was wrong! Okay, this plane was washed recently!


This is my first 1940, Battle of Britain-era RAF project since I did Airfix’s 1:24th scale Mk. Ia around 1976! I’ll certainly be doing some more subjects in these colours – they have a new tool Hurricane, the Boulton-Paul Defiant, and a couple of Curtis Tomahawks in 1940 RAF livery, all of which should looks very nice indeed (and are served by the excellent AML camouflage mask sets, which save a great deal of time and effort).


Saturday, August 25, 2018

Mustang in Blue Diamonds


Earlier this year I completed Airfix’s 1:72 P-51D Mustang (A01004). This is the same kit I built around 2014, same original issue, though the kit has been boxed several times now with fresh marking options. This time I learned from my errors and did not try to include photoetched harness, though I succeeded in installing both joystick and radio mast unbroken. It remains to be seen if I can do that trick twice.

I have long wanted to do the varied post-war schemes and an old Superscale sheet (72-149) features the markings of the Philippine Air Force, who used Mustangs between the late ’40 and late ‘50s. The most famous of these was “Shark of Zambales,” the personal mount of the commanding general of the arm, B. N. Ebuen, and which has been the subject of numerous restorations over the years, including a standing display at the PAF museum at Villamor Airbase. Superscale included markings for a very particular phase in the original’s career, as the markings seem to differ in detail from one photograph to the next. Prolific aviation artist Gaetan Marie (check out his page here) has painted three different schemes worn by this aircraft, varying by the size, shape and colour of the shark-mouth, the scroll over the tail marking, spinner decoration, etc. and Superscale seem to have based their rendition on a single B&W photograph in which I am not prepared to swear the shark-mouth was actually applied. Angle and the nature of the filmstock make it dubious, but what’s not dubious is the unlikelihood of me applying the decals perfectly, so I left them on the sheet. I can always apply them in future if I feel justified.


The sheet must be over twenty years old and worked beautifully, I find myself thinking I’ll still be using decals from my stash decades hence, and they’ll still work as well as ever!


Another important factor, this is my first natural metal scheme in many years, as I have had the greatest difficulty in achieving a credible finish. I used Tamiya flat aluminium acrylic, overworked with 6B pencil graphite to vary the tonal values, then topcoated with Micro Satin for lustre. It feels quite good and I look forward to trying this technique again.


The landing gear of the Airfix kit is its only real disappointment – the plastic is soft and the main gear legs are irretrievably warped right on the sprue. The first time I built the kit I overlooked the problem and photographed it from angles that hid the gear, but this time I just couldn’t. I picked up the white metal replacement set from Scale Aircraft Conversions, beautiful castings in strong metal, absolutely straight, and they even supply two sets in the box so the next Airfix Mustang will get them too.


This bird came out very nicely and I look forward to adding more to my line-up – I recently picked up decal sets for postwar ANG birds and third world users, plus the Airfix edition with decals for Grenada, 1983, the last user of Mustangs in a combat role. I should think I’ll develop a long line of P-51Ds based on this kit and the ocean of decals I’ve collected over the years.


Saturday, January 20, 2018

Keeping it Simple: Academy’s Hellcat


When the weather has hit 112 F out there and you need AC and fan in combination to get through the day, you don’t want heavy, complicated projects, and knocking off some quick builds is the right medicine to break up professional commitments.


I picked up Academy’s 1:72 F6F Hellcat (#2121) on eBay many years ago and it has hung around on my shelves for the last two years or so with some pre-painting done, therefore technically started. I would like to do a USN midnight blue subject in each year, along with another from the grey-over-white era, but my last blue was Academy’s F2H Banshee in 2015 – I was amazed to find years had gone by since the last time I uncapped the blue! This Hellcat is a surprisingly good little kit, very simple to put together (so long as you’re careful with alignments, the wing to fuselage can bite you on the underside) and has engraved detail so looks the part under a coat of paint.


Construction was not difficult, fit is generally okay, though the engineering is not quite up there with the big guys. Options include the small side panel windows to do the -3 variant, and you have bombs and rockets for the -5. Clear parts are well done, with a choice of windscreens for the two variants plus clear plug-in domes for the position lights on the spine an tail light under the rudder. The engine is a decent little rendition of an R-2800 and looks okay with a black wash. The prop shaft seems a bit thick and profits from a swipe with a file. Landing gear is reasonably strong for the scale, and undetailed gun barrels are moulded into the wing halves.


I’ve had disappointing results from commercial canopy masks, they can pull up the paint as you remove them, and it’s frustrating indeed when that happens as the product adds several dollars to the build cost. This time I did it the old fashioned way, using thin-cut slivers of Tamiya tape and Gunze masking fluid to outline and fill in the areas, and the thin braces are custom decals – clear Superscale decal film oversprayed first with Interior Green, then Midnight Blue, and finally Micro Satin. I made a piece 30 x 48 mm and should be cutting strips from it for many years to come. I used my “Chopper” mini guillotine to precision-cut a single strip, which provided the four short pieces necessary (I didn’t get fancy with the 45-degree corners of the bracing strips – tis is meant to be a simple project, after all).


I went with a mixed version of USN Midnight Blue (An 607/FS 25042), as I had read and agreed with the observation that Tamiya’s shade (XF-17) was too dark. I tried the mixing ratio of XF-17 : XF-8 : XF-2 at 5:3:2, this producing a slightly brighter and lighter blue. The original was not a full gloss, so Microscale Satin was the perfect finish, right out of the airbrush. I used the Academy instrument decal and going by the way it went on the kit sheet would probably have been usable, but I intended from the start to go with Superscales for this build, 72-737 being my choice, simple markings for a -5 from an unidentified unit toward the end of the war.


The support straps running under the belly tank should be in natural metal, and if I ever locate my silver strip decals I’ll add them. Likewise with the bombs – lightened Olive Drab for scale effect, but the ordnance decals I remembered turned out to be 1:48th scale, so if I ever find smaller ones I may add them and perhaps a clear coat to dull down the weapons. In the same spirit, when I get some superglue in a fresher state I’ll look at adding a radio antenna, if I judge the mast strong enough to take the mild but constant pull of EZline.


It came out very nicely and is my first Hellcat ever – I built a Wildcat as a kid, if memory serves, but never its successor.

I can’t wait to get a Corsair into this mixed blue – it looks better, to my eye, than any I’ve had out of a jar or can so far. Mind, it’s a good job I wasn’t trying for a high gloss, or I’d have been very disappointed, as I have yet to learn the trick of keeping dust and micro-fine hairs out of the painting space.

Next up looks like being a Spit, and maybe a Phantom is impending…

Cheers, Mike


Thursday, January 4, 2018

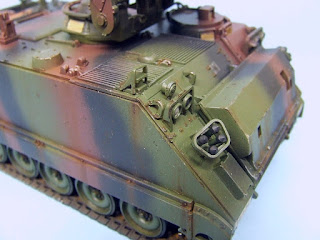
Kit Review: Academy 1:35 M981 FIST-V #1361


Yes, I know, 22 years is a long time coming for a review, but this is a rare kit. I checked on Scalemates and though there are some videos and build-logs, there don’t seem to be reviews online, and no history of production beyond the original 1996 release of this variation of Academy's basic M113 moulds. So why now? I just finished it, my fourth completion for 2017.


I bought this kit on eBay many years ago and put it together way back—I built it in 2009 when I wanted to get in some gluing time, not painting, and just set it aside awaiting paint – and it’s been in its box ever since. I figured it was high time I lay this Shelf Queen to rest.


It took a remarkable amount of effort to get the job done. I laid on the base green of the NATO camo several months ago, then it went on the back burner yet again as the affairs of life clamoured for attention and my writing career occupied a great deal of my time. But the crunch point is what it’s always been for me – that moment of truth when you need to airbrush at reasonably fine definition to lay on the second and third colours. I’ve never been able to airbrush as tightly as I’d like, it’s true, and there’s a bone in my head doesn’t like to accept that, and avoids the reality. Hey ho.

I can say the early-ish Academy engineering was not too great, though probably in some aspects mirrors early Tamiya, knowing their habit of copying the great firm from Shizuoka shamelessly. When, at the very end, I went to fit the separately painted smoke grenade dischargers, I found the holes in their bases and the pins over which they plugged were both different shapes and different sizes and that’s what prompted me to check Scalemates – I suspected for a moment that Hobbycraft might be involved somewhere in its pedigree. But no.


The plastic did not react very enthusiastically to cement, and many of the small external parts which go to make up this variant were without positive location devices – “prayer and superglue” as I always call it. Outlines appear for the locations themselves, after that you’re on your own. Given the nature of the plastic, the indie track links were beyond even contemplation, and I picked up a vinyl replacement set from AFV Club that worked well. They could have been tighter, but that’s my only criticism, and as the vehicle is featured with side skirts, the lack of proper sag in the upper run is invisible.

I used my standard armour techniques, with a few tweaks. I used Micro Flat to tie the camo (Tamiya Acrylics NATO shades – I lightened the green for scale effect but then forgot to do the same for the others – my bad) together, though the jury’s out on how bright an idea this way; I’ve done it a couple of times before on NATO camo to suggest the low lustre of a well-maintained modern vehicle, but the feel is not necessarily how I like armour to be. I also tried 6B pencil graphite over flat black to create a metallic effect on the tow cable, and while it may not be too great for bowden-cable I think it’ll work well in future for the barrels of light canons.


The kit was very fiddly at times, and I omitted the stowage accessories in the interests of getting it done – likewise the early Academy decals were not impressive at all (scalding hot water needed to get them off their backing, then they had almost no stick to the model) and I left off the large exercise markings in the name of sanity. Too many parts, too few attachment devices – that sounds like 1990s asian kits to a T.

I also forgot that the M113 is an aluminium vehicle – it does not display rust. The streaking in the images here is mostly done with MiG pigments, so it’ll wash off, and when the day comes I can think about this project again I’ll have a go to tidy it up and correct it.


It looks pretty fair on the shelf, a decent addition to my NATO/modern armour collection, but I’d have to say I look forward to whacking together Tamiya’s old M113 for comparison – a Vietnam era paint job with lashings of red dust. In conclusion, if you want the M901/M981 fire team combo, Academy is your source, and with care they build into nice looking models.
                                
Cheers, Mike Adamson