
There is perhaps no particular mileage in reviewing a kit released over twenty years ago, but a good kit is a good kit, and apropos of my ongoing commentaries on the great Tamiya-Academy “thing” that happened in the late 80/early 90s I find it highly significant to compare the Tamiya Merkava 1 to the later marks produced by Academy.
I remember seeing the Tamiya Merk I on the shelves in the late 80s and really wanting to build it, but having all kinds of airbrush woes at the time and resisting the temptation because I just knew “what kind of mess that airbrush of mine will make all over that beautiful detailing.” I finally picked up this kit on eBay a few years back and filed it in the stash, not thinking about it after that point as a plethora of other projects took my attention. I build the Academy Merk II some time ago (it’s still waiting on decent decals, the Academy stickers disintegrated, as apparently they are wont to) so when my interest in Israeli armour was piqued and I came to check out the early Mk.1 kit the similarities fairly leapt out of the box at me.

The fact is, they are not just similar, their parts are interchangeable. Yes, Academy updated the kit to Mk.II standard, with the new sideskirts, extra topside MG, appliqué armour, extra radio mast and so forth, as well as their unique vinyl tyre approach, but the guts of the kit remain an exact copy of Tamiya’s. The assembly sequence, unit by unit, is pretty much identical, and tiny inaccuracies have been reproduced, right down to the fact the skirt armour on the right hand side doesn’t want to fit, takes four goes and never lines up properly, despite the left side fitting like a breeze first time out. That is so far beyond coincidence it simply groups the basic Merkava into the same batch that Academy patterned from their competitor’s product line.

Tamiya’s kit was the subject of many excellent dioramas in the past, including a quite famous one, “The Road to Beirut,” which appeared in the print media of its day and can be viewed online at
Perth Military Modelling. While the stowage and figures have had plenty of aftermarket and scratchbuilding attention in this example, the kit is more or less out of the box, and shows well for the quality of the original.

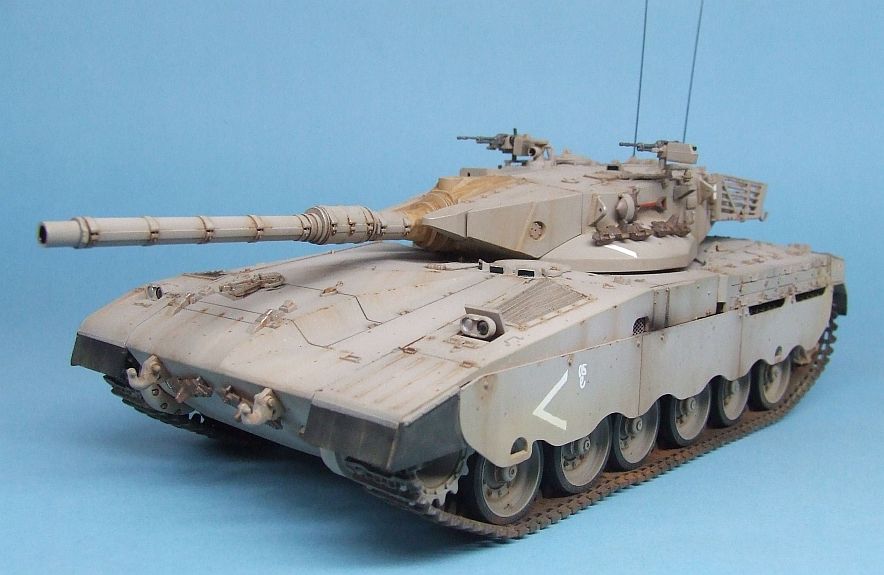
I found the kit to build with Tamiya’s trademark ease, more or less falling together. While there are photoetch and other accessories for this kit I was after a quick, straightforward build, and even used the black vinyl mesh supplied for the turret basket floor. It worked surprisingly well and looks fine, and when I get around to buying Verlinden’s Israeli stowage set it’ll look even more the part. The only major fix I felt compelled to make was to back some serious apertures with something – tanks are not see-through, and when both the starboard side engine exhaust louvres and a duct of some sort (which I wasn’t able to identify as all my reference materials pertain to later marks) on the portside were provided with nothing to back them, I had to get creative. I used some fine diamond-pattern etched brass mesh from EMA, and while I have no idea if it’s even close to accurate for the outlets of a Merk 1, it is visually a world of improvement.

I used my standard suite of armour techniques. Tamiya Acrylics were used almost exclusively (the Sinai Grey being XF-20 Light Grey and XF-57 Buff mixed 1:1, as recommended by
IDF Modelling for a 1982 Lebanon conflict-era vehicle, with two rounds of oil wash weathering, drybrushing with acrylics and enamel for bare metal, followed by Mig pigments for desert dust, ground into the decals with a stiff brush to kill their shine.

I’m quite happy with the result, and while I’ll probably spot details to pick up at a later date (such as the lack of tow cables, I need to experiment with braided copper wire or picture hanging cable, as the plastic ones in the kit need to be heated and bent to go round two 90-degree corners and then drop precisely into incredibly fragile guide parts … call my a cynic but I don’t think that was ever a realistic proposition for anyone but watchmakers and brainsurgeons) I’m pleased with the dusty desert finish and general sense of knocking about that the washes, drybrushing and dust create.

Many would argue that Academy’s later offerings are far better but I see them as merely incremental improvements building on a sound original, and this was a fun project that was on and off my bench in a reasonable time. I recommend it to anyone who is not a rivet-counter and who enjoys getting to grips with painting and weathering.

PS: Blogger just changed the way it handles information, sorry the text crowds the photos but I have no idea what to do about it at this point...
 There is perhaps no particular mileage in reviewing a kit released over twenty years ago, but a good kit is a good kit, and apropos of my ongoing commentaries on the great Tamiya-Academy “thing” that happened in the late 80/early 90s I find it highly significant to compare the Tamiya Merkava 1 to the later marks produced by Academy.
I remember seeing the Tamiya Merk I on the shelves in the late 80s and really wanting to build it, but having all kinds of airbrush woes at the time and resisting the temptation because I just knew “what kind of mess that airbrush of mine will make all over that beautiful detailing.” I finally picked up this kit on eBay a few years back and filed it in the stash, not thinking about it after that point as a plethora of other projects took my attention. I build the Academy Merk II some time ago (it’s still waiting on decent decals, the Academy stickers disintegrated, as apparently they are wont to) so when my interest in Israeli armour was piqued and I came to check out the early Mk.1 kit the similarities fairly leapt out of the box at me.
There is perhaps no particular mileage in reviewing a kit released over twenty years ago, but a good kit is a good kit, and apropos of my ongoing commentaries on the great Tamiya-Academy “thing” that happened in the late 80/early 90s I find it highly significant to compare the Tamiya Merkava 1 to the later marks produced by Academy.
I remember seeing the Tamiya Merk I on the shelves in the late 80s and really wanting to build it, but having all kinds of airbrush woes at the time and resisting the temptation because I just knew “what kind of mess that airbrush of mine will make all over that beautiful detailing.” I finally picked up this kit on eBay a few years back and filed it in the stash, not thinking about it after that point as a plethora of other projects took my attention. I build the Academy Merk II some time ago (it’s still waiting on decent decals, the Academy stickers disintegrated, as apparently they are wont to) so when my interest in Israeli armour was piqued and I came to check out the early Mk.1 kit the similarities fairly leapt out of the box at me.
 The fact is, they are not just similar, their parts are interchangeable. Yes, Academy updated the kit to Mk.II standard, with the new sideskirts, extra topside MG, appliqué armour, extra radio mast and so forth, as well as their unique vinyl tyre approach, but the guts of the kit remain an exact copy of Tamiya’s. The assembly sequence, unit by unit, is pretty much identical, and tiny inaccuracies have been reproduced, right down to the fact the skirt armour on the right hand side doesn’t want to fit, takes four goes and never lines up properly, despite the left side fitting like a breeze first time out. That is so far beyond coincidence it simply groups the basic Merkava into the same batch that Academy patterned from their competitor’s product line.
 Tamiya’s kit was the subject of many excellent dioramas in the past, including a quite famous one, “The Road to Beirut,” which appeared in the print media of its day and can be viewed online at Perth Military Modelling. While the stowage and figures have had plenty of aftermarket and scratchbuilding attention in this example, the kit is more or less out of the box, and shows well for the quality of the original.
 I found the kit to build with Tamiya’s trademark ease, more or less falling together. While there are photoetch and other accessories for this kit I was after a quick, straightforward build, and even used the black vinyl mesh supplied for the turret basket floor. It worked surprisingly well and looks fine, and when I get around to buying Verlinden’s Israeli stowage set it’ll look even more the part. The only major fix I felt compelled to make was to back some serious apertures with something – tanks are not see-through, and when both the starboard side engine exhaust louvres and a duct of some sort (which I wasn’t able to identify as all my reference materials pertain to later marks) on the portside were provided with nothing to back them, I had to get creative. I used some fine diamond-pattern etched brass mesh from EMA, and while I have no idea if it’s even close to accurate for the outlets of a Merk 1, it is visually a world of improvement.
 I used my standard suite of armour techniques. Tamiya Acrylics were used almost exclusively (the Sinai Grey being XF-20 Light Grey and XF-57 Buff mixed 1:1, as recommended by IDF Modelling for a 1982 Lebanon conflict-era vehicle, with two rounds of oil wash weathering, drybrushing with acrylics and enamel for bare metal, followed by Mig pigments for desert dust, ground into the decals with a stiff brush to kill their shine.
 I’m quite happy with the result, and while I’ll probably spot details to pick up at a later date (such as the lack of tow cables, I need to experiment with braided copper wire or picture hanging cable, as the plastic ones in the kit need to be heated and bent to go round two 90-degree corners and then drop precisely into incredibly fragile guide parts … call my a cynic but I don’t think that was ever a realistic proposition for anyone but watchmakers and brainsurgeons) I’m pleased with the dusty desert finish and general sense of knocking about that the washes, drybrushing and dust create.
 Many would argue that Academy’s later offerings are far better but I see them as merely incremental improvements building on a sound original, and this was a fun project that was on and off my bench in a reasonable time. I recommend it to anyone who is not a rivet-counter and who enjoys getting to grips with painting and weathering.
 PS: Blogger just changed the way it handles information, sorry the text crowds the photos but I have no idea what to do about it at this point...


