Saturday, January 20, 2018

Keeping it Simple: Academy’s Hellcat


When the weather has hit 112 F out there and you need AC and fan in combination to get through the day, you don’t want heavy, complicated projects, and knocking off some quick builds is the right medicine to break up professional commitments.


I picked up Academy’s 1:72 F6F Hellcat (#2121) on eBay many years ago and it has hung around on my shelves for the last two years or so with some pre-painting done, therefore technically started. I would like to do a USN midnight blue subject in each year, along with another from the grey-over-white era, but my last blue was Academy’s F2H Banshee in 2015 – I was amazed to find years had gone by since the last time I uncapped the blue! This Hellcat is a surprisingly good little kit, very simple to put together (so long as you’re careful with alignments, the wing to fuselage can bite you on the underside) and has engraved detail so looks the part under a coat of paint.


Construction was not difficult, fit is generally okay, though the engineering is not quite up there with the big guys. Options include the small side panel windows to do the -3 variant, and you have bombs and rockets for the -5. Clear parts are well done, with a choice of windscreens for the two variants plus clear plug-in domes for the position lights on the spine an tail light under the rudder. The engine is a decent little rendition of an R-2800 and looks okay with a black wash. The prop shaft seems a bit thick and profits from a swipe with a file. Landing gear is reasonably strong for the scale, and undetailed gun barrels are moulded into the wing halves.


I’ve had disappointing results from commercial canopy masks, they can pull up the paint as you remove them, and it’s frustrating indeed when that happens as the product adds several dollars to the build cost. This time I did it the old fashioned way, using thin-cut slivers of Tamiya tape and Gunze masking fluid to outline and fill in the areas, and the thin braces are custom decals – clear Superscale decal film oversprayed first with Interior Green, then Midnight Blue, and finally Micro Satin. I made a piece 30 x 48 mm and should be cutting strips from it for many years to come. I used my “Chopper” mini guillotine to precision-cut a single strip, which provided the four short pieces necessary (I didn’t get fancy with the 45-degree corners of the bracing strips – tis is meant to be a simple project, after all).


I went with a mixed version of USN Midnight Blue (An 607/FS 25042), as I had read and agreed with the observation that Tamiya’s shade (XF-17) was too dark. I tried the mixing ratio of XF-17 : XF-8 : XF-2 at 5:3:2, this producing a slightly brighter and lighter blue. The original was not a full gloss, so Microscale Satin was the perfect finish, right out of the airbrush. I used the Academy instrument decal and going by the way it went on the kit sheet would probably have been usable, but I intended from the start to go with Superscales for this build, 72-737 being my choice, simple markings for a -5 from an unidentified unit toward the end of the war.


The support straps running under the belly tank should be in natural metal, and if I ever locate my silver strip decals I’ll add them. Likewise with the bombs – lightened Olive Drab for scale effect, but the ordnance decals I remembered turned out to be 1:48th scale, so if I ever find smaller ones I may add them and perhaps a clear coat to dull down the weapons. In the same spirit, when I get some superglue in a fresher state I’ll look at adding a radio antenna, if I judge the mast strong enough to take the mild but constant pull of EZline.


It came out very nicely and is my first Hellcat ever – I built a Wildcat as a kid, if memory serves, but never its successor.

I can’t wait to get a Corsair into this mixed blue – it looks better, to my eye, than any I’ve had out of a jar or can so far. Mind, it’s a good job I wasn’t trying for a high gloss, or I’d have been very disappointed, as I have yet to learn the trick of keeping dust and micro-fine hairs out of the painting space.

Next up looks like being a Spit, and maybe a Phantom is impending…

Cheers, Mike


Thursday, January 4, 2018

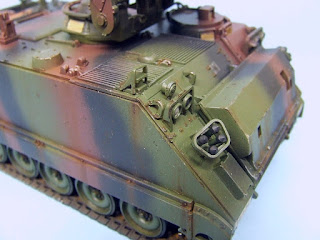
Kit Review: Academy 1:35 M981 FIST-V #1361


Yes, I know, 22 years is a long time coming for a review, but this is a rare kit. I checked on Scalemates and though there are some videos and build-logs, there don’t seem to be reviews online, and no history of production beyond the original 1996 release of this variation of Academy's basic M113 moulds. So why now? I just finished it, my fourth completion for 2017.


I bought this kit on eBay many years ago and put it together way back—I built it in 2009 when I wanted to get in some gluing time, not painting, and just set it aside awaiting paint – and it’s been in its box ever since. I figured it was high time I lay this Shelf Queen to rest.


It took a remarkable amount of effort to get the job done. I laid on the base green of the NATO camo several months ago, then it went on the back burner yet again as the affairs of life clamoured for attention and my writing career occupied a great deal of my time. But the crunch point is what it’s always been for me – that moment of truth when you need to airbrush at reasonably fine definition to lay on the second and third colours. I’ve never been able to airbrush as tightly as I’d like, it’s true, and there’s a bone in my head doesn’t like to accept that, and avoids the reality. Hey ho.

I can say the early-ish Academy engineering was not too great, though probably in some aspects mirrors early Tamiya, knowing their habit of copying the great firm from Shizuoka shamelessly. When, at the very end, I went to fit the separately painted smoke grenade dischargers, I found the holes in their bases and the pins over which they plugged were both different shapes and different sizes and that’s what prompted me to check Scalemates – I suspected for a moment that Hobbycraft might be involved somewhere in its pedigree. But no.


The plastic did not react very enthusiastically to cement, and many of the small external parts which go to make up this variant were without positive location devices – “prayer and superglue” as I always call it. Outlines appear for the locations themselves, after that you’re on your own. Given the nature of the plastic, the indie track links were beyond even contemplation, and I picked up a vinyl replacement set from AFV Club that worked well. They could have been tighter, but that’s my only criticism, and as the vehicle is featured with side skirts, the lack of proper sag in the upper run is invisible.

I used my standard armour techniques, with a few tweaks. I used Micro Flat to tie the camo (Tamiya Acrylics NATO shades – I lightened the green for scale effect but then forgot to do the same for the others – my bad) together, though the jury’s out on how bright an idea this way; I’ve done it a couple of times before on NATO camo to suggest the low lustre of a well-maintained modern vehicle, but the feel is not necessarily how I like armour to be. I also tried 6B pencil graphite over flat black to create a metallic effect on the tow cable, and while it may not be too great for bowden-cable I think it’ll work well in future for the barrels of light canons.


The kit was very fiddly at times, and I omitted the stowage accessories in the interests of getting it done – likewise the early Academy decals were not impressive at all (scalding hot water needed to get them off their backing, then they had almost no stick to the model) and I left off the large exercise markings in the name of sanity. Too many parts, too few attachment devices – that sounds like 1990s asian kits to a T.

I also forgot that the M113 is an aluminium vehicle – it does not display rust. The streaking in the images here is mostly done with MiG pigments, so it’ll wash off, and when the day comes I can think about this project again I’ll have a go to tidy it up and correct it.


It looks pretty fair on the shelf, a decent addition to my NATO/modern armour collection, but I’d have to say I look forward to whacking together Tamiya’s old M113 for comparison – a Vietnam era paint job with lashings of red dust. In conclusion, if you want the M901/M981 fire team combo, Academy is your source, and with care they build into nice looking models.
                                
Cheers, Mike Adamson