World In Miniature is devoted to the art and science of plastic modeling, by, for and about modellers who strive for realism and fun in the hobby!
Sunday, January 30, 2011
Old Decals Still Work
They do say there’s a finite lifespan to decals, and anyone who has opened a vintage kit can attest to how fragile, faded and yellowed they can become. But decal technology has come a long way and when firms like Microscale came along they used only the best. I have had aftermarket decals perish, but not the good stuff.
The latest milestone on the Italeri Corsair was getting the markings on. I had meant to do Guy Bordelon’s plane but Italeri got the famous blue (substituting for white to ‘tone down’ the visibility for a nightfighter unit during the Korean war) too vivid. I have Superscale’s better version but before I was able to locate them I decided to go with the standard marking option in the kit, VMF(N)-513. I had applied Microscale Satin over the Tamiya XF-17 paintwork, resulting in a nice, smooth lustre, and I began on the underside for caution’s sake. The kit decals were very thin, very fragile, and the whites were translucent… Not the best, but there are always options.
Out came the big box which stores decals, most of them Superscale. The “Marines” title under the wing was sourced from sheet 72-20, and the non-backgrounded national insignia, with their separately printed red bars, from 72-12. These days, the range is way above a thousand sheets and still counting, and it must be over a decade since Krasel Industries announced they would no longer be reprinting their old releases. These two sheets date from the early 1970s and may have been printed no later than the mid-90s, so I had to wonder at first how they might perform.
They have been stored away from light and pressed firmly in their packets away from air, reasonably cool and always completely dry, and these conditions seem to be acceptable, because they worked fine. Superscales are incredibly thin and that makes them inherently fragile, these tore two or three times, but were coaxed into place with the standard Microscale system chemistry. The model was given a careful wash with a brush dipped in clean water and swabbed with a tissue to remove dried chemistry, which will otherwise show up instantly and indelibly as dull tidemarks under clear coats, then another coat of satin was applied to seal everything up.
Keep a thing twenty years and you’ll find a use, they say, and these decals replaced the kit items perfectly, reducing the somewhat translucent items to codes and serials. They do look slightly different, but not so much the casual glance would pick up the problem.
I’m glad these decals work so well after such a long time ‘on standby,’ as it were. My decal collection is considerable and I look forward to finally having the chance to use it properly, building many colourful and spectacular subjects in future.
Thursday, January 27, 2011
Raiders of the Lost Paint Stand
Many years ago, about 2002 I think, I published a small article in FineScale Modeler about how to make your own painting stands. They have those fancy ones you can buy, with clamps and a rotating base, they adapt to any model, and sure, they’re great, but they cost mucho dollars. I proposed a simple solution, a purpose-made painting jig that will support a model while you’re spraying it. With aircraft, the idea is you paint the underside, then turn it over with the stand locating into the wheel wells, and go hands-off to paint the top.
Car modellers have long used the old standby of a bent coat hanger to support a car body while it’s being sprayed, the single most critical phase in car models. The finish on the paint is everything and getting that coat on just right means treating the job like the real thing. Armour is less demanding in this sense, as flat paints are much more forgiving: no matter how complex the scheme, the paints will be touch-dry in no time and you can adjust and move on.
Aircraft of multiple colours offer the chance to spray one shade, let it dry, then support the model by those areas while painting the next, but what about models which are largely or completely mono-tone? The axiom of “keeping a wet edge” to the spray coat becomes difficult to say the least, and that’s where a stand really comes in.
We probably all have ideas and solutions to this problem, and no particular approach is any righter (or wronger) than another. I have found that a handy way to do it is to glue together a few bits of styrene rod, strip and sheet to make a stand that supports the plane on three points, and it really couldn’t be easier.
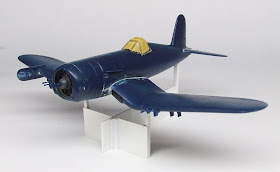
The stand I made for the article all those years ago was designed for a 1:72 Corsair, and, working on the kit that has appeared in my last two posts, I had a need for it. Unfortunately I couldn’t find it, so had to make up another. Rather than duplicate the original design, I used the even simpler design for the 1:72 Phantom painting stand that I made in 2003 for another FSM feature project, and which I do still have to hand.
Two pieces of sheet plastic are tenon-jointed together to make a cruciform shape with the short axis equal to the track of the main gear wells, and the long arm reaching to the tail gear well. They are braced together with some 3.2mm angle stock, then three uprights are installed, the main well supports from 2mm square stock, braced with small angle, and the tail support made from strip stock laid onto each side of the sheet and another piece between them to create a solid column above the sheet. I cut the pieces in ten minutes and assembled them with liquid cement in less.
The great thing is, you can adapt this formula for any aircraft type in any scale, and if you know you’ll be building many of a particular type they can solve the hassle of how to hold a monocoloured bird while the paint is going on. For US Navy types between 1944 and 1958, with that iconic overall Dark Sea Blue scheme, it really simplifies things.
Oh, and yes, if you remember that article in FSM, it was the very same Corsair model appearing in it as I am just now coming to grips with!
Wednesday, January 26, 2011
Attitude: Resisting the Fiddly
Perhaps it’s the same phenomenon I was discussing last time, a mental blockage that keeps you from either seeing a solution or, just as importantly, implementing it.
I began building a Hasegawa Kyofu Rex seaplane a week or two back, a project I’ve wanted to do for ages and finally found an excuse to as another test subject for trying out those acrylic topcoats. The model fell together like a dream, there are only 37 parts in the plane and a few more in the handling trolly (the German would be dockwagon). The acrylics are all lined up and ready to go, the only obstacle was masking the canopy. Eduard make a set for this kit’s bigger brother, Tamiya’s 1:48 scale equivalent, but for the one-piece canopy of the little guy I was on my own.
Well, slivers of tape must be coaxed into place with fine tools, obviously. But it took me a week or so to commit to the task. I felt like Sgt. Pinback being told it was time to feed the alien, in Dark Star… “Ohhhhh, I don’t wanna do that… I have to do everything ‘round here…” Maybe it’s my deteriorating eyesight, or persistent memories of being frustrated by such tasks before, but it took resurrecting that Corsair a few days ago to get me to the job. Eduard makes Corsair masks but it would be weeks before I could get hold of them and they cost money, a few slivers of tape are immediate and essentially cost nothing.
So, the mind sees the necessity, the heart deals with the angst, and the hands and eyes do the job. A couple of hours work spread out through the whole day so there’s no chance to go stale on the task, and I had both canopies outlined. From there it’s easy enough to backfill the areas with tape. One concession to the approach is that it’s obliged to be a two-part finishing process: main struts will be painted, fine secondaries, simply too small or intersecting in complex ways with the others, will be slivers of decal, which will be made from clear sheet at the painting stage.
The pre-cut masks are so convenient you forget grass-roots techniques like these. I’ve not made slivers of decal for canopy struts in 15 years, so it’ll be an interesting experiment to see how they work – or don’t. If they don’t, I’ll figure out some other solution.
Sunday, January 23, 2011
Attitude: Another Skill That Evolves
Back in the 90s I considered myself a pretty good modeller. Well over 20 years in the hobby, airbrushing for a decade and a half, I knew my way around kits pretty good; but when a kit company fell down on the job my ability to think around a problem really extended no further than filler putty and hope.
Italeri has been described as one of those companies, like Hobbycraft, that perennially spoils the ship for a hap’eth o’ tar. Near enough is good enough, it has been said, and there are plenty of examples that bear out the worth of this observation. Even in later years, with the adoption of technologies for engraved detail, better decal production and attention to the wants of modellers, Italeri could still make mysterious blunders.
I read the review in FSM of their 1:72 F4U-5N (#044, dated 1994), and Paul Boyer made a marvellous job of it. I would have expected nothing less from a modeller of his abilities! I bought the kit off the shelf and was quite impressed with it, and had it almost complete when a problem I had not expected reared its head. The wings appeared to be out of alignment. I puzzled over it for a long time, held it to the light, compared it to drawing tools and graph sheets, and sure enough my eye was telling me true. My set of the tail surfaces was correct to within a degree or two, but the wings were off. It may have been my fault, but the whole wing structure sloped up to the right by some degrees. I had fitted the wing first, believed I had it right, and did not notice the problem until I installed the tails.
I tussled with the problem for ages. It had taken a lot of work to get the wing seated properly and the joints sealed up neatly, what could I do about that mismatch on the angle? Maybe I should just accept the error and finish the model, nobody but me would ever know the problem was there… But that seemed like either cheating or admitting defeat.
Eventually I forgot about that unfinished Corsair among the kits on my shelves as I went on to new and better projects, learned many new skills, got into scratchbuilding, honed my techniques on armour, amassed an impressive stash, and so forth. Fast-forward a number of years…
My great gloss finish dilemma and the accompanying clearcoat debarkal have taken many twists and turns but eventually they seem to have sorted themselves out. On a recent trip to the LHS I spotted Tamiya’s XF-17, which appears to be a close match to FS 35042, Flat Sea Blue, and therefore the right shade for late war Corsairs. My present experimental approach is one suggested long ago by Paul Boyer in a review of Future Floor Polish (unavailable in Australia to this day): paint the model in flat paints, they’re easier to apply and dry much quicker, then bring up the lustre with a coat of clear gloss. I have the flat blue, the gloss will be arriving next week by air, all I need is a subject to test it on.
I searched my log for Corsairs, Hellcats and Avengers and was about to go stash-diving when I noticed the Italeri box on the shelf… I pulled it out and looked at that wonky wing, frowned and reassured myself with the grid on my cutting mat that my eyes were telling me true – and of course they are, they always were.
Experience counts for much. Without a qualm, I flexed the wing, sprung it away from the old glue and filler, rubbed down the filler to clean up the joints, filed the mating surfaces clean, and corrected the angle. How? .020” plastic strip a few millimetres long shimmed inside the joint on the starboard side ahead of the wing, plus about half that much filed away from the portside joint, was just enough to push the wing down and into proper alignment, while leaving the mismatch at fore and after on the underside within the ability of a lick of filler and some sanding to hide.
Back in the mid-90s that would never have occurred to me, and looking back I don’t know why. Perhaps it was still a mindset that looked on the engineering of the model company as being so far in excess of anything an enthusiast could bring to bear that it must, perforce, be correct, which leaves the mismatch of parts that has always dogged the industry as a conundrum. Perhaps the real difference between me then and now is that today I will re-engineer as required, and in those days I had not yet grasped how, or indeed how simple it can be.
I’ll post pics when this Corsair is done. Better late than never…
Sunday, January 16, 2011
Product Review: Aeromaster Decals
On my recent Avia S-199 build I didn’t fancy the looks of the Hobbycraft decals and substituted Aeromasters for the first time, sheet 48-119, which is of course one of their quite old releases. I’m always interested to compare performance and took this opportunity to evaluate the brand – certainly insofar as the quality of their product whenever this sheet was printed, and there’s no knowing that. However, quality is fairly consistent at a technical level and some brands have a certain expectation attached to their name.
Research-wise, the company made some choices which I was not able to substantiate after considerable online checking, and given that their nickname in the hobby is Errormaster, I decided to go with my own research on those points.
At a quality level, the decals were very thin and in register, and freed off from their backing after 30-60 seconds immersion, depending on area. They settled into place well but did not react very enthusiastically to setting solutions. I use Micro Set and Micro Sol, which are not the strongest chemically, but even so the decals developed wrinkles which in some cases took a long time to settle down. The setting solution was applied four times, and while it seemed to draw the decals tightly into the paint, it did not induce them to draw into recessed detail.
The large national insignia were quite strong enough to be repositioned several times, including being moved with a wet finger because a brush was simply not getting them there. For the most part the decals did their job, their carrier film virtually vanishing under clear coats, but persistent tiny air bubbles were a pain. While pricking the decals and rewetting cured the worst (notably on the wing walk stripes), there were rather too many to apply this treatment overall, and close inspection still finds some bright spots here and there.
If I had one major beef it was with the fuselage band. It was not long enough to meet and the underside of the plane has a notable gap in its ID colours. The decal was designed to wrap around the curves but the fact it did not meet up suggested to me I had it on upside down, so I coaxed it away and applied it the other way up … which was even worse, so I removed it a second time and reapplied it the first way. It is a black mark that firstly it didn’t fit quite properly and secondly that the instructions were not clear about orientation, but a tribute that the decal was strong enough and the glue resilient enough, for it to be handled so much and still end up looking right. Yes it broke, but the small part was nudged into place with the rest and the eye barely sees the joint, especially under clear coating.
It's worth noting that the striped rudder decals were not used, the hobbyist was obliged to cut the curvature of the rudder into them with scissors, the same way Hobbycraft wanted you to. I'm not that clever, I'm afraid, so I masked and airbrushed them.
In the end, the fact the model looks good must be the judgement call, and I will certainly be using the brand again, delving into the dozens of sheets I have in my collection without hesitation.
Saturday, January 15, 2011
Advanced Modeller Syndrome
If you live long enough you realise you’re suffering from AMS. It creeps up on you, takes you unawares, and what seemed like enviable thoroughness when you were younger, and became a matter of what you get out of it for what you put into it when you were all grown up, has been skewed toward superdetailing because it’s the thing to do.
I try to avoid giving in to AMS. On the one hand I will make the best of a kit cockpit rather than getting deep pockets and dropping in some resin beauty, but on the other, there are times that extra detail is well within my grasp and costs nothing but patience and skill.
Having studied the M1 tank for many years from a detailing standpoint, I am still learning about it and discovering where the kit companies simplified things. Many of those details are not difficult to add, such as missing lift lugs on the rear end made from wire, drilling out the towing points, that sort of thing. Due to the limitations of moulding technology in decades gone by, you’ll often find missing bolt heads, and they’re easy to replace with slivers of rod of the appropriate thickness.
Twenty thou rod replaces missing bolts easily, but when I started doing the same with .040” rod I had to ask myself if there wasn’t a good reason Tamiya ignored them. Shaving them from the end of the rod, many would simply vanish into the dust on my cutting mat. I placed them on the tank turret to be able to see them against the tan plastic. To place them, I wiped all the liquid glue off the bottle brush I could, then put the tiniest remaining spot of glue over a pencil mark. The sliver of plastic was manipulated by breathing gently on the curved point of my scribing tool and using that to ‘catch’ it so it could be deposited in the glue and nudged into place.
About that time I asked myself what I was doing, and besides the usual wry responses one always silently generates, I did feel a certain flush of satisfaction that I could accomplish this at all. Skills develop all through our days, and I have the strongest impression I have a great deal more to learn.
Saturday, January 1, 2011
Product Review: Microscale Satin
Sometimes a product is under your nose and you don’t realise just how good it is.
The Microscale finishing system has been around since the 1970s and it’s hard to think where the hobby would be without the products churned out by Microscale and Superscale. But the clear coats they make, water-based acrylics in those no-nonsense plastic bottles, are something of a minor miracle. I’ve experimented with clears before and been largely disappointed: orangepeel finish, flats that are anything but flat, uncooperative airbrushing, not to mention the spectre of a terrific build being spoiled by a clearcoat crazing or going misty, which really renders the clear a dubious case of gilding the lily. But this was something else...
From time to time you have to experiment and working with Hobbycraft’s Avia S-199 kit was just such a build (article forthcoming). One major innovation of this project was the decision to clearcoat over flat paints rather than mixing gloss into the paint as I have previously. While this worked perfectly in enamels, in acrylics I found bright spots in the paint as if specks of clear gloss had failed to disperse evenly into the mixture. Thus the next step, try clear again.
Microscale’s clears are a joy to use. I have yet to give their flat and gloss a whirl (I have heard their flat will never generate a true flat), and in a sense satin was the friendliest possible experiment: I was trying for neither a dead flat nor a high gloss, but the perfect compromise between them, and this product delivered beautifully.
The liquid is milky in the bottle but dries crystal clear. Cleanup is with water, and I thinned the fluid for spraying with the same, by 50% or maybe a little more. It was extremely forgiving to work with, drying so quickly on the model that you can literally blow it dry with your breath as you watch. At the same time there is absolutely no tendency to tip-dry in the airbrush, which is amazing. You can slightly lift the sheen with successive coats, but not by much, the integrity of the lustre holds good.
Above, the Avia is seen after the sealant coat. The paint was sealed with an initial two coats, applied lightly, before the decals went on. Then the panel lines were accented with Promodeller wash, and the whole was sealed with another coat of Micro Satin. The sheen is even and attractive over the decals, and the panel wash, while not very contrasty the moment it was dry, jumped out into sharp relief with the wetting effect of the clear.
Decal carrier film largely disappears, indeed this is what these finishes were developed for, and combined with the Micro Set and Micro Sol decal solutions, is a straightforward means to quality decal work that should last a long, long time.
I have used a lot of this product previously in professional art, working with brushes to apply heavy protective coats to collectibles; put on in those quantities the finish is brighter, closer to gloss but not yet there.
The handy 1oz bottles hold enough for a dozen models or more, and at US$3.00 each are excellent value. I bought this one in Australia, but as a non-solvent based product it can be shipped by air along with most Microscale products – see them all at:
Microscale Industries